博客推荐系统--mahout FP关联规则应用2
版本:Spring3+Struts2+Hibernate3+Hadoop1.0.4+Mahout0.7+Mysql5
源码可以可以在http://download.csdn.net/detail/fansy1990/6935279下载。
接上篇:http://blog.csdn.net/fansy1990/article/details/19438771 。
在获得云平台任务列表的时候,如果集群是刚刚启动的,那么任务列表就是空的,这时就获得不到jobId了,就需要用其他的办法。jobId的拼凑其实是和系统启动的时间有关的,如果获得了系统启动时间,那么就可以拼凑出jobId了。获得系统启动时间可以首先在系统启动的时候把系统 启动时间写入HDFS文件系统。然后在拼凑的时候读出即可。这样就需要修改源码,修改JobTracker的源码,添加的主要代码如下:
/**
   * write to local file the start time
   * @param value
   */
  private static void writeString(String value,JobConf conf) {
	  LOG.info("***********************************prepare to wirte to file with value:"+value);
	  Path path=new Path("/private/jobtracker/starttime");
	   FileSystem fs;
	   FSDataOutputStream out=null;
	    try {
	    	fs = FileSystem.get(path.toUri(),conf);
		    out = fs.create(path);
		    out.writeUTF(value);
	    } catch(Exception e){
	    	LOG.info("********************************:"+e.getMessage());
	    }finally {
	      Closeables.closeQuietly(out);
	    }
  }

  private static String JOBTRACKER_STARTTIME;
然后在系统启动的时候,调用下writeString即可,具体参考源码包JobTracker。
在远程调用FP关联规则的时候,需要设置Configuration,因为在FP关联规则源码中每次都是new Configuration,所以我们传入的Configuration的设置都没有了,这样就会导致程序调用出错(如果是在主节点调用,这不会出现这个问题),如何防止呢?修改Configuration的源码。在Configuration的构造方法上加入:
/** A new configuration. */
  public Configuration() {
    this(true);
    this.set("mapred.job.tracker", GlobalUtil.getValue("mapred.job.tracker"));
	this.set("fs.default.name", GlobalUtil.getValue("fs.default.name"));
  }
其中GlobalUtil是从数据库中读出数据的,数据库中存入的是云平台的信息,其代码如下
package util;

import java.util.HashMap;
import java.util.List;
import java.util.Map;

import org.fz.model.GlobalEntity;
import org.springframework.context.annotation.Scope;
import org.springframework.orm.hibernate3.HibernateTemplate;
import org.springframework.stereotype.Component;

import util.spring.SpringUtil;

/**
 * global variables
 * @author fansy
 *
 */
@Component("globalUtil")
@Scope("prototype")
public class GlobalUtil {
	public  static Map<String,String> globalMap;

	static{
		initial();
	}

	public GlobalUtil(){
		System.out.println("initial GlobalUtil");
	}

	public static String getValue(String key){
		if(globalMap==null||globalMap.size()<=0){
			initial();
		}
		return globalMap.get(key);
	}


	@SuppressWarnings("unchecked")
	private static void initial(){
		globalMap=new HashMap<String,String>();
		HibernateTemplate hibernateTemplate=(HibernateTemplate) SpringUtil.getBean("hibernateTemplate");
		List<GlobalEntity> globalEntities= hibernateTemplate.find("from GlobalEntity");
		for(GlobalEntity globalEntity:globalEntities){
			globalMap.put(globalEntity.getKey(), globalEntity.getValue());
		}
	}
}
下面就可以说说监控了。
监控主要是获得任务运行状态,也即是获得List<JobInfo> 这样的一个list,初始化的时候可以初始化一个size为3的这样的全局list,这个list只能被更新。每次获得任务运行状态其实还是按照获得jobId同样的方法,去请求任务运行列表中最顶层的数据。这个最顶层的数据在任务运行的时候就会有,是一个JobStatus的变量,这个变量中包含各种job信息。但是,如果任务还没有初始化的时候,列表中是不存在需要监控的job任务的,这时如果还是获得最顶层的JobStatus就会获得需要的任务信息的前一个任务的信息。这时我们在初始化的时候初始的一个size为3的list就有用了。这个list中的jobId属性是有值的,所以我们只需看下最顶层的JobStatus的jobId是否存在于我们的list中,如果存在那么就用JobStatus的任务信息更新list中相应的值即可。否则直接退出。当list的最后一个JobInfo的runStatus为success的时候,就说明FP关联规则全部运行完毕,那么就可以退出定时刷新了。
定时刷新是这样的一个思路:获取任务运行状态后返回给用户,展示任务列表,然后任务列表展示界面每个一定时间发送一个获得任务状态的请求,具体代码如下:
<body>
	<div id="wrap">
	    <h3>Job任务监控界面</h3>
	    <table border="1">
	    	<thead>
	    		<tr>
					<td id="taskid">任务ID</td>
					<td id="taskname">任务名称</td>
					<td id="map">map进度</td>
					<td id="reduce">reduce进度</td>
					<td>任务状态</td>
	    		</tr>
	    		<tbody>

	    			<s:iterator id="list" value="jobInfosList">
	            		<tr>
	               		 	<td><s:property value="#list.jobId" /></td>
	                		<td><s:property value="#list.jobName" /></td>
	               			<td><s:property value="#list.mapProgress" /></td>
	                		<td><s:property value="#list.redProgress" /></td>
	               			<td><s:property value="#list.runState" /></td>
	            		</tr>
	       			</s:iterator>
	    	</tbody>
	    </table>

    </div>

     <%
    	boolean flag=Boolean.parseBoolean(request.getAttribute("flag").toString());
    	%>
    	<%
    	if(!flag){
    	%>
		<script type="text/javascript">
			delayURL("monitor",1500);
			function delayURL(url, time) {
   				  setTimeout("location.href='" + url + "'", time);
				}
  		 </script>
    <%
    }else{
    %>
    	<h3 id="finishword">全部任务已经完成</h3>
    <%
    }
     %>
</body>
获得任务状态的action的关键代码如下:
public String execute(){

		/*if(!MonitorUtil.ISRUNNING){
			log.info("the cluster is running!!!");
			return ERROR;
		}*/
		try {

			if(MonitorUtil.monitorJobs!=null&&MonitorUtil.monitorJobs.size()>0){
				if(MonitorUtil.checkRunOver()){
					flag=true;
					jobInfosList=new ArrayList<JobInfo>(MonitorUtil.monitorJobs.values());
					/**
					 * 解析FP输出,存储数据库
					 */
					knowledgeService.readFpWriteToDB();
					return SUCCESS;
				}
				JobStatus jobStatus= MonitorUtil.getNewJobStatus();
				if(jobStatus==null){ //  集群是第一次启动,jobStatus是空
					flag=false;
					jobInfosList=new ArrayList<JobInfo>(MonitorUtil.monitorJobs.values());
					return SUCCESS;
				}
				/**
				 * 判断任务状态
				 */
				if(	MonitorUtil.monitorJobs.containsKey(jobStatus.getJobID().toString())){
					String jobName=HadoopUtils.getJobClient().getJob(jobStatus.getJobID()).getJobName();
					if(jobStatus.getRunState()==JobStatus.RUNNING){
						log.info("jobid:"+jobStatus.getJobID().toString()+",status:"+JobStatus.RUNNING);
						MonitorUtil.monitorJobs.put(jobStatus.getJobID().toString(), new JobInfo(jobStatus.getJobID().toString(),
						jobName,jobStatus.mapProgress(),jobStatus.reduceProgress(),"running"));
					}else if(jobStatus.getRunState()==JobStatus.FAILED){
						log.info("jobid:"+jobStatus.getJobID().toString()+",status:"+JobStatus.FAILED);
						MonitorUtil.monitorJobs.put(jobStatus.getJobID().toString(), new JobInfo(jobStatus.getJobID().toString(),
								jobName,jobStatus.mapProgress(),jobStatus.reduceProgress(),"failed"));
					}else if(jobStatus.getRunState()==JobStatus.PREP){
						log.info("jobid:"+jobStatus.getJobID().toString()+",status:"+JobStatus.PREP);
					}else if(jobStatus.getRunState()==JobStatus.SUCCEEDED){
						log.info("jobid:"+jobStatus.getJobID().toString()+",status:"+JobStatus.SUCCEEDED);
						MonitorUtil.monitorJobs.put(jobStatus.getJobID().toString(), new JobInfo(jobStatus.getJobID().toString(),
								jobName,jobStatus.mapProgress(),jobStatus.reduceProgress(),"successed"));
					}else{
						log.info("unknown jobStatus:"+jobStatus.getRunState()+" ----------------------");
					}
				}else{
					log.info("not running any furthur jobs******************");
				}
			}else{
				//--** initial monitorJobs
				try{
					MonitorUtil.initialMonitorJobs(jobNums);
				}catch(Exception e){
					log.error("initialMonitorJobs error:\n"+e.getMessage());
					return ERROR;
				}
			}
			jobInfosList=new ArrayList<JobInfo>(MonitorUtil.monitorJobs.values());
		} catch (IOException e) {
			log.error("monitor is error :\n"+e.getMessage());
			return ERROR;
		}
		flag=false;
		return SUCCESS;
	}
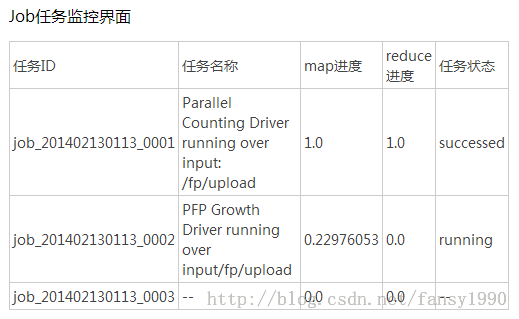
监控的界面如图2所示;
 图2
图2
如果任务运行出错,那么可以有两种解决方案:1.减小数据量;2.增大算法参数的最小支持度。
3. 博客管理模块
这个模块有2个功能,一个是博客订阅与退订,另外一个是博客推荐。
博客订阅与退订是主要就是对用户表中的博客订阅一栏数据的更新。
博客推荐分为三种方式:1. Top推荐;2. 联合推荐;3. 上次推荐;
3.1 top推荐
在运行FP关联规则算法的时候在第一个MR中会算出订阅博客的全部排名(按照订阅博客数量从高到低排列),所以解析出这个序列文件,然后取其前10行作为top推荐即可。解析序列文件并取前10行的代码如下:
/**
	 * 读取序列文件,返回前面numRecords记录
	 * @param fPath
	 * @param conf
	 * @param numRecords
	 * @return
	 * @throws IOException
	 */
	public static Map<Writable,Writable> readFromFile(String fPath,Configuration conf,long numRecords) throws IOException{
		FileSystem fs = FileSystem.get(URI.create(fPath), conf);
	    Path path = new Path(fPath);
	    Map<Writable,Writable> map=new LinkedHashMap<Writable,Writable>();
	    SequenceFile.Reader reader = null;
	    try {
	      reader = new SequenceFile.Reader(fs, path, conf);
	      Writable key = (Writable)
	        ReflectionUtils.newInstance(reader.getKeyClass(), conf);
	      Writable value = (Writable)
	        ReflectionUtils.newInstance(reader.getValueClass(), conf);
	      @SuppressWarnings("unchecked")
		Class<Writable> writableClassK=(Class<Writable>) reader.getKeyClass();
	      @SuppressWarnings("unchecked")
		Class<Writable> writableClassV=(Class<Writable>) reader.getValueClass();
	      while (reader.next(key, value)) {
	    	 // Writable的深度复制
	    	  Writable k=deepCopy(key, writableClassK);
	    	  Writable v=deepCopy(value,writableClassV);
	          map.put(k, v);
	          if(map.size()>numRecords){
	    		  break;
	    	  }
	      }
	    } finally {
	      IOUtils.closeStream(reader);
	    }
	    return map;
	}
3.2 联合推荐
FP关联规则生成的频繁项集需要经过整理才能成为知识库,所谓的知识库即是前面提到的类似这样的数据[blogid101 blogid103 500]。解析FP关联规则算法生成的频繁项集为知识库的代码如下所示:
/**
	 * 读取知识库
	 * @return
	 * @throws IOException
	 */
	public static List<Knowledge> getKnowledgeFromFp() throws IOException{
		List<Knowledge> list = new ArrayList<Knowledge>();
		String fPath= FP_OUTPATH+"/frequentpatterns/part-r-00000";
		FileSystem fs = FileSystem.get(URI.create(fPath), getConf());
	    Path path = new Path(fPath);
	    SequenceFile.Reader reader = null;
	    try {
	      reader = new SequenceFile.Reader(fs, path, getConf());
	      Writable key = (Writable)
	        ReflectionUtils.newInstance(reader.getKeyClass(), getConf());
	      Writable value = (Writable)
	        ReflectionUtils.newInstance(reader.getValueClass(), conf);

	      while (reader.next(key, value)) {
	    	  Text k=(Text)key;
	    	  TopKStringPatterns v=(TopKStringPatterns)value;
	    	  List<Pair<List<String>,Long>> knowledge=v.getPatterns();
	    	  Map<String ,Long> map= new HashMap<String ,Long>();
	    	  for(int i=knowledge.size()-1;i>=0;i--){
	    		  Pair<List<String>,Long> pair= knowledge.get(i);
	    		  List<String> plist=pair.getFirst();
	    		  plist.remove(k.toString());
	    		  for(String pl:plist){
	    			  map.put(pl, pair.getSecond());
	    		  }
	    	  }
	    	  Set<Entry<String,Long>>set=map.entrySet();
	    	  for(Entry<String,Long> s:set){
	    		  list.add(new Knowledge(Integer.parseInt(k.toString()),
	    				  Integer.parseInt(s.getKey()),s.getValue().intValue()));
	    	  }
	      }
	    } finally {
	      IOUtils.closeStream(reader);
	    }
		return list;
	}
读取到的List<Knowledge>然后批量插入数据库即可。
联合推荐就是根据用户订阅的博客然后根据知识库的数据来进行推荐的,具体代码如下所示:
/**
	 * 联合推荐
	 * @param username
	 * @return
	 */
	private String[] recommendUnion(String username) {
		User user = userDao.getUser(username);
		String order= user.getOrder();
		if(order==null||order.equals("")){
			return null;
		}
		String[] orders = order.split(" ");
		if(orders==null|| orders.length<1){
			return null;
		}
		// 整合推荐map
		Map<String ,Integer> recommendMap= new HashMap<String ,Integer>();
		for(String o:orders){
			List<Knowledge> knowledge = knowledgeDao.getKnowledge(Integer.parseInt(o));
			for(Knowledge k:knowledge){
				if(recommendMap.containsKey(k.getRelatedBlog())){
					int currentVotes=recommendMap.get(k.getRelatedBlog());
					recommendMap.put(String.valueOf(k.getRelatedBlog()), currentVotes+k.getRelatedVotes());
				}else{
					recommendMap.put(String.valueOf(k.getRelatedBlog()), k.getRelatedVotes());
				}
			}
		}
		// 排序map
		ArrayList<Entry<String,Integer>> list= sortByValue(recommendMap);
		if(list.size()<1){
			return null;
		}
		String [] recommends= null;
		if(list.size()>10){
			recommends=new String[10];
		}else{
			recommends= new String[list.size()];
		}
		StringBuffer buff= new StringBuffer();
		int i=0;
		for(Entry<String,Integer> l:list){
			recommends[i++]= l.getKey();
			buff.append(l.getKey()+" ");
			if(i>=recommends.length){
				break;
			}
		}
		// 存入更新推荐,为上次推荐算法做准备
		userDao.updateRecommend(username, buff.substring(0,buff.length()-1));
		return recommends;
	}
3.3 上次推荐
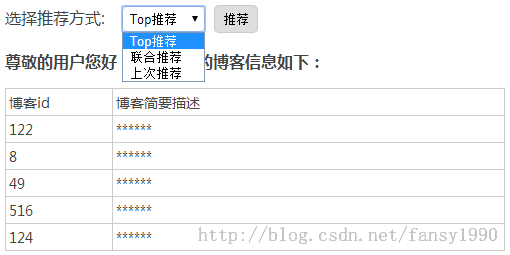
联合推荐之后就会把推荐的结果存入用户表的推荐字段,然后在使用上传推荐的时候就会直接查找数据库中的数据进行返回。联合推荐的界面如图3所示:
总结:一般云平台相关的系统,在调用算法的页面应该是后台运行的。然后类似这个系统的博客推荐以及用户管理才是属于业务逻辑(才应该展现给用户看)。如果非要在界面调用算法的话,一般采用多线程的方式,然后加监控的方式比较好,这样用户不用一直等待。如果是单线程,那么当任务运行很耗时间的话,系统就设计的不合理。
分享,成长,快乐
转载请注明blog地址:http://blog.csdn.net/fansy1990
