Android中View绘制流程以及invalidate()等相关方法分析
Android 框架层的网友,推荐这本书,希望你们能够在Android开发里学到更多的知识 。
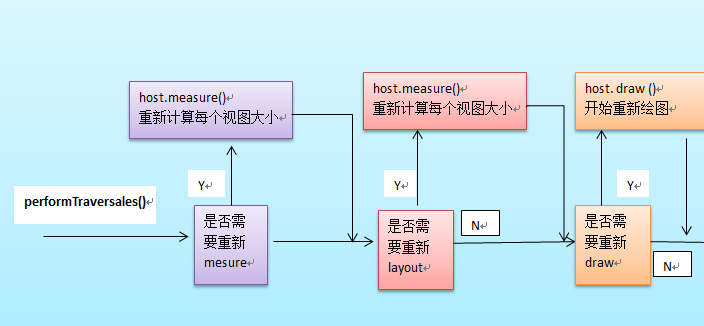
整个View树的绘图流程是在ViewRoot.java类的performTraversals()函数展开的,该函数做的执行过程可简单概况为根据之前
设置的状态,判断是否需要重新计算视图大小(measure)、是否重新需要安置视图的位置(layout)、以及是否需要重绘(draw),其
框架过程如下:
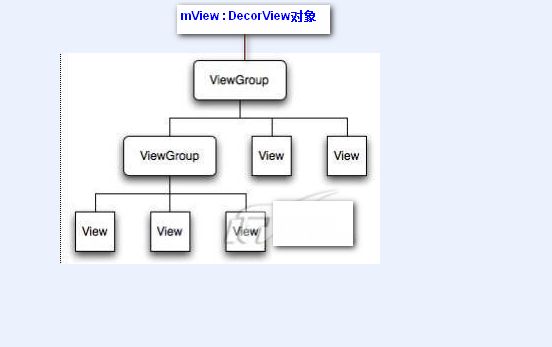
接下来温习一下整个View树的结构,对每个具体View对象的操作,其实就是个递归的实现。
流程一: mesarue()过程
主要作用:为整个View树计算实际的大小,即设置实际的高(对应属性:mMeasuredHeight)和宽(对应属性:mMeasureWidth),
每个View的控件的实际宽高都是由父视图和本身视图决定的。
具体的调用链如下:
ViewRoot根对象地属性mView(其类型一般为ViewGroup类型)调用measure()方法去计算View树的大小,回调View/ViewGroup
对象的onMeasure()方法,该方法实现的功能如下:
1、设置本View视图的最终大小,该功能的实现通过调用setMeasuredDimension()方法去设置实际的高(对应属性:
mMeasuredHeight)和宽(对应属性:mMeasureWidth) ;
2 、如果该View对象是个ViewGroup类型,需要重写该onMeasure()方法,对其子视图进行遍历的measure()过程。
2.1 对每个子视图的measure()过程,是通过调用父类ViewGroup.java类里的measureChildWithMargins()方法去实现,
该方法内部只是简单地调用了View对象的measure()方法。(由于measureChildWithMargins()方法只是一个过渡层,更简单
的做法是直接调用View对象的measure()方法)
整个measure调用流程就是个树形的递归过程
measure函数原型为 View.java 该函数不能被重载
- <span style="font-size:16px;"></span><pre class="java" name="code"> public final void measure(int widthMeasureSpec, int heightMeasureSpec) {
- //....
- //回调onMeasure()方法
- onMeasure(widthMeasureSpec, heightMeasureSpec);
- //more
- }
为了大家更好的理解,采用“二B程序员”的方式利用伪代码描述该measure流程
- // measure()过程 ViewRoot.java
- // 发起measure()的"发号者"在ViewRoot.java里的performTraversals()方法, mView.measure()
- private void performTraversals(){
- //...
- View mView ;
- mView.measure(h,l) ;
- //....
- }
- //回调View视图里的onMeasure过程
- private void onMeasure(int height , int width){
- //设置该view的实际宽(mMeasuredWidth)高(mMeasuredHeight)
- //1、该方法必须在onMeasure调用,否者报异常。
- setMeasuredDimension(h , l) ;
- //2、如果该View是ViewGroup类型,则对它的每个子View进行measure()过程
- int childCount = getChildCount() ;
- for(int i=0 ;i<childCount ;i++){
- //2.1、获得每个子View对象引用
- View child = getChildAt(i) ;
- //整个measure()过程就是个递归过程
- //该方法只是一个过滤器,最后会调用measure()过程 ;或者 measureChild(child , h, i)方法都
- measureChildWithMargins(child , h, i) ;
- //其实,对于我们自己写的应用来说,最好的办法是去掉框架里的该方法,直接调用view.measure(),如下:
- //child.measure(h, l)
- }
- }
- //该方法具体实现在ViewGroup.java里 。
- protected void measureChildWithMargins(View v, int height , int width){
- v.measure(h,l)
- }
流程二 、 layout布局过程:
主要作用 :为将整个根据子视图的大小以及布局参数将View树放到合适的位置上。
具体的调用链如下:
host.layout()开始View树的布局 ,继而回调给View/ViewGroup类中的layout()方法。 具体流程如下
1 、layout方法会设置该View视图位于父视图的坐标轴,即mLeft,mTop,mLeft,mBottom(调用setFrame()函数去实现),
接下来回调onLayout()方法(如果该View是ViewGroup对象,需要实现该方法,对每个子视图进行布局) ;
2、如果该View是个ViewGroup类型,需要遍历每个子视图chiildView,调用该子视图的layout()方法去设置它的坐标值。
layout函数原型为 View.java
- /* final 标识符 , 不能被重载 , 参数为每个视图位于父视图的坐标轴
- * @param l Left position, relative to parent
- * @param t Top position, relative to parent
- * @param r Right position, relative to parent
- * @param b Bottom position, relative to parent
- */
- public final void layout(int l, int t, int r, int b) {
- boolean changed = setFrame(l, t, r, b); //设置每个视图位于父视图的坐标轴
- if (changed || (mPrivateFlags & LAYOUT_REQUIRED) == LAYOUT_REQUIRED) {
- if (ViewDebug.TRACE_HIERARCHY) {
- ViewDebug.trace(this, ViewDebug.HierarchyTraceType.ON_LAYOUT);
- }
- onLayout(changed, l, t, r, b);//回调onLayout函数 ,设置每个子视图的布局
- mPrivateFlags &= ~LAYOUT_REQUIRED;
- }
- mPrivateFlags &= ~FORCE_LAYOUT;
- }
同样地, 将上面layout调用流程,用伪代码描述如下:
- // layout()过程 ViewRoot.java
- // 发起layout()的"发号者"在ViewRoot.java里的performTraversals()方法, mView.layout()
- private void performTraversals(){
- //...
- View mView ;
- mView.layout(left,top,right,bottom) ;
- //....
- }
- //回调View视图里的onLayout过程 ,该方法只由ViewGroup类型实现
- private void onLayout(int left , int top , right , bottom){
- //如果该View不是ViewGroup类型
- //调用setFrame()方法设置该控件的在父视图上的坐标轴
- setFrame(l ,t , r ,b) ;
- //--------------------------
- //如果该View是ViewGroup类型,则对它的每个子View进行layout()过程
- int childCount = getChildCount() ;
- for(int i=0 ;i<childCount ;i++){
- //2.1、获得每个子View对象引用
- View child = getChildAt(i) ;
- //整个layout()过程就是个递归过程
- child.layout(l, t, r, b) ;
- }
- }
流程三、 draw()绘图过程
由ViewRoot对象的 performTraversals()方法调用draw()方法发起绘制该View树,值得注意的是每次发起绘图时,并不会重新
绘制每个View树的视图,而只会重新绘制那些“需要重绘”的视图,View类内部变量包含了一个标志位DRAWN,当该视图需要
重绘时,就会为该View添加该标志位。
调用流程 :
mView.draw()开始绘制 ,draw()方法实现的功能如下:
1 、绘制该View的背景
2 、为显示渐变框做一些准备操作(见5,大多数情况下,不需要改渐变框)
3、调用onDraw()方法绘制视图本身 (每个View都需要重载该方法,ViewGroup不需要实现该方法)
4、调用dispatchDraw ()方法绘制子视图(如果该View类型不为ViewGroup,即不包含子视图,不需要重载该方法。)值得
说明的是,ViewGroup类已经为我们重写了dispatchDraw ()的功能实现,应用程序一般不需要重写该方法,但可以重载父类
函数实现具体的功能。
4.1 dispatchDraw()方法内部会遍历每个子视图,调用drawChild()去重新回调每个子视图的draw()方法(注意,这个地方“需要
重绘”的视图才会调用draw()方法)。值得说明的是,ViewGroup类已经为我们重写了dispatchDraw()的功能实现,应用程序一
般不需要重写该方法,但可以重载父类函数实现具体的功能。
5、 绘制滚动条
于是,整个调用链就这样递归下去了。
同样地,使用伪代码描述如下:
- // draw()过程 ViewRoot.java
- // 发起draw()的"发号者"在ViewRoot.java里的performTraversals()方法, 该方法会继续调用draw()方法开始绘图
- private void draw(){
- //...
- View mView ;
- mView.draw(canvas) ;
- //....
- }
- //回调View视图里的onLayout过程 ,该方法只由ViewGroup类型实现
- private void draw(Canvas canvas){
- //该方法会做如下事情
- //1 、绘制该View的背景
- //2、为绘制渐变框做一些准备操作
- //3、调用onDraw()方法绘制视图本身
- //4、调用dispatchDraw()方法绘制每个子视图,dispatchDraw()已经在Android框架中实现了,在ViewGroup方法中。
- // 应用程序程序一般不需要重写该方法,但可以捕获该方法的发生,做一些特别的事情。
- //5、绘制渐变框
- }
- //ViewGroup.java中的dispatchDraw()方法,应用程序一般不需要重写该方法
- @Override
- protected void dispatchDraw(Canvas canvas) {
- //
- //其实现方法类似如下:
- int childCount = getChildCount() ;
- for(int i=0 ;i<childCount ;i++){
- View child = getChildAt(i) ;
- //调用drawChild完成
- drawChild(child,canvas) ;
- }
- }
- //ViewGroup.java中的dispatchDraw()方法,应用程序一般不需要重写该方法
- protected void drawChild(View child,Canvas canvas) {
- // ....
- //简单的回调View对象的draw()方法,递归就这么产生了。
- child.draw(canvas) ;
- //.........
- }
强调一点的就是,在这三个流程中,Google已经帮我们把draw()过程框架已经写好了,自定义的ViewGroup只需要实现
measure()过程和layout()过程即可 。
引起View树重新绘制的因素有如下几种:
1、 导致视图大小发生变化 ;
2、导致ViewGroup重新为子视图分配位置
3、视图显示情况发生变化需要重绘
这三种情况,最终会直接或间接调用到三个函数,分别为invalidate(),requsetLaytout()以及requestFocus() ,接着这三个
函数最终会调用到ViewRoot中的schedulTraversale()方法,该函数然后发起一个异步消息,消息处理中调用performTraverser()
方法对整个View进行遍历。
invalidate()方法
说明:请求重绘View树,即draw()过程,假如视图发生大小没有变化就不会调用layout()过程,并且只绘制那些“需要重绘的”视图,即谁(View的话,只绘制该View ;ViewGroup,则绘制整个
ViewGroup)请求invalidate()方法,就绘制该视图。
一般引起invalidate()操作的函数如下:
1、直接调用invalidate()方法,请求重新draw(),但只会绘制调用者本身。
2、setSelection()方法 :请求重新draw(),但只会绘制调用者本身。
3、setVisibility()方法 : 当View可视状态在INVISIBLE转换VISIBLE时,会间接调用invalidate()方法,继而绘制该View。
4 、setEnabled()方法 : 请求重新draw(),但不会重新绘制任何视图包括该调用者本身。
requestLayout()方法
说明 :只是对View树重新布局layout过程,不会调用draw()过程,但不会重新绘制任何视图包括该调用者本身。
一般引起invalidate()操作的函数如下:
1、setVisibility()方法 :
当View的可视状态在INVISIBLE / VISIBLE 转换为 GONE状态时,会间接调用requestLayout() 和invalidate方法。同时,
由于整个个View树大小发生了变化,会请求measure()过程以及draw()过程,同样地,只绘制需要“重新绘制”的视图。
requestFocus()函数说明:
说明:请求View树的draw()过程,但只绘制“需要重绘”的视图。
下面写个简单的小Demo吧,主要目的是给大家演示绘图的过程以及每个流程里该做的一些功能。截图如下 :
1、 MyViewGroup.java 自定义ViewGroup类型
- package com.qin.customviewgroup;
- import android.content.Context;
- import android.graphics.Canvas;
- import android.util.AttributeSet;
- import android.util.Log;
- import android.view.View;
- import android.view.ViewGroup;
- import android.widget.Button;
- import android.widget.ImageView;
- import android.widget.TextView;
- /**
- * @author http://http://blog.csdn.net/qinjuning
- */
- //自定义ViewGroup 对象
- public class MyViewGroup extends ViewGroup{
- private static String TAG = "MyViewGroup" ;
- private Context mContext ;
- public MyViewGroup(Context context) {
- super(context);
- mContext = context ;
- init() ;
- }
- //xml定义的属性,需要该构造函数
- public MyViewGroup(Context context , AttributeSet attrs){
- super(context,attrs) ;
- mContext = context ;
- init() ;
- }
- //为MyViewGroup添加三个子View
- private void init(){
- //调用ViewGroup父类addView()方法添加子View
- //child 对象一 : Button
- Button btn= new Button(mContext) ;
- btn.setText("I am Button") ;
- this.addView(btn) ;
- //child 对象二 : ImageView
- ImageView img = new ImageView(mContext) ;
- img.setBackgroundResource(R.drawable.icon) ;
- this.addView(img) ;
- //child 对象三 : TextView
- TextView txt = new TextView(mContext) ;
- txt.setText("Only Text") ;
- this.addView(txt) ;
- //child 对象四 : 自定义View
- MyView myView = new MyView(mContext) ;
- this.addView(myView) ;
- }
- @Override
- //对每个子View进行measure():设置每子View的大小,即实际宽和高
- protected void onMeasure(int widthMeasureSpec, int heightMeasureSpec){
- //通过init()方法,我们为该ViewGroup对象添加了三个视图 , Button、 ImageView、TextView
- int childCount = getChildCount() ;
- Log.i(TAG, "the size of this ViewGroup is ----> " + childCount) ;
- Log.i(TAG, "**** onMeasure start *****") ;
- //获取该ViewGroup的实际长和宽 涉及到MeasureSpec类的使用
- int specSize_Widht = MeasureSpec.getSize(widthMeasureSpec) ;
- int specSize_Heigth = MeasureSpec.getSize(heightMeasureSpec) ;
- Log.i(TAG, "**** specSize_Widht " + specSize_Widht+ " * specSize_Heigth *****" + specSize_Heigth) ;
- //设置本ViewGroup的宽高
- setMeasuredDimension(specSize_Widht , specSize_Heigth) ;
- for(int i=0 ;i<childCount ; i++){
- View child = getChildAt(i) ; //获得每个对象的引用
- child.measure(50, 50) ; //简单的设置每个子View对象的宽高为 50px , 50px
- //或者可以调用ViewGroup父类方法measureChild()或者measureChildWithMargins()方法
- //this.measureChild(child, widthMeasureSpec, heightMeasureSpec) ;
- }
- }
- @Override
- //对每个子View视图进行布局
- protected void onLayout(boolean changed, int l, int t, int r, int b) {
- // TODO Auto-generated method stub
- //通过init()方法,我们为该ViewGroup对象添加了三个视图 , Button、 ImageView、TextView
- int childCount = getChildCount() ;
- int startLeft = 0 ;//设置每个子View的起始横坐标
- int startTop = 10 ; //每个子View距离父视图的位置 , 简单设置为10px吧 。 可以理解为 android:margin=10px ;
- Log.i(TAG, "**** onLayout start ****") ;
- for(int i=0 ;i<childCount ; i++){
- View child = getChildAt(i) ; //获得每个对象的引用
- child.layout(startLeft, startTop, startLeft+child.getMeasuredWidth(), startTop+child.getMeasuredHeight()) ;
- startLeft =startLeft+child.getMeasuredWidth() + 10; //校准startLeft值,View之间的间距设为10px ;
- Log.i(TAG, "**** onLayout startLeft ****" +startLeft) ;
- }
- }
- //绘图过程Android已经为我们封装好了 ,这儿只为了观察方法调用程
- protected void dispatchDraw(Canvas canvas){
- Log.i(TAG, "**** dispatchDraw start ****") ;
- super.dispatchDraw(canvas) ;
- }
- protected boolean drawChild(Canvas canvas , View child, long drawingTime){
- Log.i(TAG, "**** drawChild start ****") ;
- return super.drawChild(canvas, child, drawingTime) ;
- }
- }
MyView.java 自定义View类型 ,重写onDraw()方法
- package com.qin.customviewgroup;
- import android.content.Context;
- import android.graphics.Bitmap;
- import android.graphics.BitmapFactory;
- import android.graphics.Canvas;
- import android.graphics.Color;
- import android.graphics.Paint;
- import android.graphics.Typeface;
- import android.graphics.Bitmap.Config;
- import android.util.AttributeSet;
- import android.util.Log;
- import android.view.View;
- //自定义View对象
- public class MyView extends View{
- private Paint paint = new Paint() ;
- public MyView(Context context) {
- super(context);
- // TODO Auto-generated constructor stub
- }
- public MyView(Context context , AttributeSet attrs){
- super(context,attrs);
- }
- protected void onMeasure(int widthMeasureSpec, int heightMeasureSpec){
- //设置该View大小为 80 80
- setMeasuredDimension(50 , 50) ;
- }
- //存在canvas对象,即存在默认的显示区域
- @Override
- public void onDraw(Canvas canvas) {
- // TODO Auto-generated method stub
- super.onDraw(canvas);
- Log.i("MyViewGroup", "MyView is onDraw ") ;
- //加粗
- paint.setTypeface(Typeface.defaultFromStyle(Typeface.BOLD));
- paint.setColor(Color.RED);
- canvas.drawColor(Color.BLUE) ;
- canvas.drawRect(0, 0, 30, 30, paint);
- canvas.drawText("MyView", 10, 40, paint);
- }
- }
主文件布局main.xml
- <?xml version="1.0" encoding="utf-8"?>
- <LinearLayout xmlns:android="http://schemas.android.com/apk/res/android"
- android:orientation="vertical" android:layout_width="fill_parent"
- android:layout_height="fill_parent">
- <TextView android:id="@+id/txt" android:layout_width="fill_parent"
- android:layout_height="wrap_content" android:text="@string/hello" />
- <Button android:id="@+id/btn" android:layout_width="fill_parent" android:layout_marginTop="20px"
- android:layout_height="wrap_content" android:text="点击我查看Log绘制流程"></Button>
- <com.qin.customviewgroup.MyViewGroup android:id="@+id/custemViewGroup"
- android:layout_height="fill_parent" android:layout_width="fill_parent">
- </com.qin.customviewgroup.MyViewGroup>
- </LinearLayout>
主Activity只是显示了该xml文件 ,在此也不罗嗦了 。 大家可以查看该ViewGroup的Log仔细分析下View的绘制流程以及相关方
法的使用。 第一次启动后捕获的Log如下,网上找了些资料 ,第一次View树绘制过程会走两遍,具体原因我也不得而知,
但这根本不影响我们的界面显示效果 。
总的来说: 整个绘制过程还是十分十分复杂地,每个具体方法的实现都是我辈难以立即的,感到悲剧啊。 对Android提供
的一些ViewGroup对象,比如LinearLayout、RelativeLayout布局对象的实现也很有压力。 本文重在介绍整个View树的绘制流
程,希望大家在此基础上,多接触源代码进行更深入地扩展。
示例DEMO下载地址:http://download.csdn.net/detail/qinjuning/3982468


