C# 支持拖放的TreeView控件,文件拖拽大全。
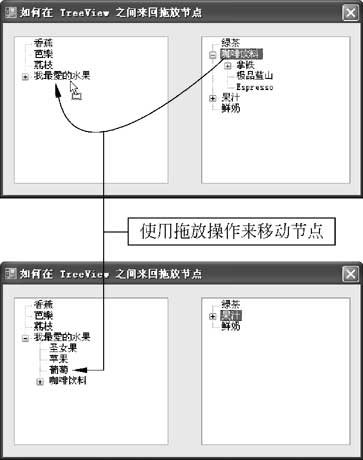
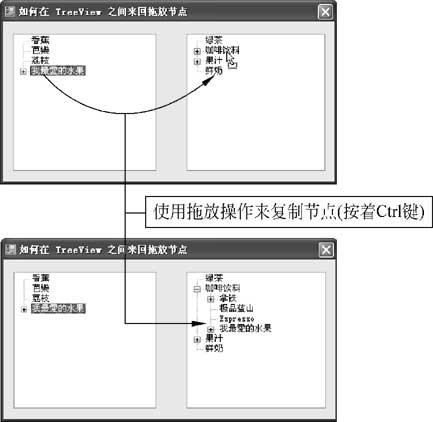
c# winform TreeView控件中实现拖拽的功能
必须处理好三种事件:"ItemDrag"(开始)、"DragEnter"(进入)、"DragDrop"(处理放下)。其中只有第一种事件是在源组件中触发的,另外二种事件是在目标组件中...更多>>
使用Clipboard ,这是一个静态类
1,存数据
if(textBox1.SelectedText != "")  // 如果textbox1中选中的数据不为空
       Clipboard.SetDataObject(textBox1.SelectedText); //则把数据置于剪切板中
2,读数据
    IDataObject iData = Clipboard.GetDataObject();
    //确定数据的格式是否是你想要的
    if(iData.GetDataPresent(DataFormats.Text)) {
       //如果是,那就把它粘贴到textbox2里
       textBox2.Text = (String)iData.GetData(DataFormats.Text);
    }
    else {
       // 否则
       textBox2.Text = "无法检索数据";
    }
有关Clipboard 类的用法你可以查一下,msdn上有很详细的示例
希望对你有帮助
在Form Load的时候为了完全显示节点,不必一一点开,建议加上如下代码:
using System;
using System.Collections.Generic;
using System.ComponentModel;
using System.Data;
using System.Drawing;
using System.Text;
using System.Windows.Forms;

namespace treeViewDragDrop
{
    public partial class Form1 : Form
    {
        //拖拽的点
        private Point Position = new Point(0, 0);

        public Form1()
        {
            InitializeComponent();
            this.treeView1.ExpandAll();
        }

        private void treeView1_AfterSelect(object sender, TreeViewEventArgs e)
        {

        }

        private void treeView1_ItemDrag(object sender, ItemDragEventArgs e)
        {
            //开始拖拽,设定拖拽效果。传递的参数e.Item项目
            //数据data=e.item,拖拽的最终效果为move
            DoDragDrop(e.Item, DragDropEffects.Move);
        }

        private void treeView1_DragEnter(object sender, DragEventArgs e)
        {
            //进入拖拽区间发生,判断是否可以转换成指定的格式来决定是否能够进入此区域。
            if (e.Data.GetDataPresent(typeof(TreeNode)))//是否是真
            {
                e.Effect = DragDropEffects.Move;
            }
            else
            {
                e.Effect = DragDropEffects.None;
            }

        }

        private void treeView1_DragDrop(object sender, DragEventArgs e)
        {
            //拖拽结束,Drop放下时执行
            TreeNode myNode = null;
            if (e.Data.GetDataPresent(typeof(TreeNode)))
            {
                myNode = (TreeNode)(e.Data.GetData(typeof(TreeNode)));//拖拽源节点dragNode

            }
            else
            {
                MessageBox.Show("errror!");
            }

            ///处理拖拽
            Position.X = e.X;
            Position.Y = e.Y;
            Position = treeView1.PointToClient(Position);

            //取得拖拽点的数据
            TreeNode dropNode = this.treeView1.GetNodeAt(Position);

            //1.// 1.目标节点不是空。
            //2.目标节点不是被拖拽接点的子节点。
            //3.目标节点不是被拖拽节点本身

            if (dropNode != null
                //&& dropNode.Parent != myNode.Parent
                && dropNode != myNode)
            {
                TreeNode dragNode = myNode;//缺取得员节点
                myNode.Remove();
                dropNode.Nodes.Add(dragNode);
            }

            // 如果目标节点不存在,即拖拽的位置不存在节点,那么就将被拖拽节点放在根节点之下
            if (dropNode == null)
            {
                TreeNode DragNode = myNode;
                myNode.Remove();
                treeView1.Nodes.Add(DragNode);
            }
        }
    }
}
 #region TreeView Drag/Drop
 // Constants for the SendMessage() method.
         private const int WM_HSCROLL = 276;
         private const int WM_VSCROLL = 277;
         private const int SB_LEFT = 6;
         private const int SB_RIGHT = 7;
         private const int SB_TOP = 6;
         private const int SB_BOTTOM = 7;
         [DllImport("user32.dll")]
         private static extern int SendMessage(IntPtr hWnd, int wMsg,
                                           int wParam, int lParam);

         // Node being dragged
         private TreeNode dragNode = null;
         // Temporary drop node for selection
         private TreeNode tempDropNode = null;

         private void treeView_DragDrop(object sender, DragEventArgs e)
         {
             // Unlock updates
             DragHelper.ImageList_DragLeave(this.treeView.Handle);

             // Get drop node
             TreeNode dropNode = this.treeView.GetNodeAt(this.treeView.PointToClient(new Point(e.X, e.Y)));

             // If drop node isn't equal to drag node, add drag node as child of drop node
             if (this.dragNode != dropNode)
             {
                 // Remove drag node from parent
                 if (this.dragNode.Parent == null)
                 {
                     this.treeView.Nodes.Remove(this.dragNode);
                 }
                 else
                 {
                     this.dragNode.Parent.Nodes.Remove(this.dragNode);
                 }

                 // Add drag node to drop node
                 dropNode.Nodes.Add(this.dragNode);
                 dropNode.ExpandAll();

                 // Set drag node to null
                 this.dragNode = null;
             }
         }

         private void treeView_DragEnter(object sender, DragEventArgs e)
         {
             DragHelper.ImageList_DragEnter(this.treeView.Handle, e.X - this.treeView.Left,
                 e.Y - this.treeView.Top);
         }

         private void treeView_DragLeave(object sender, EventArgs e)
         {
             DragHelper.ImageList_DragLeave(this.treeView.Handle);
         }

         private void treeView_DragOver(object sender, DragEventArgs e)
         {
             // Compute drag position and move image
             Point formP = this.PointToClient(new Point(e.X, e.Y));
             DragHelper.ImageList_DragMove(formP.X - this.treeView.Left, formP.Y - this.treeView.Top);

             // Get actual drop node
             TreeNode dropNode = this.treeView.GetNodeAt(this.treeView.PointToClient(new Point(e.X, e.Y)));
             if (dropNode == null)
             {
                 e.Effect = DragDropEffects.None;
                 return;
             }

             e.Effect = DragDropEffects.Move;

             // if mouse is on a new node select it
             if (this.tempDropNode != dropNode)
             {
                 DragHelper.ImageList_DragShowNolock(false);
                 this.treeView.SelectedNode = dropNode;
                 DragHelper.ImageList_DragShowNolock(true);
                 tempDropNode = dropNode;
             }

             // Avoid that drop node is child of drag node
             TreeNode tmpNode = dropNode;
             while (tmpNode.Parent != null)
             {
                 if (tmpNode.Parent == this.dragNode) e.Effect = DragDropEffects.None;
                 tmpNode = tmpNode.Parent;
             }

             Point pt = this.treeView.PointToClient(new Point(e.X, e.Y));
             // if mouse is near to the top, scroll up
             if (pt.Y  < 30)
             {
                 // set actual node to the upper one
                 if (dropNode.PrevVisibleNode != null)
                 {
                     dropNode = dropNode.PrevVisibleNode;

                     // hide drag image
                     DragHelper.ImageList_DragShowNolock(false);

                     SendMessage(treeView.Handle, WM_VSCROLL, SB_TOP, 0);

                     // show drag image
                     DragHelper.ImageList_DragShowNolock(true);

                 }
             }
             // if mouse is near to the bottom, scroll down
             else if (pt.Y > this.treeView.Size.Height - 30)
             {
                 if (dropNode.NextVisibleNode != null)
                 {
                     dropNode = dropNode.NextVisibleNode;

                     DragHelper.ImageList_DragShowNolock(false);

                     SendMessage(treeView.Handle, WM_VSCROLL, SB_BOTTOM, 0);

                     DragHelper.ImageList_DragShowNolock(true);
                 }
             }
             // if mouse is near to the left, scroll left
             else if (pt.X  < 30)
             {
                 //dropNode = dropNode.NextVisibleNode;

                 DragHelper.ImageList_DragShowNolock(false);

                 SendMessage(treeView.Handle, WM_HSCROLL, SB_LEFT, 0);

                 DragHelper.ImageList_DragShowNolock(true);
             }
             // if mouse is near to the right, scroll right
             else if (pt.X > this.treeView.Size.Width - 30)
             {
                 //dropNode = dropNode.NextVisibleNode;

                 DragHelper.ImageList_DragShowNolock(false);

                 SendMessage(treeView.Handle, WM_HSCROLL, SB_RIGHT, 0);

                 DragHelper.ImageList_DragShowNolock(true);
             }
         }

         private void treeView_GiveFeedback(object sender, GiveFeedbackEventArgs e)
         {
             if (e.Effect == DragDropEffects.Move)
             {
                 // Show pointer cursor while dragging
                 e.UseDefaultCursors = false;
                 this.treeView.Cursor = Cursors.Default;
             }
             else e.UseDefaultCursors = true;
         }

         private void treeView_ItemDrag(object sender, ItemDragEventArgs e)
         {
             // Get drag node and select it
             this.dragNode = (TreeNode)e.Item;
             this.treeView.SelectedNode = this.dragNode;

             // Reset image list used for drag image
             this.imageListDrag.Images.Clear();
             this.imageListDrag.ImageSize = new Size(this.dragNode.Bounds.Size.Width + this.treeView.Indent, this.dragNode.Bounds.Height);

             // Create new bitmap
             // This bitmap will contain the tree node image to be dragged
             Bitmap bmp = new Bitmap(this.dragNode.Bounds.Width + this.treeView.Indent, this.dragNode.Bounds.Height);

             // Get graphics from bitmap
             Graphics gfx = Graphics.FromImage(bmp);

             // Draw node icon into the bitmap
             gfx.DrawImage(this.imageListTreeView.Images[dragNode.ImageIndex], 0, 0);

             // Draw node label into bitmap
             gfx.DrawString(this.dragNode.Text,
                 this.treeView.Font,
                 new SolidBrush(this.treeView.ForeColor),
                 (float)this.treeView.Indent, 1.0f);

             // Add bitmap to imagelist
             this.imageListDrag.Images.Add(bmp);

             // Get mouse position in client coordinates
             Point p = this.treeView.PointToClient(Control.MousePosition);

             // Compute delta between mouse position and node bounds
             int dx = p.X + this.treeView.Indent - this.dragNode.Bounds.Left;
             int dy = p.Y - this.dragNode.Bounds.Top;

             // Begin dragging image
             if (DragHelper.ImageList_BeginDrag(this.imageListDrag.Handle, 0, dx, dy))
             {
                 // Begin dragging
                 this.treeView.DoDragDrop(bmp, DragDropEffects.Move);
                 // End dragging image
                 DragHelper.ImageList_EndDrag();
             }
         }
         #endregion
#region TreeView拖动
        private void tvFormel_ItemDrag(object sender, ItemDragEventArgs e)
        {
            TreeNode tn = e.Item as TreeNode;
            //根节点不允许拖放操作
            if ((e.Button == MouseButtons.Left) && (tn != null) && (tn.Parent != null))
            {
                this.tvFormel.DoDragDrop(tn, DragDropEffects.Copy | DragDropEffects.Move | DragDropEffects.Link);
            }
            //DoDragDrop(e.Item, DragDropEffects.Move);
        }

        private void tvFormel_DragEnter(object sender, DragEventArgs e)
        {
             if (e.Data.GetDataPresent("System.Windows.Forms.TreeNode"))
            {
                e.Effect = DragDropEffects.Move;
            }
            else
            {
                e.Effect = DragDropEffects.None;
            }
        }

        private void tvFormel_DragDrop(object sender, DragEventArgs e)
        {
            TreeNode NewNode;
            if (e.Data.GetDataPresent(typeof(TreeNode)))
            {
                Point pt = ((TreeView)sender).PointToClient(new Point(e.X, e.Y));

                TreeNode DestinationNode = ((TreeView)sender).GetNodeAt(pt);

                NewNode = (TreeNode)e.Data.GetData("System.Windows.Forms.TreeNode");

                DestinationNode.Nodes.Add((TreeNode)NewNode.Clone());

                DestinationNode.Expand();

                //删除已经移动的节点
                NewNode.Remove();

            }
        }
        #endregion
Control.DoDragDrop 方法
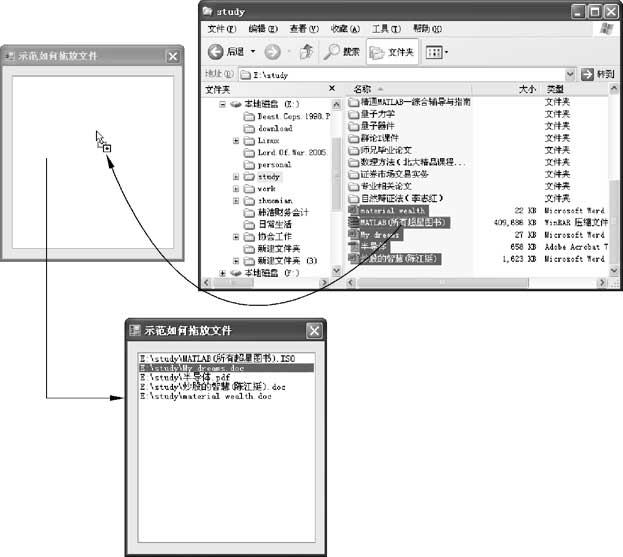
拖放操作其实与剪切与粘贴(或复制与粘贴)没有什么不同,只不过它是使用鼠标而不是使用键盘。在这两类操作中,您都会拥有一个来源(也就是您剪切或 复制的对象)以及一个目标(也就是您所粘贴之处)。不论是哪一种操作,在操作期间,都会在内存中存在数据的一份副本。剪切与粘贴会使用到剪贴板,而拖放则 会使用到一个DataObject对象,其实DataObject对象就好比是一个私有剪贴板。
在一个典型的拖放操作中,将会依序引发下列事件:
1.您可以通过调用源控件的DoDragDrop 方法来初始化拖曳操作 。DoDragDrop方法的语法如下所示:
DragDropEffects DoDragDrop(
Object data,
DragDropEffects allowedEffects)DoDragDrop方法会接受下列两个参数:
data参数用来指定所要拖曳(传递)的数据。
allowedEffects参数用来指定哪些操作(“复制”和/或“移动”)是被允许的。
一个新的DataObject对象会自动被创建。
2.接下来会引发源控件的GiveFeedback事件。在大多数的情况下,您并不需要去处理GiveFeedback事件,但是如果您想在拖曳期间显示一个自定义的鼠标指针,则可以在GiveFeedback事件处理函数中编写程序代码来完成此项设定。
3.AllowDrop属性被设定成True的任何控件都可以是置放目标。您可以在设计阶段在“属性”窗口中将要作为目标控件的AllowDrop 属性设定成True , 或者是于运行阶段在窗体的Load事件处理函数中将要作为目标控件的AllowDrop属性设定成True。
4.当您将鼠标指针移至任何一个控件的上方时,便会引发该控件的DragEnter 事件 。我们通常会在目标控件的DragEnter事件处理函数 中,使用GetDataPresent 方法去检测所拖曳的数据格式是否适用于目标控件 ,并使用DragEventArgs类型参数的Effect属性来设 定所允许的置放操作。
5.如果用户在一个有效的置放目标上放开鼠标按键,将会引发目标控件的DragDrop 事件 。我们通常会在目标控件的DragDrop事件处理函数中编写程序代码,从DataObject对象撷取数据并将其显示于目标控件中。
关于拖放操作,您还必须注意下列事项:
某些控件具有自定义的特定拖曳事件。例如,ListView与TreeView控件就拥有ItemDrag事件。
当一项拖曳操作正在执行 的时候,您可以处理QueryContinueDrag事件,该事件会向系统“要求使用权限”来继续执行拖曳操作。当以该方法处理的时候,也是一种对调用 那些对拖曳操作有影响的方法非常恰当的时机。比方说,当鼠标指针停留在TreeView控件上方的时候展开一个TreeNode。
您也可以定义您自己的DataFormats。做法非常简单,您只需将您的对象指定为SetData方法中的Object参数,同时请确定所指定的对象是可序列化的。
除此之外,您还可以使用KeyState属性,以便根据拖放操作期间所按下的按键来产生特定效果。举例来说,当Ctrl键被按下时所拖曳的数据通常要进行复制。
拖曳文字
拖曳操作最简单的实现就是将某一个TextBox控件中的文字移动或复制到另一个TextBox控件中。当然,您也可以使用复制或剪切以及粘贴操作在两个TextBox控件间复制或移动数据,然而使用拖放操作来完成此类操作绝对会更有效率。
程序范例CH8_DemoForm011.cs示范如何在两个TextBox控件间拖曳文字,其功能特性如下所示:图8.10示范如何拖曳文字
如图8.10所示,由于右侧上方TextBox控件的AllowDrop属性被设定成False,因此您无法从左侧的TextBox控件中将文字拖放其中。
如图8.11所示,由于右侧下方之TextBox控件的AllowDrop属性被设定成True,因此您可以使用拖放方式将左侧TextBox控件中的文字移动至右侧下方的TextBox控件中。
值得一提的是,如果您持续按Ctrl键,则可以使用拖放方式将左侧TextBox控件的文字复制到右侧下方的TextBox控件中(如图8.12所示)。
图8.12通过拖放操作来复制文字
程序范例CH8_DemoForm011.cs在拖放操作方面的程序代码如下所示:
// 声明一个常量以便调试在拖曳期间Ctrl键是否被按下。
const byte CtrlMask = 8;
// 替左侧的 TextBox 控件处理 MouseDown 事件。
// 当用户在此控件的范围内按下鼠标按键时便会引发此事件。
private void txtLeft_MouseDown(object sender, MouseEventArgs e)
{
// 如果用户按下鼠标左键。
if (e.Button == System.Windows.Forms.MouseButtons.Left)
{
// 选取文本框中所有的文字。
txtLeft.SelectAll();
// 初始化拖放操作。
txtLeft.DoDragDrop(
txtLeft.SelectedText,
DragDropEffects.Move | DragDropEffects.Copy);
}
}
// 处理右侧下方 TextBox 控件的 DragEnter 事件。
// 当一个对象被拖曳至目标控件的范围内时,就会引发
// 目标控件的 DragEnter 事件。
private void txtLowerRight_DragEnter(object sender, DragEventArgs e)
{
// 检查被拖曳的数据的类型是否适用于目标控件。如果不适用,则拒绝置放。
if (e.Data.GetDataPresent(DataFormats.Text))
{
// 如果在拖曳期间按着 Ctrl 键,则执行复制操作;反之,则执行移动操作。
if ((e.KeyState & CtrlMask) == CtrlMask)
{
e.Effect = DragDropEffects.Copy;
}
else
{
e.Effect = DragDropEffects.Move;
}
}
else
{
e.Effect = DragDropEffects.None;
}
}
// 处理右侧下方 TextBox 控件的 DragDrop 事件。
// 当用户放开鼠标按键时就会引发此事件,并终止拖放操作。
private void txtLowerRight_DragDrop(object sender, DragEventArgs e)
{
txtLowerRight.Text = e.Data.GetData(
DataFormats.Text).ToString();
// 如果 Ctrl 键没有被按下,移除源文字以便营造出移动文字的效果。
if ((e.KeyState & CtrlMask) != CtrlMask)
{
txtLeft.Text = "";
}
}
从以上的程序代码可以看出,我们会在拖放源(也就是左侧的TextBox控件)的MouseDown事件处理函数中判断鼠标按键已经被按下,而且如果用户是按下鼠标左键的话,便会调用DoDragDrop 方法并传递下列两个参数给它以便初始化拖曳操作:
我们使用TextBox控件中被选取的文字作为第一个参数(即data参数)的值,也就是TextBox控件中的文字将成为被拖曳的数据。
我们将第二个参数(也就是allowedEffects参数)设定成DragDropEffects.Move Or DragDropEffects.Copy,以便允许用户移动或复制。
我们会于置放目标(也就是右侧下方的TextBox控件)的DragEnter事件处理函数中执行下列处理:
1.先使用GetDataPresent方法来检查被拖曳的数据是否为纯文字(DataFormats.Text)。如果不是纯文字的话,便将 Effect属性设定成DragDropEffects.None表示置放目标不接受数据;如果是纯文字的话,则继续进行后续处理。
2.检查Ctrl键是否被按下。如果Ctrl键被按下的话,便将Effect属性设定成DragDropEffects.Copy,表示复制数据到 置放目标中,此时鼠标指针将会显示成复制指针图标;如果Ctrl键没有被按下的话,便将Effect属性设定成 DragDropEffects.Move,表示移动数据到置放目标中。
我们会于置放目标(也就是右侧下方的TextBox控件)的DragDrop事件处理函数中执行下列处理:
1.使用GetData方法从DataObject对象中提取被拖曳的文字并将它赋给置放目标。
2.判断Ctrl键是否被按下。如果Ctrl键没有被按下,表示要执行移动操作,此时会移除来源文字以便营造出移动文字的效果。
public partial class Form1 : Form
{
    public Form1()
    {
        InitializeComponent();
        InitializeListView();
    }
    // 初始化listView1.
    private void InitializeListView()
    {
        listView1.ListViewItemSorter = new ListViewIndexComparer();
        //初始化插入标记
        listView1.InsertionMark.Color = Color.Red;
        //
        listView1.AllowDrop = true;
    }

    // 当一个项目拖拽是启动拖拽操作
    private void listView1_ItemDrag(object sender, ItemDragEventArgs e)
    {
        listView1.DoDragDrop(e.Item, DragDropEffects.Move);
    }

    private void listView1_DragEnter(object sender, DragEventArgs e)
    {
        e.Effect = e.AllowedEffect;
    }

    //像拖拽项目一样移动插入标记
    private void listView1_DragOver(object sender, DragEventArgs e)
    {
        // 获得鼠标坐标
        Point point = listView1.PointToClient(new Point(e.X, e.Y));
        // 返回离鼠标最近的项目的索引
        int index = listView1.InsertionMark.NearestIndex(point);
        // 确定光标不在拖拽项目上
        if (index > -1)
        {
            Rectangle itemBounds = listView1.GetItemRect(index);
            if (point.X > itemBounds.Left + (itemBounds.Width / 2))
            {
                listView1.InsertionMark.AppearsAfterItem = true;
            }
            else
            {
                listView1.InsertionMark.AppearsAfterItem = false;
            }
        }
        listView1.InsertionMark.Index = index;
    }

    // 当鼠标离开控件时移除插入标记
    private void listView1_DragLeave(object sender, EventArgs e)
    {
        listView1.InsertionMark.Index = -1;
    }

    // 将项目移到插入标记所在的位置
    private void listView1_DragDrop(object sender, DragEventArgs e)
    {
        // 返回插入标记的索引值
        int index = listView1.InsertionMark.Index;
        // 如果插入标记不可见,则退出.
        if (index == -1)
        {
            return;
        }
        // 如果插入标记在项目的右面,使目标索引值加一
        if (listView1.InsertionMark.AppearsAfterItem)
        {
            index++;
        }

        // 返回拖拽项
        ListViewItem item = (ListViewItem)e.Data.GetData(typeof(ListViewItem));
        //在目标索引位置插入一个拖拽项目的副本
        listView1.Items.Insert(index, (ListViewItem)item.Clone());
        // 移除拖拽项目的原文件
        listView1.Items.Remove(item);
    }

    // 对ListView里的各项根据索引进行排序
    private class ListViewIndexComparer : System.Collections.IComparer
    {
        public int Compare(object x, object y)
        {
            return ((ListViewItem)x).Index - ((ListViewItem)y).Index;
        }
    }
}


