IOS之Objective-C学习 代理设计模式
鉴于Objective-C是不支持多继承的,所以需要用协议来代替实现其他类的方法,所以有了代理设计模式。
代理,又称委托,delegation。
代理模式可以让一个单继承的类实现父类以外其他类的方法。代理也可以用于传值。
我们先来说说原理,最后再看看是如何传值的。
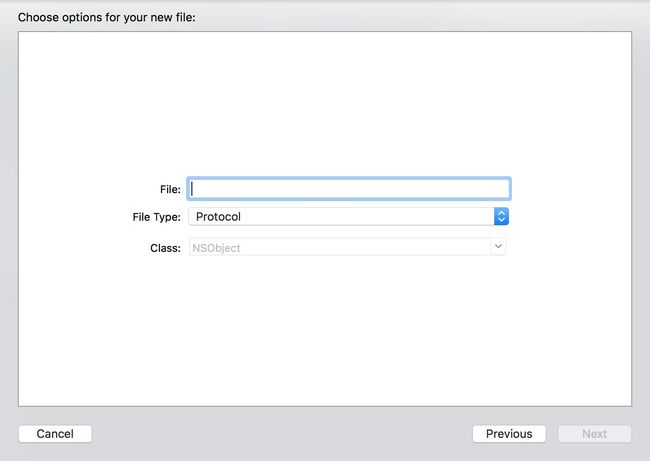
如图选取Objective-C File并选择Protocol创建文件后在该协议文件中写入方法。
myProtocol.h
@protocol myDelegation <NSObject>
-(void)method1;
-(void)method2;
@end
创建另一个类用于实现myProtocol.h中的方法
myDelegate.h
#import <Foundation/Foundation.h>
#import "myProtocol.h"
@interface myDelegate : NSObject<myProtocol>
{
id<myProtocol>obj;
}
-(void)method3;
-(instancetype)initWithObj:(id<myProtocol>)obj;
@end
myDelegate.m
#import "myDelegate.h"
@implementation myDelegate
-(instancetype)initWithObj:(id<myProtocol>)o{
self=[super init];
if(self){
obj=o;
}
return self;
}
-(void)method1{
[obj method1];
}
-(void)method2{
[obj method2];
}
-(void)method3{
NSLog(@"自身的方法。。。");
}
@end
创建一个实现方法的类
helper.h
#import <Foundation/Foundation.h>
#import "myProtocol.h"
@interface helper : NSObject<myProtocol>
@end
helper.m
#import "helper.h"
@implementation helper
-(void)method1{
NSLog(@"helper做method1。。。");
}
-(void)method2{
NSLog(@"helper做method2。。。");
}
@end
代理实现:
#import <Foundation/Foundation.h>
#import "myProtocol.h"
#import "myDelegate.h"
#import "helper.h"
int main(int argc, const char * argv[]) {
@autoreleasepool {
helper *h=[[helper alloc]init];
myDelegate *delegate=[[myDelegate alloc]initWithObj:h];
[delegate method1];
[delegate method2];
[delegate method3];
}
return 0;
}
运行结果:
helper做method1。。。
helper做method2。。。
自身的方法。。。
以上就是代理的原理,接下来我们看看代理是如何传值的。
代理传值有通过类与类之间,还有通过控制器(Controller)与控制器(Controller)之间的传值。我以控制器之间传值为例展示一下代理传值。
首先创建一个Protocol文件
sendDataDelegate.h
#import <Foundation/Foundation.h>
@protocol sendDataDelegate <NSObject>
-(void)sendData:(NSString*)str;
@end
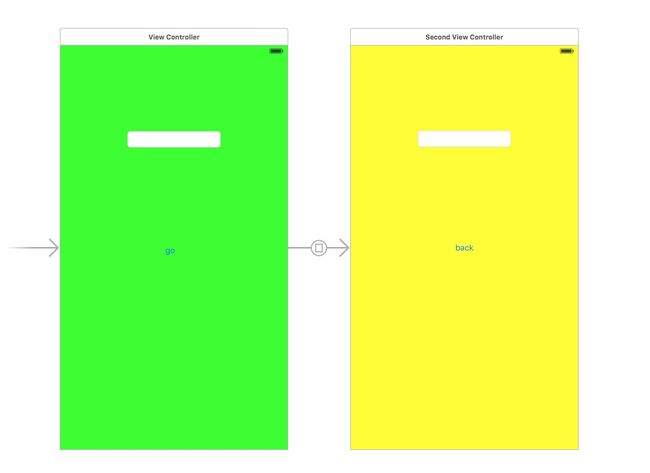
然后创建第二个视图控制器类,并在main.storyborad中拖拽另一个视图控制器并将类与视图匹配。添加button到系统给的视图控制器并以modal的方式连接到第二个视图控制器,如图:
ViewController.h
#import <UIKit/UIKit.h>
#import "sendDataDelegate.h"
@interface ViewController : UIViewController<sendDataDelegate>
@end
ViewController.m
#import "ViewController.h"
#import "secondViewController.h"
@interface ViewController ()
@property (weak, nonatomic) IBOutlet UITextField *myTextField;//从故事版中拖拽进来
@property(nonatomic,strong)NSString *temp;
@end
@implementation ViewController
//记得给故事版中go button拖拽的segue的identifier属性命名gotosecond
-(void)prepareForSegue:(UIStoryboardSegue *)segue sender:(id)sender{
if ([segue.identifier isEqualToString:@"gotosecond"]) {
secondViewController *svc=(secondViewController*)segue.destinationViewController;
svc.delegate=self;
}
}
- (void)viewDidLoad {
[super viewDidLoad];
}
-(void)sendData:(NSString *)str{
self.temp =str;
self.myTextField.text=self.temp;
}
- (void)didReceiveMemoryWarning {
[super didReceiveMemoryWarning];
}
@end
secondViewController.h
#import <UIKit/UIKit.h>
#import "sendDataDelegate.h"
@interface secondViewController : UIViewController
@property(nonatomic,weak)id<sendDataDelegate>delegate;
@end
secondViewController.m
#import "secondViewController.h"
#import "ViewController.h"
@interface secondViewController ()
@property (weak, nonatomic) IBOutlet UITextField *myTextField;
@end
@implementation secondViewController
- (IBAction)back:(id)sender {
[self.delegate sendData:self.myTextField.text];
[self dismissViewControllerAnimated:YES completion:nil];
}
- (void)viewDidLoad {
[super viewDidLoad];
}
- (void)didReceiveMemoryWarning {
[super didReceiveMemoryWarning];
}
@end
效果图演示
当一个视图控制器需要另一个视图控制器更新UI或者做其他事情的时候,我们可以通过代理传值的方法来实现。

