集成新版(5.17+)Activiti Modeler与Rest服务
声明:
- 此教程适合Activiti 5.17+版本。
- 本博客所涉及的内容均可在kft-activiti-demo中找到。
- 在线demo可以访问 http://demo.kafeitu.me:8080/kft-activiti-demo 菜单路径:管理模块 -> 流程管理 -> 模型工作区,可以『创建』或者『编辑』模型
1. 简介
上一篇介绍整合Activiti Modeler《整合Activiti Modeler到业务系统(或BPM平台)》已经有2年多时间了,自从Activiti 5.17版本发布以后该教程已经不适用了,很多网友也反馈不知道怎么把Activiti Modeler整合到自己的项目中去,为此抽时间为适配5.17+版本的集成方法整理成这篇博文,希望对有需求的网友有帮助。
最新版本的kft-activiti-demo已经使用了5.17+版本的Activiti,并且集成了最新的Activiti Modeler组件,可以下载最新源码:https://github.com/henryyan/kft-activiti-demo。
1.1 新版Activiti Modeler特性
先来欣赏一下新版的界面,相比上一版漂亮了许多,调性高了~~~
界面布局:上(工具区)、左(组件类目)、右(工作区)、右下(属性区)
Activiti Modeler内部的实现上还是以oryx为图形组件为内核,用angular.js作为界面基本元素的基础组件以及调度oryx的API。
2. 官方Activiti Explorer的集成方式
先从Github下载官方Activiti源码,地址:https://github.com/Activiti/Activiti。
2.1 Activiti Exploer的内部结构-Java
源码目录(如果是zip下载请先解压缩)中找到modules/activiti-webapp-explorer2/src/main子目录,结构如下:
├── assembly
├── java
│   └── org
│       └── activiti
├── resources
│   └── org
│       └── activiti
└── webapp
    ├── META-INF
    ├── VAADIN
    │   ├── themes
    │   └── widgetsets
    ├── WEB-INF
    ├── diagram-viewer
    │   ├── images
    │   └── js
    └── editor-app
        ├── configuration
        ├── css
        ├── editor
        ├── fonts
        ├── i18n
        ├── images
        ├── libs
        ├── partials
        ├── popups
        └── stencilsets
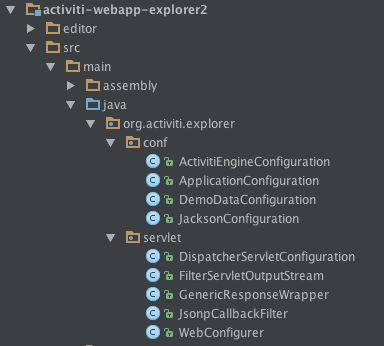
我们需要关注的目录是webapp/editor-app,以及java/org/activiti,目录结构:
新版本的Activiti Explorer放弃了XML方式的配置方式,采用Bean Configuration的方式代替,上图中org/activiti/explorer/conf包中就是各种配置,在org/activiti/explorer/servlet/WebConfigurer类用Servlet 3.0方式配置Servlet映射关系,映射的路径为/service/*。
2.2 Activiti Exploer的内部结构-Web
新版本Activiti Modeler的Web资源不再像旧版那么散乱,新版本只需要关注:
- src/main/webapp/editor-app:目录中包含设计器里面所有的资源:angular.js、oryx.js以及配套的插件及css
- src/main/webapp/modeler.html:设计器的主页面,用来引入各种web资源
- src/main/resources/stencilset.json: bpmn标准里面各种组件的json定义,editor以import使用。
3. 整合到自己的项目中
了解过网友的需求不知道如何整合新版Activiti Modeler的原因有两个:
- 不知道怎么把注解的方式转换为XML方式
- editor-app目录的结构位置
- 和自己应用的整合参数配置
3.1 Activiti Rest接口与Spring MVC配置
3.1.1 Maven依赖
Activiti Modeler对后台服务的调用通过Spring MVC方式实现,所有的Rest资源统一使用注解RestController标注,所以在整合到自己项目的时候需要依赖Spring MVC,Modeler模块使用的后台服务都存放在activiti-modeler模块中,在自己的项目中添加依赖:
<dependency>
    <groupId>org.activiti</groupId>
    <artifactId>activiti-modeler</artifactId>
    <version>5.19.0</version>
</dependency>
<dependency>
    <groupId>org.activiti</groupId>
    <artifactId>activiti-diagram-rest</artifactId>
    <version>5.19.0</version>
</dependency>
模块作用:
- activiti-modeler模块提供模型先关的操作:创建、保存、转换json与xml格式等
- activiti-diagram-rest模块用来处理流程图有关的功能:流程图布局(layout)、节点高亮等
3.1.2 准备基础服务类
复制文件(https://github.com/henryyan/kft-activiti-demo/tree/master/src/main/java/org/activiti/explorer) 里面的java文件到自己项目中。
3.1.3 Activiti Spring配置
创建文件src/main/resources/beans/beans-activiti.xml定义Activiti引擎的beans:
<?xml version="1.0" encoding="UTF-8"?>
<beans xmlns="http://www.springframework.org/schema/beans" xmlns:xsi="http://www.w3.org/2001/XMLSchema-instance"
       xsi:schemaLocation="
        http://www.springframework.org/schema/beans http://www.springframework.org/schema/beans/spring-beans-4.1.xsd">

    <context:component-scan
            base-package="org.activiti.conf,org.activiti.rest.editor">
        <context:exclude-filter type="annotation" expression="org.springframework.stereotype.Controller"/>
    </context:component-scan>

    <!-- 单例json对象 -->
    <bean id="objectMapper" class="com.fasterxml.jackson.databind.ObjectMapper"/>

    <!-- 引擎内部提供的UUID生成器,依赖fastxml的java-uuid-generator模块 -->
    <bean id="uuidGenerator" class="org.activiti.engine.impl.persistence.StrongUuidGenerator" />

    <!-- Activiti begin -->
    <bean id="processEngineConfiguration" class="org.activiti.spring.SpringProcessEngineConfiguration">
        <property name="dataSource" ref="dataSource"/>
        <property name="transactionManager" ref="transactionManager"/>
        <property name="databaseSchemaUpdate" value="true"/>
        <property name="jobExecutorActivate" value="true"/>
    </bean>

    <bean id="processEngine" class="org.activiti.spring.ProcessEngineFactoryBean">
        <property name="processEngineConfiguration" ref="processEngineConfiguration"/>
    </bean>

    <!-- 7大接口 -->
    <bean id="repositoryService" factory-bean="processEngine" factory-method="getRepositoryService"/>
    <bean id="runtimeService" factory-bean="processEngine" factory-method="getRuntimeService"/>
    <bean id="formService" factory-bean="processEngine" factory-method="getFormService"/>
    <bean id="identityService" factory-bean="processEngine" factory-method="getIdentityService"/>
    <bean id="taskService" factory-bean="processEngine" factory-method="getTaskService"/>
    <bean id="historyService" factory-bean="processEngine" factory-method="getHistoryService"/>
    <bean id="managementService" factory-bean="processEngine" factory-method="getManagementService"/>

</beans>
在spring初始化的时候引入即可,例如在web.xml中使用通配符方式:
<context-param>
    <param-name>contextConfigLocation</param-name>
    <param-value>classpath*:/beans/beans-*.xml</param-value>
</context-param>
3.1.4 Spring MVC配置
创建文件WEB-INF/spring-mvc-modeler.xml,内容如下:
<?xml version="1.0" encoding="UTF-8"?>
<beans xmlns="http://www.springframework.org/schema/beans" xmlns:xsi="http://www.w3.org/2001/XMLSchema-instance"
    xmlns:context="http://www.springframework.org/schema/context"
    xmlns:mvc="http://www.springframework.org/schema/mvc"
    xsi:schemaLocation="http://www.springframework.org/schema/beans http://www.springframework.org/schema/beans/spring-beans-3.1.xsd
        http://www.springframework.org/schema/context http://www.springframework.org/schema/context/spring-context-3.1.xsd
        http://www.springframework.org/schema/mvc http://www.springframework.org/schema/mvc/spring-mvc-3.1.xsd">

    <!-- 自动扫描且只扫描@Controller -->
    <context:component-scan base-package="org.activiti.rest.editor,org.activiti.rest.diagram">
        <context:include-filter type="annotation" expression="org.springframework.stereotype.Controller" />
    </context:component-scan>

    <mvc:annotation-driven />
</beans>
上面XML中告知spring mvc扫描路径为**
3.1.5 web.xml中配置Servlet服务
在web.xml中配置下面的Servlet:
<servlet>
    <servlet-name>ModelRestServlet</servlet-name>
    <servlet-class>org.springframework.web.servlet.DispatcherServlet</servlet-class>
    <init-param>
        <param-name>contextConfigLocation</param-name>
        <param-value>/WEB-INF/spring-mvc-modeler.xml</param-value>
    </init-param>
    <load-on-startup>1</load-on-startup>
</servlet>
<servlet-mapping>
    <servlet-name>ModelRestServlet</servlet-name>
    <url-pattern>/service/*</url-pattern>
</servlet-mapping>
3.1.6 模型设计器的Web资源
-
直接从Activiti Explorer中复制文件modeler.html文件到src/main/webapp目录即可,该文件会引入定义基本的布局(div)、引入css以及js文件。
-
修改editor-app/app-cfg.js文件的contextRoot属性为自己的应用名称,例如/kft-activiti-demo/service
3.1.7 模型控制器
在《整合Activiti Modeler到业务系统(或BPM平台)》中已经介绍过ModelController类的作用了,这里需要在基础上稍微做一点调整:
- create方法中在创建完Model后跳转页面由service/editor?id=改为modeler.html?modelId=
- 当从模型列表编辑某一个模型时也需要把路径修改为modeler.html?modelId=
4. 整合Activiti Rest
有了Activiti Modeler的基础只需要依葫芦画瓢即可。
4.1 Maven依赖
<dependency>
    <groupId>org.activiti</groupId>
    <artifactId>activiti-rest</artifactId>
    <version>5.19.0</version>
</dependency>
4.3 Activiti组件包扫描
文件src/main/resources/beans/beans-activiti.xmlcontext:component-scan标签的base-package属性中添加org.activiti.rest.service包,包里面包含了所有Rest API的接口Rest Controller。
4.4 添加Rest安全认证组件
package org.activiti.conf;

import org.activiti.rest.security.BasicAuthenticationProvider;
import org.springframework.context.annotation.Bean;
import org.springframework.context.annotation.Configuration;
import org.springframework.security.authentication.AuthenticationProvider;
import org.springframework.security.config.annotation.web.builders.HttpSecurity;
import org.springframework.security.config.annotation.web.configuration.EnableWebSecurity;
import org.springframework.security.config.annotation.web.configuration.WebSecurityConfigurerAdapter;
import org.springframework.security.config.annotation.web.servlet.configuration.EnableWebMvcSecurity;
import org.springframework.security.config.http.SessionCreationPolicy;

@Configuration
@EnableWebSecurity
@EnableWebMvcSecurity
public class SecurityConfiguration extends WebSecurityConfigurerAdapter {

    @Bean
    public AuthenticationProvider authenticationProvider() {
        return new BasicAuthenticationProvider();
    }

    @Override
    protected void configure(HttpSecurity http) throws Exception {
        http.authenticationProvider(authenticationProvider())
            .sessionManagement().sessionCreationPolicy(SessionCreationPolicy.STATELESS).and()
            .csrf().disable()
            .authorizeRequests()
            .anyRequest().authenticated()
            .and()
            .httpBasic();
    }
}
4.5 spring mvc配置文件
创建文件WEB-INF/spring-mvc-rest.xml:
<?xml version="1.0" encoding="UTF-8"?>
<beans xmlns="http://www.springframework.org/schema/beans" xmlns:xsi="http://www.w3.org/2001/XMLSchema-instance"
    xmlns:context="http://www.springframework.org/schema/context"
    xmlns:mvc="http://www.springframework.org/schema/mvc"
    xsi:schemaLocation="http://www.springframework.org/schema/beans http://www.springframework.org/schema/beans/spring-beans-3.1.xsd
        http://www.springframework.org/schema/context http://www.springframework.org/schema/context/spring-context-3.1.xsd
        http://www.springframework.org/schema/mvc http://www.springframework.org/schema/mvc/spring-mvc-3.1.xsd">

    <!-- 自动扫描且只扫描@Controller -->
    <context:component-scan base-package="org.activiti.rest">
        <context:include-filter type="annotation" expression="org.springframework.stereotype.Controller" />
    </context:component-scan>

    <mvc:annotation-driven />
</beans>
4.6 配置Servlet映射
<servlet>
    <servlet-name>RestServlet</servlet-name>
    <servlet-class>org.springframework.web.servlet.DispatcherServlet</servlet-class>
    <init-param>
        <param-name>contextConfigLocation</param-name>
        <param-value>/WEB-INF/spring-mvc-rest.xml</param-value>
    </init-param>
    <load-on-startup>1</load-on-startup>
</servlet>
<servlet-mapping>
    <servlet-name>RestServlet</servlet-name>
    <url-pattern>/rest/*</url-pattern>
</servlet-mapping>
4.7 访问Rest接口
现在启动应用可以访问 http://localhost:8080/your-app/rest/management/properties 以Rest方式查看引擎的属性列表,如果在网页中访问会提示输入用户名密码;也可以访问在线demo测试
