淺談Unity 5.4新功能:Light Probe Proxy Volume
作者:CHRISTOPHER POPE 原文連結
Unity 5.4進入到Beta的階段,其中一個特別的功能是光照探頭代理Light Probe Proxy Volume(LPPV)。本篇會向大家介紹什麼是LPPV,並介紹它如何運作
對Unity5.4beta有興趣可以從這裡下載,必須有Pro的序號才能使用。
什麼是光照探頭代理
如何使用LPPV元件
使用LPPV元件必須要跟著一組光探頭組(Light Probe Group)。可以從 Component -> Rendering -> Light Probe Proxy Volume找到它,在預設情況下,這個元件看起來是這樣:

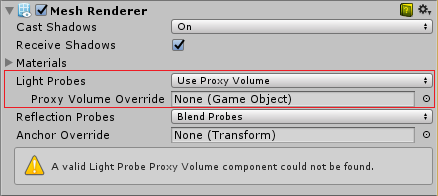
這個元件需要加到像是有網格甚至光照探頭組的遊戲物件中,想要用到LPPV的物件需要有MeshRenderer或者Renderer元件,並將Light Probes屬性設為“Use Proxy Volume”。

你可以透過指定Proxy Volume Override來使用其它GameObject上的LPPV元件,只需拖放這個物件到任何你想要使用它的Renderer元件的屬性裡。
例如:將LPPV元件加到光照探頭組物件中,那麼你就可以透過Proxy Volume Override屬性在所有Renderer元件中共用它:

設定邊界:
邊界的設定有三個選項:
- Automatic Local
- Automatic World
- Custom
Automatic Local:預設屬性,邊界會在本地空間內計算,插值光探頭位置將在這個範圍內產生,計算包含Renderer和它底下階層所有有設定Use Proxy Volume的Renderer元件,Automatic World也是一樣算法。

Automatic World:會計算對齊世界坐標軸的邊界。這兩種選項應該與Proxy Volume Override屬性配合使用在其它的Renderer元件上。另外你也可以將同一個LPPV元件指定到最上層的父物件來使所有下層的物件使用這個LPPV元件。
World和Local的區別在於,在Local模式下當一個階層太多的子物件嘗試使用父物件的LPPV元件會在計算邊界時比較耗效能,但計算出來的邊界尺寸也許會更小,那麼光照資料就會更確實。
Custom:這個模式能用工具來自訂邊界,從場景裡直接編輯或是從inspector介面來修改大小。這個模式邊界是在物件的本地空間中設定的,所以你需要確定所有帶有Renderer元件的物件都要在LPPV的範圍內。
設定完邊界之後,你還需要考慮代理的密度和解析度。在Resolution Mode底下有兩個選項:
Automatic:自動 - 預設屬性,用來給密度設定一個值,例如每單位的探頭數量。每單位在X,Y,Z軸上的探頭數量計算,數量取決於邊界大小。
Custom:自訂 - 用下拉式功能表來設定X,Y,Z軸上解析度的值。值從1開始以2的次方遞增最大到32,所以你最多可以有32x32x32 個內插(Interpolation)探頭
World和Local的區別在於,在Local模式下當一個階層太多的子物件嘗試使用父物件的LPPV元件會在計算邊界時比較耗效能,但計算出來的邊界尺寸也許會更小,那麼光照資料就會更確實。
Custom:這個模式能用工具來自訂邊界,從場景裡直接編輯或是從inspector介面來修改大小。這個模式邊界是在物件的本地空間中設定的,所以你需要確定所有帶有Renderer元件的物件都要在LPPV的範圍內。
設置解析度/密度:
設定完邊界之後,你還需要考慮代理的密度和解析度。在Resolution Mode底下有兩個選項:
Automatic:自動 - 預設屬性,用來給密度設定一個值,例如每單位的探頭數量。每單位在X,Y,Z軸上的探頭數量計算,數量取決於邊界大小。
Custom:自訂 - 用下拉式功能表來設定X,Y,Z軸上解析度的值。值從1開始以2的次方遞增最大到32,所以你最多可以有32x32x32 個內插(Interpolation)探頭
使用LPPV時效能的考量:
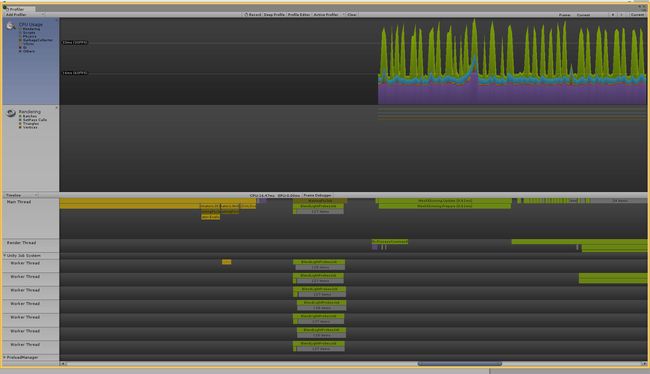
請記住每批64個內插光探頭的內插計算大概需要0.15毫秒的CPU運算(i7-4Ghz)(用Profiler觀察的數據)。光探頭內插計算可以是多執行緒的,但任何小於或等於64個內插光照探頭不會用多緒而只在主執行緒中執行。
所以當你使用Unity內建的Profiler在Timeline視圖你會看到BlendLightProbesJob在主執行緒上,如果你將內插光探頭數量增加到超過64個,你就會在工作執行緒上看到BlendLightProbesJob:

當只有一批次的64個內插光探頭時將只會在主執行緒上計算,當有多個批次(大於64)的時候只會在主執行緒上計算一批,其它的會分配到工作執行緒上,但這個行為只針對單個LPPV。如果你有多個LPPV,並且都少於64個內插光探頭的話,那他們都會主執行緒上運作。
硬體需求:
要讓這個功能運作需要至少支援Shader Model 4的硬體以及相對的API支援,包括支援32位元浮點格式以及線性過濾的3D材質。
Unity的標準著色器是支援這個功能的,但如果你想使用自訂Shader,可以用ShadeSHPerPixel函式。這個範例說明如何使用這個函式:
使用ShadeSHPerPixel的粒子系統著色器的範例:
Unity的標準著色器是支援這個功能的,但如果你想使用自訂Shader,可以用ShadeSHPerPixel函式。這個範例說明如何使用這個函式:
|
1
2
3
4
5
6
7
8
9
10
11
12
13
14
15
16
17
18
19
20
21
22
23
24
25
26
27
28
29
30
31
32
33
34
35
36
37
38
39
40
41
42
43
44
45
46
47
48
49
50
51
52
53
54
55
56
57
58
59
60
61
62
63
64
65
66
67
68
69
70
71
72
73
74
75
76
77
78
79
|
Shader
"Particles/AdditiveLPPV"
{
Properties
{
_MainTex (
"Particle Texture"
, 2D) =
"white"
{}
_TintColor (
"Tint Color"
, Color) = (0.5,0.5,0.5,0.5)
}
Category
{
Tags {
"Queue"
=
"Transparent"
"IgnoreProjector"
=
"True"
"RenderType"
=
"Transparent"
}
Blend SrcAlpha One
ColorMask RGB
Cull Off Lighting Off ZWrite Off
SubShader
{
Pass
{
CGPROGRAM
#pragma vertex vert
#pragma fragment frag
#pragma multi_compile_particles
#pragma multi_compile_fog
// Don’t forget to specify the target
#pragma target 3.0
#include "UnityCG.cginc"
// You have to include this header to have access to ShadeSHPerPixel
#include "UnityStandardUtils.cginc"
fixed4 _TintColor;
sampler2D _MainTex;
struct
appdata_t
{
float4 vertex : POSITION;
float3 normal : NORMAL;
fixed4 color : COLOR;
float2 texcoord : TEXCOORD0;
};
struct
v2f
{
float4 vertex : SV_POSITION;
fixed4 color : COLOR;
float2 texcoord : TEXCOORD0;
UNITY_FOG_COORDS(1)
float3 worldPos : TEXCOORD2;
float3 worldNormal : TEXCOORD3;
};
float4 _MainTex_ST;
v2f vert (appdata_t v)
{
v2f o;
o.vertex = UnityObjectToClipPos(v.vertex);
o.worldNormal = UnityObjectToWorldNormal(v.normal);
o.worldPos = mul(unity_ObjectToWorld, v.vertex).xyz;
o.color = v.color;
o.texcoord = TRANSFORM_TEX(v.texcoord,_MainTex);
UNITY_TRANSFER_FOG(o,o.vertex);
return
o;
}
fixed4 frag (v2f i) : SV_Target
{
half3 currentAmbient = half3(0, 0, 0);
half3 ambient = ShadeSHPerPixel(i.worldNormal, currentAmbient, i.worldPos);
fixed4 col = _TintColor * i.color * tex2D(_MainTex, i.texcoord);
>col.xyz += ambient;
UNITY_APPLY_FOG_COLOR(i.fogCoord, col, fixed4(0,0,0,0));
// fog towards black due to our blend mode
return
col;
}
ENDCG
}
}
}
}
|