nginx1.8.1反向代理、负载均衡功能的实现
nginx1.8.1 proxy 服务器192.168.8.40
web1 centos6.5 httpd2.2.15
web2 centos7.2 httpd2.4.6
1、代理功能的简单实现
nginx代理服务器:192.168.8.40
web服务器:192.168.8.101
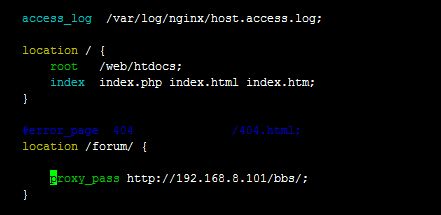
location /forum/ {
proxy_pass http://192.168.8.101/bbs/;
}

在被代理的web端
创建目录mkdir /web/htdocs/bbs
vim /web/htdocs/bbs/index.html
加入<h1>192.168.8.101 bbs</h1>
访问 http://192.168.8.40/forum/即可出现8.101的内容
改成正则表达式的方式:
location ~* ^/forum {
proxy_pass http://192.168.8.101;
}
此时http://192.168.8.40/forum/的方式不能访问,需要通过修改192.168.8.101的bbs目录改为forum即可访问
# mv bbs forum
2、代理上显示客户端真实IP(方便统计真实的IP访问情况)
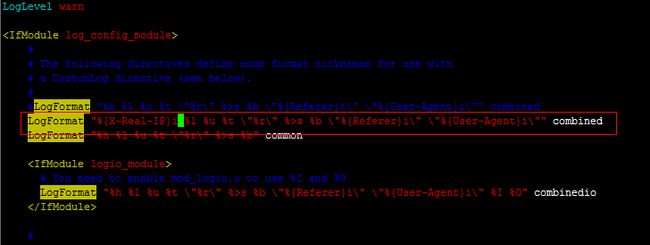
8.101上更改显示日志的方式:
# vim /etc/httpd/conf/httpd.conf
LogFormat "%{X-Real-IP}i %l %u %t \"%r\" %>s %b \"%{Referer}i\" \"%{User-Agent}i\"" combined
nginx服务器端8.40配置:
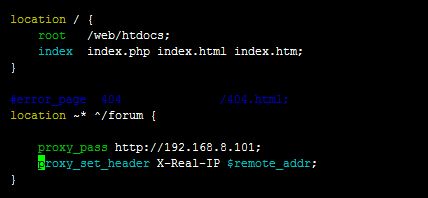
location ~* ^/forum {
proxy_pass http://192.168.8.101;
proxy_set_header X-Real-IP $remote_addr;
}

3.实现简单的负载均衡:
nginx proxy server:192.168.8.40apache web1:192.168.8.39
apache web2:192.168.8.101
nginx proxy server:192.168.8.40配置:
# 定义web服务器集群:
upstream webservers {
server 192.168.8.39 weight=1;
server 192.168.8.101 weight=1;
}
server {
#location / {
# root /web/htdocs;
# index index.php index.html index.htm;
#}
#定义访问集群
location / {
proxy_pass http://webservers/;
proxy_set_header X-Real-IP $remote_addr;
}
}
通过访问http://192.168.8.40可以看到负载的效果
4、对负载均衡的服务器宕机情况进行适配
#添加错误的定义
server {
listen 8080;
server_name localhost;
root /web/errorpages;
index index.html;
}
# 创建错误页面定义
# mkdir /web/errorpages/ -pv
# vim index.html
加入
sorry,website is being repaired please wait
# 添加超时定义及错误页面定义,如果连续访问错误两次则踢掉,检测时间间隔2秒
upstream webservers {
server 192.168.8.39 weight=1 max_fails=2 fail_timeout=2;
server 192.168.8.101 weight=1 max_fails=2 fail_timeout=2;
server 127.0.0.1:8080 weight=1 backup;
}
测试,关闭web1则,只能访问到web2,关闭web2后出现错误提示
5、为反向代理启用缓存功能
proxy_cache_path /nginx/cache/first levels=1:2 keys_zone=first:20m max_size=1g;
server {
listen 80;
server_name localhost;
index index.html index.php;
add_header X-Via $server_addr;
add_header X-Cache "$upstream_cache_status from $server_addr";
location / {
proxy_pass http://webservers/;
proxy_set_header X-Real-IP $remote_addr;
proxy_cache first;
proxy_cache_valid 200 10m;
}
# nginx -t
nginx: the configuration file /etc/nginx/nginx.conf syntax is ok
nginx: [emerg] mkdir() "/nginx/cache/first" failed (2: No such file or directory)
nginx: configuration file /etc/nginx/nginx.conf test failed
[root@centossz008 ~]# mkdir -pv /nginx/cache/first
mkdir: created directory `/nginx'
mkdir: created directory `/nginx/cache'
mkdir: created directory `/nginx/cache/first'
add_header X-Via $server_addr;
add_header X-Cache "$upstream_cache_status from $server_addr";
提示信息如下:
6、重定向规则
location / {#root html;
root /web/htdocs;
index index.html index.htm;
rewrite ^/bbs/(.*)$ http://192.168.8.101/forum/$1;
}
访问:http://192.168.8.40/bbs/
7、上传文件的负载均衡
可能碰到这样的业务场景,几台web app设置了主从,一个服务器负责上传,其他只能通过同步来获取nginx配置:
location / {
proxy_pass http://192.168.8.40/;
if ($request_method = "PUT"){
proxy_pass http://192.168.8.101;
}
}
客户端配置:
# vim /etc/httpd/conf/httpd.conf
在<Directory "/web/htdocs">下面添加Dav on
<Directory "/web/htdocs">
Dav on

# curl -T /etc/fstab http://192.168.8.40
<!DOCTYPE HTML PUBLIC "-//IETF//DTD HTML 2.0//EN">
<html><head>
<title>201 Created</title>
</head><body>
<h1>Created</h1>
<p>Resource /fstab has been created.</p>
</body></html>
在8.101上可以看到上传的文件
htdocs]# ls
forum fstab index.html

