android学习笔记
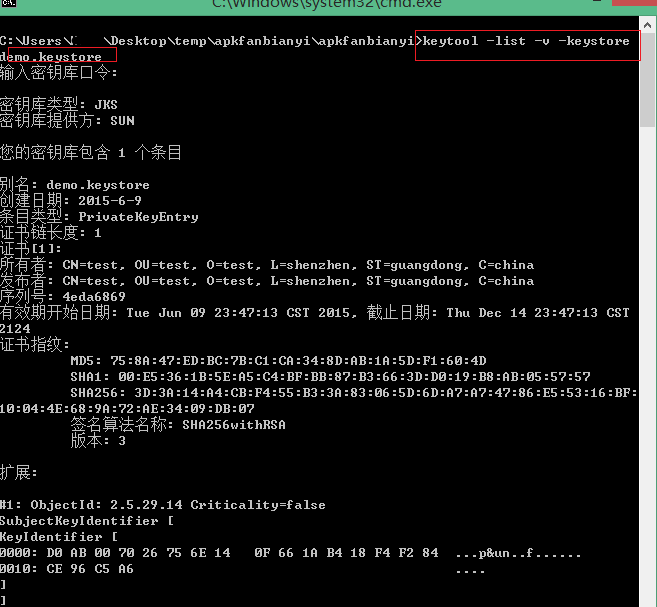
android获得签名证书的详细信息:
keytool -list -v -keystore 签名证书的路径,如下:

android实现截屏的效果:
//构建Bitmap

WindowManager windowManager = getWindowManager();

Display display = windowManager.getDefaultDisplay();

int w = display.getWidth();

int h = display.getHeight();

Bitmap Bmp = Bitmap.createBitmap( w, h, Config.ARGB_8888 );
//获取屏幕
View decorview = this.getWindow().getDecorView();
decorview.setDrawingCacheEnabled(true);
Bmp = decorview.getDrawingCache(); android检查设备上是否有哪些物理健
 public static boolean checkDeviceHasNavigationBar(Context activity) {
  //通过判断设备是否有返回键、菜单键(不是虚拟键,是手机屏幕外的按键)来确定是否有navigation bar
        boolean hasMenuKey = ViewConfiguration.get(activity)
                .hasPermanentMenuKey();
        boolean hasBackKey = KeyCharacterMap
                .deviceHasKey(KeyEvent.KEYCODE_BACK);

        if (!hasMenuKey && !hasBackKey) {
            // 做任何你需要做的,这个设备有一个导航栏
            return true;
        }
        return false;
    }
使用zipalign优化apk
zipalign [-f] [-v] <alignment> infile.apk outfile.apk如果需要通过logcat打印waring或者更高级别的日志
adb logcat *:WIntent.ACTION_VIEW
一个activity在AndroidManifest.xml中注册 只要有应用发送这个action我就能接收到 然后就能显示出所有接收到这个action的应用列表
android设置edittext光标颜色
1.如果光标的颜色需要和字体颜色一致,只需要新建一个样式
<style name="AppTheme" parent="android:Theme.Holo"> <item name="android:textCursorDrawable">@null</item> </style> 然后在activity中引用这个样式即可
2.如果需要自定义光标的颜色:
在drawable下新建一个xml文件,我在这里叫做corlor_cursor.xml,内容如下:
<?xml version="1.0" encoding="utf-8"?>
<shape xmlns:android="http://schemas.android.com/apk/res/android" android:shape="rectangle" >

    <size android:width="3dp" />
    <solid android:color="#ff0000" />
</shape>
在对应的edittext中设置android:textCursorDrawable属性即可:
<EditText android:id="@+id/textid" android:layout_width="match_parent" android:layout_height="wrap_content" android:textCursorDrawable="@drawable/corlor_cursor" />plurals标签的使用
在android当中,如果需要根据个数来判断显示不同的字符串,用在一个单词或者短语在单数和复数时拼写不一样的情况,可以使用下面这种方式:
<plurals name="message_view_selected_message_count">
    <item quantity="one" ><xliff:g id="message_count" example="1">%d</xliff:g> selected</item>
    <item quantity="other"><xliff:g id="message_count" example="9">%d</xliff:g> selected</item>
</plurals>
int selectNum = getSelectedCount();
mChatSelect.setText(getResources().getQuantityString(
R.plurals.message_view_selected_message_count, selectNum, selectNum));Base64将字符串和图片之间相互转换
public Bitmap stringtoBitmap(String string){
    //将字符串转换成Bitmap类型
    Bitmap bitmap=null;
    try {
    byte[]bitmapArray;
    bitmapArray=Base64.decode(string, Base64.DEFAULT);
    bitmap=BitmapFactory.decodeByteArray(bitmapArray, 0,     bitmapArray.length);
    } catch (Exception e) {
    e.printStackTrace();
    }
    return bitmap;
 }
public String bitmaptoString(Bitmap bitmap){
//将Bitmap转换成字符串
String string=null;
ByteArrayOutputStream bStream=new ByteArrayOutputStream();
bitmap.compress(CompressFormat.PNG,100,bStream);
byte[]bytes=bStream.toByteArray();
string=Base64.encodeToString(bytes,Base64.DEFAULT);
return string;
}android防止点击多个控件
只要在xml文件中的父容器总加入这样一行代码即可:
android:splitMotionEvents=”false”
android统一管理id
在android开发中,我们可以对控件的id进行统一管理:在res目录下新建一个ids.xml文件,内容如下:
<resources>
    <item type="id" name="button2"/>
</resources>
在布局中这样使用:android:id=”@android:id/button2”