Java EE HTML5 WebSocket 编码器与解码器的例子
至少原文要保留,原味没有了.也就没意思了,
原文链接:http://www.byteslounge.com/tutorials/java-ee-html5-websockets-encoder-and-decoder-example
In this tutorial we will implement a Java EE ServerEndpoint message Encoder and Decoder in order to convert HTML5 websocket messages into Java objects (and also the reverse operation of converting Java objects into ready to be sent websocket messages).
在本教程,为了将HTML5 WebSocket消息转成Java对象(将Java对象转成准备要发送的WebSocket消息的反向操作也一样),我们将实现一个Java EE服务器端点消息编码与解码.
1. Introduction
1.介绍
As we have seen in previous examples a ServerEndpoint is the Java EE implementation of the server-side HTML5 websocket component:
正如我们已经在前面看到的例子,一个服务器端点就是服务器端的HTML5 WebSocket组件的Java EE实现:
Java EE HTML5 WebSocket example
Java EE HTML5 WebSockets with multiple clients example
In those previous examples the implemented ServerEndpoint received and sent messages in plain text format. What if we want to bind this textual information to complex Java objects? The Java EE WebSockets API includes a couple of components for this exact purpose: Encoders and Decoders.
在之前的那些例子,实现的服务器端点使用纯文本格式来接收和发送消息.要是我们想要绑定复杂的信息到复杂的Java对象,会怎样呢?Java EE的WebSockets API包含了一对组件来达到这样精确的目的:编码器和解码器.
Encoders are used to transform a complex Java object sent by a ServerEndpoint in a format that will be understood by the client. Example: XML, JSON, Binary or some other custom format.
以一种客户端可以理解的格式,编码器被用来转换一个复杂的Java对象,这个对象是由服务器端点发送出去的.例如,XML,JSON,二进制或一些其他自定义格式。
Decoders implement the reverse task: They transform textual or binary data sent by clients into complex Java objects ready to be passed into a given ServerEndpoint.
解码器实现相反的任务:它们将由客户端发送的文本或二进制数据转成复杂的Java对象准备传递给一个给定的服务器端点.
In this tutorial we will implement a simple Encoder - and the respective Decoder - in order to convert messages sent by clients in JSON format into a Java object representation (and vice-versa).
在本教程中,我们会实现一个简单的编码器和相应的解码器,为了将客户端发送的消息以JSON格式转成一个JAVA对象表示(反过来也一样).
This tutorial considers the following environment:
本教程考虑了以下环境:
Ubuntu 12.04
JDK 1.7.0.21
Glassfish 4.0
Note: WebSockets support was introduced in Java EE 7
.注:WebSockets的支持在Java EE 7才被引入.
2. WebSocket server endpoint
2.WebSocket服务器端点
Following next is the ServerEndpoint used in this example:
接下来的就是这个例子使用的服务器端点:
package com.byteslounge.websockets;

import java.io.IOException;

import javax.websocket.EncodeException;
import javax.websocket.OnClose;
import javax.websocket.OnMessage;
import javax.websocket.OnOpen;
import javax.websocket.Session;
import javax.websocket.server.ServerEndpoint;

@ServerEndpoint(
  value = "/websocket",
  encoders = { MessageEncoder.class },
  decoders = { MessageDecoder.class }
)
public class WebSocketTest {

  @OnMessage
  public void onMessage(Message message, Session session)
      throws IOException, EncodeException {

    // Echo the received message back to the client
    Message response = new Message();
    response.setSubject("Response to " + message.getSubject());
    response.setContent("echo " + message.getContent());
    session.getBasicRemote().sendObject(response);

  }

  @OnOpen
  public void onOpen() {
    System.out.println("Client connected");
  }

  @OnClose
  public void onClose() {
    System.out.println("Connection closed");
  }

}
We have introduced some changes into this server endpoint when compared to the ones we defined in the previous tutorials.
和我们之前的教程定义过的服务端点相比,这个服务端点,我们已经介绍过了一些变化.
Method onMessage is now receiving a parameter of type Message instead of receiving a String (we will see the Message class in a few moments). This same method now writes an object - also of type Message - directly to the connected client.
onMessage方法现在是接收一个Message类型的参数,而不是接受一个String(我们将过一会就看到Message类。现在这个同样的方法写一个对象 - 也是Message类型 - 直接连接的客户端。
We are now declaring encoders and decoders in the type level @ServerEndpoint annotation. They will be used to convert messages received from the clients in a specific text format into instances of type Message (and vice-versa).
现在我们在类级别上的@ServerEndpoint注解声明编码器和解码器. 它们将用于转换接收到来自于客户端的使用一种指定的文本格式消息,变成为Message类型的实例(反之亦然)
package com.byteslounge.websockets;

public class Message {

  private String subject;
  private String content;

  public String getSubject() {
    return subject;
  }

  public void setSubject(String subject) {
    this.subject = subject;
  }

  public String getContent() {
    return content;
  }

  public void setContent(String content) {
    this.content = content;
  }

}
This class is just a simple POJO that represents a message received by a connected client. It contains a subject and the message content itself. It will be also used to represent server responses sent to clients.
In this example the connected clients will be expecting messages sent by the server to be in JSON format. Since our ServerEndpoint is directly sending instances of type Message we must define an Encoder to convert them into a JSON String:
package com.byteslounge.websockets;

import javax.json.Json;
import javax.json.JsonObject;
import javax.websocket.EncodeException;
import javax.websocket.Encoder;
import javax.websocket.EndpointConfig;

public class MessageEncoder implements Encoder.Text<Message> {

  @Override
  public String encode(Message message) throws EncodeException {

    JsonObject jsonObject = Json.createObjectBuilder()
        .add("subject", message.getSubject())
        .add("content", message.getContent()).build();
    return jsonObject.toString();

  }

  @Override
  public void init(EndpointConfig ec) {
    System.out.println("MessageEncoder - init method called");
  }

  @Override
  public void destroy() {
    System.out.println("MessageEncoder - destroy method called");
  }

}
既然我们定义这个编码器在我们的服务器端点使用,所有由这个端点发送的消息就会通过这个编码器.此编码器拿到了由这个端点发送的Message实例,并将它转成JSON格式.
The encoder must implement the javax.websocket.Encoder interface. The implemented interface methods are kind of self-explanatory.
编码器必须实现的javax.websocket.Encoder接口。实现的接口方法都是不言自明的。
5. The Decoder
5.解码器.
Now we need a decoder, ie. the component that will receive JSON messages from connected clients and convert them into Message instances:
现在我们还需要一个解码器,这个组件将会接收来自于连接到的客户端的消息,并将它们转成Message实例.
package com.byteslounge.websockets;

import java.io.StringReader;

import javax.json.Json;
import javax.json.JsonObject;
import javax.websocket.DecodeException;
import javax.websocket.Decoder;
import javax.websocket.EndpointConfig;

public class MessageDecoder implements Decoder.Text<Message> {

  @Override
  public Message decode(String jsonMessage) throws DecodeException {

    JsonObject jsonObject = Json
        .createReader(new StringReader(jsonMessage)).readObject();
    Message message = new Message();
    message.setSubject(jsonObject.getString("subject"));
    message.setContent(jsonObject.getString("content"));
    return message;

  }

  @Override
  public boolean willDecode(String jsonMessage) {
    try {
      // Check if incoming message is valid JSON
      Json.createReader(new StringReader(jsonMessage)).readObject();
      return true;
    } catch (Exception e) {
      return false;
    }
  }

  @Override
  public void init(EndpointConfig ec) {
    System.out.println("MessageDecoder -init method called");
  }

  @Override
  public void destroy() {
    System.out.println("MessageDecoder - destroy method called");
  }

}
As we can see the decoder converts a JSON textual message into an instance of type Message. After this step the message will finally be delivered to the ServerEndpoint in the expected format.
正如我们可以看到的解码器将一个JSON文本消息转成一个Message类型实例.紧跟着下一步,这条消息最终使用期望的格式发送到服务器端点.
The decoder must implement the javax.websocket.Decoder interface.
这个解码器必须实现javax.websocket.Decoder接口
The method willDecode is called previously than decode method and is used to determine if the message should really be decoded. In this example we are just checking if the message sent by the client is valid JSON.
比decode方法要早调用的willDecode方法,并且它用来决定这条消息是否应该真正要被解码.在这个例子,我们只是检查由客户端发送的消息是不是有效的JSON.
All other methods are kind of self-explanatory.
所有其它的方法都是不言自明的.
6. Client side
6.客户端
Now we need to write the client-side of our test application:
现在我们需要编写我们测试应用的客户端.
<!DOCTYPE html>
<html>
<head>
<title>Testing websockets</title>
</head>
<body>
  <div>
    <span>Subject:</span>
    <input id="subject" type="text" />
    <br />
    <span>Content:</span>
    <input id="content" type="text" />
  </div>
  <div>
    <input type="submit" value="Send message" onclick="send()" />
  </div>
  <div id="messages"></div>
  <script type="text/javascript">
    var webSocket =
      new WebSocket('ws://localhost:8080/byteslounge/websocket');

    webSocket.onerror = function(event) {
      onError(event);
    };

    webSocket.onopen = function(event) {
      onOpen(event);
    };

    webSocket.onmessage = function(event) {
      onMessage(event);
    };

    function onMessage(event) {
      var json = JSON.parse(event.data);
      document.getElementById('messages').innerHTML
        = '<br />Received server response!'
        + '<br />Subject: ' + json.subject
        + '<br />Content: ' + json.content;
    }

    function onOpen(event) {
      alert('Connection established');
    }

    function onError(event) {
      alert('Error');
    }

    function send() {
      var subject = document.getElementById('subject').value;
      var content = document.getElementById('content').value;
      var json = {
        'subject' : subject,
        'content' : content
      };
      webSocket.send(JSON.stringify(json));
      return false;
    }
  </script>
</body>
</html>
Similarly to what we have done in the previous tutorials - as stated in this article Introduction section - we will use this sample page in order to interact with our ServerEndpoint.
和我们之前完成的教程一样,在这篇文章中介绍部分的描述,我们将会使用这个示例页与我们的服务器端点进行交互.
There are two input fields, one for inserting the message subject and the other for inserting the message content.
有两个输入字段,一个是插入消息的主题和另一个插入消息的内容.
When the user presses the "Send message" button the input fields content will be converted into a textual JSON message and sent through the websocket. The ServerEndpoint together with the Encoder and the Decoder will produce a message response and send it back to the client.
当用户按下"Send Message"按钮,输入字段内容就会转成文本JSON消息,并通过websocket发送.服务器端点和编码器,解码器一起产生一个消息响应,并发送回到客户端.
Finally the message received from the server in JSON format will be processed by the client and presented to the user.
最后接收了来自于服务器使用了JSON格式的消息会由客户端处理,并呈现给用户.
7. Testing
7.测试
Now we deploy the application and access the following URL:
现在我们部署此应用并访问以下URL:
http://localhost:8080/byteslounge/page.html
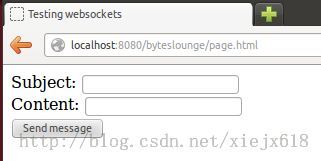
The following page will be presented:
将呈现以下页面
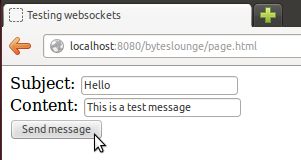
Now we fill the details and press the Send button:
现在,我们填写的详细信息,然后按“发送”按钮:
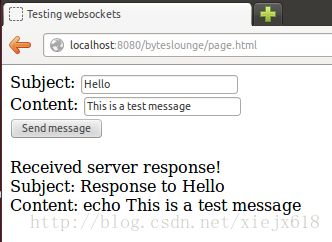
We will receive the response from the server:
我们将收到来自于服务器的响应:
8. Conclusion
8.概括.
As we have seen Encoders and Decoders are very convenient to convert messages in some format that the client understands into Java objects of arbitrary complexity. The message exchanging format may be whatever format that suits your needs.
正如我们已经看到的编码器和解码器都非常方便将一些客户端能理解的格式的消息转成任意复杂的Java对象.消息交换格式可以是任何适合你需要的格式.
In this concrete example we used JSON but you may use any other format like XML or even a completely custom format. Even pure binary messages may be used but that will be covered in another tutorial.
在这个具体的例子中,我们使用JSON,但是你可以使用任何其它格式.如XML或者甚至是一种完全自定义的格式.即使纯二进制消息可以使用,但那将会在另一个教程提到.
9. Downloadable sample
9.下载的示例.
The example source code is available for download at the end of this page. The test was executed in Glassfish 4 (you will need a Java EE 7 compliant application server).
这个例子源码在本页的末尾可供下载.这个测试是执行在Glassfish4(你将需要一个JavaEE 7兼容应用服务器).
Download source code from this tutorial
Download link(下载链接): java-ee-html5-websockets-encoder-and-decoder-example.zip


