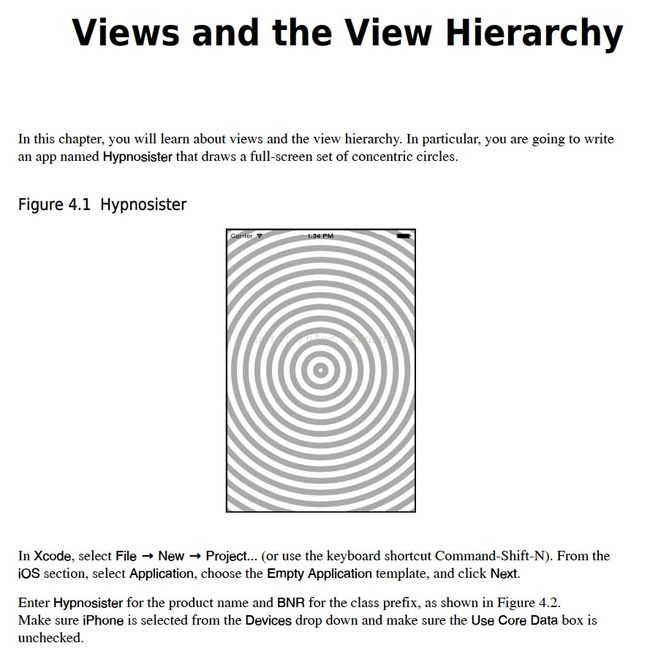
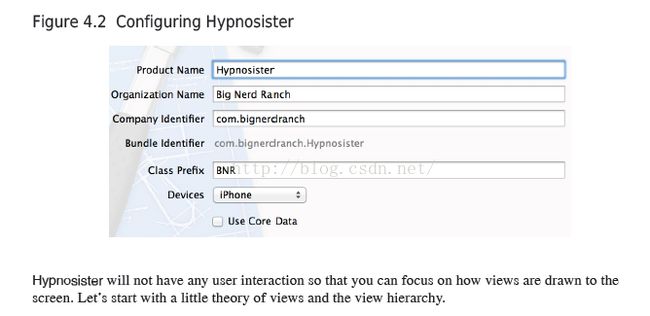
4 views
一,介绍ui-framework
基础的视图组件view, 提供视图和事件功能;
介绍了以UIWindow为根节点的视图树
二,自定义view
覆盖drawRect方法
三,介绍2d渲染库
ui-framework提供绘制和事件的功能,而view是ui-framework的基础。
首先了解视图的原理和视图层级结构。
View Basics
• A view is an instance of UIView or one of its subclasses.
• A view knows how to draw itself.
• A view handles events, like touches.
• A view exists within a hierarchy of views. The root of this hierarchy is the application’s window.
1,视图是UIView或者它子类的一个实例
2,视图知道如何去绘制?
3,视图处理事件
4,视图存在一个view的层级结构中。 最底层的是应用程序的窗口。
所有的ui-framework都有2个特性,渲染和事件。
In Chapter 1, you created four views for the Quiz app: two instances of UIButton and two instances
of UILabel. You created and configured these views in Interface Builder, but you can also create views
programmatically. In Hypnosister, you will create views programmatically.
即可以在Interface Builder中创建视图,也可以用代码的方式创建视图。本章用代码的方式。The View Hierarchy
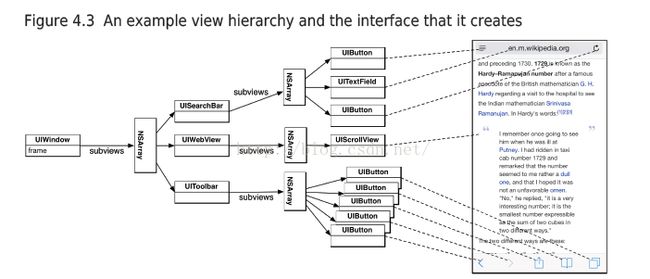
Every application has a single instance of UIWindow that serves as the container for all the views in the
application. The window is created when the application launches. Once the window is created, you
can add other views to it.
每一个ios应用都会创建一个唯一的UIWindow,它用于包含所有的视图(类似于Android PhoneWindow, 但android是每个
activity都对应一个,ios则一个应用只有一个);这个UIWindow在程序启动的时候就会创建。当窗口
创建后,你可以往里面添加view, window就是view容器,它是所有view的根节点(那多页面在IOS中是怎么处理的?)
When a view is added to the window, it is said to be a subview of the window. Views that are subviews
of the window can also have subviews, and the result is a hierarchy of view objects with the window at
its root.
当一个view加入一个这个窗口时,它就是这个窗口的子视图。 窗口的子视图同样可以添加自己的子视图,
结果是这个视图的层级结构的根节点是window.
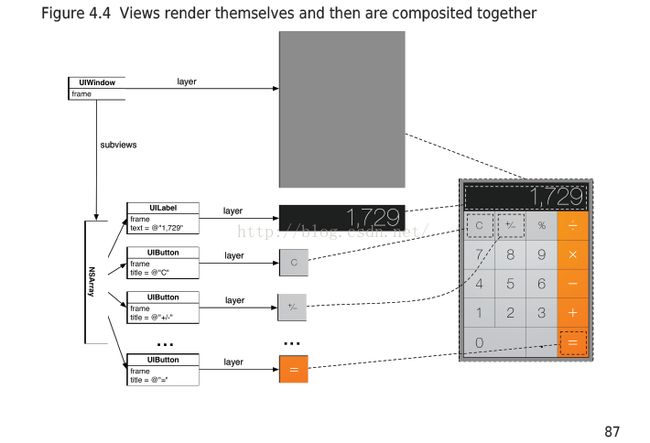
Once the view hierarchy has been created, it will be drawn to the screen. This process can be broken
into two steps: (screen对应一个屏幕,在ios当有外接屏幕连接时,也会收到相关的信息)
当这个视图层级结构创建之后,它就即将要绘制到screen中。这个过程可以分为2个阶段。
• Each view in the hierarchy, including the window, draws itself. It renders itself to its layer, which
is an instance of CALayer. (You can think of a view’s layer as a bitmap image.)
层级结构中的所有view,包含window,开始渲染自己。它渲染到自己的layer中,这个layer的类型是CALayer。(
你可以把它想象成一块buffer)
• The layers of all the views are composited together on the screen.
最终所有views会合成一张图片,并在桌面中显示
Figure 4.4 shows another example view hierarchy and the two drawing steps.
instance, in Quiz, you created instances of UILabel and told them what text to display, but you did not have to tell them how to draw text.
Apple’s developers took care of that.
UIButton 以及UILabel 在ios framework以及实现了绘制方法。
Apple, however, does not provide a class whose instances know how to draw concentric circles. Thus,
for Hypnosister, you are going to create your own UIView subclass and write custom drawing code.
但在Hypnosister程序中,需要实现绘制的方法。
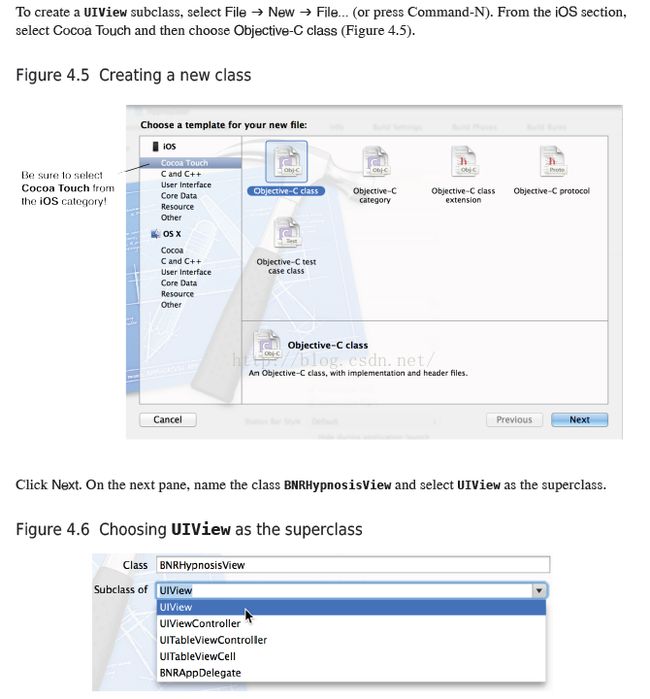
创建一个UiView对象;
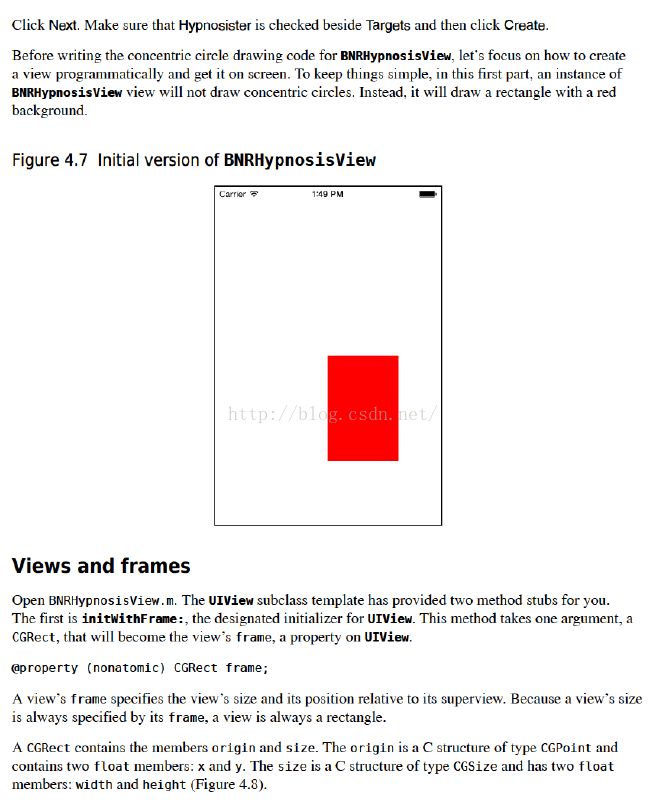
Views And FramesUIView视图的子类模板都会2个方法;一个是initWithFrame, 这个是默认的构造函数, 它提供了一个参数CGRect, 我们将会把它保存到一个property中;一个视图的frame提供了视图的大小和相对其父视图的位置。 因为一个视图的大小都是由frame指定的,所以视图总是一个矩形。
CGRect类包含2个成员origin和size; origin的类型是CGPoint,包含2个float成员x和y; 坐标是相对于父组件的值;size的类型是CGSize并包含2个float成员:width和height;
Open BNRAppDelegate.m. At the top of this file, import the header file for BNRHypnosisView.#import "BNRAppDelegate.h"
#import "BNRHypnosisView.h"
@implementation BNRAppDelegate
application:didFinishLaunchingWithOptions:. After the line that creates the window, create a CGRect that will be the frame of a BNRHypnosisView.
在BNRAppDelegate.m的application:didFinishLaunchingWithOptions:中创建一个CGRect,用于设置BNRHypnosisView的frame
Next, create an instance of BNRHypnosisView and set its backgroundColor property to red. Finally, add the BNRHypnosisView as a subview of the window to make it part of the view hierarchy.
下一步,创建一个BNRHypnosisView实例,并且设置它的背景属性为红色,并将其添加到window中,它会成为整个视图树的一部分。
- (BOOL)application:(UIApplication *)application
didFinishLaunchingWithOptions:(NSDictionary *)launchOptions
{
//创建应用程序窗口
//UIWindow继承于UIView
self.window = [[UIWindow alloc] initWithFrame:[[UIScreen mainScreen] bounds]];
//创建第一个视图
CGRect firstFrame = CGRectMake(160, 240, 100, 150);
BNRHypnosisView *firstView = [[BNRHypnosisView alloc] initWithFrame:firstFrame];
firstView.backgroundColor = [UIColor redColor];
[self.window addSubview:firstView];
//设置窗口背景色
self.window.backgroundColor = [UIColor whiteColor];
[self.window makeKeyAndVisible];
return YES;
}
(类似于linux应用,先创建window,再创建view; 而android每个activity都会有对应的window和views)
A structure is not an Objective-C object, so you cannot send messages to a CGRect. To create one, you
used CGRectMake() and pass in the values for the origin.x, origin.y, size.width and size.height.
结构体并非oc对象,所以无法向它发消息;可以使用CGRectMake()创建一个对象,这个方法应该是一个c的方法。
A CGRect is small compared to most objects, so instead of passing a pointer to it, you just pass the
entire structure. Thus, initWithFrame: expects a CGRect, not a CGRect *.
CGRect占用空间比较小,所以可以直接传递整个结构体来代替传递指针,而不会太多得消耗内存。
所以initWithFrame的参数是CGRect,而不是CGRect*
To set the backgroundColor, you used the UIColor class method redColor. This is a convenience
method; it allocates and initializes an instance of UIColor that is configured to be red. There are a
number of UIColor convenience methods for common colors, such as blueColor, blackColor, and
clearColor.
创建一个颜色的方法是,调用UIColor类的redColor,它是一个便利的方法来创建一个颜色对象。
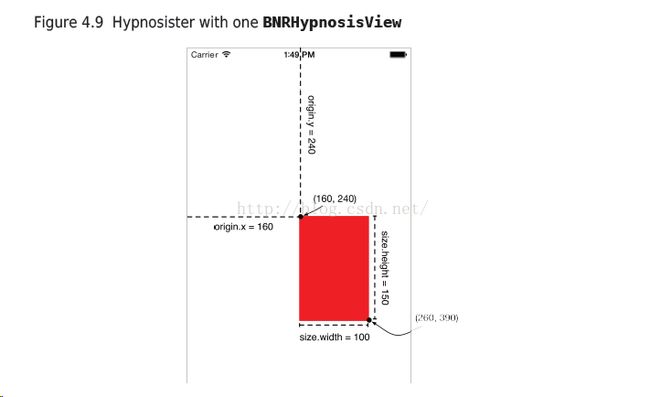
Build and run the application. The red rectangle is the instance of BNRHypnosisView. Because the
BNRHypnosisView’s frame’s origin is (160, 240), its top left corner is 160 points to the right and 240
points down from the top-left corner of the window (its superview). The view stretches 100 points to
the right and 150 points down from its origin, in accordance with its frame’s size.
编译并运行程序。这个红色的方块就是BNRHyposisView的实例。因为它的frame的origin是160,240; 其中160是相对于
父组件左边的距离,240是相对于父组件原点上方的值。而100,150是方块的宽、高。
Note these values are in points, not pixels. If the values were in pixels, then they would not be
consistent across displays of different resolutions (i.e., Retina vs. non-Retina).
要注意的是,这些值都是point而不是pixel. 如果是pixel的话,就必须和屏幕相对应的分辨率对应。
A single point is a relative unit of a measure; it will be a different number of pixels depending on how many pixels
there are in the display. Sizes, positions, lines, and curves are always described in points to allow for
differences in display resolution.
point是一个分辨率独立点,根据屏幕像素的不同它的值也不同。
On a Retina Display, a pixel is half a point tall and half a point wide by default. On a non-Retina
Display, one pixel is one point tall and one point wide by default. When printing to paper, an inch is 72
points long.
在retina屏,一个point对应2个像素,非retina屏则对应一个像素,所以retina屏要清晰点。(每个像素的颜色是唯一的,
渲染的像素点越多则越清晰)
In Xcode’s console, notice the comment informing you that “Application windows are expected to have
a root view controller at the end of application launch.” A view controller is an object that controls
some set of an application’s view hierarchy, and most iOS apps have one or more view controllers.
Hypnosister, however, is simple enough that it does not need a view controller, so you can ignore this
comment. You will learn about view controllers in Chapter 6.
Take a look at the view hierarchy that you have created:
在xcode的console,发现有下面的提示:需要在程序启动过程结束前创建一个root-view controller。一个视图控制器主要
用于控制视图层级结构,基本上每一个ios应用都会有一个或者多个控制器。但是,我们现在的这个例子太简单了,不需要
用到这个。
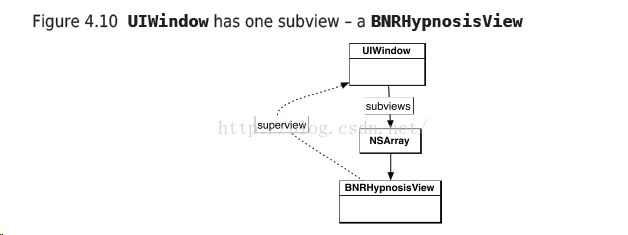
Take a look at the view hierarchy that you have created:
图4.10
Every instance of UIView has a superview property. When you add a view as a subview of another
view, the inverse relationship is automatically established. In this case, the BNRHypnosisView’s
superview is the UIWindow. (To avoid a strong reference cycle, the superview property is a weak
reference.)
每一个uiview都会有superView属性。当你加一个视图加入到另外一个视图时,superView的属性也就设置了。
(为了避免出现强引用环,所以superview是一个弱引用)
Let’s experiment with your view hierarchy. In BNRAppDelegate.m, create another instance of
BNRHypnosisView with a different frame and background color.
...
[self.window addSubview:firstView];
CGRect secondFrame = CGRectMake(20, 30, 50, 50);
BNRHypnosisView *secondView = [[BNRHypnosisView alloc] initWithFrame:secondFrame];
secondView.backgroundColor = [UIColor blueColor];
[self.window addSubview:secondView];
self.window.backgroundColor = [UIColor whiteColor];
...
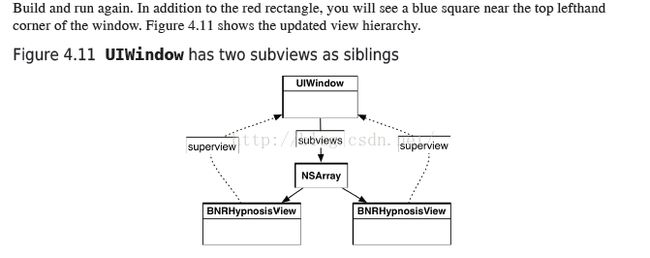
Build and run again. In addition to the red rectangle, you will see a blue square near the top lefthand
corner of the window. Figure 4.11 shows the updated view hierarchy.
同样的方法,添加了另外一个蓝色的方块。
A view hierarchy can be deeper than two levels. Let’s make that happen by adding the second instance
of BNRHypnosisView as a subview of the first instance of BNRHypnosisView instead of the window:
view树的层级可以超过2层。 让我们新创建一个新的BNRHypnosisView,并作为第一个view的字视图。
(If the blue instance of BNRHypnosisView looks smaller than it did previously, that is just an optical
illusion. Its size has not changed.)
如果蓝色方块看起来比第一次的小,那是视觉上的错误,实际上大小并没有改变。
Now that you have had some experience with the view hierarchy, remove the second instance of
BNRHypnosisView before continuing.
现在你对view有了一定的理解了,进入下一单元之前,先删除之前创建的第二个BNRHypnosisView
Custom Drawing in drawRect:
So far, you have subclassed UIView, created instances of the subclass, inserted them into the view
hierarchy, and specified their frames and backgroundColors. In this section, you will write the custom
drawing code for BNRHypnosisView in its drawRect: method.
自定义视图,要重载它的drawRect方法(类似于android的 onPaint)
The drawRect: method is the rendering step where a view draws itself onto its layer. UIView subclasses
override drawRect: to perform custom drawing. For example, the drawRect: method of UIButton
draws light-blue text centered in a rectangle.
视图绘制的时候就会调用drawRect方法。
The first thing that you typically do when overriding drawRect: is get the bounds rectangle of the view.
The bounds property, inherited from UIView, is the rectangle that defines the area where the view will
draw itself.
第一件事情就是得到view的bounds属性,这个属性继承于UIView,它定义了view的渲染区域。
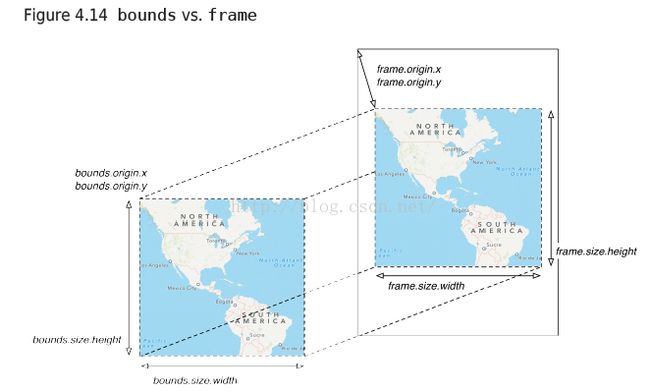
Each view has a coordinate system that it uses when drawing itself. The bounds is a view’s rectangle in
its own coordinate system. The frame is the same rectangle in its superview’s coordinate system.
每个view绘制自己的时候都会使用一个坐标系系统,bounds是基于自身的坐标系系统,而frame是基于
父视图的一个相同大小的方块。
You might be wondering, “Why do we need another rectangle when we already have frame?”
The frame and bounds rectangles have distinct purposes. A view’s frame rectangle is used during
compositing to lay out the view’s layer relative to the rest of the view hierarchy. The bounds rectangle
is used during the rendering step to lay out detailed drawing within the boundaries of the view’s layer.
你会觉得很奇怪,frame和bounds的属性有什么区别?
bounds用户渲染自己的时候的属性,是基于自己的坐标系系统的。
frame是用于在合成的过程中,视图的layer相对于其他视图树的布局大小(合成过程中是使用layer)
frame和bound的区别是相对的坐标系不同。
You can use the bounds property of the window to define the frame for a full-screen instance of
BNRHypnosisView.
In BNRAppDelegate.m, update firstView’s frame to match the bounds of the window.
- (BOOL)application:(UIApplication *)application
didFinishLaunchingWithOptions:(NSDictionary *)launchOptions
{
self.window = [[UIWindow alloc] initWithFrame:[[UIScreen mainScreen] bounds]];
// Override point for customization after application launch
CGRect firstFrame = self.window.bounds;
BNRHypnosisView *firstView = [[BNRHypnosisView alloc] initWithFrame:firstFrame];
[self.window addSubview:firstView];
self.window.backgroundColor = [UIColor whiteColor];
[self.window makeKeyAndVisible];
return YES;
}
Build and run the application, and you will be greeted with a full-sized view with a red background.
把window的bounds赋值给view的frame,这样就可以得到全屏的视图。
Drawing a single circle
You are going to ease into the drawing code by drawing a single circle – the largest that will fit within
the bounds of the view.
先画这个矩形内的最大的一个圆。
In BNRHypnosisView.m, add code to drawRect: that finds the center point of bounds.
- (void)drawRect:(CGRect)rect
{
CGRect bounds = self.bounds;
// Figure out the center of the bounds rectangle
CGPoint center;
center.x = bounds.origin.x + bounds.size.width / 2.0;
center.y = bounds.origin.y + bounds.size.height / 2.0;
}
计算出圆心。
Next, set the radius for your circle to be half of the smaller of the view’s dimensions. (Determining the
smaller dimension will draw the right circle in portrait and landscape orientations.)
- (void)drawRect:(CGRect)rect
{
CGRect bounds = self.bounds;
// Figure out the center of the bounds rectangle
CGPoint center;
center.x = bounds.origin.x + bounds.size.width / 2.0;
center.y = bounds.origin.y + bounds.size.height / 2.0;
// The circle will be the largest that will fit in the view
float radius = (MIN(bounds.size.width, bounds.size.height) / 2.0);
}
接着设置圆的半径,这个决定于矩形长和宽小的值。
UIBezierPath
贝塞尔曲线
The next step is to draw the circle using the UIBezierPath class. Instances of this class define and
draw lines and curves that you can use to make shapes, like circles.
通过UIBezierPath类可以绘制线和曲线。
First, create an instance of UIBezierPath.
- (void)drawRect:(CGRect)rect
{
...
// The circle will be the largest that will fit in the view
float radius = (MIN(bounds.size.width, bounds.size.height) / 2.0);
UIBezierPath *path = [[UIBezierPath alloc] init];
}
The next step is defining the path that the UIBezierPath object should follow. How do you define
a circle-shaped path? The best place to find an answer to this question is the UIBezierPath class
reference in Apple’s developer documentation。
如何使用UIBezierPath绘制圆? 请查看apple文档。
Using the developer documentation
From Xcode’s menu, select Help → Documentation and API Reference. You can also use the keyboard
shortcut Option-Command-? (be sure to hold down the Shift key, too, to get the ‘?’).
(When you access the documentation, Xcode may try to go get the latest for you from Apple. You may
be asked for your Apple ID and password.)
使用Help->Documentation和Api Reference可以查看api介绍,也可以使用快捷键。
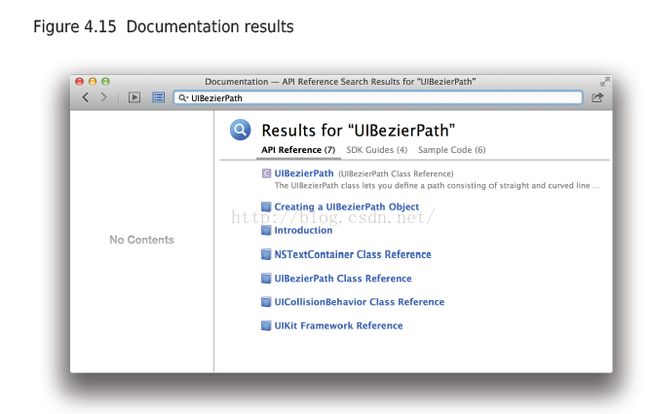
When the documentation browser opens, search for UIBezierPath. You will be offered several results.
Find and select UIBezierPath Class Reference.
打开后,搜索UIBezierPath获取类的介绍。
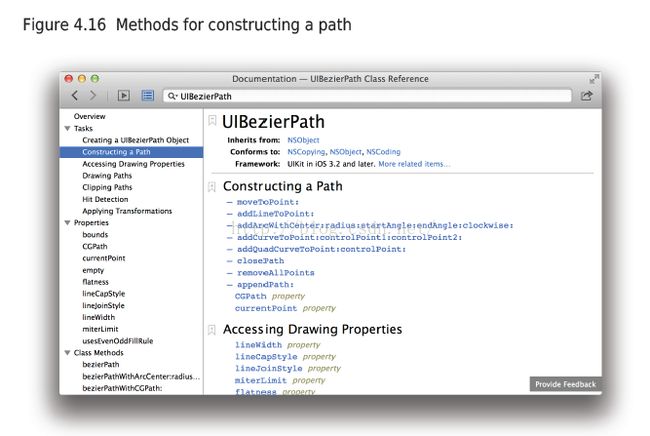
This page opens to an overview of the class, which is interesting, but let’s stay focused on your circleshaped
path question. The lefthand side of the reference is the table of contents. (If you do not see a
table of contents, select the icon at the top left of the browser.)
In the table of contents, find the Tasks section. This is a good place to begin the hunt for a method
that does something specific. The first task is Creating a UIBezierPath Object. You have already done
that, so take a look at the second task: Constructing a Path. Select this task, and you will see a list of
relevant UIBezierPath methods.
在这个页面中,你可以打开对应类的content目录,在这个目录中,选中task条目(从task条目开始更好得入门),你可以看到
UIBezierPath类的很多相关方法。
A likely candidate for a circular path is
addArcWithCenter:radius:startAngle:endAngle:clockwise:. Click this method to see more details
about its parameters. You have already computed the center and the radius. The start and end angle
values are in radians.
可以看到addArcWithCenter这个类估计比较适合画一个圆;它的参数包括半径、起始角度、结束角度和旋转方向。
起始和结束角度都是弧度的单位。
To draw a circle, you will use 0 for the start angle and M_PI * 2 for the end
angle. (If your trigonometry is rusty, you can take our word on this or click the Figure 1 link within the
Discussion of this method’s documentation to see a diagram of the unit circle.) Finally, because you are
drawing a complete circle, the clockwise parameter will not matter. It is a required parameter, however,
so you will need to give it a value..
指定初始角度为0,终止角度为2π,这样就可以画圆了。
In BNRHypnosisView.m, send a message to the UIBezierPath that defines its path.
- (void)drawRect:(CGRect)rect
{
CGRect bounds = self.bounds;
// Figure out the center of the bounds rectangle
CGPoint center;
center.x = bounds.origin.x + bounds.size.width / 2.0;
center.y = bounds.origin.y + bounds.size.height / 2.0;
// The circle will be the largest that will fit in the view
float radius = (MIN(bounds.size.width, bounds.size.height) / 2.0);
UIBezierPath *path = [[UIBezierPath alloc] init];
// Add an arc to the path at center, with radius of radius,
// from 0 to 2*PI radians (a circle)
[path addArcWithCenter:center
radius:radius
startAngle:0.0
endAngle:M_PI * 2.0
clockwise:YES];
}
You have defined a path, but you have not drawn anything yet. Back in the UIBezier class reference,
find and select the Drawing Paths task. From these methods, the best choice is stroke. (The other
methods either fill in the entire shape or require a CGBlendMode that you do not need.)
In BNRHypnosisView.m, send a message to the UIBezierPath that tells it to draw.
- (void)drawRect:(CGRect)rect
{
...
UIBezierPath *path = [[UIBezierPath alloc] init];
// Add an arc to the path at center, with radius of radius,
// from 0 to 2*PI radians (a circle)
[path addArcWithCenter:center
radius:radius
startAngle:0.0
endAngle:M_PI * 2.0
clockwise:YES];
// Draw the line!
[path stroke];
}
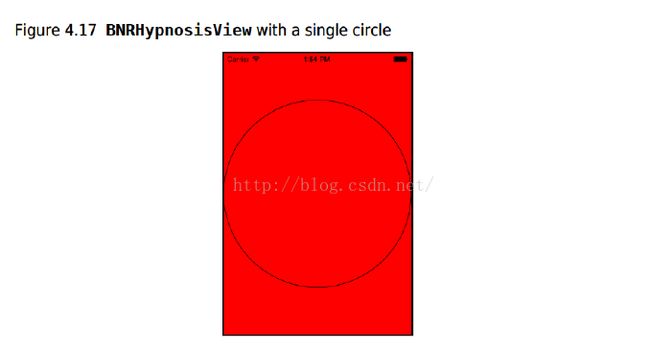
Build and run the application, and you will see a thin, black outline of a circle that is as wide as the
screen (or as tall if you are in landscape orientation).
你现在就能砍到一个细的,黑色的和屏幕大小差不多大的圆。但这和我们的需求有点距离。
可以设置圆的线宽,找到UIBezierPath 类的属性lineWidth,可以用来设置线宽。

但类并没有和颜色相关的属性,这时可以从类的overview中找到相关的线索,从table中切换到overview,在其中的第五
段可以看到下面的提示:可以通过UIColor类来设置stroke和颜色。
The UIColor class is linked, so you can click it to be taken directly to the UIColor class reference. In
UIColor’s Tasks section, select Drawing Operations and browse through the associated methods. For
your purposes, you could use either set or setStroke. You will use setStroke to make your code
more obvious to others.
直接点击UIColor的链接,跳转到UIColor类。你可以看到类的介绍,同样选择task章节查看绘制操作并查看相关的方法。
根据目标,可以选择set或者setStroke方法。
The setStroke method is an instance method, so you need an instance of UIColor to send it to. Recall
that UIColor has convenience methods that return common colors. You can see these methods listed
under the Class Methods section of the UIColor reference, including one named lightGrayColor.
Now you have the information you need. In BNRHypnosisView.m, add code to create a light gray
UIColor instance and send it the setStroke message so that when the path is drawn, it will be drawn in
light gray.
setStroke是一个实例的方法,所以需要创建UIColor类并发送消息。UIColor有便利的方法可以创建颜色,查看类的说明,
可以看到lightGrayColor这个颜色。
- (void)drawRect:(CGRect)rect
{
...
// Configure line width to 10 points
path.lineWidth = 10;
// Configure the drawing color to light gray
[[UIColor lightGrayColor] setStroke]; //类似于opengl的状态机,设置画笔的颜色
// Draw the line!
[path stroke];
}
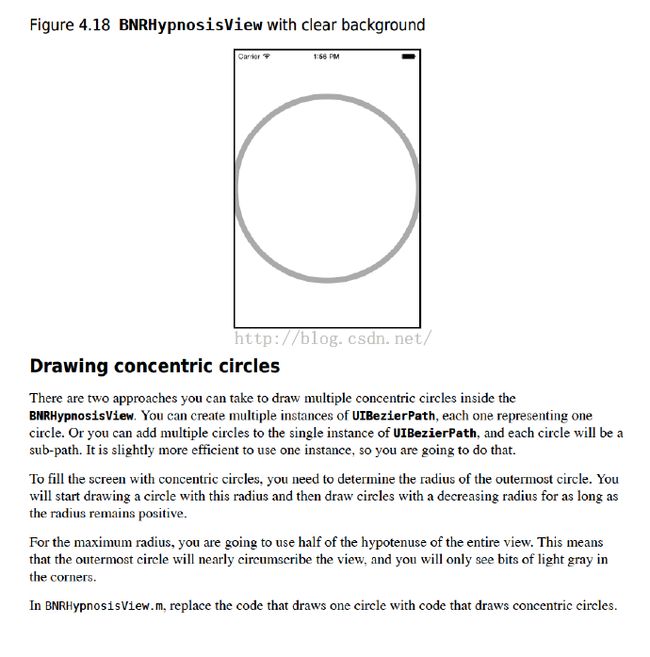
Build and run the application, and you will see a wider, light gray outline of a circle.
这样你就可以得到一个宽的,light gray的圆。
By now, you will have noticed that a view’s backgroundColor is drawn regardless of what drawRect:
does. Often, you will set the backgroundColor of a custom view to be transparent, or “clear-colored,”
so that only the results of drawRect: show.
目前为止,你可以注意到一个view的背景无法在drawRect方法中处理,所以对于自定义的视图,我们可以将view的背景设置为透明,
这样view显示的内容就是drawRect:中绘制的。
In BNRAppDelegate.m, remove the code that sets the background color of the view.
在BNRAppDelegate.m中,移除设置背景相关的代码。
BNRHypnosisView *firstView = [[BNRHypnosisView alloc] initWithFrame:firstFrame];
firstView.backgroundColor = [UIColor redColor]; //删除这一行
[self.window addSubview:view];
Then, in BNRHypnosisView.m, add code to initWithFrame: to set the background color of every
BNRHypnosisView to clear.
- (instancetype)initWithFrame:(CGRect)frame
{
self = [super initWithFrame:frame];
if (self) {
// All BNRHypnosisViews start with a clear background color
self.backgroundColor = [UIColor clearColor];
}
return self;
}
Build and run the application. Figure 4.18 shows the clear background and the resulting circle.
Drawing concentril circles
有2种方法可以画出同轴圆,一种是每个圆对应一个UIBezierPath类,一种是用一个UIBezierPath画多个圆。比较起来
当然第二种方法比较好。
To fill the screen with concentric circles, you need to determine the radius of the outermost circle.
You will start drawing a circle with this radius and then draw circles with a descreasing radius for as
long as the radius remains positive.
要画同轴圆,就要先决定最外层圆的半径,然后逐个得递减直到变为负值。
For the maximum radius, you are going to use half of the hypotenuse of the entire view. This means that
the outermost circle will nearly circumscribe the view, and you will only see bits of light gray in the
coners.
我们用整个视图的长宽求弦来作为半径,这就是说最外层的圆肯定有部分在视图外部。
如此我们就可以画出一个同轴圆。
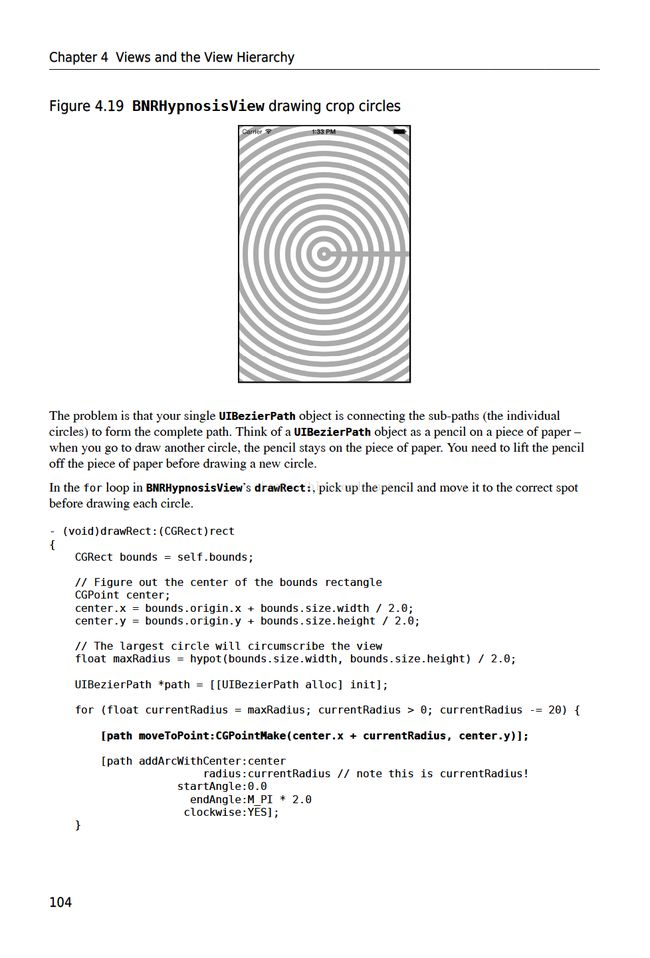
但这里有个问题:画完之后所有的圆都会通过一条线连在一起,原因就是画完一个圆后没有把画笔提起,导致画另外一个圆
时也会画它们之间的连线。
Bronze Challenge: Draw an Image
The challenge is to load an image from the filesystem and draw it on top of the concentric circles, as in
Figure 4.21.
这一章是介绍从本地系统中加载一张图片,并将其绘制在同心圆的上面。
Figure 4.21 Drawing an Image
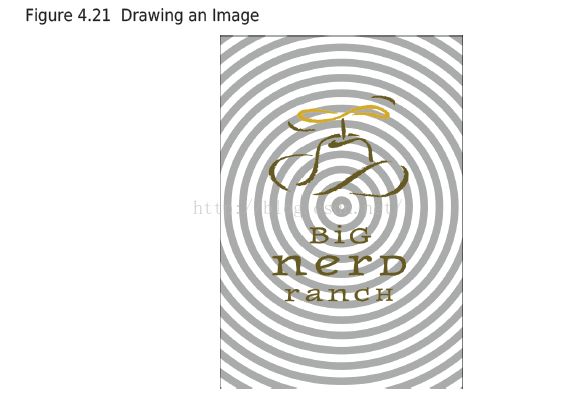
Find an image file. A PNG with some transparent parts would be especially interesting. (The zip file
you downloaded has logo.png that will work nicely.) Drag it into your Xcode project.
找张图片,如果一张透明的png图片将会更加有趣。
Creating a UIImage object from that file is one line:
UIImage *logoImage = [UIImage imageNamed:@"logo.png"];
使用UIImage创建一张图片。
In your drawRect: method, compositing it onto your view is just one more:
[logoImage drawInRect:someRect];
For the More Curious: Core Graphics
In general, the drawRect: method uses UIImage, UIBezierPath, and NSString instances to draw
images, shapes, and text, respectively.
在drawRect方法中使用UIImage来画图,使用UIBezierPath来画shape,使用NSString来绘制text;
Each of these classes implements at least one method that, when
executed in drawRect:, draws pixels to the layer of the view that was sent drawRect:.
上述的这些类都有至少有一个方法,当uiview发送drawRect消息时,都会往view的layer中绘制像素。
These classes make iOS drawing look simple and convenient. However, there is a lot going on
underneath the hood.
这些类封装了底层调用,所以Ios的代码看上去简洁和便利。
Drawing images in iOS – whether it is an image you will save as a JPEG or PDF or a layer that
represents a UIView – is the responsibility of the Core Graphics framework. The classes that you used
to perform drawing in this chapter, like UIBezierPath, wrap Core Graphics code into their methods
to ease drawing for the programmer.
在ios中绘制图片,不管是你想要保存图片成JPEG或者PGF,或者绘制到一个UIView的layer中(UIImage),它们都是
底层framework的代码已经封装好了。我们上层仅仅是使用了已经封装好的方法。
To truly understand how theses classes work and how images are
created, you should understand how Core Graphics does its job.
为了真实得理解这些类做了什么以及图片是如何创建的,你应该去理解底层的core graphics framework做了什么。
Core Graphics is a 2D drawing API written in C. As such, there are no Objective-C objects or methods,
but instead C structures and C functions that mimic object-oriented behavior. The most important Core
Graphics “object” is the graphics context, which really holds two things: the state of drawing, like the
current color of the pen and its line thickness, and the memory that is being drawn upon. A graphics
context is represented by “instances” of CGContextRef.
core-graphics是一个2d的渲染库,它的底层是用c实现的,但它模拟了一个面向对象的行为。这个库最重要的一个
对象时context,它保存了绘制的状态(类似于opengl的状态机),也保存了绘图的内存。
context类的类型是CGContextRef.
Right before drawRect: is sent to an instance of UIView, the system creates a CGContextRef for that
view’s layer. The layer has the same bounds as the view and some default values for its drawing state.
在drawRect消息发送给UIView之前,系统已经为view的layer创建了CGContextRef对象。这个Layer和view的
大小一样,并且已经被初始化了。
As drawing operations are sent to the context, the pixels in the layer are changed. After drawRect:
completes, the system grabs the layer and composites it to the screen.
当绘制的操作传送给context的时候,在Layer中的像素被改变了。当drawRect的操作完成后,
系统获取layer并将其合成到屏幕中(其实是由合成器完成这一过程的,合成器获取)
The drawing classes you used in this chapter all know how to call Core Graphics functions that change
the drawing state and issue drawing operations on the appropriate CGContextRef. For example, sending
setStroke to an instance of UIColor will call functions that change the drawing state of the current
context. So, these two chunks of code are equivalent:
这章介绍的所有绘图类都知道如果调用core-graphics方法,改变对应CGContextRef的state和提交绘制方法。
比如UIColor调用setStroke方法会改变当前context的drawing state.
[[UIColor colorWithRed:1.0 green:0.0 blue:1.0 alpha:1.0] setStroke];
UIBezierPath *path = [UIBezierPath bezierPath];
[path moveToPoint:a];
[path addLineToPoint:b];
[path stroke];
Is equivalent to these lines:
CGContextSetRGBStrokeColor(currentContext, 1, 0, 0, 1);
CGMutablePathRef path = CGPathCreateMutable();
CGPathMoveToPoint(path, NULL, a.x, a.y);
CGPathAddLineToPoint(path, NULL, b.x, b.y);
CGContextAddPath(currentContext, path);
CGContextStrokePath(currentContext);
CGPathRelease(path);
The Core Graphics functions that operate on the context, like CGContextSetRGBStrokeColor, take a
pointer to context that they will modify as their first argument. You can grab a pointer to the current
context in drawRect: by calling the function UIGraphicsGetCurrentContext. The current context is
an application-wide pointer that is set to point to the context created for a view right before that view is
sent drawRect:.
- (void)drawRect:(CGRect)rect
{
CGContextRef currentContext = UIGraphicsGetCurrentContext();
CGContextSetRGBStrokeColor(currentContext, 1, 0, 0, 1);
CGMutablePathRef path = CGPathCreateMutable();
CGPathMoveToPoint(path, NULL, a.x, a.y);
CGPathAddLineToPoint(path, NULL, b.x, b.y);
CGContextAddPath(currentContext, path);
CGContextStrokePath(currentContext);
CGPathRelease(path);
CGContextSetStrokeColorWithColor(currentContext, color);
Anything you can do with UIBezierPath and UIColor can be done directly in Core Graphics. In
fact, there are C structures that have the same behavior as these classes (CGMutablePathRef and
CGColorRef). However, it is usually easier to work with the Objective-C counterparts.
任何可以用UIBezierPath和UIColor做的事情都可以直接在core-graphics中完成。事实上,这些类都会在
core-graphics中有对应的数据结构(分别是CGMutablePathRef和CGColorRef). 但oc中提供的类使用
起来更加方便。
Also, there are some things you just cannot do yet without dropping down to Core Graphics, like
drawing gradients. However, because you remembered that types from frameworks all have the same
prefix, you can search the documentation for types beginning in CG to find out what is available to you.
目前core-graphics中的一些功能在framework中无法找到。比如绘制gradients(渐进色)。
但是你只要记得,在CG中的类都有相同的前缀,所以你可以根据文档找到相关的功能实现。
You might be wondering why many of the Core Graphics types have a Ref after them. Every Core
Graphics type is a structure, but some mimic the behavior of objects by being allocated on the heap.
Therefore, when you create one of these Core Graphics “objects”, you are returned a pointer to their
address in memory.
你可能会好奇为什么core-graphics中的一些类都带有Ref前缀。所有CG中的类型都是结构体,但是为了模拟
对象的行为,所以在heap中申请内存。因此,当你创建CG中的对象,实际上是获取它的指针。
Each Core Graphics structure that is allocated in this way has a type definition that incorporates the
asterisk (*) into the type itself. For example, there exists a structure CGColor (that you never use) and
a type definition CGColorRef that means CGColor * (that you always use). This convention makes it
easy for a programmer to glance at code and determine whether or not the variable is a C structure
masquerading as an object or an Objective-C object that you can send messages to.
指针是用*号来标识的。比如CGColorRef实际上是CGColor *. 这种方法可以让你看清类是CG的还是OC的(就是从
类的名字是否带有Ref)。
Another point of confusion for programmers in Core Graphics is that some types do not have a Ref or
an asterisk, like CGRect and CGPoint. These types are small data structures that can live on the stack, so
there is no need to pass a pointer to them.
还有一些CG中的类,比如CGRect和CGPoint,这些类都是有比较小的数据结构,可以在stack中分配内存,所有
这些类没有相关的Ref类。
However, some Core Graphics types are much more involved than simply holding onto a few floats –
they actually have pointers to other Core Graphics objects. These “objects” will take strong ownership
of the objects they point to, but ARC will not track this ownership.
但是,在CG中的大部分结构体都有比较复杂的数据结构,实际上结构体中的值还可能指向另外一个CG对象。
而且这些都是强引用,但ARC并不能跟踪这些对象。
Instead, you must manually release
ownership of these types of objects when you are done with them. The rule is: if you create a Core
Graphics object with a function that has the word Create or Copy in it, you must call the matching
Release function and pass a pointer to the object as the first argument.
你必须要手动得释放这些对象的内存。规则是:当你使用带有Create或者Copy字段的方法去创建一个CG对象,
那么你必须要调用相关的释放内存的方法,并将对象的指针作为第一个参数。
One final note about Core Graphics: It exists on the Mac, too. You can write code, as done in the open
source core-plot framework, that will work on both iOS and OS X.
还有一个好处是,如果你使用CG,那么这代码也可以在mac上运行。
(Core graphics是渲染库)
Gold Challenge: Shadows and Gradients
At this time, adding drop shadows and drawing with gradients can only be done using Core Graphics.
To create a drop shadow, you install a shadow on the graphics context. After that, anything opaque
that you draw will have a drop shadow. The shadow has an offset (which is expressed with an CGSize),
and a blur in points. Here is the declaration of the method used to install the shadow on the graphics
context:
目前,添加drop阴影只能在CG中实现。 创建它的方法是先在context上安装阴影(应该是一个context状态),接着所有不透明的绘制的东西
都有drop阴影的效果。 阴影有一个offset和一个blur模糊系数。 下面的结构体用于声明阴影:
void CGContextSetShadow (
CGContextRef context,
CGSize offset,
CGFloat blur);
(There is a version that takes a color, but you almost always want a dark shadow.)
(还有一个结构体是可以添加一个color, 这样就可以实现一个暗色阴影)
There is no unset shadow function. Thus, you will need to save the graphics state before setting the
shadow and then restore it after setting the shadow. It looks something like this:
(绘制阴影前要保存context的状态,这样就很容易在绘制阴影和不绘制阴影之间切换)
CGContextSaveGState(currentContext);
CGContextSetShadow(currentContext, CGSizeMake(4,7), 3);
// Draw stuff here, it will appear with a shadow
CGContextRestoreGState(currentContext);
// Draw stuff here, it will appear with no shadow
The first part of the challenge is to put a drop shadow on the image you composited onto the view in
the previous challenge.
第一个挑战是在在上一章节绘制的图片上实现drop阴影的效果。
Figure 4.22 Drop Shadow
下面介绍Gradients渐进色
Gradients allow you to do shading that moves smoothly through a list of colors. The CGGradientRefhas a list of colors and you ask it to draw the list either linear or radial. It looks like this:
Gradients可以实现阴影的颜色渐进效果。CGGradientRef可以包含一组颜色,并且可以设置成绘制线性的或者
非线性的。
CGFloat locations[2] = { 0.0, 1.0 }; //设置渐进色的起始点
CGFloat components[8] = { 1.0, 0.0, 0.0, 1.0, // Start color is red
1.0, 1.0, 0.0, 1.0 }; // End color is yellow //设置渐进色颜色的起始颜色
CGColorSpaceRef colorspace = CGColorSpaceCreateDeviceRGB(); //分配颜色内存?
CGGradientRef gradient = CGGradientCreateWithColorComponents(colorspace, components,
locations, 2);
CGPoint startPoint = ...;
CGPoint endPoint = ...;
CGContextDrawLinearGradient(currentContext, gradient, startPoint, endPoint, 0);
CGGradientRelease(gradient);
CGColorSpaceRelease(colorspace);
The last argument to CGContextDrawLinearGradient() determines what happens before the start point
and after the end point. If you want the first color to cover the space before the start point, you supply
kCGGradientDrawsBeforeStartLocation. If you want the last color to cover the space after the end
point, you supply kCGGradientDrawsAfterEndLocation. To use both, bitwise or them together:
CGContextDrawLinearGradient(currentContext, gradient, startPoint, endPoint,
kCGGradientDrawsBeforeStartLocation | kCGGradientDrawsAfterEndLocation);
CGContextDrawLinearGradient()方法的最后一个参数,用于决定在起始点之前和在终止点之后的颜色。 如果设置为
KCGGradientDrawsBeforeStartLocation那么会用初始颜色绘制起始点之上,如果使用KCGGradientDrawsAfterEndLocation
那么就会用结束颜色绘制终止点之后。当然也可以结合2个参数一起来用。
The tricky thing about gradients is that they cover everything in the view. Before drawing a gradient,
you typically install a clipping path on the graphics context that defines what you want painted in the
gradient. Then, you draw the gradient. Once again, there is no function for clearing the clip path, so
you typically save the graphics state before installing the clipping path and restore the state afterward.
If you have a CGContextRef and a UIBezierPath, here is how you install that path as the clipping path:
有点要注意的是,gradients会覆盖它上面的视图。 所以可以在绘制gradient之前,你可以先创建一个
clipping区域(类似OpenGL的剪切区域),在这个区域里绘制渐进色。还有一点就是clipping区域也属于context中
的一个状态,所以必须在设置clipping区域之前保存context,并在gradient绘制完后恢复context.
CGContextSaveGState(currentContext);
[myPath addClip];
// Draw your gradient here
CGContextRestoreGState(currentContext);
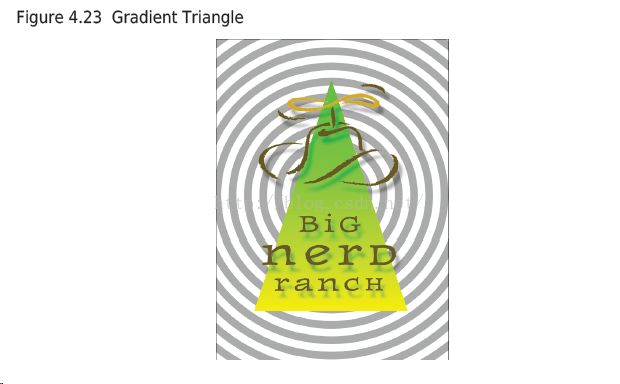
The challenge is to fill a triangle with a gradient that goes from yellow at the bottom to green at the
top.
Figure 4.23 Gradient Triangle
 // start...

    CGContextRef currentContext = UIGraphicsGetCurrentContext();

    // 2、绘制渐变
    // 2.1绘制三角形

UIBezierPath *myPath = [UIBezierPath bezierPath];
[myPath moveToPoint:CGPointMake(160, 142)];
[myPath addLineToPoint:CGPointMake(260, 446)];
[myPath addLineToPoint:CGPointMake(60, 446)];
[myPath addLineToPoint:CGPointMake(160, 142)];
    [myPath stroke];

    CGContextSaveGState(currentContext);

    [myPath addClip];

    // 为myPath填充渐变

    // 为什么三角形没有填充渐变?
    CGFloat locations[2] = {0.0, 1.0};
    CGFloat components[8] = {1.0, 1.0, 0.0, 1.0, 1.0, 0.0, 0.0, 1.0}; // yellow->red

    CGColorSpaceRef colorspace = CGColorSpaceCreateDeviceRGB();
    CGGradientRef gradient = CGGradientCreateWithColorComponents(colorspace, components, locations, 2);

    CGPoint startPoint = CGPointMake(160, 142);
    CGPoint endPoint = CGPointMake(160, 446);
    CGContextDrawLinearGradient(currentContext, gradient, startPoint, endPoint, 0);

    CGGradientRelease(gradient);
    CGColorSpaceRelease(colorspace);

    CGContextRestoreGState(currentContext);


    // 1、绘制阴影
    CGContextSaveGState(currentContext);
    CGContextSetShadow(currentContext, CGSizeMake(4, 7), 2);

    UIImage *logoImage = [UIImage imageNamed:@"logo.png"];
    [logoImage drawInRect:CGRectMake(80, 142, self.window.frame.size.width / 2.0, self.window.frame.size.height / 2.0)];

    CGContextRestoreGState(currentContext);
