【Android】给Cocos2d-x的EditBox添加确定按钮
【说明】
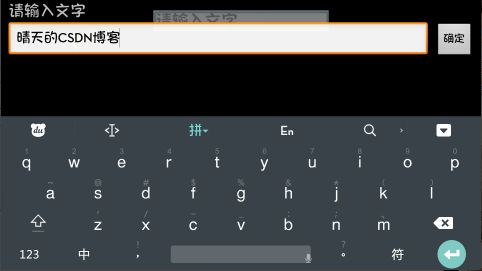
Cocos2d-x封装了输入框类(EditBox),是分平台实现的,在Android下输入有些不友好,其中之一就是输入完成后,必须要点输入法的 “Enter” 才能完成输入,导致很多人不知道怎么结束输入。因此,我决定在输入框后面加一个确定按钮,这样更加符合输入习惯。
【效果】
【步骤】
1. 修改 “proj.android\src\org\cocos2dx\lib” 目录下的 “Cocos2dxEditBoxDialog.java” 类,在 “onCreate” 中添加一个按钮。
2. 原理非常简单,cocos原本的实现是一个纵向布局的layout,然后将静态文本和输入框添加进去。
我们要做的是,创建一个横向布局的childLayout,将输入框和按钮添加到childLayout,然后将静态文本和childLayout添加到主layout。
有个地方需要注意,为了保证输入框和按钮铺满整个屏幕,需要将输入框设置成MATCH_PARENT,并且将weight设置成1。
直接贴代码,代码中有注释。
    @Override
    protected void onCreate(final Bundle pSavedInstanceState) {
        super.onCreate(pSavedInstanceState);

        this.getWindow().setBackgroundDrawable(new ColorDrawable(0x80000000));

        // main layout(纵向布局)
        final LinearLayout layout = new LinearLayout(this.getContext());
        layout.setOrientation(LinearLayout.VERTICAL);
        final LinearLayout.LayoutParams layoutParams = new LinearLayout.LayoutParams(ViewGroup.LayoutParams.MATCH_PARENT, ViewGroup.LayoutParams.MATCH_PARENT);

        // 文本(main layout)
        this.mTextViewTitle = new TextView(this.getContext());
        final LinearLayout.LayoutParams textviewParams = new LinearLayout.LayoutParams(ViewGroup.LayoutParams.WRAP_CONTENT, ViewGroup.LayoutParams.WRAP_CONTENT);
        textviewParams.leftMargin = textviewParams.rightMargin = this.convertDipsToPixels(10);
        this.mTextViewTitle.setTextSize(TypedValue.COMPLEX_UNIT_DIP, 20);

        layout.addView(this.mTextViewTitle, textviewParams); // 加入到main layout

        // child layout(横向布局)
        final LinearLayout childLayout = new LinearLayout(this.getContext());
        childLayout.setOrientation(LinearLayout.HORIZONTAL); // 横向布局
        final LinearLayout.LayoutParams childLayoutParams = new LinearLayout.LayoutParams(ViewGroup.LayoutParams.MATCH_PARENT, ViewGroup.LayoutParams.MATCH_PARENT);

        // 输入框(child layout)
        this.mInputEditText = new EditText(this.getContext());
        final LinearLayout.LayoutParams editTextParams = new LinearLayout.LayoutParams(ViewGroup.LayoutParams.MATCH_PARENT, ViewGroup.LayoutParams.WRAP_CONTENT);
        editTextParams.leftMargin = editTextParams.rightMargin = this.convertDipsToPixels(10);
        editTextParams.weight = 1; // 这里很关键,如果不这样,输入框会占满屏幕宽,按钮回到屏幕外

        childLayout.addView(this.mInputEditText, editTextParams); // 加入到child layout

        // 按钮(child layout)
        this.mButtonOK = new Button(this.getContext());
        this.mButtonOK.setText("确定");
        this.mButtonOK.setOnClickListener(new OnClickListener()); // 按钮事件

        final LinearLayout.LayoutParams buttonParams = new LinearLayout.LayoutParams(ViewGroup.LayoutParams.WRAP_CONTENT, ViewGroup.LayoutParams.WRAP_CONTENT);
        buttonParams.leftMargin = this.convertDipsToPixels(0);
        buttonParams.rightMargin = this.convertDipsToPixels(10);
        childLayout.addView(this.mButtonOK, buttonParams); // 加入到child layout

        // 将(child layout)加入到( main layout)中
        layout.addView(childLayout, childLayoutParams);

        // 将main layout加入视图
        this.setContentView(layout, layoutParams);

        this.getWindow().addFlags(WindowManager.LayoutParams.FLAG_FULLSCREEN);

        this.mTextViewTitle.setText(this.mTitle);
        this.mInputEditText.setText(this.mMessage);

        int oldImeOptions = this.mInputEditText.getImeOptions();
        this.mInputEditText.setImeOptions(oldImeOptions | EditorInfo.IME_FLAG_NO_EXTRACT_UI);
        oldImeOptions = this.mInputEditText.getImeOptions();

        // 后面的代码就不贴了
        ......
}
3. 设置按钮回调事件,OK搞定,直接上代码。
    // 按钮点击事件
    class OnClickListener implements android.view.View.OnClickListener {
    	@Override
    	public void onClick(View v) {
    		// 回调给Cocos2d并且关闭键盘
    		Cocos2dxHelper.setEditTextDialogResult(Cocos2dxEditBoxDialog.this.mInputEditText.getText().toString());
            Cocos2dxEditBoxDialog.this.closeKeyboard();
            Cocos2dxEditBoxDialog.this.dismiss();
    	}
    }
【附件】
代码:http://download.csdn.net/detail/ldpjay/8944077
