ios8 使用storyboard 进行自动布局(一)
xcode 6使用storyboard 进行自动布局,迷惑的问题主要由:
1,classsize 到底是一个什么东东?
2,classSize 和 layout 有什么区别?
3, 如何使用storyboard 进行自动布局
4,什么是约束?
5,常见的约束报错有哪些?
6,在开发过程中(使用storyboard)应该注意哪些问题?
这些问题我会在
代码级别的界面显示
1,如果是从代码层面开始使用Autolayout,需要对使用的View的translatesAutoresizingMaskIntoConstraints的属性设置为NO.
即可开始通过代码添加Constraint,否则View还是会按照以往的autoresizingMask进行计算.
而在Interface Builder中勾选了Ues Autolayout,IB生成的控件的translatesAutoresizingMaskIntoConstraints属性都会被默认设置NO.
2,值得注意的是,添加约束之前一定要将子视图优先addSubview到父视图中,否则在添加约束时会产生编译器警告.
而我们在理解的时候,可以通过这种方式来理解.item1.attribute = multiplier ⨉ item2.attribute + constant,比如看下面的代码
- UIView *newView = [[UIView alloc]init];
- newView.backgroundColor = [UIColor redColor];
- [self.view addSubview:newView];
- // self.view.translatesAutoresizingMaskIntoConstraints =NO;
- newView.translatesAutoresizingMaskIntoConstraints =NO;
- NSLayoutConstraint *constraint = nil;
- constraint = [NSLayoutConstraint constraintWithItem:newView
- attribute:NSLayoutAttributeLeading
- relatedBy:NSLayoutRelationEqual
- toItem:self.view
- attribute:NSLayoutAttributeLeading
- multiplier:1.0f
- constant:20];
- [self.view addConstraint:constraint];
- constraint = [NSLayoutConstraint constraintWithItem:newView
- attribute:NSLayoutAttributeTrailing
- relatedBy:NSLayoutRelationEqual
- toItem:self.view
- attribute:NSLayoutAttributeTrailing
- multiplier:1.0f
- constant:-20];
- [self.view addConstraint:constraint];
- constraint = [NSLayoutConstraint constraintWithItem:newView
- attribute:NSLayoutAttributeTop
- relatedBy:NSLayoutRelationEqual
- toItem:self.view
- attribute:NSLayoutAttributeTop
- multiplier:1.0f
- constant:80];
- [self.view addConstraint:constraint];
- constraint = [NSLayoutConstraint constraintWithItem:newView
- attribute:NSLayoutAttributeBottom
- relatedBy:NSLayoutRelationEqual
- toItem:self.view
- attribute:NSLayoutAttributeBottom
- multiplier:1.0f
- constant:-20];
- [self.view addConstraint:constraint];
创建了一个单视图,距离各边界的距离依次是:20 20 80 20(左,右,上,下),或许有人会疑问为什么距离右写的是-20,why, 其实原因很简单,因为我们参照的是self.view.trailing ,而视图newView是加在self.view上,是在self.view.trailing 的左边,所以应该是赋值,以此类推距离底部也是一样
有人会问到底属性都有哪些,下面会给大家列举一下,这里包括ios 8 最新添加的(一下加红的是常用的一些方法)
NSLayoutAttributeLeft = 1, 对齐对象的左边
NSLayoutAttributeRight, 对齐对象的右边
NSLayoutAttributeTop, 距离顶部的距离
NSLayoutAttributeBottom, 距离底部的距离
NSLayoutAttributeLeading, 距离左边的距离
NSLayoutAttributeTrailing, 距离右边部的距离
NSLayoutAttributeWidth, 控件的宽度
NSLayoutAttributeHeight, 控件的高度
NSLayoutAttributeCenterX, x 轴中线点的距离
NSLayoutAttributeCenterY, y 轴中线点的距离
NSLayoutAttributeBaseline,
NSLayoutAttributeLastBaseline = NSLayoutAttributeBaseline,
// 在API 8.0 文档中貌似没有详细的说明,但大家一看意思也明白了,就是距离各个边界的设置
NSLayoutAttributeFirstBaseline NS_ENUM_AVAILABLE_IOS(8_0),
NSLayoutAttributeLeftMargin NS_ENUM_AVAILABLE_IOS(8_0),
NSLayoutAttributeRightMargin NS_ENUM_AVAILABLE_IOS(8_0),
NSLayoutAttributeTopMargin NS_ENUM_AVAILABLE_IOS(8_0),
NSLayoutAttributeBottomMargin NS_ENUM_AVAILABLE_IOS(8_0),
NSLayoutAttributeLeadingMargin NS_ENUM_AVAILABLE_IOS(8_0),
NSLayoutAttributeTrailingMargin NS_ENUM_AVAILABLE_IOS(8_0),
NSLayoutAttributeCenterXWithinMargins NS_ENUM_AVAILABLE_IOS(8_0),
NSLayoutAttributeCenterYWithinMargins NS_ENUM_AVAILABLE_IOS(8_0),
NSLayoutAttributeNotAnAttribute = 0
注:NSLayoutAttributeLeft/NSLayoutAttributeRight 和 NSLayoutAttributeLeading/NSLayoutAttributeTrailing的区别是left/right永远是指左右,而leading/trailing在某些从右至左习惯的地区会变成,leading是右边,trailing是左边。
以上就是通过简单的代码实现了自动布局(单一控件),大家会发如果页面上试图多的话,用这种方式显得特别麻烦,的确是的,下面我介绍一下另一种方法
通过可视化语言的方式
先学点基础知识,
1 调用的方法
- + (NSArray *)constraintsWithVisualFormat:(NSString *)format
- options:(NSLayoutFormatOptions)opts
- metrics:(NSDictionary *)metrics
- views:(NSDictionary *)views
1 format 约束的规格要求 说白了就是条件。
2 opts 主要用来描述属性和用来指导可视化语言中的布局样式。
3 metrics 一个字典实例主要用来显示你在可视化话中用的字符串的参数设置,比如:nextwidth:@12, 必须是一个字典对象。
4 views 所有描述的空间字典集合,也必须以字典的形式展现出来。
下面通过一个实例的方式
- UIView *two = [UIView new];
- two.backgroundColor = [UIColor greenColor];
- [self.view addSubview:two];
- two.translatesAutoresizingMaskIntoConstraints = NO;
- NSDictionary *views = NSDictionaryOfVariableBindings(two, self.view);
- NSMutableArray *constraintArray = [NSMutableArray array];
- [constraintArray addObjectsFromArray:[NSLayoutConstraint constraintsWithVisualFormat:@"H:|-20-[two]-20-|"
- options:0
- metrics:nil
- views:views]];
- [constraintArray addObjectsFromArray:[NSLayoutConstraint constraintsWithVisualFormat:@"V:|-80-[two]-20-|" options:0 metrics:nil views:views]];
- [self.view addConstraints:constraintArray];
简单的几句话就实现了和上面同样的效果,从而可以充分的看到可视化语言是多么的方便
下面为大家带来介绍一些第三方实现该效果的代码
首推:PureLayout 他是UIView+Layout 的后继者,项目中建议使用PureLayout , 使用起来特方便,至于如何导入请大家参考文档自己完成
下载地址:https://github.com/smileyborg/PureLayout
直接上代码:
- UIView *newView = [UIView new];
- newView.backgroundColor = [UIColor blueColor];
- [self.view addSubview:newView];
- newView.translatesAutoresizingMaskIntoConstraints = NO;
- [newView autoPinEdgeToSuperviewEdge:(ALEdgeLeading) withInset:20];
- [newView autoPinEdgeToSuperviewEdge:(ALEdgeTrailing) withInset:20];
- [newView autoPinEdgeToSuperviewEdge:(ALEdgeTop) withInset:80];
- [newView autoPinEdgeToSuperviewEdge:(ALEdgeBottom) withInset:20];
你可能会很吃惊,哇?这么简单,的确是的就是这么简单,完全符合我们使用storyboard 的习惯,至于UIView+autoLayout 和 PureLayout的具体使用,我会在后面的文章中单独拿出一章单独介绍他的使用,现在主要是了解一下自动布局的使用
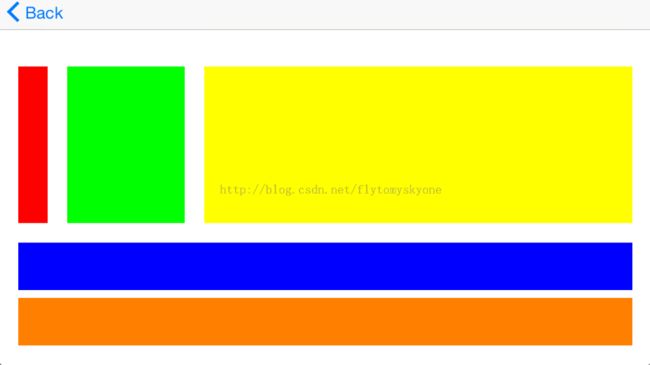
先看一下效果图,横屏效果图
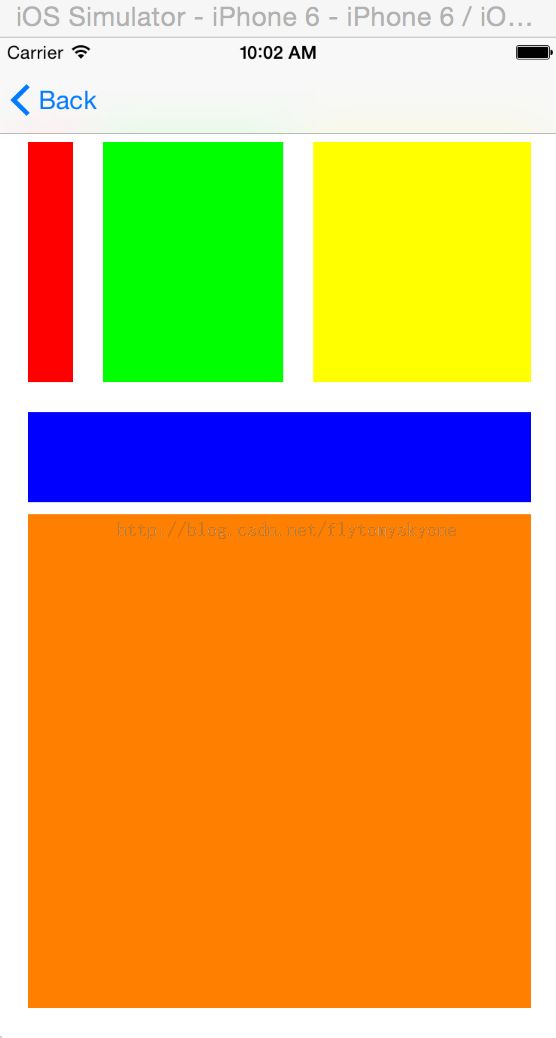
竖屏效果图
下面咱们来点有难度的代码,嘿嘿,终于可以放手做一下了
- - (void)viewDidLoad {
- [super viewDidLoad];
- self.view.backgroundColor = [UIColor whiteColor];
- // 1 创建三个视图 红/绿/蓝/黄/橙色视图
- // 红
- UIView *redView = [self alive];
- redView.backgroundColor = [UIColor redColor];
- [self.view addSubview:redView];
- // 绿
- UIView *greenView = [self alive];
- greenView.backgroundColor = [UIColor greenColor];
- [self.view addSubview:greenView];
- // 蓝
- UIView *blueView = [self alive];
- blueView.backgroundColor = [UIColor blueColor];
- [self.view addSubview:blueView];
- // 黄
- UIView *yellowView = [self alive];
- yellowView.backgroundColor = [UIColor yellowColor];
- [self.view addSubview:yellowView];
- // 橙
- UIView *orangeView = [self alive];
- orangeView.backgroundColor = [UIColor orangeColor];
- [self.view addSubview:orangeView];
- [self.view addConstraints:[self portraitConstraints:redView :greenView :blueView yellowView:yellowView orangeView:orangeView]];
- }
- // 这样写完全是为了代码的方便使用,创建对象的同时初始化控件
- - (UIView *)alive
- {
- UIView *newView = [UIView new];
- newView.translatesAutoresizingMaskIntoConstraints = NO;
- return newView;
- }
- - (NSMutableArray *) portraitConstraints:(UIView *)redView :(UIView *)greenView :(UIView *)blueView yellowView:(UIView *)yellowView orangeView:(UIView *)orangeView
- {
- NSMutableArray *array = [NSMutableArray array];
- // 注1:红色视图的宽度大于等于10 小于30 黄色视图的宽度大于40 小于120 水平
- [array addObjectsFromArray:[NSLayoutConstraint constraintsWithVisualFormat:@"H:|-20-[redView(>=10,<=30)]-20-[greenView(>=40,<=120)]-20-[yellowView]-20-|" options:0 metrics:nil
- views:NSDictionaryOfVariableBindings(redView, greenView, yellowView)]];
- // 注2:垂直方向 red高度H:100<= <=160 蓝色 H:30<= <=60 橙色待定
- [array addObjectsFromArray:[NSLayoutConstraint constraintsWithVisualFormat:@"V:|-70-[redView(>=100,<=160)]-20-[blueView(>=30,<=60)]-[orangeView]-20-|" options:0 metrics:nil
- views:NSDictionaryOfVariableBindings(redView, blueView, orangeView)]];
- // 和注2类似
- [array addObjectsFromArray:[NSLayoutConstraint constraintsWithVisualFormat:@"V:|-70-[greenView(>=100,<=160)]-20-[blueView(>=30,<=60)]-[orangeView]-20-|" options:0 metrics:nil
- views:NSDictionaryOfVariableBindings(greenView, blueView, orangeView)]];
- // 和注2类似 或许有人会问 为什么得添加黄色和绿色,原因很简单,就是为了满足各个约束,避免造成约束不足
- [array addObjectsFromArray:[NSLayoutConstraint constraintsWithVisualFormat:@"V:|-70-[yellowView(>=100,<=160)]-20-[blueView(>=30,<=60)]-[orangeView]-20-|" options:0 metrics:nil
- views:NSDictionaryOfVariableBindings(yellowView, blueView, orangeView )]];
- // 注3:控制blued的宽度
- [array addObjectsFromArray:[NSLayoutConstraint
- constraintsWithVisualFormat:@"H:|-20-[blueView]-120-|" options:0 metrics:nil
- views:NSDictionaryOfVariableBindings(blueView)]];
- // 注4:为橙色高度添加约束条件
- [array addObjectsFromArray:[NSLayoutConstraint constraintsWithVisualFormat:@"V:[blueView]-20-[orangeView(>=blueView)]-20-|" options:0 metrics:nil views:NSDictionaryOfVariableBindings(blueView, orangeView)]];
- // 注4:为橙色添加宽度约束条件
- [array addObjectsFromArray:[NSLayoutConstraint constraintsWithVisualFormat:@"H:|-20-[orangeView]-20-|" options:0 metrics:nil views:NSDictionaryOfVariableBindings(blueView, orangeView)]];
- return array;
- }

