Android5.x新特性之CardView立体卡片--阴影、圆角
苹果追求的是扁平化,安卓追求的是层次,立体,阴影化
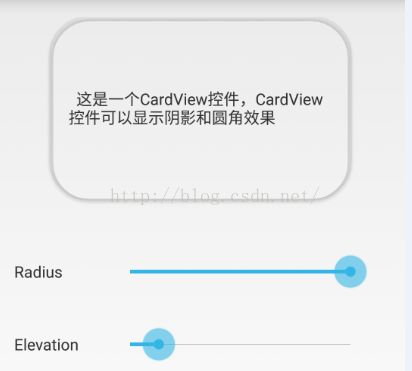
安卓5.X新特性里面就有一个CardView可以实现该效果
测试工具:Nexus5 开发工具Es Sdk版本5.1.1
代码下载地址 点击打开链接------------
提示:demo无法在4.x的手机上运行,由于Nexus5我刷机是5.x的rom,所以可以跑起来,我初学,不知道原因是不是,这个控件只能适用于5.x的系统
将V7下的cardview.jar包放到项目中
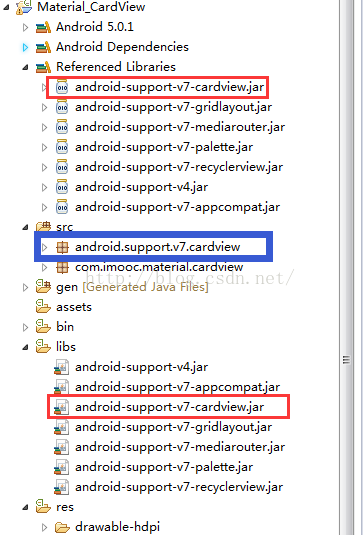
接下来看项目框架--主要是将cardview.jar包导入到项目中
看上面截图的蓝色框里面需要加入cardview库下的代码--可以直接编译该库,然后将gen目录下的代码拷贝进来即可
activity_main.xml看代码的布局文件
<?xml version="1.0" encoding="utf-8"?>
<ScrollView xmlns:android="http://schemas.android.com/apk/res/android"
    xmlns:card_view="http://schemas.android.com/apk/res-auto"
    android:layout_width="match_parent"
    android:layout_height="match_parent" >

    <LinearLayout
        android:layout_width="match_parent"
        android:layout_height="match_parent"
        android:orientation="vertical"
        android:paddingBottom="16dp"
        android:paddingLeft="16dp"
        android:paddingRight="16dp"
        android:paddingTop="16dp" >

        <android.support.v7.widget.CardView
            android:id="@+id/cardview"
            android:layout_width="fill_parent"
            android:layout_height="160dp"
            android:layout_marginLeft="32dp"
            android:layout_marginRight="32dp"
            android:elevation="100dp"
            card_view:cardBackgroundColor="#71C3DE"
            card_view:cardCornerRadius="8dp" >

            <TextView
                android:layout_width="wrap_content"
                android:layout_height="wrap_content"
                android:layout_gravity="center"
                android:layout_margin="16dp"
                android:text="  这是一个CardView控件,CardView控件可以显示阴影和圆角效果" />
        </android.support.v7.widget.CardView>

        <LinearLayout
            android:layout_width="fill_parent"
            android:layout_height="wrap_content"
            android:layout_marginTop="32dp"
            android:orientation="horizontal" >

            <TextView
                android:layout_width="70dp"
                android:layout_height="wrap_content"
                android:layout_gravity="center_vertical"
                android:text="Radius" />

            <SeekBar
                android:id="@+id/cardview_radius_seekbar"
                android:layout_width="fill_parent"
                android:layout_height="wrap_content"
                android:layout_margin="16dp" />
        </LinearLayout>

        <LinearLayout
            android:layout_width="fill_parent"
            android:layout_height="wrap_content"
            android:orientation="horizontal" >

            <TextView
                android:layout_width="70dp"
                android:layout_height="wrap_content"
                android:layout_gravity="center_vertical"
                android:text="Elevation" />

            <SeekBar
                android:id="@+id/cardview_elevation_seekbar"
                android:layout_width="fill_parent"
                android:layout_height="wrap_content"
                android:layout_margin="16dp" />
        </LinearLayout>
    </LinearLayout>

</ScrollView>
styles.xml 上面布局中的card_view需要在style中进行设置
<declare-styleable name="CardView">
        <attr name="cardBackgroundColor" format="color" />
        <attr name="cardCornerRadius" format="dimension" />
    </declare-styleable>
CardViewActivity
package com.imooc.material.cardview;

import android.app.Activity;
import android.os.Bundle;
import android.support.v7.widget.CardView;
import android.widget.SeekBar;

public class CardViewActivity extends Activity {
	CardView mCardView;

	SeekBar mRadiusSeekBar;

	SeekBar mElevationSeekBar;

	@Override
	protected void onCreate(Bundle savedInstanceState) {
		super.onCreate(savedInstanceState);
		setContentView(R.layout.activity_main);
		mCardView = (CardView) findViewById(R.id.cardview);
		mRadiusSeekBar = (SeekBar) findViewById(R.id.cardview_radius_seekbar);
		mRadiusSeekBar
				.setOnSeekBarChangeListener(new SeekBar.OnSeekBarChangeListener() {

					@Override
					public void onStopTrackingTouch(SeekBar seekBar) {

					}

					@Override
					public void onStartTrackingTouch(SeekBar seekBar) {

					}

					@Override
					public void onProgressChanged(SeekBar seekBar,
							int progress, boolean fromUser) {
						mCardView.setRadius(progress);

					}
				});

		mElevationSeekBar = (SeekBar) findViewById(R.id.cardview_elevation_seekbar);
		mElevationSeekBar
				.setOnSeekBarChangeListener(new SeekBar.OnSeekBarChangeListener() {

					@Override
					public void onStopTrackingTouch(SeekBar seekBar) {

					}

					@Override
					public void onStartTrackingTouch(SeekBar seekBar) {

					}

					@Override
					public void onProgressChanged(SeekBar seekBar,
							int progress, boolean fromUser) {
						mCardView.setElevation(progress);

					}
				});

	}
}
——————————————————————案例效果2————————————————————————
点击打开链接,下载代码
activity_main.xml主布局就一个frameLayout
<LinearLayout xmlns:android="http://schemas.android.com/apk/res/android"
    android:id="@+id/sample_main_layout"
    android:layout_width="match_parent"
    android:layout_height="match_parent"
    android:orientation="vertical" >

    <FrameLayout
        android:id="@+id/sample_content_fragment"
        android:layout_width="match_parent"
        android:layout_height="0px"
        android:layout_weight="2" />

</LinearLayout>
MainActivity主布局界面代码
package com.imooc.material_shadows;

import android.os.Bundle;
import android.support.v4.app.FragmentActivity;
import android.support.v4.app.FragmentTransaction;

public class MainActivity extends FragmentActivity {

	@SuppressWarnings("null")
	@Override
	protected void onCreate(Bundle savedInstanceState) {
		super.onCreate(savedInstanceState);

		setContentView(R.layout.activity_main);
		FragmentTransaction transaction = getSupportFragmentManager()
				.beginTransaction();
		ElevationBasicFragment fragment = new ElevationBasicFragment();
		transaction.replace(R.id.sample_content_fragment, fragment);
		transaction.commit();

	}

}
看fragment布局elevation_basic.xml---只有叠放的2个图
<?xml version="1.0" encoding="utf-8"?>

<FrameLayout xmlns:android="http://schemas.android.com/apk/res/android"
             xmlns:tools="http://schemas.android.com/tools"
             android:layout_width="match_parent"
             android:layout_height="match_parent">
    <View
            android:id="@+id/floating_shape"
            android:layout_width="160dp"
            android:layout_height="160dp"
            android:layout_marginRight="40dp"
            android:background="@drawable/shape"
            android:elevation="50dp"
            android:layout_gravity="center"/>
    <View
            android:id="@+id/floating_shape_2"
            android:layout_width="160dp"
            android:layout_height="160dp"
            android:layout_marginLeft="25dp"
            android:background="@drawable/shape2"
            android:layout_gravity="center"/>
</FrameLayout>
圆shape.xml
<?xml version="1.0" encoding="utf-8"?>

<shape xmlns:android="http://schemas.android.com/apk/res/android"
    android:shape="oval">
    <solid android:color="#E91E63" />
</shape>
矩形shape2.xml
<?xml version="1.0" encoding="utf-8"?>
<shape xmlns:android="http://schemas.android.com/apk/res/android"
    android:shape="rectangle">
    <solid android:color="#673AB7" />
</shape>
ElevationBasicFragment
translationZ允许你创建一个动画暂时的反应出View的高度值(elevation)变化。
这对于响应触摸手势很有用处
package com.imooc.material_shadows;

import android.support.v4.app.Fragment;
import android.os.Bundle;
import android.view.LayoutInflater;
import android.view.MotionEvent;
import android.view.View;
import android.view.ViewGroup;

public class ElevationBasicFragment extends Fragment {


	@Override
	public View onCreateView(LayoutInflater inflater, ViewGroup container,
			Bundle savedInstanceState) {

		View rootView = inflater.inflate(R.layout.elevation_basic, container,
				false);

		//矩形
		View shape2 = rootView.findViewById(R.id.floating_shape_2);

		shape2.setOnTouchListener(new View.OnTouchListener() {
			@Override
			public boolean onTouch(View view, MotionEvent motionEvent) {
				int action = motionEvent.getActionMasked();

				switch (action) {
				case MotionEvent.ACTION_DOWN:
					view.setTranslationZ(40);
					break;
				case MotionEvent.ACTION_UP:
					view.setTranslationZ(0);
					break;
				default:
					return false;
				}
				return true;
			}
		});
		return rootView;
	}
}
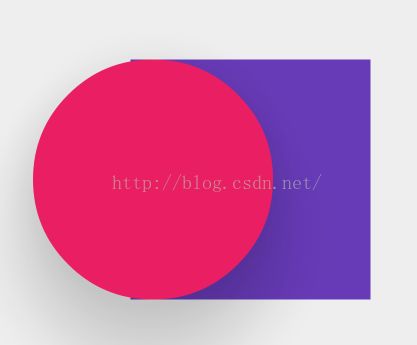
在elevation_basic.xml布局中,由于圆形属性 android:elevation="50dp",使得其静态高度为50,结果圆在矩形之上
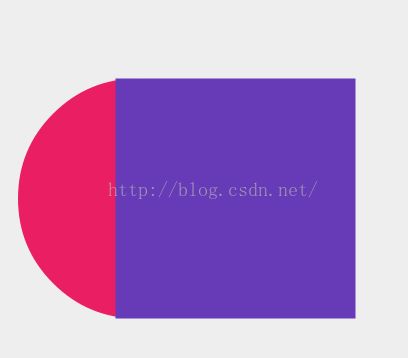
如果改成android:elevation="0dp"
那么就是这样的效果
按下的效果是带阴影的如图:


