【写作】Texlive和Texmaker学习
前言
最近要看一些论文做一下笔记,所以准备使用一下比较流行的Texlive和Texmaker写一下。其实CSDN的Markdown也是不错滴。
首先国际惯例,贴几个地址:
Texlive镜像下载地址:http://mirror.lzu.edu.cn/CTAN/systems/texlive/Images/
Texlive云盘下载地址:链接:http://pan.baidu.com/s/1c2l2JUK 密码:u849
texmaker官方地址:http://www.xm1math.net/texmaker/
texmaker云盘地址:链接:http://pan.baidu.com/s/1mhZHhoO 密码:1v0e
贴吧下载的学习文档:链接:http://pan.baidu.com/s/1qXFqmVa 密码:a2ar
【强烈推荐】比较好的简短的教程:http://liam0205.me/2014/09/08/latex-introduction/
安装
两个软件的安装顺序随意,路径随意,我一般安装的软件就是默认C盘了o(╯□╰)o
本人首先安装了Texmaker,一直下一步就行了
然后安装Texlive
①解压iso镜像文件,然后双击install-tl-advanced.bat
②修改一下倒数第二项为否,因为我们即将使用的编辑器是Texmaker而非自带的TeXworks前端
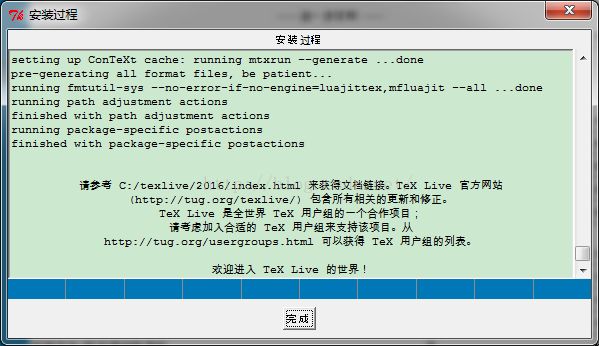
然后安装吧,安装完成的标志是:
安装完毕以后点击完成并关闭cmd窗口。
接下来就是关联两个软件:
打开TexMaker->选项->配置TexMaker->命令,配置前两项如下:
【PS】如果你的安装路径是默认的,其实这个地方已经自动关联了,无需修改。如果更改了安装路径,那最好还是修改一下吧。
基本使用
添加注释的时候使用"%" 即可,和C语言或者C++里面的 "//" 一样
还有就是usepackage的代码都在\documentclass下面写
文件->新建,键入以下代码
\documentclass{article}
\begin{document}
Hello world
\end{document}
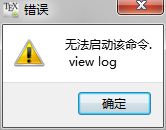
然后保存,如果不保存直接点击快速构建会出现
正确保存以后再快速构建就会出现正确结果
中文输入
之前安装的是Miktex,但是CJK语言包实在是安装不上,链接一直中断,无法下载。所以无奈之下才选择了Texlive。
很简单,修改documentclass的类型就行了,如下:
\documentclass[UTF8]{ctexart}
\begin{document}
Hello Wrold!!
你好   世界!!
\end{document}
简单框架
一般文档都包含基本的几个部分:①标题 ②作者 ③摘要 ④目录 ⑤正文:章节、段落、参考文献
关于参考文献以后再说,先说说前面的基本组成部分。
【PS】这一部分需要仔细研读,有很多符号的作用可以通过删除此符号和添加此符号去看效果。比如\indent的作用
\documentclass[UTF8]{ctexart} %文档类型,可键入中文
\title{测试\\换行\& 与符号}%文档标题
\author{白菜}%作者
\begin{document}%开始文章书写
\maketitle%将封面打印出来,也就是上面的标题作者
\tableofcontents %自动目录
%摘要
\vspace{8pt} %字号大小
\renewcommand{\abstractname}{\huge 摘\quad 要}
\begin{abstract} %开始写摘要
\normalsize
\noindent 这个是摘要啦
\end{abstract}
\section{第一个章节}
\paragraph{主要内容}~{} \newline \indent 换一行写正文,两个缩进
\subparagraph{子段}本次汇报主要总结最近精看的几篇深度学习文章以及关于卷积RBM在运动捕捉数据中的实验结果和进一步将展开的工作。深度学习文章主要有四篇,分别介绍了CNN在运动捕捉数据建模中的应用,以及卷积RBM最开始的提出和在Audio分类中的应用。另外一篇论文介绍了运动拼接的一种方法。

\section{第二个章节}
\paragraph{} 写什么好呢
\subsection{来个子章节}可以可以

\section{第三个章节}
\paragraph{}写一个段落
\subparagraph{}再来一个字段落
\end{document}
运行以后发现第一页挺正常,但是第二页多了一个页眉
解决办法,在\begin{document}下一行加一句话\pagestyle{empty}
\documentclass[UTF8]{ctexart} %文档类型,可键入中文
\title{测试\\换行\& 与符号}%文档标题
\author{白菜}%作者
\begin{document}%开始文章书写
\pagestyle{empty}
\maketitle%将封面打印出来,也就是上面的标题作者
\tableofcontents %自动目录
%后面我就不贴了
添加公式
我在上面的第二个章节添加了公式,只贴第二章的代码
<pre code_snippet_id="1922972" snippet_file_name="blog_20161011_5_2376271" name="code" class="cpp">\section{第二个章节}
\paragraph{} 写什么好呢
\subsection{来个子章节}可以可以
随便来个行内公式$E=mc^2$或者来一个不带序号行间公式\[ E=mc^2\]也可以这样表示行间带序号的公式
\begin{equation}
E=mc^2
\end{equation}
来个上下标累加和的
\begin{equation}
a=\sum_{i=1}^{i=N} a_i^{frame}
\end{equation}
此外还有很多符号,比如分式、累乘、开根号等以及很多的符号比如α、β、η等,都可以去此百度页面找到更多的比如矩阵、公式组、分段函数等,在文章开头的强烈推荐的网址中有介绍,我这里贴一下代码,有兴趣的自己运行看看,依旧还是第二章节:
\section{第二个章节}
\paragraph{} 写什么好呢
\subsection{来个子章节}可以可以
随便来个行内公式$E=mc^2$或者来一个不带序号行间公式\[ E=mc^2\]也可以这样表示行间带序号的公式
\begin{equation}
E=mc^2
\end{equation}
来个上下标累加和的
\begin{equation}
a=\sum_{i=1}^{i=N} a_i^{frame}
\end{equation}
\newline 来一堆符号
\[ \pm\; \times \; \div\; \cdot\; \cap\; \cup\;\geq\; \leq\; \neq\; \approx \; \equiv \]
\newline 来一堆加和累乘的
$ \sum_{i=1}^n i$\\
$\prod_{i=1}^n $\\
$ \sum\limits _{i=1}^n i$\\
$ \prod\limits _{i=1}^n $\\
\newline 求极限,求积分什么的,还有一个多重积分
\[ \lim_{x\to0}x^2 \quad \int_a^b x^2 dx \]
\[ \lim\nolimits _{x\to0}x^2\quad \int\nolimits_a^b x^2 dx \]
\[ \iint\quad \iiint\quad \iiiint\quad \idotsint \]
\newline 大括号
\[ \Bigg(\bigg(\Big(\big((x)\big)\Big)\bigg)\Bigg) \]
\[ \Bigg[\bigg[\Big[\big[[x]\big]\Big]\bigg]\Bigg] \]
\[ \Bigg \{\bigg \{\Big \{\big \{\{x\}\big \}\Big \}\bigg \}\Bigg\} \]
\[ \Bigg\langle\bigg\langle\Big\langle\big\langle\langle x
\rangle\big\rangle\Big\rangle\bigg\rangle\Bigg\rangle \]
\[ \Bigg\lvert\bigg\lvert\Big\lvert\big\lvert\lvert x
\rvert\big\rvert\Big\rvert\bigg\rvert\Bigg\rvert \]
\[ \Bigg\lVert\bigg\lVert\Big\lVert\big\lVert\lVert x
\rVert\big\rVert\Big\rVert\bigg\rVert\Bigg\rVert \]
\newline 根式和分式
$\sqrt{x}$, $\frac{1}{2}$.
\[ \sqrt{x}, \]
\[ \frac{1}{2}. \]
\newline 省略号
\[ x_1,x_2,\dots ,x_n\quad 1,2,\cdots ,n\quad
\vdots\quad \ddots \]
\newline 矩阵
\[ \begin{pmatrix} a&b\\c&d \end{pmatrix} \quad
\begin{bmatrix} a&b\\c&d \end{bmatrix} \quad
\begin{Bmatrix} a&b\\c&d \end{Bmatrix} \quad
\begin{vmatrix} a&b\\c&d \end{vmatrix} \quad
\begin{Vmatrix} a&b\\c&d \end{Vmatrix} \]
\newline 来一个行内小矩阵
Marry has a little matrix$(\begin{smallmatrix}a&b\\c&d\end{smallmatrix})$
\newline 无需对齐的长公式
\begin{multline}%不需要编号的时候使用multline*
x=a+b+c+{}\\
d+e+f
\end{multline}
\newline 需要对齐的公式
\[\begin{aligned}
x={}& a+b+c+{} \\
&d+e+f+g
\end{aligned}\]
\newline 公式组
\begin{gather}
a=b+c+d\\
x=y+z
\end{gather}
\begin{align}
a&=b+c+d\\
x&=y+z
\end{align}
\newline 分段函数
\[ y= \begin{cases}
-x,\quad x\leq 0\\
x,\quad x>0
\end{cases}\]
\section{第三个章节}
\paragraph{}写一个段落
\subparagraph{}再来一个字段落
\graphicspath{{RGBnumber/}}%外层大括号可写多个路径
\newline 插入一张图片\newline
\includegraphics[width=0.1\textwidth]{0.png}
插入一张图片\newline
\begin{figure}[!h]%!h是不让图片直接显示在页面顶部
\centering%居中显示
\includegraphics[width=0.1\textwidth ,height=1in]{1.png}%width和height设置长宽
\end{figure}
\begin{figure}[!h]
\centering
\subfigure[数字2]%子图1
{\includegraphics{2.png}}
\subfigure[数字3]%子图2
{\includegraphics{3.png}}
\caption{子图数字展示}
\label{figure1}
\end{figure}
插入图片
以我前面制作的手写数字的图片为例
云盘下载地址:链接:http://pan.baidu.com/s/1o7NySMu 密码:bead
首先在顶部添加一个引用包
\usepackage{graphicx}然后再第三章中添加图片,先加入图片路径
\graphicspath{{RGBnumber/}}%外层大括号可写多个路径
①可以用最简单的插入图片方法,但是图片会位于左边顶格
\newline 插入一张图片\newline
\includegraphics[width=0.1\textwidth]{0.png}
效果如下:
插入一张图片\newline
\begin{figure}[!h]%!h是不让图片直接显示在页面顶部
\centering%居中显示
\includegraphics[width=0.1\textwidth ,height=1in]{1.png}%width和height设置长宽
\end{figure}
效果如下:
③插入子图有时候需要图片能够并列编号,就像matlab的subplot一样
\begin{figure}[!h]
\centering
\subfigure[数字2]%子图1
{\includegraphics{2.png}}
\subfigure[数字3]%子图2
{\includegraphics{3.png}}
\caption{子图数字展示}
\label{figure1}
\end{figure}效果如下:
贴一下第三章的代码:
\section{第三个章节}
\paragraph{}写一个段落
\subparagraph{}再来一个字段落
\graphicspath{{RGBnumber/}}%外层大括号可写多个路径
\newline 插入一张图片\newline
\includegraphics[width=0.1\textwidth]{0.png}
插入一张图片\newline
\begin{figure}[!h]%!h是不让图片直接显示在页面顶部
\centering%居中显示
\includegraphics[width=0.1\textwidth ,height=1in]{1.png}%width和height设置长宽
\end{figure}
\begin{figure}[!h]
\centering
\subfigure[数字2]%子图1
{\includegraphics{2.png}}
\subfigure[数字3]%子图2
{\includegraphics{3.png}}
\caption{子图数字展示}
\label{figure1}
\end{figure}
插入表格
介绍两种方法:
①推荐博客使用的比较简单的tabular方法,使用hline表示横线,用 | 表示竖线,用&分列,用\\换行,用l、c、r分别表示居左,居中、居右
\section{画表格}
画一张简单的表格
\begin{table}[!htb]%不加!htb会自动置顶
\caption{操作系统}
\centering
\begin{tabular}{|l|c|r|}
\hline
操作系统& 发行版& 编辑器\\
\hline
Windows & MikTeX & TexMakerX \\
\hline
Unix/Linux & teTeX & Kile \\
\hline
Mac OS & MacTeX & TeXShop \\
\hline
通用& TeX Live & TeXworks \\
\hline
\end{tabular}
\end{table}
②如果是长表格,就用longtable,加上另外一个用于旋转的包和跨行包,跟设计网页的表格有点类似
\usepackage{longtable}
\usepackage{multirow}
\usepackage{rotating}
使用长表格部分的代码为:
使用长表格
\newpage
\begin{longtable}{| c | c | c | c
| c | c |}
    \hline
    & \multicolumn{5}{| c |}{ } \\
    & \multicolumn{5}{| c |}{\textbf{\large 处理(卷积核大小5*3,DBN单元数$600->400->200->50->2$)}} \\
    & \multicolumn{5}{| c |}{ } \\
    \hline
    & & & & & \\
    \multicolumn{1}{|c|}{\textbf{}}
    &  \multicolumn{1}{|c|}{\textbf{}}
    &  \multicolumn{1}{c|}{\textbf{关节位置}}
    &  \multicolumn{1}{c|}{\textbf{欧拉角}}
    &  \multicolumn{1}{c|}{\textbf{做差diff}}
    &  \multicolumn{1}{c|}{\textbf{无diff}} \\
    & & & & & \\
     \cline{2-6}
    & & & & & \\
    \multirow{5}{*}{\begin{sideways}{\textbf{\large 实验}}\end{sideways}}
    &   \textbf{实验一}   &   √      &       &   ×      &     \\
    & & & & & \\
    \cline{2-6}
    & & & & & \\
   &   \textbf{实验二}   &   √      &        &          &   × \\
    & & & & & \\
     \cline{2-6}
    & & & & & \\
    &   \textbf{实验三}  &          &    √   &   ×      &      \\
    & & & & & \\
     \cline{2-6}
    & & & & & \\
    &   \textbf{实验四}  &         &    √    &          &   ×  \\
    & & & & & \\
    \hline
    \end{longtable}
效果如下:
页眉页脚
直接在begin{document}后面写页眉代码即可,刚开始在简单框架中,我们设置了页眉为空,是为了防止每页顶部自动添加文章标题,在这里我们注释掉取消页眉的那一行,添加如下代码
%\pagestyle{empty}
\lhead{\author{白菜}}
\chead{\date \today}
\rhead{123456789}
\lfoot{}
\cfoot{\thepage}
\rfoot{}
\renewcommand{\headrulewidth}{0.4pt}
\renewcommand{\headwidth}{\textwidth}
\renewcommand{\footrulewidth}{0pt}
效果如下:
(1)下面这种效果
可以用代码如下:
\section{句子表示}
\paragraph{} 怎么表示呢?
\begin{enumerate}
\item 额
\item 好
\item 什么鬼
\end{enumerate}
(2)如果想添加小黑点
这样的话,需要先添加一个包(这里我贴一下目前所用的所有包,第二个包就是本例使用的包)
\documentclass[UTF8]{ctexart} %文档类型,可键入中文
\usepackage{enumitem}
\usepackage{amsmath}
\usepackage{graphicx}
\usepackage{subfigure}
\usepackage{longtable}
\usepackage{multirow}
\usepackage{rotating}
\usepackage{fancyhdr}
\pagestyle{fancy}
然后再第四章中加入:
\paragraph{}加个小黑点
\begin{itemize}
\item 可以么
\item 试试呗
\end{itemize}
参考文献
最好去谷歌学术上查找相应的参考文献,在百度学术上导出的可能遇到部分问题。
举个例子,对比一下《Verbs and adverbs: Multidimensional motion interpolation》这篇文章分别在谷歌学术和百度学术上的bibtex导入链接
谷歌学术上为:
@article{rose1998verbs,
  title={Verbs and adverbs: Multidimensional motion interpolation},
  author={Rose, Charles and Cohen, Michael F and Bodenheimer, Bobby},
  journal={IEEE Computer Graphics and Applications},
  volume={18},
  number={5},
  pages={32--40},
  year={1998},
  publisher={IEEE}
}
百度学术上为:
@article{Rose1998Verbs,
  title={Verbs and Adverbs: Multidimensional Motion Interpolation},
  author={Rose, Charles and Cohen, Michael F. and Bodenheimer, Bobby},
  journal={IEEE Computer Graphics & Applications},
  volume={18},
  number={5},
  pages={32-40},
  year={1998},
}
可以看到,谷歌学术上会多一行,从下面的实验中可以看出来多一行和少一行的区别。
参考文献添加步骤:
①新建一个bib文件,我这里称为test.bib,里面放入从百度学术复制的一篇文章的bibtex
@article{Rose1998Verbs,
  title={Verbs and Adverbs: Multidimensional Motion Interpolation},
  author={Rose, Charles and Cohen, Michael F. and Bodenheimer, Bobby},
  journal={IEEE Computer Graphics & Applications},
  volume={18},
  number={5},
  pages={32-40},
  year={1998},
}
②在你的正文文档,也就是书写内容的tex文档中的
\begin{document}%开始文章书写之后引用
\bibliographystyle{plain}然后在需要引用参考文献的地方使用:
\cite{Rose1998Verbs}接下来在
\end{document}之前显示所有被引用的参考文献
\bibliography{test.bib}③点击快速构建
这就是刚开始说的,多一行与少一行的差别
因此,我们采用谷歌学术的方法去复制导入bibtex,再点击快速构建,然后点击工具栏->工具->BibTex或者直接按F11,最后再快速构建两次,即可成功
开头:
\begin{document}%开始文章书写
\bibliographystyle{plain}
%\pagestyle{empty}
\lhead{\author{白菜}}
结尾
参考文献\cite{Rose1998Verbs} 能不能打印出来
\bibliography{test.bib}
\end{document}
效果:
————————————————后续遇到问题会持续更新此博客——————————————


