以太坊私有链创建及智能合约的部署和交互
部署本机私有链
区块链说白了就是一个个块链接起来的一个链表结果,所以要在本机生成一个自己的私有链首先要做的就是自己先创建一个块作为第一个将要生成的区块链的第一个区块(区块链叫做创世块),所以先生成一个json文件genesis.json,内容为创世块的内容(也是每个区块的包含的基本内容):
{
"nonce":"0x0000000000000042",
"difficulty":"0x020000",
"mixhash":"0x0000000000000000000000000000000000000000000000000000000000000000",
"coinbase":"0x0000000000000000000000000000000000000000",
"timestamp":"0x00",
"parentHash":"0x0000000000000000000000000000000000000000000000000000000000000000",
"extraData":"0x11bbe8db4e347b4e8c937c1c8370e4b5ed33adb3db69cbdb7a38e1e50b1b82fa",
"gasLimit":"0x4c4b40",
"alloc":{}
}
说明:
mixhash:与nonce配合用于挖矿,由上一个区块的一部分生成的hash。
nonce: nonce就是一个64位随机数,用于挖矿。
difficulty: 设置当前区块的难度,如果难度过大,cpu挖矿就很难,这里设置较小难度
alloc: 用来预置账号以及账号的以太币数量,因为私有链挖矿比较容易,所以我们不需要预置有币的账号,需要的时候自己创建即可以。
coinbase: 矿工的账号,随便填
timestamp: 设置创世块的时间戳
parentHash: 上一个区块的hash值,因为是创世块,所以这个值是0
extraData: 附加信息,随便填,可以填你的个性信息
gasLimit: 该值设置对GAS的消耗总量限制,用来限制区块能包含的交易信息总和,因为我们是私有链,所以可以填最大。
创世块我们就这样创建好了。然后创建一个data文件夹用来存储区块数据和账号信息。本机创建私有链要确保安装以太坊的客户端https://geth.ethereum.org/downloads/。
这一切准备工作完成后我们就可以开始初始化创世块及启动我们自己的私有链。
初始化创世块
创建脚本start_init.bat:
geth --identity "超神链"--datadir "%cd%\data" init genesis.json
@pause
说明:identity 区块标示,名称
init 表示初始化区块,后面就是创世块的配置
datadir 表示数据存放的位置
创建私有链启动脚本startup.dat:
geth --identity "超神链"--datadir data --networkid 123456 --rpc --rpcaddr="0.0.0.0"--rpccorsdomain "*" --port "30303" --rpcapi"db,eth,net,web3" --nodiscover console
说明:networkid 表示启动私有链的网络ID,已其他节点相连是网络IP要一致。
rpc 开启rpc通信,可进行智能合约部署和调用。
rpcaddr 区块链提供了对外RPC接口,默认是localhost,这个设置为可以IP访问。
Rpccorsdomain 表示任何链接都可以连接到此节点。
Port 该节点对外开放端口。
Rpcapi 可以连接的客户端。
console:启动命令行模式,可以在Geth中执行命令。
其他的一些启动配置:
Bootnodes:设置要连接的节点,后面跟其他节点的信息。如:--bootnodesenode://bfdb56e1091f0a6a443efa5b255a5b085295208621d700528d4db080a56150b28244d2d34b6630deffee5328d20f562e60e6518ff7128832e6a3b9c305ae780b@10.132.97.29:30303console
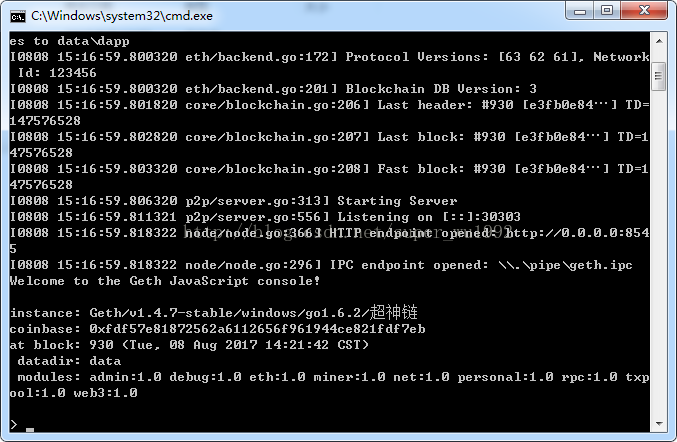
所有前期准备做好以后分布启动初始化及启动脚本。启动成功后会进入ethereum的javascript控制台。如下:
相关命令
创建新账号
personal.newAccount()
或者 personal.newAccount("123456")
查看节点信息
admin.nodeInfo
挖矿
开始挖矿 miner.start(1)
停止挖矿 miner.stop()
查看当前矿工账号
eth.coinbase默认为第一个账户
修改矿工账号
miner.setEtherbase(eth.accounts[1])
查看账户信息
eth.accounts[0]
查看账户余额
eth.getBalance(eth.accounts[0])
或者 web3.fromWei(eth.getBalance(eth.accounts[0]),"ether")
解锁账号
personal.unlockAccount(eth.accounts[0])
使用账户资金前都需要先解锁账号
转账eth.sendTransaction({from:eth.accounts[0],to:"0x587e57a516730381958f86703b1f8e970ff445d9",value:web3.toWei(3,"ether")})
使用 txpool.status 可以看到交易状态
查看区块数据
eth.blockNumber
eth.getTransaction("0x0c59f431068937cbe9e230483bc79f59bd7146edc8ff5ec37fea6710adcab825")
eth.getBlock(1)通过区块号查看区块
部署智能合约
合约部署需要挖矿才能成功,我们新开一个窗口用与挖矿,新开一个控制台,输入命令:geth attach 连接到控制台,执行miner.start(1),开始挖矿。
这里在网上找了个代币的只能合约,可以进行充值、转账和查询,issue 函数可以向充值以太到合约账户,transfer 函数可以向其他账号发送token,getBalance 函数可以获取某个账号的token余额,代码如下:
pragma solidity ^0.4.2;
contract Token {
address issuer;
mapping (address => uint) balances;
event Issue(address account, uint amount);
event Transfer(address from, address to,uint amount);
function Token() {
issuer = msg.sender;
}
function issue(address account, uintamount) {
if (msg.sender != issuer) throw;
balances[account] += amount;
}
function transfer(address to, uint amount){
if (balances[msg.sender] < amount)throw;
balances[msg.sender] -= amount;
balances[to] += amount;
Transfer(msg.sender, to, amount);
}
function getBalance(address account)constant returns (uint) {
return balances[account];
}
}
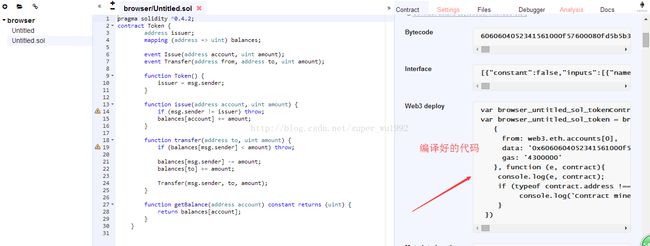
智能合约的部署需要编译,这里用在线编译:
https://ethereum.github.io/browser-solidity/#version=soljson-v0.4.14+commit.c2215d46.js
修改编译好的gas和对象名称:
varbrowser_untitled_sol_tokenContract =web3.eth.contract([{"constant":false,"inputs":[{"name":"account","type":"address"},{"name":"amount","type":"uint256"}],"name":"issue","outputs":[],"payable":false,"type":"function"},{"constant":false,"inputs":[{"name":"to","type":"address"},{"name":"amount","type":"uint256"}],"name":"transfer","outputs":[],"payable":false,"type":"function"},{"constant":true,"inputs":[{"name":"account","type":"address"}],"name":"getBalance","outputs":[{"name":"","type":"uint256"}],"payable":false,"type":"function"},{"inputs":[],"payable":false,"type":"constructor"},{"anonymous":false,"inputs":[{"indexed":false,"name":"account","type":"address"},{"indexed":false,"name":"amount","type":"uint256"}],"name":"Issue","type":"event"},{"anonymous":false,"inputs":[{"indexed":false,"name":"from","type":"address"},{"indexed":false,"name":"to","type":"address"},{"indexed":false,"name":"amount","type":"uint256"}],"name":"Transfer","type":"event"}]);
var token =browser_untitled_sol_tokenContract.new(
{
from: web3.eth.accounts[0],
data:'0x6060604052341561000f57600080fd5b5b336000806101000a81548173ffffffffffffffffffffffffffffffffffffffff021916908373ffffffffffffffffffffffffffffffffffffffff1602179055505b5b6103d2806100616000396000f30060606040526000357c0100000000000000000000000000000000000000000000000000000000900463ffffffff168063867904b414610054578063a9059cbb14610096578063f8b2cb4f146100d8575b600080fd5b341561005f57600080fd5b610094600480803573ffffffffffffffffffffffffffffffffffffffff16906020019091908035906020019091905050610125565b005b34156100a157600080fd5b6100d6600480803573ffffffffffffffffffffffffffffffffffffffff169060200190919080359060200190919050506101d2565b005b34156100e357600080fd5b61010f600480803573ffffffffffffffffffffffffffffffffffffffff1690602001909190505061035c565b6040518082815260200191505060405180910390f35b6000809054906101000a900473ffffffffffffffffffffffffffffffffffffffff1673ffffffffffffffffffffffffffffffffffffffff163373ffffffffffffffffffffffffffffffffffffffff1614151561018057600080fd5b80600160008473ffffffffffffffffffffffffffffffffffffffff1673ffffffffffffffffffffffffffffffffffffffff168152602001908152602001600020600082825401925050819055505b5050565b80600160003373ffffffffffffffffffffffffffffffffffffffff1673ffffffffffffffffffffffffffffffffffffffff16815260200190815260200160002054101561021e57600080fd5b80600160003373ffffffffffffffffffffffffffffffffffffffff1673ffffffffffffffffffffffffffffffffffffffff1681526020019081526020016000206000828254039250508190555080600160008473ffffffffffffffffffffffffffffffffffffffff1673ffffffffffffffffffffffffffffffffffffffff168152602001908152602001600020600082825401925050819055507fddf252ad1be2c89b69c2b068fc378daa952ba7f163c4a11628f55a4df523b3ef338383604051808473ffffffffffffffffffffffffffffffffffffffff1673ffffffffffffffffffffffffffffffffffffffff1681526020018373ffffffffffffffffffffffffffffffffffffffff1673ffffffffffffffffffffffffffffffffffffffff168152602001828152602001935050505060405180910390a15b5050565b6000600160008373ffffffffffffffffffffffffffffffffffffffff1673ffffffffffffffffffffffffffffffffffffffff1681526020019081526020016000205490505b9190505600a165627a7a723058204afe007a03446d43d13ac892e6dba9d032f540a11ff427d26c22560727cbea2f0029',
gas: '4300000'
}, function (e, contract){
console.log(e, contract);
if (typeof contract.address !=='undefined') {
console.log('Contract mined! address:' + contract.address + ' transactionHash: ' + contract.transactionHash);
}
})
将编译好的代码拷贝直接放到控制台即可。如果出现Error: account is locked undefined错误的话, 则使用personal.unlockAccount(eth.accounts[0],'password')命令将用户解锁。Password为你创建账号的密码。一段时间后geth窗口就会出现Contract mined! address..., 表明合约代码发布成功。
智能合约的调用
合约部署成功后,在控制台可以直接调用。
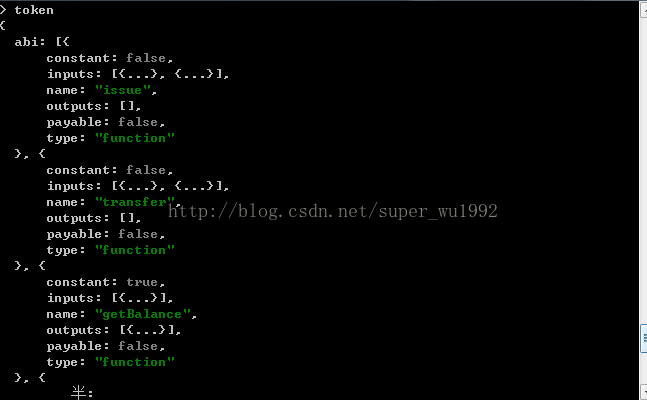
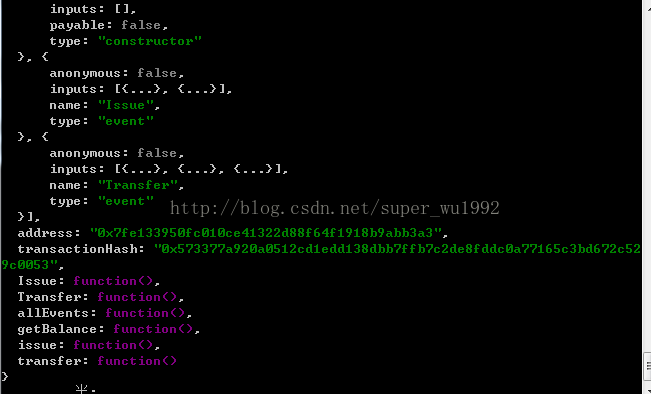
控制输入token,放回该合约的信息:这里重点就是address表示的是合约的地址,你会发现这个和账号的信息结果一样,其实你也可以把这个合约地址看做是一个账号地址,后面我们外部调用到的就是这个合约地址。
控制台调用
充值
personal.unlockAccount(eth.accounts[0])
token.issue.sendTransaction(eth.accounts[0],100, {from: eth.accounts[0]});
miner.start(1)
miner.stop()
发送 token
token.transfer(eth.accounts[1], 30, {from:eth.accounts[0]})
miner.start(1)
miner.stop()
查看余额
token.getBalance()
控制台调用就不多说,和java对象调用一样,直接调用即可。
外部接口与智能合约交互
以太坊对外提供的有很多接口JSON RPC接口,web3接口,这里我们用JSON RPC接口。
相关API: https://github.com/ethereum/wiki/wiki/JSON-RPC#eth_sendrawtransaction
合约交互的原理
合约的交互都是一次交易,而我们要做的就是把要调用的方法和参数按照api规定的以参数的形式向区块请求一次交易,ethereum接收到我们的请求后通过解析传递的参数来执行相关的合约代码。
RPC接口给我们提供了俩个方法:eth_sendTransaction和eth_call。
eth_sendTransaction
Createsnew message call transaction or a contract creation, if the data field containscode.
Parameters
Object- The transaction object
from:DATA, 20 Bytes - The address the transaction is send from.to:DATA, 20 Bytes - (optional when creating new contract) The address the transaction is directed to.gas:QUANTITY- (optional, default: 90000) Integer of the gas provided for the transaction execution. It will return unused gas.gasPrice:QUANTITY- (optional, default: To-Be-Determined) Integer of the gasPrice used for each paid gasvalue:QUANTITY- (optional) Integer of the value send with this transactiondata:DATA- The compiled code of a contract OR the hash of the invoked method signature and encoded parameters. For details see Ethereum Contract ABInonce:QUANTITY- (optional) Integer of a nonce. This allows to overwrite your own pending transactions that use the same nonce.
可以看到,如果我们创建的为合约时,我们只需要from,to(文档上写的是可选的,但是实际操作中没有to为null的话合约不能正常执行,建议还是加上,这个值就是前面我们部署合约后生成的合约address),data。Data的属性的值具体可以看Contract ABI。这里大概说下:
Data的值相对来说不是固定的,具体怎么生成与合约的参数类型,参数数量都有关联。这里我们以部署的token合约的三个方法为例:
充值issue (address account, uintamount)
这个方法有俩个参数,address充值账号,uint充值数量。
根据Contract ABI,data值应该为方法名的sha3的前8个字节+参数的64字节,不够前面补充为0。
这里方法名并不是issue (address account, uint amount)而是issue(address,uint256)的sha3值。
我们往第一个账号充值10,这里的数据不是以太币,而是我们自己创建的代币。
将10转换为16进制为
000000000000000000000000000000000000000000000000000000000000000a
那么data的数据为:
0x867904b4000000000000000000000000fdf57e81872562a6112656f961944ce821fdf7eb000000000000000000000000000000000000000000000000000000000000000a
那么最后我们调用eth_sendTransaction方法传递参数JSON对象为:
{
from:0xfdf57e81872562a6112656f961944ce821fdf7eb,
to:0x7fe133950fc010ce41322d88f64f1918b9abb3a3,
data: 0x867904b4000000000000000000000000fdf57e81872562a6112656f961944ce821fdf7eb000000000000000000000000000000000000000000000000000000000000000a
}
返回:此交易的hash值,此时该交易还没有执行,只是创建,还需要矿工通过挖矿才能完成。
调用接口方法:
JsonRpcHttpClient client = newJsonRpcHttpClient(new URL(“http://127.0.0.1:8545”));
Object result = client.invoke(methodName,params, Object.class);
通过控制台查看第一个账号已有代币:

执行调用接口代码。返回交易hash值:
0x2013764d1c3fea680f9015353497aa5f9f8d61580a3bd0524b3613b34329c095
此时控制台输入:

说明此交易等待矿工处理。
查看此时交易状态:
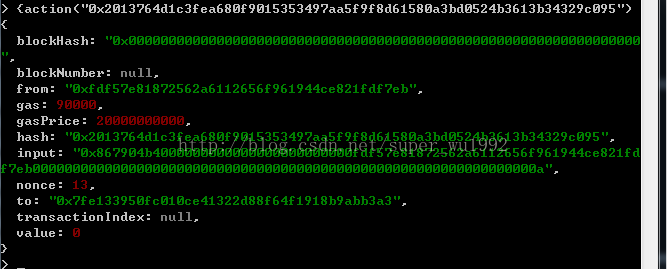
发现这个交易中blockNumber还是null,因为此次交易还处于挂起状态,需要生成一个新的区块才能行。

可以看到此次等待交易为1.
现在开启挖矿。生成新的区块后我们停止挖矿,再来看看第一个账号此时的代币金额:
我们再来看下此时的交易状态:
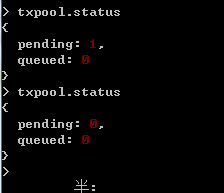
来看下此次的交易详情:
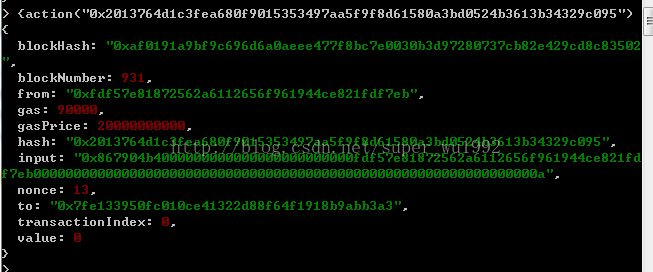
区块数据已经出来了,至此此次充值成功。
交易和充值一样,需要注意的是代币转出账号为from属性的值,代币转入账号为data属性里的值,to对应的是合约地址。
eth_call
Executes anew message call immediately without creating a transaction on the block chain.
Parameters
Object- The transaction call object
from:DATA, 20 Bytes - (optional) The address the transaction is sent from.to:DATA, 20 Bytes - The address the transaction is directed to.gas:QUANTITY- (optional) Integer of the gas provided for the transaction execution. eth_call consumes zero gas, but this parameter may be needed by some executions.gasPrice:QUANTITY- (optional) Integer of the gasPrice used for each paid gasvalue:QUANTITY- (optional) Integer of the value send with this transactiondata:DATA- (optional) Hash of the method signature and encoded parameters. For details seeEthereum Contract ABI
QUANTITY|TAG- integer block number, or the string"latest","earliest"or"pending", see the default block parameter
这个方法返回一条信息给我们,相当于数据库的查询功能,参数也是三个,from,to,data,数据格式都是一样的。
查询getBalance(address account)
查询方法hash码:
查询我们上一步充值的账号,那么传递的参数data为:
0xf8b2cb4f000000000000000000000000fdf57e81872562a6112656f961944ce821fdf7eb
eth_call方法最后参数为:
{
from: 0xfdf57e81872562a6112656f961944ce821fdf7eb,
to:0x7fe133950fc010ce41322d88f64f1918b9abb3a3,
data:0xf8b2cb4f000000000000000000000000fdf57e81872562a6112656f961944ce821fdf7eb
}
注意,这个方法需要俩参数,处理一个JSONobject外,还有一个字符串参数,这俩可以为“”或者"latest", "earliest" or "pending"
调用接口返回一个16进制字符串:
0x0000000000000000000000000000000000000000000000000000000000000071就是该账号的代币数量,转换为十进制为:113,与控制查询一致。这就是一个智能合约的交互过程。是不是很简单啊。
