一、前言
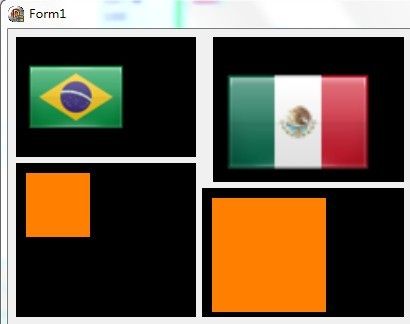
在学习OpenGL的过程中,发现很多函数都是全局的。前面几章中都是在一个窗口DC中画图,那么要在多个窗口画图,需要怎么处理呢?网上方法有多种,这里采用其中一种,利用wglMakeCurrent函数来切换不同窗口,以达到多窗口同时喧染的目的。
二、准备
每个窗口与OpenGL绑定时,都通过以下几个过程进行:
1.获取窗口句柄Handle/HWND(在TWinControl继承下来的类中,都可以通过TWinControl.Handle获得,MFC的窗口可以通过CWnd::GetSafeHwnd()获得)
2.通过句柄获取设备场景HDC(通过API GetDC()获取)
3.通过设备场景HDC获取OpenGL的HGLRC(通过OpenGL的wglCreateContext()获得)
当然,在程序销毁时记得释放相应的HGLRC与窗口DC。通过以上的对应关系,可以把这些信息存储在数组中。以四个窗口为例,我建了这样几个数组:
    FDC: array[0..3] of HDC;
    FHRC: array[0..3] of HGLRC;
    FHwnd: array[0..3] of THandle;
三、初始化
本例以多个TPanel为例代替多个窗口,以上三个数组进行初始化。新建了一个inidc()的方法,在窗口的OnCreate时调用,目的是初始化数组变量的值
procedure TForm1.FormCreate(Sender: TObject);
begin
  Fbmpindex := 0;
  // 对多个窗口进行初始化
  inidc(0, Pnl1.Handle);
  inidc(1, Pnl2.Handle);
  inidc(2, Pnl3.Handle);
  inidc(3, Pnl4.Handle);
end;
下面的inidc的代码
procedure TForm1.inidc(i: Integer; hform: THandle);
var
 pfd:TPIXELFORMATDESCRIPTOR;
  pixelFormat: Integer;
begin
  With pfd do
  begin
    nSize := sizeof(TPIXELFORMATDESCRIPTOR); // size
    nVersion := 1; // version
    dwFlags := PFD_SUPPORT_OPENGL or PFD_DRAW_TO_WINDOW or PFD_DOUBLEBUFFER; // support double-buffering
    iPixelType := PFD_TYPE_RGBA; // color type
    cColorBits := 24; // preferred color depth
    cRedBits := 0;
    cRedShift := 0; // color bits (ignored)
    cGreenBits := 0;
    cGreenShift := 0;
    cBlueBits := 0;
    cBlueShift := 0;
    cAlphaBits := 0;
    cAlphaShift := 0; // no alpha buffer
    cAccumBits := 0;
    cAccumRedBits := 0; // no accumulation buffer,
    cAccumGreenBits := 0; // accum bits (ignored)
    cAccumBlueBits := 0;
    cAccumAlphaBits := 0;
    cDepthBits := 16; // depth buffer
    cStencilBits := 0; // no stencil buffer
    cAuxBuffers := 0; // no auxiliary buffers
    iLayerType := PFD_MAIN_PLANE; // main layer
    bReserved := 0;
    dwLayerMask := 0;
    dwVisibleMask := 0;
    dwDamageMask := 0;
  end;
  FDC[i] := GetDC(hform);
  FHwnd[i] := hform;
  pixelFormat := ChoosePixelFormat(FDC[i], @pfd);
  if pixelFormat = 0 then
    Exit;
  if not SetPixelFormat(FDC[i], pixelFormat, @pfd) then
    Exit;
  FHRC[i] := wglCreateContext(FDC[i]);
  wglMakeCurrent(FDC[i], FHRC[i]);

  // 设置背景色为 黑色 参数为 RGBA
  glClearColor(0, 0, 0, 0);
end;
四、绘制
这里修改一下前面几章中的Draw函数,用于支持多窗口的绘制,代码如下:
procedure TForm1.Draw(i: Integer);
var
  Bmp: TBitmap;
  texture: GLuint;
  l, t, w, h: Integer;
  rc: TRect;
begin
  // 重新设置显示区域
  wglMakeCurrent(FDC[i], FHRC[i]);
  // 重新计算并设置显示区域大小
  GetWindowRect(fhwnd[i], rc);
  w := rc.Right - rc.Left;
  h := rc.Bottom - rc.Top;
  glMatrixMode(GL_PROJECTION);
  glLoadIdentity;
  glViewPort(0, 0, w, h);
  gluOrtho2D(0, w, h, 0);
  glMatrixMode(GL_MODELVIEW);
  glLoadIdentity;

  // 只是为了显示多个图片,不是必须的
  inc(Fbmpindex);
  Bmp := TBitmap.Create;
  Bmp.LoadFromFile(ExtractFilePath(ParamStr(0)) + IntToStr(Fbmpindex mod 3) + '.bmp');
  // 创建纹理区域
  glGenTextures(1, @texture); // 这地方是错误的,应该用成员变量,不能一直创建纹理,否则内存会一直涨
  // 绑定纹理区域
  glBindTexture(GL_TEXTURE_2D, texture);
  // 使用位图创建图像纹理
  glTexImage2D(
    GL_TEXTURE_2D,            // 纹理是一个2D纹理 GL_TEXTURE_2D
    0,                        // 图像的详细程度 默认 0
    3,                        // 数据的成分数。因为图像是由红,绿,蓝三种组成 默认3
    Bmp.Width,                // 纹理的宽度
    Bmp.Height,               // 纹理的高度
    0,                        // 边框的值 默认 0
    GL_BGR_EXT,               // 数据格式 bmp使用 bgr
    GL_UNSIGNED_BYTE,         // 组成图像的数据是无符号字节类型的
    Bmp.ScanLine[Bmp.Height - 1] // DIB数据指针
  );
  // 下面两行是让opengl在放大原始的纹理大(GL_TEXTURE_MAG_FILTER)或缩小原始纹理(GL_TEXTURE_MIN_FILTER)时OpenGL采用的滤波方式。
  // GL_LINEAR 使用线性滤波,可以把图片处理处平滑,但需要更多的内存与CPU
  glTexParameteri(GL_TEXTURE_2D, GL_TEXTURE_MIN_FILTER, GL_LINEAR);  // 线形滤波
  glTexParameteri(GL_TEXTURE_2D, GL_TEXTURE_MAG_FILTER, GL_LINEAR);  // 线形滤波

  // 以下是绘图,利用一个四边形,绘制图片

  // 启用纹理映射
  if glIsEnabled(GL_TEXTURE_2D) = 0 then
    glEnable(GL_TEXTURE_2D);
  // 清空缓冲区
  glClear(GL_COLOR_BUFFER_BIT or GL_DEPTH_BUFFER_BIT);

  l := 10;
  t := 10;
  w := 100 + (i * 50); // 放大为200*200的图片

  // 选择纹理 如果场景中使用多个纹理,不能在glBegin() 和 glEnd() 之间绑定纹理
  glBindTexture(GL_TEXTURE_2D, texture);
  glBegin(GL_QUADS);
  // glTexCoord2f 的第一个参数是X坐标。
  // 0.0是纹理的左侧。 0.5是纹理的中点, 1.0是纹理的右侧。
  // glTexCoord2f 的第二个参数是Y坐标。
  // 0.0是纹理的底部。 0.5是纹理的中点, 1.0是纹理的顶部。
  glTexCoord2f(0, 1);
  glVertex2f(l, t);
  glTexCoord2f(1, 1);
  glVertex2f(l + w, t);
  glTexCoord2f(1, 0);
  glVertex2f(l + w, t + w);
  glTexCoord2f(0, 0);
  glVertex2f(l, t + w);
  glEnd();

  Bmp.Free;
  SwapBuffers(FDC[i]);
end;
上面的画图片的代码,如果觉得看起来复杂,可以用以下简单点的代码:
procedure TForm1.DrawSimple(i: Integer);
var
  l, t, w, h: Integer;
  rc: TRect;
begin
  // 重新设置显示区域
  wglMakeCurrent(FDC[i], FHRC[i]);
  // 重新计算并设置显示区域大小
  GetWindowRect(fhwnd[i], rc);
  w := rc.Right - rc.Left;
  h := rc.Bottom - rc.Top;
  glMatrixMode(GL_PROJECTION);
  glLoadIdentity;
  glViewPort(0, 0, w, h);
  gluOrtho2D(0, w, h, 0);
  glMatrixMode(GL_MODELVIEW);
  glLoadIdentity;

  // 清空缓冲区
  glClear(GL_COLOR_BUFFER_BIT or GL_DEPTH_BUFFER_BIT);
  // 设置四边形的颜色
  glColor3f(1, 0.5, 0);

  // 绘制第一个多边形
  l := 10;
  t := 10;
  w := 64 + (i - 2) * 50;
  glBegin(GL_QUADS);
  glVertex2f(l, t);
  glVertex2f(l + w, t);
  glVertex2f(l + w, t + w);
  glVertex2f(l, t + w);
  glEnd();
  SwapBuffers(FDC[i]);
end;
为了方便演示,这里用一个定时器TTimer代替以前在窗口的OnPaint画图,定时器下的代码如下:
procedure TForm1.tmr1Timer(Sender: TObject);
begin
  Draw(0);
  Draw(1);
  DrawSimple(2);
  DrawSimple(3);
end;
五、释放
最后记得释放资源,Delphi中基本上申请的资源都要回收,new->delete/dispose、get->release、create->destroy,简单的说,创建(create)的要销毁(destroy),借(get)的要还(release)。
procedure TForm1.FormDestroy(Sender: TObject);
var
  i: Integer;
begin
  for i := 0 to 4 - 1 do
  begin
    wglMakeCurrent(FDC[i], FHRC[i]);
    wglDeleteContext(FHRC[i]);
    ReleaseDC(fhwnd[i], FDC[i]);
  end;
end;
效果如下:
源码下载:OpenGL_06.zip
2014-07-17 by lin
