Tensorflow(六)使用LSTM对MNIST数据集进行分类
对于RNN和LSTM不了解的朋友,可以去看看这两篇入门介绍,写的非常棒,在此特别感谢两位作者!!
RNN入门:https://zhuanlan.zhihu.com/p/28054589
LSTM入门:http://colah.github.io/posts/2015-08-Understanding-LSTMs
本文参照了:https://jasdeep06.github.io/posts/Understanding-LSTM-in-Tensorflow-MNIST/ 对这篇文章结合自己的理解作出翻译。
1.MNIST数据集结构
- Training data(
mnist.train)-55000 个训练数据集 - Test data(
mnist.test)-10000 个测试数据集 - Validation data(
mnist.validation)-5000个验证数据集
每个类别又分为了images和labels,也就是图片以及标签,每张图片都是(28*28*1)的,数据集中将图片的特征值压缩为(number,784)。LSTMs通常适用于复杂的序列问题像自然语言处理这类的问题,但这种问题本身就不太好理解,我们的主要目标是去理解LSTMs在tensorflow中具体实现细节,比如处理输入格式,LSTM的cell运作以及对网络模型的整体设计。MNIST就是一个不错的选择。
2.Implementation
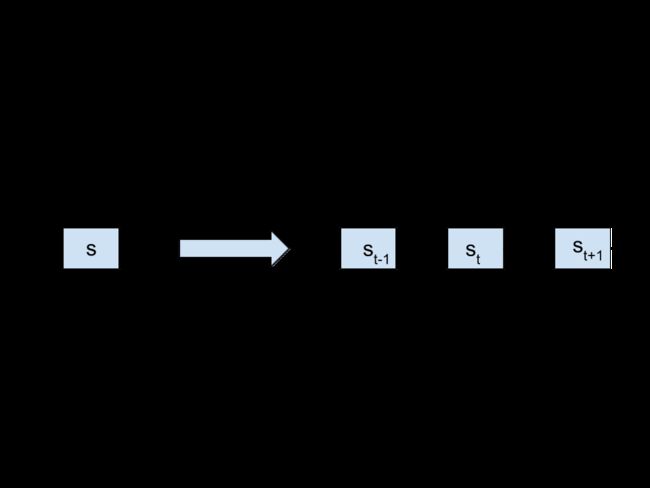
首先给出一张RNN网络图,理解了这张图再去实现代码就会更直观。
- xt 代表了每个时间节点的输入
- st 代表了在t时间点的隐藏单元 这也成为网络的记忆 memory
- ot 代表每个时间点的输出
- U,V and W 是每个时间点都共享的参数,使用相同参数的巧妙之处就在于我们的模型每次都使用不同的输入来处理相同的任务。
t时间节点中st接收的输入包括了xt(数据的输入)和前一个时间节点隐藏层处理的结果。
上面说的这些其实是RNN基础内容,也没有涉及LSTM,如果读者认为这部分难以理解的话,请先阅读最开始推荐的两篇入门,原文这里也没介绍LSTM,说实话有了colah那篇LSTMs入门,我再写介绍都显得多余了,下面就直接进入正题了。
Interpretation of LSTM cells in tensorflow 解释tensorflow中的LSTM cell
一个基本的LSTM cell在tf中可以这样定义:
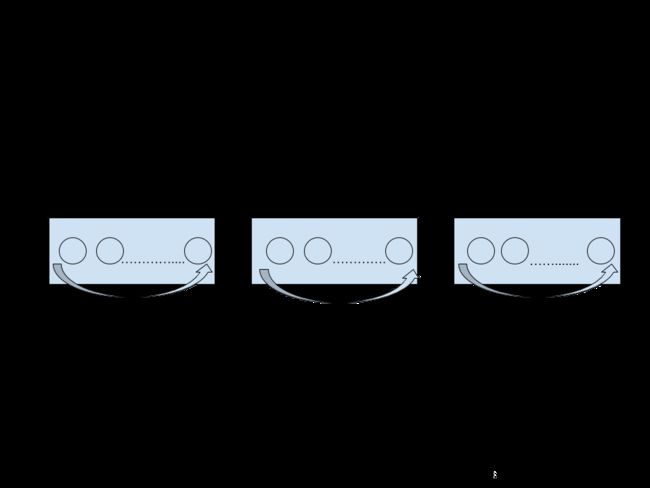
tf.contrib.rnn.BasicLSTMCell(num_units)num_units是指LSTM cell中的单元数目,可以类比前馈神经网络中的隐藏层的处理单元个数,见下图。
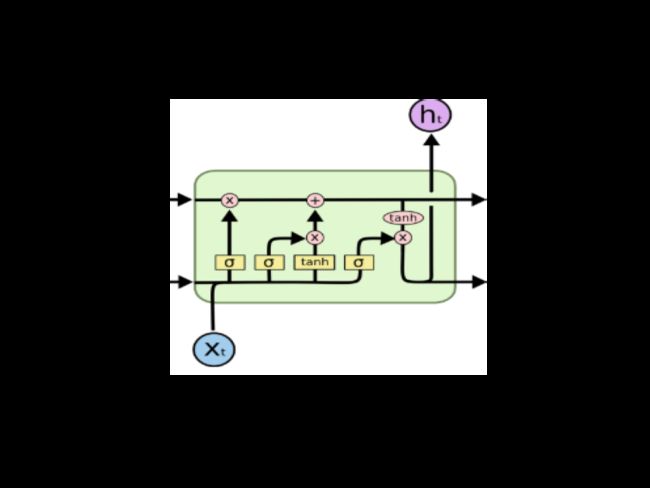
每一个num_units 都可以看做是一个标准的LSTM单元,如下:
Formatting inputs before feeding them to tensorflow RNNs 把数据喂给RNN之前对数据进行处理
tensorflow中最简单的RNN结果可以这样定义:
tf.contrib.static_rnn(cell,inputs)这个方法还有其他参数,但现在我们集中处理这两个参数,input参数接受的数据格式为[batch_size,input_size]。
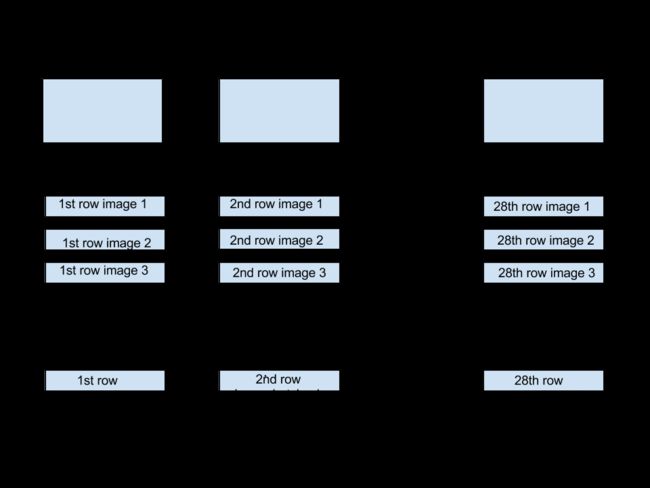
这个inputs列表的长度是网络展开时间节点的个数。拿MNIST为例,一张图片是28*28的,每次喂给cell一行数据,那么需要喂28次,那么在这个例子中的时间节点就是28。如果使用batch_size,对于第一个时间节点来说,都要将 batch_size张图片的第一行喂给cell,见下图。
tf.static_run产生的结果是格式为[batch_size,num_units]的一系列数据,它的长度还是网络展开后时间节点的个数。每个时间节点有一个输出,也就是一共28个,我们将这个输出结果叫做output tensor。在这个例子中,我们将最后一个时间节点的输出tensor视为网络的预测值。
理清楚这些概念,就可以写代码了,如果觉得看的有些迷糊,不用急,可以借助代码去理解上面的东西。
3.Code
先引入重要的包依赖,数据集,以及申明一些常量
import tensorflow as tf
from tensorflow.contrib import rnn

#import mnist dataset
from tensorflow.examples.tutorials.mnist import input_data
mnist=input_data.read_data_sets("/tmp/data/",one_hot=True)

#先定义几个后面要用到的常量
#时间节点
time_steps=28
#LSTM 隐藏层单元数量
num_units=128
#一行输入28个像素点
n_input=28
# adam的学习率
learning_rate=0.001
#标签种类 (0-9).
n_classes=10
#一个批次(batch)的数量
batch_size=128
现在申明placehoder,如果对SQL语句有些了解,这里的placeholder和占位符在功能上其实很相似。再申明参数值,包括weights和bias,其中weights需要将[batch_size,num_units]转化为[batch_size,n_classes]的格式,所以weights的申明格式就是[num_units,n_classes],可以类比前馈神经网络中输出层的weights格式。
#weights & bias
out_weights=tf.Variable(tf.random_normal([num_units,n_classes]))
out_bias=tf.Variable(tf.random_normal([n_classes]))

#两个占位符
x=tf.placeholder("float",[None,time_steps,n_input])
y=tf.placeholder("float",[None,n_classes])

#上面x的格式需要转换为[batch_size,n_input]才能作为input 创给static_rnn方法
#转化以后 input就变成格式为 [batch_size,n_input] 长度为time_teps 也就是28的一个list
#我们将这个list也称为tensor
input=tf.unstack(x ,time_steps,1)
接下来就可以定义我们的网络模型了,我们定义一个 lstm_layer 这里也就是一个LSTM cell,将layer传给static_rnn就可以获取到输出结果,定义预测值,loss,优化器和准确度。
#定义layer和rnn训练
lstm_layer=rnn.BasicLSTMCell(num_units,forget_bias=1)
outputs,_=rnn.static_rnn(lstm_layer,input,dtype="float32")


#只考虑最后时间节点的输出 作为我们的预测值
prediction=tf.matmul(outputs[-1],out_weights)+out_bias

#loss
loss=tf.reduce_mean(tf.nn.softmax_cross_entropy_with_logits(logits=prediction,labels=y))

#优化器
opt=tf.train.AdamOptimizer(learning_rate=learning_rate).minimize(loss)

#计算准确度
correct_prediction=tf.equal(tf.argmax(prediction,1),tf.argmax(y,1))
accuracy=tf.reduce_mean(tf.cast(correct_prediction,tf.float32))
至此,我们的图结构就全部定义完了,(图结构是指tensorflow中的Graph),下面就可以运行了
#初始化变量
init=tf.global_variables_initializer()
with tf.Session() as sess:
    sess.run(init)
    iter=1
    while iter<800:
        #获取下一批次的数据
        batch_x,batch_y=mnist.train.next_batch(batch_size=batch_size)
        #改变x的结构,获取到的数据格式为[number,784] 要改变才能匹配我们定义的placehodler
        batch_x=batch_x.reshape((batch_size,time_steps,n_input))
        #运行
        sess.run(opt, feed_dict={x: batch_x, y: batch_y})

        if iter %10==0:
            #计算训练集的准确度
            acc=sess.run(accuracy,feed_dict={x:batch_x,y:batch_y})
            los=sess.run(loss,feed_dict={x:batch_x,y:batch_y})
            print("For iter ",iter)
            print("Accuracy ",acc)
            print("Loss ",los)
            print("__________________")

        iter=iter+1

    #也可以计算测试集的准确度 参考结果 : 99.21%
    test_data = mnist.test.images.reshape((-1, time_steps, n_input))
    test_label = mnist.test.labels
    print("Testing Accuracy:", sess.run(accuracy, feed_dict={x: test_data, y: test_label}))
结果:
__________________
For iter  770
Accuracy  0.9609375
Loss  0.111083694
__________________
For iter  780
Accuracy  0.9609375
Loss  0.093546726
__________________
For iter  790
Accuracy  0.984375
Loss  0.050075933
__________________

Testing Accuracy: 0.9647
作者这里迭代了800次,但其实不是每一次迭代都训练了所有的数据,只训练了一个批次的数据,运行速度很快,大概2min吧,我用的是CPU,如果用GPU加速了估计更快,可以看出虽然每次迭代没有训练所有的数据,但是结果也还是满意的。


