PyOpenGL骨骼动画(skeleton animation) 二
上一期简单介绍了一下Collada文件的格式,这一节我们就来实际操作该文件,但是不是自己定义xml文件的读取解析方法(这个轮子就没必要造了),在google查了一下,python里有pycollada扩展库,可以用来帮我们解析dae格式的文件,同时,它还可以生成dae文件,功能很强大,这里我们只是用最基础的功能。
废话不多说,先来看一下最终动画的效果(录制原因导致帧率有点低)。代码及资源参考了这里,完整项目托管在这里。
pycollada(依赖numpy)安装
pip install pycollada
生成一个Collada的对象
from collada import Collada
model = Collada("human.dae")
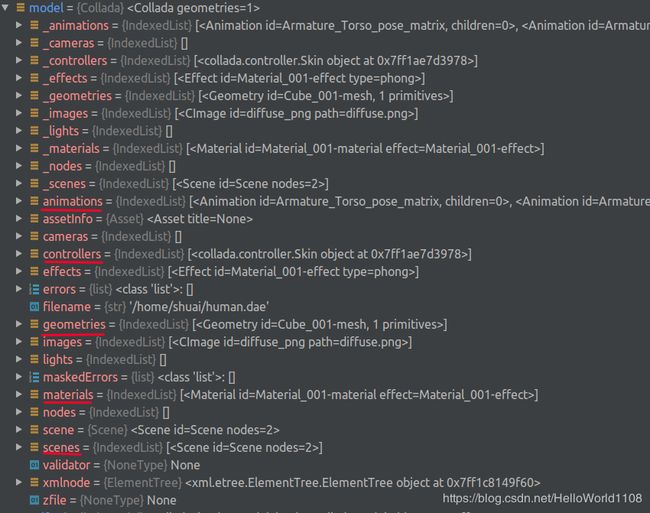
ok,来看一下这个对象下面都有什么。

可以看到这里有上节主要讲的animation geometries materials scenes controllers,我们接下来的任务就是从中整理出对应的OpenGL顶点,法线,纹理,关节,权值信息,注册到vao中,然后进行渲染。
顶点,法线,纹理,关节,权值信息获取
直接看代码(个人写法,有些粗陋)
    def __load_mesh_data(self, node):
        self.ntriangles = []
        self.texture = []
        weights_data = np.squeeze(node.controller.weights.data)
        for index, mesh_data in enumerate(node.controller.geometry.primitives):
            vertex = []
            self.ntriangles.append(mesh_data.ntriangles)
            try:
                material = node.materials[index]
                diffuse = material.target.effect.diffuse
                texture_type = "v_color" if type(diffuse) == tuple else "sampler"
            except:
                texture_type = None
            for i in range(mesh_data.ntriangles):
                v = mesh_data.vertex[mesh_data.vertex_index[i]]
                n = mesh_data.normal[mesh_data.normal_index[i]]
                if texture_type == "sampler":
                    t = mesh_data.texcoordset[0][mesh_data.texcoord_indexset[0][i]]
                elif texture_type == "v_color":
                    t = np.array(diffuse[:-1]).reshape([1, -1]).repeat([3], axis=0)
                j_index_ = [node.controller.joint_index[mesh_data.vertex_index[i, 0]],
                            node.controller.joint_index[mesh_data.vertex_index[i, 1]],
                            node.controller.joint_index[mesh_data.vertex_index[i, 2]]]

                w_index = [node.controller.weight_index[mesh_data.vertex_index[i, 0]],
                           node.controller.weight_index[mesh_data.vertex_index[i, 1]],
                           node.controller.weight_index[mesh_data.vertex_index[i, 2]]]

                w_ = [weights_data[w_index[0]], weights_data[w_index[1]], weights_data[w_index[2]]]

                j_index = []
                w = []
                for j in range(3):
                    if j_index_[j].size < 3:
                        j_index.append(
                            np.pad(j_index_[j], (0, 3 - j_index_[j].size), 'constant', constant_values=(0, 0))[:3])
                        w.append(
                            np.pad(w_[j], (0, 3 - j_index_[j].size), 'constant', constant_values=(0, 0))[:3])
                    else:
                        j_index.append(j_index_[j][:3])

                        w.append(w_[j][:3] / np.sum(w_[j][:3]))

                if not texture_type:
                    vertex.append(np.concatenate((v, n, j_index, w), axis=1))
                else:
                    vertex.append(np.concatenate((v, n, j_index, w, t), axis=1))

            self.__set_vao(np.row_stack(vertex), texture_type)

            if texture_type == "sampler":
                self.texture.append(self.__set_texture(diffuse.sampler.surface.image))
            else:
                self.texture.append(-1)
骨架信息获取
递归方式获得骨架信息
    def __load_armature(self, node):
        children = []
        for child in node.children:
            if type(child) == collada.scene.Node:
                joint = Joint(child.id, self.inverse_transform_matrices[self.joints_order.get(child.id)])
                joint.children.extend(self.__load_armature(child))
                children.append(joint)
        return children
关键帧加载
    def __load_keyframes(self, animation_node):
        self.keyframes = []
        keyframes_times = np.squeeze(animation_node[0].sourceById.get(animation_node[0].id + "-input").data).tolist()
        for index, time in enumerate(keyframes_times):
            joint_dict = dict()
            for animation in animation_node:
                joint_dict[animation.id] = animation.sourceById.get(animation.id + "-output").data[
                                           index * 16:(index + 1) * 16].reshape((4, 4))
            self.keyframes.append(KeyFrame(time, joint_dict))
插值
接下来讲几点值得关注的点,进行动画关键帧插值的时候,顶点坐标可以直接进行插值,即初始坐标加上两个关键帧之间的动画进度progress*两帧距离,看下面的代码
	# 位移的插值 translation_a为初始帧 translation_b为结束帧 progress表示在a b两帧之间的动画进度,范围为[0,1]
    def interpolating_translation(self, translation_a, translation_b, progress):
        i_translation = np.identity(4)
        i_translation[0, 3] = translation_a[0, 3] + (translation_b[0, 3] - translation_a[0, 3]) * progress
        i_translation[1, 3] = translation_a[1, 3] + (translation_b[1, 3] - translation_a[1, 3]) * progress
        i_translation[2, 3] = translation_a[2, 3] + (translation_b[2, 3] - translation_a[2, 3]) * progress
        return i_translation
然而旋转角度的插值不能直接用欧拉角度的方式操作,这里选择四元数quaternion进行操作。同时我也是用了一个矩阵变换工具类transformations.py,内部包含了四元数与numpy数组的转化,角度的插值方法也有。
导入函数
from .transformations import quaternion_from_matrix, quaternion_matrix, quaternion_slerp
角度插值函数
	# 参数同interpolating_translation
    def interpolating_rotation(self, rotation_a, rotation_b, progress):
        return quaternion_matrix(quaternion_slerp(rotation_a, rotation_b, progress))
动画
关键帧插值完成之后,便得到了对应动画时间的局部关节坐标及旋转角度,接下来就需要通过骨架信息的遍历求得各个关节相对于根节点的变幻矩阵。
    def animation(self, shader_program, loop_animation=False):
        if not self.doing_animation:
            self.doing_animation = True
            self.frame_start_time = glutGet(GLUT_ELAPSED_TIME)
        pre_frame, next_frame = self.keyframes[self.animation_keyframe_pointer:self.animation_keyframe_pointer + 2]
        frame_duration_time = (next_frame.time - pre_frame.time) * 1000
        current_frame_time = glutGet(GLUT_ELAPSED_TIME)
        frame_progress = (current_frame_time - self.frame_start_time) / frame_duration_time
        if frame_progress >= 1:
            self.animation_keyframe_pointer += 1
            if self.animation_keyframe_pointer == len(self.keyframes) - 1:
                self.animation_keyframe_pointer = 0
            self.frame_start_time = glutGet(GLUT_ELAPSED_TIME)
            pre_frame, next_frame = self.keyframes[self.animation_keyframe_pointer:self.animation_keyframe_pointer + 2]
            frame_duration_time = (next_frame.time - pre_frame.time) * 1000
            current_frame_time = glutGet(GLUT_ELAPSED_TIME)
            frame_progress = (current_frame_time - self.frame_start_time) / frame_duration_time

        # interpolating; pre_frame, next_frame, frame_progress
        self.interpolation_joint = dict()
        for key, value in pre_frame.joint_transform.items():
            t_m = self.interpolating_translation(value[0], next_frame.joint_transform.get(key)[0], frame_progress)
            r_m = self.interpolating_rotation(value[1], next_frame.joint_transform.get(key)[1], frame_progress)
            matrix = np.matmul(t_m, r_m)
            self.interpolation_joint[key] = matrix

        self.load_animation_matrices(self.root_joint, np.identity(4))
        self.render(shader_program)

  	def load_animation_matrices(self, joint, parent_matrix):
        p = np.matmul(parent_matrix, self.interpolation_joint.get(joint.id + "_pose_matrix"))
        for child in joint.children:
            self.load_animation_matrices(child, p)
        self.render_static_matrices[self.joints_order.get(joint.id)] = np.matmul(p, joint.inverse_transform_matrix)
ok,很多细节没说清楚,有兴趣的话可以跟我沟通,这里是完整的代码。