Android Studio使用Robolectric对android程序实现单元测试
在Android开发过程中,很多人都知道单元测试,但真正用过的人并不多。一方面原因是因为本身代码逻辑并不是很复杂,打log或debug基本可以跟踪解决问题。另一方面是Android本身的编译环境决定。如果你的unit test里面含有android代码,运行时会抛出RuntimeException("stub");
下面就是要介绍的一个开源framework,Robolectric。Robolectric中提供了实现类可以运行Android代码。想了解的同学可以去参考,这里不过多介绍。下面是我们的项目中所用到的Robolectric进行的单元测试方法,在这里介绍给大家:
1.新建了工程目录,起名为test,与src同一目录就可以。
2.新建了抽象类BaseTestCase,主要是一些相关配置。我们是的项目是基于Aquery框架的,需要导入Aquery的jar包,大家自行下载。
import com.androidquery.util.AQUtility;
import org.robolectric.Robolectric;
import org.robolectric.shadows.ShadowLog;
public abstract class BaseTestCase {
final String TAG = "## " + getClass().getSimpleName() + "; ";
protected void setup() throws Exception {
AQUtility.setDebug(true);
AQUtility.setContext(Robolectric.application);
enableTestNetwork(true);
enableTestOutput(false);
}
protected void tearDown() throws Exception {
enableTestOutput(false);
}
protected void enterTestCase() {
System.out.println(TAG + new Throwable().getStackTrace()[1].toString() + " start.");
enableTestOutput(true);
}
protected void exitTestCase() {
System.out.println(TAG + new Throwable().getStackTrace()[1].toString() + " stop.");
enableTestOutput(false);
}
protected void enableTestNetwork(boolean enableNetwork) {
// 使用真实网络请求,需要关闭Robolectric的HTTP模拟
Robolectric.getFakeHttpLayer().interceptHttpRequests(!enableNetwork);
Robolectric.getFakeHttpLayer().interceptResponseContent(!enableNetwork);
}
protected void enableTestOutput(boolean enableLogOutput) {
if (enableLogOutput) ShadowLog.stream = System.out;
else ShadowLog.stream = null;
}
private Boolean complete = false;
protected void waitTestComplete(long... waitTime) {
long now = System.currentTimeMillis();
long endTime = now + (waitTime.length > 0 ? waitTime[0] : -1);
if (endTime <= now) endTime = Long.MAX_VALUE;
complete = false;
while (true) {
AQUtility.debugWait(200);
Robolectric.runUiThreadTasksIncludingDelayedTasks();
Robolectric.runBackgroundTasks();
if (complete || System.currentTimeMillis() >= endTime) break;
}
}
protected void notifyTestComplete() {
complete = true;
AQUtility.debugNotify();
}
}
3.新建测试类,继承BaseTestCase类。下面给出一个测试方法:
import com.androidquery.AQuery;
import com.androidquery.callback.AjaxCallback;
import com.androidquery.callback.AjaxStatus;
import com.google.gson.Gson;
import com.xyre.framework.BaseTestCase;
import junit.framework.Assert;
import org.junit.Before;
import org.junit.Test;
import org.junit.runner.RunWith;
import org.robolectric.Robolectric;
import org.robolectric.RobolectricTestRunner;
import org.robolectric.annotation.Config;
@RunWith(RobolectricTestRunner.class)
@Config(manifest="../AndroidManifest.xml")
public class TestApi extends BaseTestCase {
AQuery aq;
@Before
public void setUp() throws Exception {
super.setup();
aq = new AQuery(Robolectric.application.getApplicationContext());
}
@Test
public void testGetList() throws Exception {
enterTestCase();
/**
AjaxCallback
@Override
public void callback(String url, TestBean result, AjaxStatus status) {
System.out.println("Request=" + url);
System.out.println("Response=" + new Gson().toJson(result));
System.out.println("Status=" + status.getCode() + "," + status.getMessage() + ",From=" + status.getSource());
notifyTestComplete();
}
};
执行aquery的网络请求
**/
//注释部分为测试方法,这里只是给了一个例子,具体的方法自行实现
waitTestComplete();
Assert.assertTrue(callback.getStatus().getCode() == 200);
Assert.assertTrue(callback.getResult() != null);
TestBean result = callback.getResult();
Assert.assertNotNull(result.result);
Assert.assertNotNull(result.data);
exitTestCase();
}
}
4.测试类写好了,下面就是运行了。
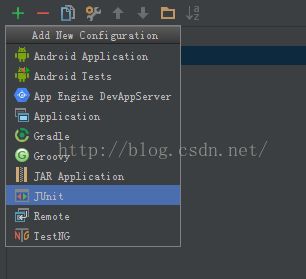
Edit Configurations - add new Configuration 就是小"+" - JUnit 
Test Kind 选择你要测试的类或方法 - use classpath of module 选择你的工程 - apply - ok
然后就可以运行了。
这里只是介绍了基于Robolectric进行单元测试的基本方法过程,对代码并没有过多的介绍。我们这里用到的是调试接口的单元测试,如果是Android代码,需要用到Robolectric中的实现类来编写代码,网上有很多,大家可以百度一下。第一篇博客,可能写的有点乱,大家多包涵!