之前我们借助一个SuperSocket实现了一个简易版的服务器, 但是不管是Server还是Session都是使用框架的,本篇博客我们要实现自己的Server和Session,来重写框架原生的Server或Session的方法,或添加自己所需的属性,来实现自己的业务逻辑,并且也不在使用事件来绑定接收,连接,或关闭事件,全部交给Bootstrap来执行,(这个Bootstrap并不是指前端框架的Bootstrap ,而是指的SuperSocket框架的一个引导程序或说是辅助程序),就是这里我们会使用Bootstrap 来配置启动SuperSocket;
本篇文章皆为我阅读官方文档后总结实现,所以很多代码是直接搬的官方文档的,我的主要目的是为了能实现并运行SuperSocket服务器,所以建议优先阅读官方文档
官方文档:http://docs.supersocket.net/v1-6/zh-CN
SuperSocket 是一个轻量级, 跨平台而且可扩展的 .Net/Mono Socket 服务器程序框架。你无须了解如何使用 Socket, 如何维护 Socket 连接和 Socket 如何工作,但是你却可以使用 SuperSocket 很容易的开发出一款 Socket 服务器端软件,例如游戏服务器,GPS 服务器, 工业控制服务和数据采集服务器等等。
怎么从NuGet安装SuperSocket就不再赘述了,我们直接看实现
首先我们可以按自己需求定义自己APPSession(因为我也不知道我自己定义的Session中应该有什么方法,什么属性,所以照搬官方文档了~~~)
using SuperSocket.SocketBase;
using SuperSocket.SocketBase.Protocol;
using System;
using System.Collections.Generic;
using System.Linq;
using System.Text;
using System.Threading.Tasks;

namespace SuperSocket2.Session
{
  public class MySession : AppSession
  {
    protected override void OnSessionStarted()
    {
      this.Send("Welcome to SuperSocket Telnet Server");
    }

    protected override void HandleUnknownRequest(StringRequestInfo requestInfo)
    {
      this.Send("Unknow request");
    }

    protected override void HandleException(Exception e)
    {
      this.Send("Application error: {0}", e.Message);
    }

    protected override void OnSessionClosed(CloseReason reason)
    {
      //add you logics which will be executed after the session is closed
      base.OnSessionClosed(reason);
    }
  }
}
接着按自己需求定义自己APPServer,
using SuperSocket.SocketBase;
using SuperSocket.SocketBase.Config;
using SuperSocket.SocketBase.Protocol;
using SuperSocket2.Session;
using System;
using System.Collections.Generic;
using System.Linq;
using System.Text;
using System.Threading.Tasks;

namespace SuperSocket2.Server
{
  public class MyServer : AppServer
  {

    public MyServer()
      : base(new CommandLineReceiveFilterFactory(Encoding.Default, new BasicRequestInfoParser(":", ",")))
    {

    }

    protected override bool Setup(IRootConfig rootConfig, IServerConfig config)
    {
      return base.Setup(rootConfig, config);
    }

    protected override void OnStartup()
    {
      base.OnStartup();
    }

    protected override void OnStopped()
    {
      base.OnStopped();
    }
  }
}
自定义的APPserver,在继承APPServer是的Session泛型,记得要更改为我们自定义的Session上一篇文章我们也说道,它默认的请求的 key 和 body 通过字符 ' ' 空格分隔, 因需求不同 我们可以将它改为 ':' 分隔 ,而且多个参数被字符 ',' 分隔,所以我们在修改了无参构造函数,来实现拓展命令行协议;
接下来要做的
所以我们来自己写一个命令类
using SuperSocket.SocketBase.Command;
using SuperSocket.SocketBase.Protocol;
using SuperSocket2.Session;
using System;
using System.Collections.Generic;
using System.Linq;
using System.Text;
using System.Threading.Tasks;
using System.Windows.Forms;
using System.Threading;

namespace SuperSocket2.Command
{
   ///
   /// 处理请求头为6003的命令
   ///
  public class CommandOne : CommandBase
  {
    public override string Name
    {
      get
      {
        return "6003";
      }
    }

    public override void ExecuteCommand(MySession session, StringRequestInfo requestInfo)
    {
      //向客户端返回信息,已接受到6003命令
      s.Send("Order 6003 received");
     }

   }
}
请求处理代码必须被放置于方法 "ExecuteCommand(TAppSession session, TRequestInfo requestInfo)" 之中,并且属性 "Name" 的值用于匹配接收到请求实例(requestInfo)的Key。当一个请求实例(requestInfo) 被收到时,SuperSocket 将会通过匹配请求实例(requestInfo)的Key和命令的Name的方法来查找用于处理该请求的命令
但是由于类名的命名必须有字母数字下划线组成,且数字不能开头,如果要接收请求的Key为6003,我们就需要做一些修改
所以这里我重写了Name方法,这样,请求的Key是6003 也能触发CommandOne命令
好了,我们的自定义Server,Session,命令都写完了,接下来需要我们使用Bootstrap来配置启动,我们这里只为了保证SuperSocket能正常启动,所以不做多余的配置(☞配置示例)
修改App.config文件,添加
配置完毕,我们启动程序,在Form_load中实例化bootstrap,启动服务(原谅我懒,实在不愿意对这个Form美化了,就加了一个Richtextbox,显示一下是否初始化成功,启动成功)
using SuperSocket.SocketBase;
using SuperSocket.SocketEngine;
using System;
using System.Collections.Generic;
using System.ComponentModel;
using System.Data;
using System.Drawing;
using System.Linq;
using System.Text;
using System.Threading.Tasks;
using System.Windows.Forms;


namespace SuperSocket2
{
  public partial class Form1 : Form
  {
    public Form1()
    {
      InitializeComponent();
    }
    private void Form1_Load(object sender, EventArgs e)
    {
      //声明bootStrap实例
      var bootstrap = BootstrapFactory.CreateBootstrap();
      //初始化
      if (!bootstrap.Initialize())
      {
        SetMessage("Failed to initialize!");
        return;
      }
      //开启服务
      var result = bootstrap.Start();

      if (result == StartResult.Failed)
      {
        SetMessage("Failed to start!");

        return;
      }
      else
      {
        SetMessage("服务器启动成功");
      }
      //bootstrap.Stop();

    }

    public void SetMessage(string msg)
    {
      this.richTextBox1.Invoke(new Action(() => { this.richTextBox1.AppendText(msg + "\r\n"); }));
    }

  }
}
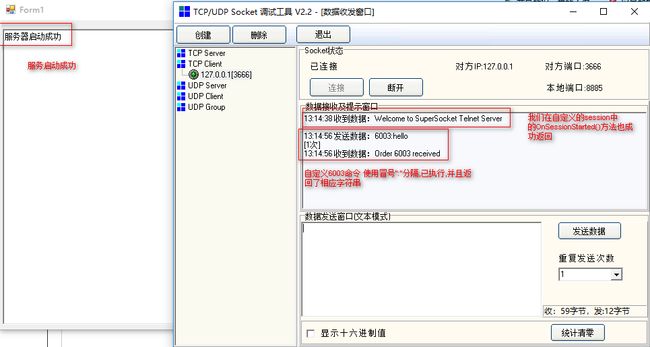
好,一个简单的,完整的自定义SuperSocket就完成了,我们运行,借助TCP/UDP Socket调试工具执行6003命令试一下
这里说明一下,SuperSocket框架的命令行协议定义了每个请求必须以回车换行结尾 "\r\n";
所以我们输完6003:hello命令后,记得加回车;
测试完成,简易SuperSocket框架搭建成功
以上就是全部知识点内容,感谢大家对脚本之家的支持。


