学习文章
- CocoaPods的一些略为高级一丁点的使用
- 使用CocoaPods(二)删除已经配置的类库和移除CocoaPods
补充
更新specification
也许你在用pod install时,遇到[!] Unable to find a specification for 某个库名,这说明你pod的specification需要更新,只要pod repo update一下,成功之后再pod install即可.
指定源
CocoaPods支持私有 Spec 仓库的,我们可以建立自己的源,也可以使用非官方的源,只要是符合规定的都可以指定。
source 'https://github.com/artsy/Specs.git'
source 'https://github.com/CocoaPods/Specs.git'
抑制警告
inhibit_warnings参数能够有效的抑制CocoaPods引入的第三方代码库产生的warning。
// 可以全部指定
inhibit_all_warnings!
// 也可以针对指定
pod 'ReactiveCocoa', '~> 2.4', :inhibit_warnings => true
使用git的HEAD指向的分支
pod 'ISO8601DateFormatter', :head
使用 master 分支
pod 'ARAnalytics/Mixpanel', :git => 'https://github.com/orta/ARAnalytics.git'
指定branch
pod 'Reachability', :git => 'https://github.com/ashfurrow/Reachability.git', :branch => 'frameworks'
指定tag
pod 'AFNetworking', :git => 'https://github.com/gowalla/AFNetworking.git', :tag => '0.7.0'
指定commit
pod 'ARTiledImageView', :git => 'https://github.com/dblockARTiledImageView', :commit => '1a31b864d1d56b1aaed0816c10bb55cf2e078bb8'
使用子库
pod 'QueryKit/Attribute'
// 也可以这样指定多个子库
pod 'QueryKit', :subspecs => ['Attribute', 'QuerySet']
使用本地代码
// 通过:path可以指定本地代码,不过需要确保目录包含podspec文件。
pod 'AFNetworking', :path => '~/Documents/AFNetworking'
指定target的依赖库
target :ZipApp do
  pod 'SSZipArchive'
end
排除taget
target 'Artsy Tests', :exclusive => true do
  pod 'FBSnapshotTestCase', '1.4'
end
用workspace管理多工程
platform :ios

inhibit_all_warnings!

workspace 'BundleTestWorkspace.xcworkspace'

target :FrameworkTest do
    // 在target中指定工程路径,如果 .xcodeproj文件和podfile文件同级,可以不指定工程路径
    project 'FrameworkTest/FrameworkTest.xcodeproj'
    pod 'AFNetworking'
end

target 'BundleTestProject' do
    // 在target中指定工程路径,如果 .xcodeproj文件和podfile文件同级,可以不指定工程路径
    project 'BundleTestProject/BundleTestProject.xcodeproj'
    pod 'JPush'
end
指定连接的target
link_with 'CocoaPodsTest', 'Second'
platform :ios
pod 'Reachability',  '~> 3.0.0'
pod 'SBJson', '~> 4.0.0'

platform :ios, '7.0'
pod 'AFNetworking', '~> 2.0'
指定依赖库的配置文件
pod 'PonyDebugger', :configuration => ['Release']
指定target的配置文件
xcodeproj 'TestProject', 'Mac App Store' => :release, 'Test' => :debug
使用Dynamic Frameworks代替Static Libraries
通过标志use_frameworks!就可知开启这个功能。如果需要使用Swift的库,就必须加上这个标志了。
加快pod install/update 速度
使用CocoaPods来添加第三方类库,无论是执行pod install还是pod updat很多时候都卡在了Analyzing dependencies不动,这是更新本地的pod spec所以文件导致的。通过--no-repo-update标志可以不更新本地pod spec索引。当然首次install不应该添加这个标志,后续修改Podfile的时候可以适当使用,加快pod速度。
pod install --no-repo-update
pod update --no-repo-update

// 输出详细日志
pod update --verbose
移除Cocoapods
1.删除工程文件夹下的Podfile、Podfile.lock和Pods文件夹。
2.删除xcworkspace文件(如果不是用workspace来管理工程的)。
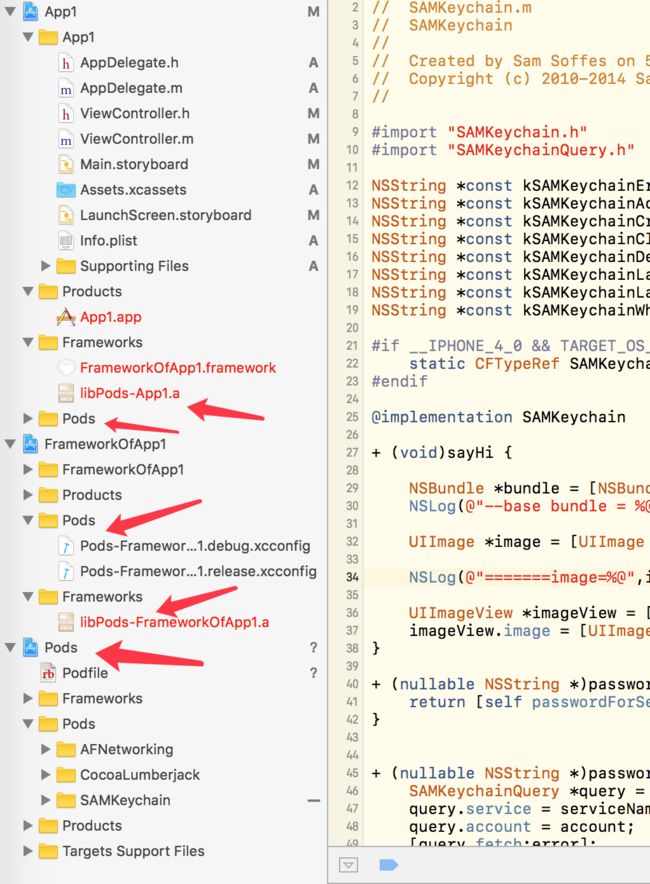
3.打开xcodeproj文件(如果是workspace管理文件的,还是打开xcworkspace),删除Pods这个Target,删除依赖了Pods的相关Target中的pods文件(Pods文件夹和Frameworks中libPods-*.a),如下图中,利用workspace管理工程,其中Target App1和 FrameworkOfApp2都用了CocoaPods,所以都要分别删除:
4.打开Build Phases选项,删除和CocoaPods有关的项:

