第一步
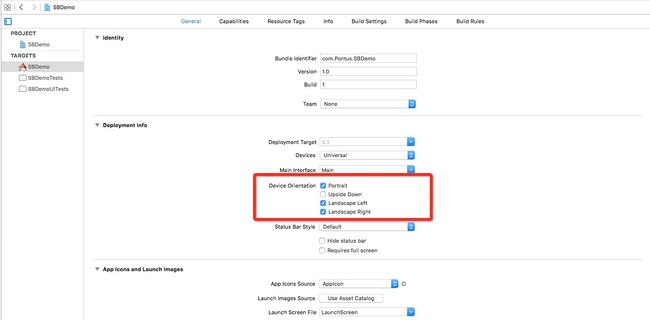
首先保证工程支持横竖屏 不多说看图
保证圈红的地方 打对勾
58F678EC-EABC-4320-9FCB-F72BA617AFB5.png
第二步:
分两种情况
第一种:
你的window的rootViewController是一个UITabBarController
这时候你就需要创建一个 继承自 UITabBarController 的YourProjectTabBarController
然后在你的YourProjectTabBarController.m里添加如下的三个方法
OC实现
//是否跟随屏幕旋转
-(BOOL)shouldAutorotate{
return self.selectedViewController.shouldAutorotate;
}
//支持旋转的方向有哪些
-(UIInterfaceOrientationMask)supportedInterfaceOrientations{
return [self.selectedViewController supportedInterfaceOrientations];
}
//控制 vc present进来的横竖屏和进入方向 ,支持的旋转方向必须包含改返回值的方向 (详细的说明见下文)
-(UIInterfaceOrientation)preferredInterfaceOrientationForPresentation{
return [self.selectedViewController preferredInterfaceOrientationForPresentation];
}
Swift实现
//是否跟随屏幕旋转
override func shouldAutorotate() -> Bool {
return (selectedViewController?.shouldAutorotate())!
}
//支持旋转的方向有哪些
override func supportedInterfaceOrientations() -> UIInterfaceOrientationMask {
return (selectedViewController?.supportedInterfaceOrientations())!
}
//控制 vc present进来的横竖屏和进入方向 ,支持的旋转方向必须包含改返回值的方向 (详细的说明见下文)
override func preferredInterfaceOrientationForPresentation() -> UIInterfaceOrientation {
return (selectedViewController?.preferredInterfaceOrientationForPresentation())!
}
如果YourProjectTabBarController 里装载的视图 又是这种结构的
OC举例
UIViewController * vc1 = [[UIViewController alloc]init];
BaseNavigationViewController * nvc1 = [[BaseNavigationViewController alloc]initWithRootViewController:vc1];
UIViewController * vc2 = [[UIViewController alloc]init];
BaseNavigationViewController * nvc2 = [[BaseNavigationViewController alloc]initWithRootViewController:vc2];
UIViewController * vc3 = [[UIViewController alloc]init];
BaseNavigationViewController * nvc3 = [[BaseNavigationViewController alloc]initWithRootViewController:vc3];
self.viewControllers = @[nvc1,nvc2,nvc3];
Swift举例
let vc1 = UIViewController()
let nvc1 = BaseNavigationViewController(rootViewController: vc1)
let vc2 = UIViewController()
let nvc2 = BaseNavigationViewController(rootViewController: vc2)
let vc3 = UIViewController()
let nvc3 = BaseNavigationViewController(rootViewController: vc3)
viewControllers = [nvc1, nvc2, nvc3]
即 tabbarController的viewControllers里放的是导航栏视图而不是不同的UIViewController
这时候你需要创建一个继承自UINavigationController 的YourProjectNavigationController
然后在你的YourProjectNavigationController.m里添加如下的三个方法
OC实现
-(BOOL)shouldAutorotate{
return self.topViewController.shouldAutorotate;
}
-(UIInterfaceOrientationMask)supportedInterfaceOrientations{
return [self.topViewController supportedInterfaceOrientations];
}
-(UIInterfaceOrientation)preferredInterfaceOrientationForPresentation{
return [self.topViewController preferredInterfaceOrientationForPresentation];
}
Swift实现
override func shouldAutorotate() -> Bool {
return (topViewController?.shouldAutorotate())!
}
override func supportedInterfaceOrientations() -> UIInterfaceOrientationMask {
return (topViewController?.supportedInterfaceOrientations())!
}
override func preferredInterfaceOrientationForPresentation() -> UIInterfaceOrientation {
return (topViewController?.preferredInterfaceOrientationForPresentation())!
}
仔细看和上面YourProjectTabBarController里的还是有区别的。
一个是 self.selectedViewController 一个是 self.topViewController
接下来就可以控制每一个Controller的是否可以旋转了(前提 “iphone的竖排方向锁定” 是关闭的状态)
在需要旋转的controller里添加如下方法
OC实现
//是否旋转
-(BOOL)shouldAutorotate{
return YES;
}
//支持的方向
- (UIInterfaceOrientationMask)supportedInterfaceOrientations {
return UIInterfaceOrientationMaskAll;
}
Swift实现
override func shouldAutorotate() -> Bool {
return true
}
override func supportedInterfaceOrientations() -> UIInterfaceOrientationMask {
return UIInterfaceOrientationMask.All
}
在不需要旋转的controller里添加如下方法
OC实现
//是否旋转
-(BOOL)shouldAutorotate{
return NO;
}
//支持的方向
- (UIInterfaceOrientationMask)supportedInterfaceOrientations {
return UIInterfaceOrientationMaskPortrait;
}
Swift实现
override func shouldAutorotate() -> Bool {
return false
}
override func supportedInterfaceOrientations() -> UIInterfaceOrientationMask {
return UIInterfaceOrientationMask.Portrait
}
tips:有一个小建议 你可以创建一个继承自UIViewController的BaseViewController,然后你项目里创建的vc都继承自BaseViewController。你可以在BaseViewController 添加屏幕不能旋转的方法 ,这样创建的每一个vc都不能旋转。 然后,如果你需要旋转的时候,在vc里添加支持旋转的代码就好了。这样就省去了,如果大多数vc不需要支持屏幕旋转,重复添加不支持旋转的代码了。
第2种情况:
你的window的rootViewController是一个UINavigationController
这种情况 你只要省去上面创建 继承自 UITabBarController 的YourProjectTabBarController的步骤就可以了。
详细说下这个方法
-(UIInterfaceOrientation)preferredInterfaceOrientationForPresentation{
return UIInterfaceOrientationPortrait;
}
共有5个返回值
//该方法 只适用于 vc present 进入 不适用于 push
typedef NS_ENUM(NSInteger, UIInterfaceOrientation) {
UIInterfaceOrientationUnknown //貌似没什么用
UIInterfaceOrientationPortrait //vc 竖屏 从下 present 进入
UIInterfaceOrientationPortraitUpsideDown //vc 竖屏 从上 present 进入
UIInterfaceOrientationLandscapeLeft //vc 横屏 从左 present 进入
UIInterfaceOrientationLandscapeRight //vc 横屏 从又 present 进入
} __TVOS_PROHIBITED;
//这个方法需要和下面的方法一起使用
- (UIInterfaceOrientationMask)supportedInterfaceOrientations {
return UIInterfaceOrientationMaskPortrait;
}
//支持的旋转方向必须包含改返回值的方向 这句话的意思是:
举几个例子
- (UIInterfaceOrientationMask)supportedInterfaceOrientations {
return UIInterfaceOrientationMaskPortrait; // 支持竖屏
}
-(UIInterfaceOrientation)preferredInterfaceOrientationForPresentation{
return UIInterfaceOrientationLandscapeLeft; //却横屏进入
}
这样的组合会造成程序崩溃
- (UIInterfaceOrientationMask)supportedInterfaceOrientations {
return UIInterfaceOrientationMaskAll; // 支持所有状态
}
-(UIInterfaceOrientation)preferredInterfaceOrientationForPresentation{
return UIInterfaceOrientationLandscapeLeft; //横屏进入
}
或
- (UIInterfaceOrientationMask)supportedInterfaceOrientations {
return UIInterfaceOrientationMaskLandscape; // 支持横屏状态
}
-(UIInterfaceOrientation)preferredInterfaceOrientationForPresentation{
return UIInterfaceOrientationLandscapeLeft; //横屏进入
}
这两种就不会崩溃。
该方法主要用于,你当前处于竖屏状态但是你希望下一个页面是 横屏状态 的时候。且 “iphone的竖排方向锁定” 是否开启 不会影响该方法。
方法三:
除了上面的横竖屏方法还有另一个,但是部分跟上面2个方法的设置是一样的,比如方向设定.
// 强制转屏
- (void)setInterfaceOrientation:(UIInterfaceOrientation)orientation {
if([[UIDevicecurrentDevice]respondsToSelector:@selector(setOrientation:)]) {
SELselector=NSSelectorFromString(@"setOrientation:");
NSInvocation*invocation = [NSInvocationinvocationWithMethodSignature:[UIDeviceinstanceMethodSignatureForSelector:selector]];
[invocationsetSelector:selector];
[invocationsetTarget:[UIDevicecurrentDevice]];
// 从2开始是因为前两个参数已经被selector和target占用
[invocationsetArgument:&orientationatIndex:2];
[invocationinvoke];
}
}
方法四:重置一下rootViewController,如此系统才会重新触发- (UIInterfaceOrientationMask)supportedInterfaceOrientations {}等方法.
// hack, turn to landscape code.
UIWindow*mainWindow = [[UIApplicationsharedApplication].delegatewindow];
UIViewController*root = mainWindow.rootViewController;
mainWindow.rootViewController=nil;
mainWindow.rootViewController= root;
if([rootisKindOfClass:[UITabBarControllerclass]]) {
UITabBarController*tab = (UITabBarController*)root;
NSIntegercurrentIdx = tab.selectedIndex;
[tabsetSelectedIndex:(currentIdx+1)%4];
[tabsetSelectedIndex:currentIdx];
}
总结:
对于方法三、四注意事项:应用在横屏进入后台时,要预防方向被修改为竖屏。同时要注意在AppDelegate中设置要某些类需要的方向。此文第一步、第二部为转载的下面作者的内容,有问题的,欢迎讨论:QQ:1401699567.
这篇文章作为基础知识还是很有参考价值的:http://www.jianshu.com/p/62431e148e68
转载声明:
作者:张梓辰
链接:http://www.jianshu.com/p/a2201f39b6a7
來源:
著作权归作者所有。商业转载请联系作者获得授权,非商业转载请注明出处。