Android的存储系统的简要分析
Android的存储系统主要由SystemServer进程中的MountServer进程中的MountService和Vold进程中的VolimeManager组成,他们管理着系统的存储设备,执行各种操作,包括mount,unmount,format等。
1)在Android的存储系统中,MountService是为应用提供服务的Binder类,运行在SystemServer中,而StorageManager是MountServer代理,而StorageManager是MountServer的代理,在用户进程中使用。
2)Vold是一个守护进程,负责和底层存储系统的驱动交互。
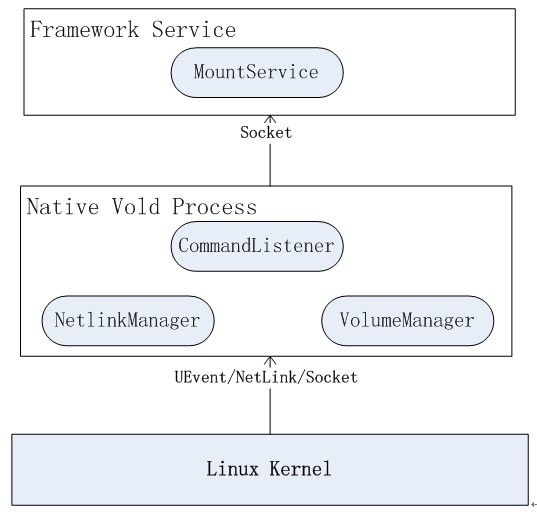
3)MountService和Vold之间通过socket进行通信,这个通信过程是双向的,有从MountService到Vold的操作命令,也有从Vold到MountService的消息,用来通知底层硬件发生了变化。
管理存储设备---Vold守护进程
Vold也是通过init进程启动,它在init.rc中定义如下:
service vold /system/bin/vold
class core
socket vold stream 0660 root mount
ioprio be 2
vold服务放到了core分组,就意味着这系统启动时它会被init进程启动,同时定义了一个socket,它主要用于Vold和Java层MountService通信。
Vold框架图如下:
Vold关于SD card settings的代码位于:
packages/apps/Settings/src/com/android/settings/deviceinfo/Memory.java
Vold上层MountService的代码位于:
frameworks/base/services/java/com/android/server/MountService.java
Vold底层处理的代码位于:
system/vold/
对存储设备的操作---MountService服务
MountService作为SystemServer中的一个Binder服务,它的作用是让用户进程能通过它的接口对系统存储设备进行各种操作,包括mount,unmount和format等。
MountService也是在SystemServer中启动的代码如下:
以下主要是SystemServer创建了MountService对象,并把它加入到ServiceManager中。
try {
                    /*
                     * NotificationManagerService is dependant on MountService,
                     * (for media / usb notifications) so we must start MountService first.
                     */
                    mSystemServiceManager.startService(MOUNT_SERVICE_CLASS);
                    mountService = IMountService.Stub.asInterface(
                            ServiceManager.getService("mount"));
                } catch (Throwable e) {
                    reportWtf("starting Mount Service", e);
                }
MountService的构造方法如下:
    /**
     * Constructs a new MountService instance
     *
     * @param context  Binder context for this service
     */
    public MountService(Context context) {
        sSelf = this;

        mContext = context;
        mCallbacks = new Callbacks(FgThread.get().getLooper());

        // XXX: This will go away soon in favor of IMountServiceObserver
//获得PackageManagerService引用,因为如果存储发生变化,需要通知PackageManagerService,需要重新扫描。
       mPms = (PackageManagerService) ServiceManager.getService("package");

        HandlerThread hthread = new HandlerThread(TAG);
        hthread.start();
        mHandler = new MountServiceHandler(hthread.getLooper());

        // Add OBB Action Handler to MountService thread.
//创建ObbActionHandler 对象,用于处理和Obb文件系统相关的信息。
       mObbActionHandler = new ObbActionHandler(IoThread.get().getLooper());

        // Initialize the last-fstrim tracking if necessary
        File dataDir = Environment.getDataDirectory();
        File systemDir = new File(dataDir, "system");
        mLastMaintenanceFile = new File(systemDir, LAST_FSTRIM_FILE);
        if (!mLastMaintenanceFile.exists()) {
            // Not setting mLastMaintenance here means that we will force an
            // fstrim during reboot following the OTA that installs this code.
            try {
                (new FileOutputStream(mLastMaintenanceFile)).close();
            } catch (IOException e) {
                Slog.e(TAG, "Unable to create fstrim record " + mLastMaintenanceFile.getPath());
            }
        } else {
            mLastMaintenance = mLastMaintenanceFile.lastModified();
        }

        mSettingsFile = new AtomicFile(
                new File(Environment.getSystemSecureDirectory(), "storage.xml"));

        synchronized (mLock) {
            readSettingsLocked();
        }

        LocalServices.addService(MountServiceInternal.class, mMountServiceInternal);

        /*
         * Create the connection to vold with a maximum queue of twice the
         * amount of containers we'd ever expect to have. This keeps an
         * "asec list" from blocking a thread repeatedly.
         */

        mConnector = new NativeDaemonConnector(this, "vold", MAX_CONTAINERS * 2, VOLD_TAG, 25,
                null);
        mConnector.setDebug(true);

        Thread thread = new Thread(mConnector, VOLD_TAG);
        thread.start();

        // Reuse parameters from first connector since they are tested and safe
       //创建NativeDaemonConnector对象。
       mCryptConnector = new NativeDaemonConnector(this, "cryptd",
                MAX_CONTAINERS * 2, CRYPTD_TAG, 25, null);
        mCryptConnector.setDebug(true);
    //开启一个线程,用于和底层的Vold进行Socket进行通信。
        Thread crypt_thread = new Thread(mCryptConnector, CRYPTD_TAG);
        crypt_thread.start();
//监听几种intent
        final IntentFilter userFilter = new IntentFilter();
        userFilter.addAction(Intent.ACTION_USER_ADDED);
        userFilter.addAction(Intent.ACTION_USER_REMOVED);
        mContext.registerReceiver(mUserReceiver, userFilter, null, mHandler);

        addInternalVolume();

        // Add ourself to the Watchdog monitors if enabled.
        if (WATCHDOG_ENABLE) {
            Watchdog.getInstance().addMonitor(this); //加入到WatchDog监控列表
        }
    }
以上MountService构造方法主要实现了
1)创建PackageManagerService,因为当底层的存储系统发生变化的时候,通知PackageManagerService重新扫描。
2)监听集中Intent变化
3)创建ObbActionHander对象,用于处理和Obb文件系统相关的信息。
4)创建NativeDaemonConnector,主要用于底层和Vold进程之间的Socket通信
5)创建一个线程,这个线程的执行函数是NativeDaemonConnector的run方法。
Socket通信--NativeDaemonConnector
NativeDaemonConnector对象用于和底层的Vold进程进行Socket通信,构造方法如下
    NativeDaemonConnector(INativeDaemonConnectorCallbacks callbacks, String socket,
            int responseQueueSize, String logTag, int maxLogSize, PowerManager.WakeLock wl,
            Looper looper) {
        mCallbacks = callbacks; //这个callbacks 其实就是MountService
        mSocket = socket;
        mResponseQueue = new ResponseQueue(responseQueueSize);
        mWakeLock = wl;
        if (mWakeLock != null) {
            mWakeLock.setReferenceCounted(true);
        }
        mLooper = looper;
        mSequenceNumber = new AtomicInteger(0);
        TAG = logTag != null ? logTag : "NativeDaemonConnector";
        mLocalLog = new LocalLog(maxLogSize);
}接下来我们具体看看NativeDaemonConnector类的run 方法,它是MountService的构造中所启动的线程
Thread crypt_thread = new Thread(mCryptConnector, CRYPTD_TAG);
crypt_thread.start();
    @Override
    public void run() {
        mCallbackHandler = new Handler(mLooper, this);

        while (true) {
            try {
                listenToSocket();
            } catch (Exception e) {
                loge("Error in NativeDaemonConnector: " + e);
                SystemClock.sleep(5000);
            }
        }
    }
以上run()方法进入了一个无限循环,反复调用listenToSocket方法,代码如下:
    private void listenToSocket() throws IOException {
        LocalSocket socket = null;

        try {
            socket = new LocalSocket();
            LocalSocketAddress address = determineSocketAddress(); //得到Socket地址

            socket.connect(address);//连接Vold中的Socket

            InputStream inputStream = socket.getInputStream();//得到Input对象
            synchronized (mDaemonLock) {
                mOutputStream = socket.getOutputStream();
            }

            mCallbacks.onDaemonConnected();

            byte[] buffer = new byte[BUFFER_SIZE];
            int start = 0;

            while (true) {
               //又是一个无限循环,从Socket中读取数据,没数据的时候会挂起。
                int count = inputStream.read(buffer, start, BUFFER_SIZE - start);
                if (count < 0) {
                    loge("got " + count + " reading with start = " + start);
                    break;
                }

                // Add our starting point to the count and reset the start.
                count += start;
                start = 0;

                for (int i = 0; i < count; i++) {
                    if (buffer[i] == 0) {
                        // Note - do not log this raw message since it may contain
                        // sensitive data
                        final String rawEvent = new String(
                                buffer, start, i - start, StandardCharsets.UTF_8);

                        boolean releaseWl = false;
                        try {
                            final NativeDaemonEvent event = NativeDaemonEvent.parseRawEvent(
                                    rawEvent);

                            log("RCV <- {" + event + "}");

                            if (event.isClassUnsolicited()) {
                                // TODO: migrate to sending NativeDaemonEvent instances
                                if (mCallbacks.onCheckHoldWakeLock(event.getCode())
                                        && mWakeLock != null) {
                                    mWakeLock.acquire();
                                    releaseWl = true;
                                }
                                if (mCallbackHandler.sendMessage(mCallbackHandler.obtainMessage(
                                        event.getCode(), event.getRawEvent()))) {
                                    releaseWl = false;
                                }
                            } else {
                                mResponseQueue.add(event.getCmdNumber(), event);
                            }
                        } catch (IllegalArgumentException e) {
                            log("Problem parsing message " + e);
                        } finally {
                            if (releaseWl) {
                                mWakeLock.acquire();
                            }
                        }

                        start = i + 1;
                    }
                }

                if (start == 0) {
                    log("RCV incomplete");
                }

                // We should end at the amount we read. If not, compact then
                // buffer and read again.
                if (start != count) {
                    final int remaining = BUFFER_SIZE - start;
                    System.arraycopy(buffer, start, buffer, 0, remaining);
                    start = remaining;
                } else {
                    start = 0;
                }
            }
        } catch (IOException ex) {
            loge("Communications error: " + ex);
            throw ex;
        } finally {
            synchronized (mDaemonLock) {
                if (mOutputStream != null) {
                    try {
                        loge("closing stream for " + mSocket);
                        mOutputStream.close();
                    } catch (IOException e) {
                        loge("Failed closing output stream: " + e);
                    }
                    mOutputStream = null;
                }
            }

            try {
                if (socket != null) {
                    socket.close();
                }
            } catch (IOException ex) {
                loge("Failed closing socket: " + ex);
            }
        }
    }
以上listenToSocket()调用determineSocketAddress()方法来得到Vold中的Socket地址(注意Vold进程的Socket值是放在环境变量中的,这里通过前面的Vold参数值来获得socket数值,并且创建LocalSocketAddress对象用于监听)。
和Vold进程中的Socket链接以后,listenToSocket会进入无限循环,在循环中读取socket中的数据,收到的数据格式是以0结尾的字符串。
除了以上MountService这个服务和存储管理有关系外,
还有2个服务和存储管理有关系。
监视存储设备的大小---DeviceStorageMonitorService
打印系统分区信息---DiskStatusService
