最近因为需要给大数据金融学院的学生讲解《Python数据挖掘及大数据分析》的课程,所以在这里,我将结合自己的上课内容,详细讲解每个步骤。作为助教,我更希望这门课程以实战为主,同时按小组划分学生,每个小组最后都提交一个基于Python的数据挖掘及大数据分析相关的成果。但是前面这节课没有在机房上,所以我在CSDN也将开设一个专栏,用于对该课程的补充。
希望该文章对你有所帮助,尤其是对大数据或数据挖掘的初学者,很开心和夏博、小民一起分享该课程,上课的感觉真的挺不错的,挺享受的。我也将认真对待每一个我的学生,真的好想把自己的所学的所有知识都给予你们。同时由于学生来自不同的学院,有的甚至没有接触过编程,所以这门课程也将采用从零单排的形式讲述。
这门课程围绕下图所示的内容进行展开及实战。
课程资源:
一. 大数据及数据挖掘基础
第一部分主要简单介绍三个问题(觉得无聊的直接调至第二部分):
1、什么是大数据?
2、什么是数据挖掘?
3、大数据和数据挖掘的区别?
由于前面几节课老师普及了大数据等一些基础知识,这里我并没有详细介绍,只是给几张图片,让大家简单了解下大数据和数据挖掘相关的基础概念,我分享更多的是实战以及编程。
<一>.大数据(Big Data)
大数据(big data)指无法在一定时间范围内用常规软件工具进行捕捉、管理和处理的数据集合,是需要新处理模式才能具有更强的决策力、洞察发现力和流程优化能力来适应海量、高增长率和多样化的信息资产。
下图是大数据经典的4V特征。
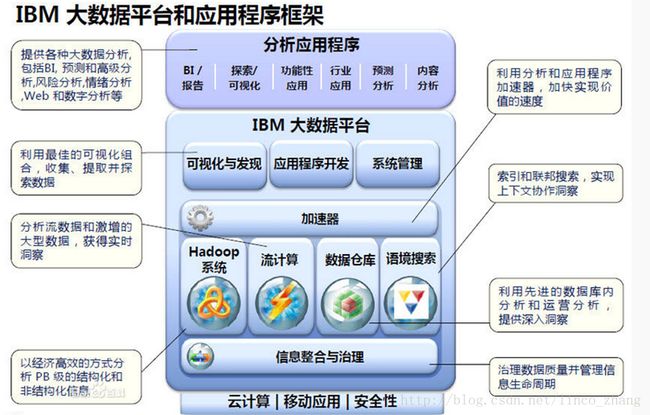
IBM大数据库框架及可视化技术,大数据常用:Hadoop、Spark,现在更多的是实时数据分析,包括淘宝、京东、附近美食等。
下图是大数据的一些应用。
说到大数据,就不得不提Hadoop,而说到Hadoop,又不得不提Map-Reduce。
MapReduce是一个软件框架由上千个商用机器组成的大集群上,并以一种可靠的,具有容错能力的方式并行地处理上TB级别的海量数据集。MapReduce的思想是“分而治之”。Mapper负责“分,Reducer负责对map阶段的结果进行汇总。
<二>.数据挖掘(Data Mining)
数据挖掘(Data Mining):数据库、机器学习、人工智能、统计学的交叉学科。
数据挖掘需要发现有价值的知识,同时最顶端都是具有智慧的去发现知识及有价值的信息。
因为这门课程主要是针对网页数据进行的大数据分析,需要Web Mining分类如下:

Web挖掘主要分为三类:Web日志挖掘、Web内容挖掘、Web结构挖掘。
<三>.机器学习
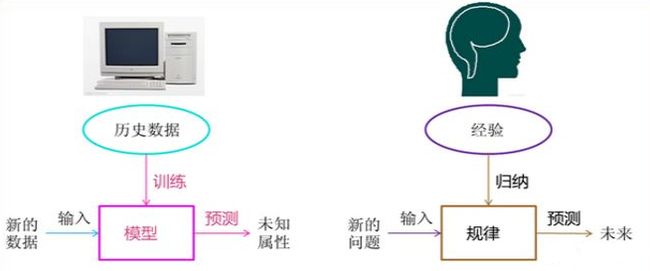
讲到机器学习和数据挖掘相关的知识,我通常都会补充两幅图片,感觉真的很棒。很想象的表示了计算机智能化与人类传统知识的类比。
推荐文章:机器学习:“一文读懂机器学习,大数据/自然语言处理/算法全有了”
二. 安装Python及基础知识
<一>.安装Python
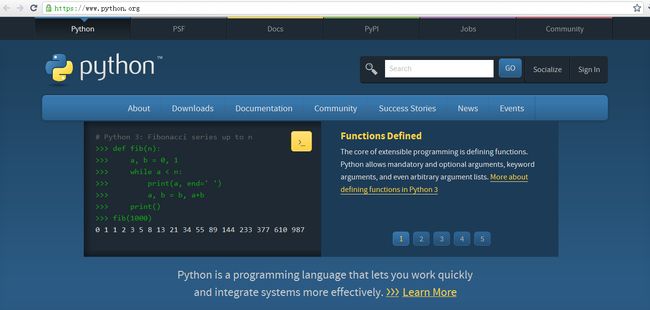
在开始使用Python编程之前,需要介绍Python的安装过程。python解释器在Linux中可以内置使用安装,windows中需要去http://www.python.org官网downloads页面下载。具体步骤如下:
第一步:打开Web浏览器并访问http://www.python.org官网;
第二步:在官网首页点击Download链接,进入下载界面,选择Python软件的版本,作者选择下载python 2.7.8,点击“Download”链接。
Python下载地址:
第三步:选择文件下载地址,并下载文件。
第四步:双击下载的“python-2.7.8.msi”软件,并对软件进行安装。
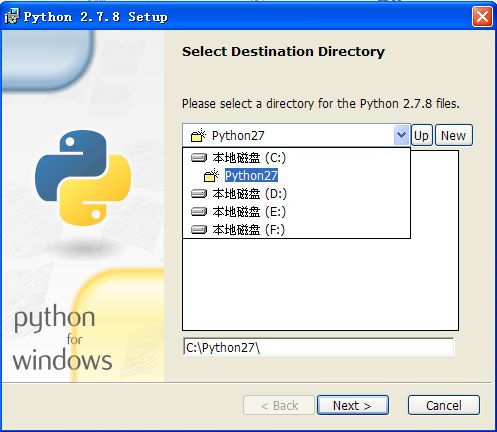
第五步:在Python安装向导中选择默认设置,点击“Next”,选择安装路径,这里设置为默认的安装路径“C:\Python27”,点击“Next”按钮,如图所示。
注意1:建议将Python安装在C盘下,通常路径为C:\Python27,不要存在中文路径。
在Python安装向导中选择默认设置,点击“Next”,选择安装路径,这里设置为默认的安装路径“C:\Python27”,点击“Next”按钮。
安装成功后,如下图所示:
第六步:假设安装一切正常,点击“开始”,选中“程序”,找到安装成功的Python软件,如图所示:
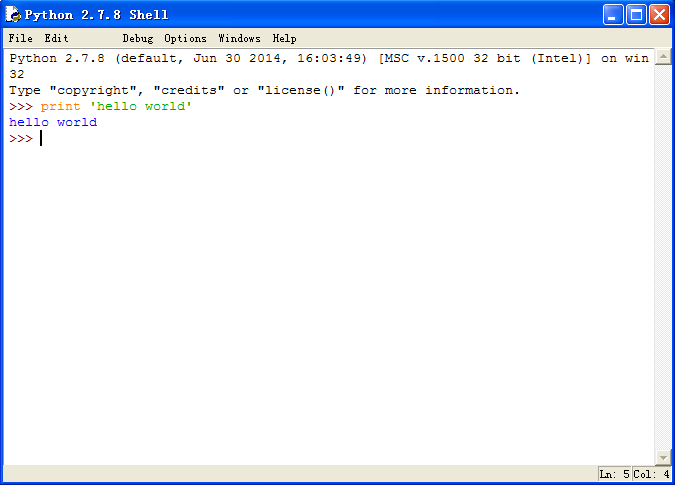
选中上图中第三个图标,即点击“Python (command line)命令行模式”,运行程序输入如下代码:
print 'hello world'
则python命令行模式的解释器会打印输出“hello world”字符串,如下图所示。
选中图中的第一个图片,点击“IDLE (Python GUI)”,即运行Python的集成开发环境(Python Integrated Development Environment,IDLE),运行结果如下图。
注意2:建议大家使用IDLE写脚本,完整的代码而不是通过命令行模式。
<二>.Python基础知识
这里简单入门介绍,主要介绍下条件语句、循环语句、函数等基础知识。
1、函数及运行
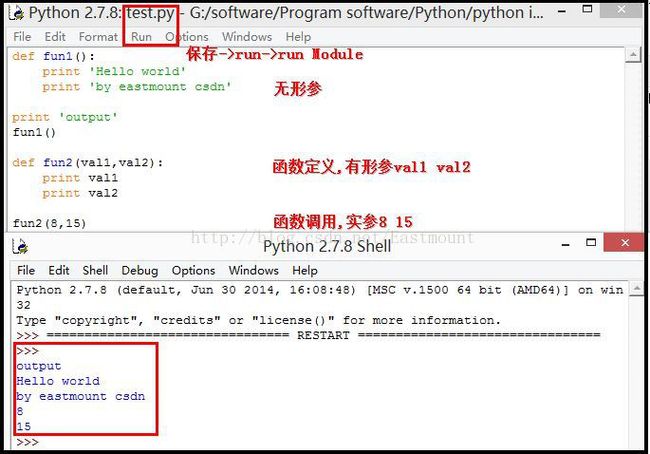
这里举个简单的例子。打开IDLE工具->点击栏"File"->New File新建文件->命名为test.py文件,在test文件里添加代码如下:
def fun1():
    print 'Hello world'
    print 'by eastmount csdn'
print 'output'
fun1()
def fun2(val1,val2):
    print val1
    print val2
fun2(8,15)
保存文件。并在test.py文件里点击Run->Run Module,输出结果如下图所示。
2、条件语句
包括单分支、双分支和多分支语句,if-elif-else。
(1).单分支语句
它的基本格式是:
if condition:
statement
statement
需要注意的是Ptthon中if条件语句条件无需圆括号(),条件后面需要添加冒号,它没有花括号{}而是使用TAB实现区分。其中condition条件判断通常有布尔表达式(True|False 0-假|1-真 非0即真)、关系表达式(>= <= == !=)和逻辑运算表达式(and or not)。
(2).双分支语句
它的基本格式是:
if condition:
statement
statement
else:
statement
statement
(3).多分支语句
if多分支由if-elif-else组成,其中elif相当于else if,同时它可以使用多个if的嵌套。具体代码如下所示:
#双分支if-else
count = input("please input:")
print 'count=',count
if count>80:
    print 'lager than 80'
else:
    print 'lower than 80'
print 'End if-else'

#多分支if-elif-else
number = input("please input:")
print 'number=',number
if number>=90:
    print 'A'
elif number>=80:
    print 'B'
elif number>=70:
    print 'C'
elif number>=60:
    print 'D'
else:
    print 'No pass'
print 'End if-elif-else'

#条件判断
sex = raw_input("plz input your sex:")
if sex=='male' or sex=='m' or sex=='man':
    print 'Man'
else:
    print 'Woman'
3、while循环语句
while循环语句的基本格式如下:
while condition:
statement
statement
else:
statement
statement
其中判断条件语句condition可以为布尔表达式、关系表达式和逻辑表达式,else可以省略(此处列出为与C语言等区别)。举个例子:
#循环while计数1+2+..+100
i = 1
s = 0
while i <= 100:
    s = s+i
    i = i+1
else:
    print 'exit while'
print 'sum = ',s

'''
输出结果为:exit while
          sum = 5050
'''
4、for循环
该循环语句的基础格式为:
for target in sequences:
statements
target表示变量名,sequences表示序列,常见类型有list(列表)、tuple(元组)、strings(字符串)和files(文件).
Python的for没有体现出循环的次数,不像C语言的for(i=0;i<10;i++)中i循环计数,Python的for指每次从序列sequences里面的数据项取值放到target里,取完即结束,取多少次循环多少次。其中in为成员资格运算符,检查一个值是否在序列中。同样可以使用break和continue跳出循环。
下面是文件循环遍历的过程:
#文件循环遍历三种对比
for n in open('for.py','r').read():
    print n,
print 'End'
for n in open('for.py','r').readlines():
    print n,
print 'End'
for n in open('for.py','r').readline():
    print n,
print 'End'
5、课堂讲解代码
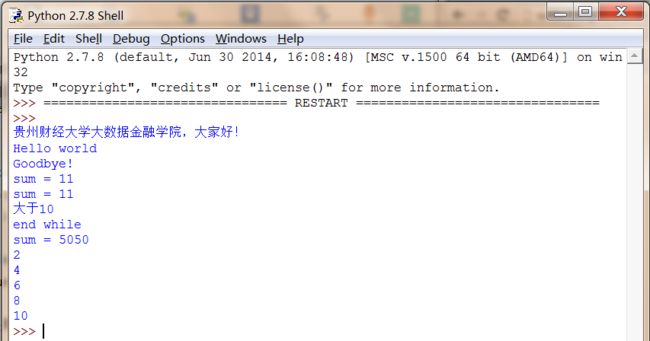
这是我课堂讲解的代码,仅供大家参考:
#coding=utf-8
import os
import string

print '贵州财经大学大数据金融学院,大家好!'

def fun1():
    print 'Hello world'
    print 'Goodbye!'

#计算和
def fun2(n, m):
    return n+m

#输出结果
fun1()
s = fun2(3,8)
print 'sum = ' + str(s)
print 'sum =', s

#判断语句 u表示unicode字符串
if(s>10):
    print u'大于10'
else:
    print u'小于等于10'

#循环语句
i = 1
s = 0
while i<=100:
    s = s + i
    i = i + 1
else:
    print 'end while'
print 'sum =', s
'''
输出结果为:sum=5050
'''

#for循环
num = [2, 4, 6, 8, 10]
for x in num:
    print x
输出结果如下图所示:
三. 安装PIP及第三方包
接下来需要详解介绍爬虫相关的知识了,这里主要涉及到下面几个知识:
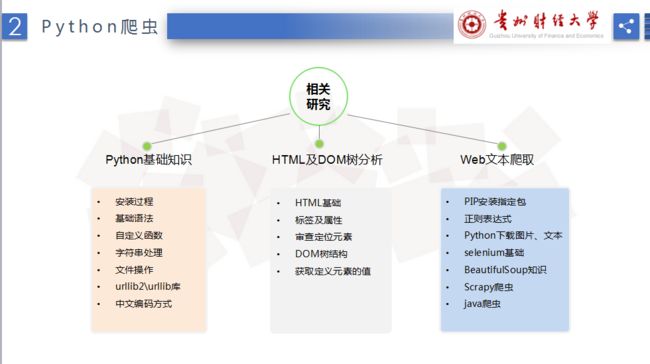
爬虫主要使用Python(字符串|urllib)+Selenium+PhantomJS+BeautifulSoup。

在介绍爬虫及Urllib下载网页或图片之前,先交大家如何使用pip安装第三方的库。
PIP
在介绍介绍它们之前,需要安装PIP软件。正如xifeijian大神所说:“作为Python爱好者,如果不知道easy_install或者pip中的任何一个的话,那么......”。
easy_insall的作用和perl中的cpan,ruby中的gem类似,都提供了在线一键安装模块的傻瓜方便方式,而pip是easy_install的改进版,提供更好的提示信息,删除package等功能。老版本的python中只有easy_install,没有pip。常见的具体用法如下:
easy_install的用法:
1) 安装一个包
 $ easy_install
 $ easy_install "=="
2) 升级一个包
 $ easy_install -U ">="

pip的用法
1) 安装一个包
 $ pip install
 $ pip install ==
2) 升级一个包 (如果不提供version号,升级到最新版本)
 $ pip install --upgrade >=
3)删除一个包
 $ pip uninstall
第一步:下载PIP软件
可以在官网http://pypi.python.org/pypi/pip#downloads下载,同时cd切换到PIP目录,在通过python setup.py install安装。而我采用的是下载pip-Win_1.7.exe进行安装,下载地址如下:
这里作者提供几种方法供大家下载:
http://download.csdn.net/detail/eastmount/9598651
第二步:安装PIP软件


当提示"pip and virtualenv installed"表示安装成功,那怎么测试PIP安装成功呢?
第三步:配置环境变量
此时在cmd中输入pip指令会提示错误“不是内部或外部命令”。
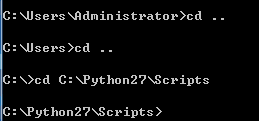
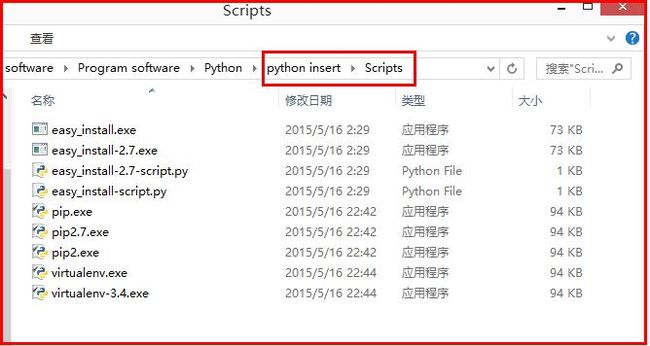
注意:两种解决方法,一种是通过cd ..去到Srcipts环境进行安装,pip install...
方法二:另一种配置Path路径。
需要添加path环境变量。PIP安装完成后,会在Python安装目录下添加python\Scripts目录,即在python安装目录的Scripts目录下,将此目录加入环境变量中即可!过程如下:
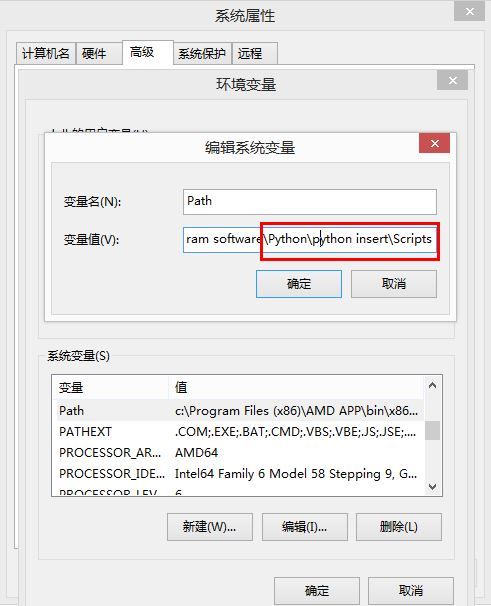
第四步:使用PIP命令
下面在CMD中使用PIP命令,“pip list outdate”列举Python安装库的版本信息。

注意:安装成功后,会在Python环境中增加Scripts文件夹,包括easy_install和pip。
PIP安装过程中可能出现各种问题,一种解决方法是去到python路径,通过python set_up.py install安装;另一种是配置Path环境比例。
课堂重点知识:
第一节课主要想让大家体会下Python网络爬虫的过程及示例。需要安装的第三方库主要包括三个:
pip install httplib2
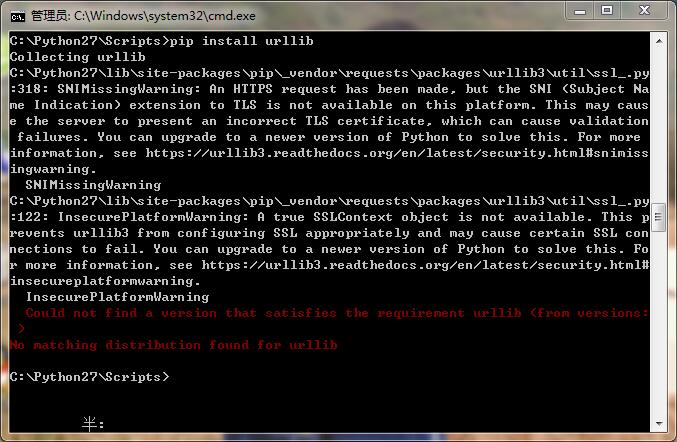
pip install urllib
pip install selenium
在安装过程中,如果pip install urllib报错,是因为httplib2包含了,可直接用。
注意:如果pip安装报错ascii编码问题,需要把计算机名称从中文修改为英文名。
四. Urllib下载网页及图片
在使用pip install urllib或pip install urllib2后,下面这段代码是下载网页。
#coding=utf-8
import os
import urllib
import httplib2
import webbrowser as web

#爬取在线网站
url = "http://www.baidu.com/"
content = urllib.urlopen(url).read()
open("baidu.html","w").write(content)
#浏览求打开网站
web.open_new_tab("baidu.html")
首先我们调用的是urllib2库里面的urlopen方法,传入一个URL,这个网址是百度首页,协议是HTTP协议,当然你也可以把HTTP换做FTP、FILE、HTTPS 等等,只是代表了一种访问控制协议,urlopen一般接受三个参数,它的参数如下:
urlopen(url, data, timeout)
第一个参数url即为URL,第二个参数data是访问URL时要传送的数据,第三个timeout是设置超时时间。
第二三个参数是可以不传送的,data默认为空None,timeout默认为 socket._GLOBAL_DEFAULT_TIMEOUT。
第一个参数URL是必须要传送的,在这个例子里面我们传送了百度的URL,执行urlopen方法之后,返回一个response对象,返回信息便保存在这里面。
response = urllib2.urlopen("http://www.baidu.com")
print response.read()
response对象有一个read方法,可以返回获取到的网页内容。
获取的网页本地保存为"baidu.html",通过浏览器打开如下图所示:
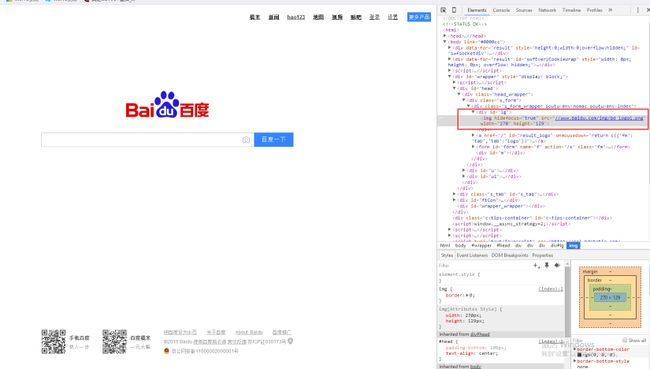
然后是需要下载图片,这里需要学会找到图片的URL,如下图百度的LOGO,可以通过浏览器右键"审查元素"或"检查"来进行定位。
定位URL后,再通过函数urlretrieve()进行下载。
#coding=utf-8
import os
import urllib
import httplib2
import webbrowser as web

#爬取在线网站
url = "http://www.baidu.com/"
content = urllib.urlopen(url).read()
open("baidu.html","w").write(content)
#浏览求打开网站
web.open_new_tab("baidu.html")

#下载图片 审查元素
pic_url = "https://www.baidu.com/img/bd_logo1.png"
pic_name = os.path.basename(pic_url)  #删除路径获取图片名字
urllib.urlretrieve(pic_url, pic_name)


#本地文件
content = urllib.urlopen("first.html").read()
print content

#下载图片 审查元素
pic_url = "imgs/bga1.jpg"
pic_name = os.path.basename(pic_url)  #删除路径获取图片名字
urllib.urlretrieve(pic_url, pic_name)
重点知识:
urllib.urlopen(url[, data[, proxies]]) :创建一个表示远程url的类文件对象,然后像本地文件一样操作这个类文件对象来获取远程数据。
urlretrieve方法直接将远程数据下载到本地。
如果需要显示进度条,则使用下面这段代码:
import urllib
def callbackfunc(blocknum, blocksize, totalsize):
    '''回调函数
    @blocknum: 已经下载的数据块
    @blocksize: 数据块的大小
    @totalsize: 远程文件的大小
    '''
    percent = 100.0 * blocknum * blocksize / totalsize
    if percent > 100:
        percent = 100
    print "%.2f%%"% percent
url = 'http://www.sina.com.cn'
local = 'd:\\sina.html'
urllib.urlretrieve(url, local, callbackfunc)
五. HTML网页基础知识及审查元素
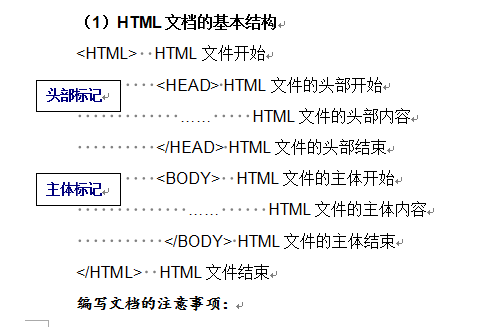
HTML DOM是HTML Document Object Model(文档对象模型)的缩写,HTML DOM则是专门适用于HTML/XHTML的文档对象模型。熟悉软件开发的人员可以将HTML DOM理解为网页的API。它将网页中的各个元素都看作一个个对象,从而使网页中的元素也可以被计算机语言获取或者编辑。
DOM是以层次结构组织的节点或信息片断的集合。这个层次结构允许开发人员在树中导航寻找特定信息。分析该结构通常需要加载整个文档和构造层次结构,然后才能做任何工作。由于它是基于信息层次的,因而 DOM 被认为是基于树或基于对象的。
HTML DOM 定义了访问和操作HTML文档的标准方法。 HTML DOM 把 HTML 文档呈现为带有元素、属性和文本的树结构(节点树)。它们都是一个节点(Node),就像公司的组织结构图一样。 我们现在从另一个角度来审视源代码,first.html的源码如下:
    Python挖掘开发


    欢迎大家学习《基于Python的Web大数据爬取实战指南》!
这个例子的第一个元素就是元素,在这个元素的起始标签和终止标签之间,又有几个标签分别起始和闭合,包括、和<body>。<head>和<body>标签是直接被<html>元素包含的,而<title>标签则包含在<head>标签内。要描述一个HTML网页的这种多层结构,用树来进行类比是最好的方式。树形结构如下图所示:</span>
<br>
<div style="font-size:18px;text-align:center;">
<a href="http://img.e-com-net.com/image/info8/ace76eaeac99402bb0963da1532eac72.png" target="_blank"><img src="http://img.e-com-net.com/image/info8/ace76eaeac99402bb0963da1532eac72.png" alt="【Python数据挖掘课程】一.安装Python及爬虫入门介绍_第37张图片" width="551" height="375" style="border:1px solid black;"></a>
</div>
<br>
<span style="font-family:'Microsoft YaHei';font-size:18px;"> <span style="color:#ff0000;"> <strong>重点:</strong></span><br> 在网络爬虫中,通常需要结合浏览器来定位元素,浏览器右键通常包括两个重要的功能:查看源代码和审查或检查元素。</span>
<br>
<div style="font-size:18px;text-align:center;">
<a href="http://img.e-com-net.com/image/info8/0fa0dbfefa8842208327468839b880c2.jpg" target="_blank"><img src="http://img.e-com-net.com/image/info8/0fa0dbfefa8842208327468839b880c2.jpg" width="650" height="203" alt="【Python数据挖掘课程】一.安装Python及爬虫入门介绍_第38张图片" style="border:1px solid black;"></a>
</div>
<br>
<span style="font-size:18px;"><span style="font-family:'Microsoft YaHei';"> 通过审查元素,可以定位到需要爬取图片或网页的HTML源文件,通常是table或div的布局,这些HTML标签通常是成对出现的,如<html></html>、<div></div>等;同时会包括一些属性id、name、class来指定该标签。如:<br></span><span style="font-family:'Microsoft YaHei';"> <div id="content" name="n1" class="cc">....</div></span></span>
<br>
<br>
<div style="text-align:center;">
<span style="font-size:18px;"><a href="http://img.e-com-net.com/image/info8/6e038c885db54756aec0bf42c8e98bf4.jpg" target="_blank"><img src="http://img.e-com-net.com/image/info8/6e038c885db54756aec0bf42c8e98bf4.jpg" width="650" height="369" alt="【Python数据挖掘课程】一.安装Python及爬虫入门介绍_第39张图片" style="text-align:center;;border:1px solid black;"></a><br></span>
</div>
<br>
<p></p>
<p><span style="font-family:'Microsoft YaHei';font-size:18px;"><br></span></p>
<h2><span style="font-family:'Microsoft YaHei';"><span style="font-size:24px;color:#3333ff;">六. 安装Selenium及网页简单爬取</span></span></h2>
<p><span style="font-family:'Microsoft YaHei';"><span style="font-size:18px;"> Selenium用于Web应用程序测试的工具,模拟浏览器用户操作,通过Locating Elements 定位元素。安装过程如下图所示,通过pip install selenium安装。<br> <span style="color:#ff0000;">注意:需要cd去到Scripts目录进行安装。</span><br><br></span></span></p>
<div style="text-align:center;">
<a href="http://img.e-com-net.com/image/info8/c75b7f0d83a6481fbd327908fffd2d64.png" target="_blank"><img src="http://img.e-com-net.com/image/info8/c75b7f0d83a6481fbd327908fffd2d64.png" alt="【Python数据挖掘课程】一.安装Python及爬虫入门介绍_第40张图片" width="667" height="189" style="border:1px solid black;"></a>
</div>
<p><br></p>
<p style="text-align:center;"><span style="font-family:'Microsoft YaHei';font-size:18px;"><a href="http://img.e-com-net.com/image/info8/6aa5d455eb1d44dfb821ca1b58e475ab.png" target="_blank"><img src="http://img.e-com-net.com/image/info8/6aa5d455eb1d44dfb821ca1b58e475ab.png" alt="【Python数据挖掘课程】一.安装Python及爬虫入门介绍_第41张图片" width="668" height="435" style="border:1px solid black;"></a><br></span></p>
<p><span style="font-family:'Microsoft YaHei';font-size:18px;"><br> selenium结合浏览器定位的基本函数包括:<br><br></span></p>
<div style="text-align:center;">
<a href="http://img.e-com-net.com/image/info8/1990c76b10ee4043a2e12cbb2edeea6e.jpg" target="_blank"><img src="http://img.e-com-net.com/image/info8/1990c76b10ee4043a2e12cbb2edeea6e.jpg" width="650" height="365" alt="【Python数据挖掘课程】一.安装Python及爬虫入门介绍_第42张图片" style="border:1px solid black;"></a>
</div>
<br>
<span style="font-family:'Microsoft YaHei';font-size:18px;"> 推荐文章,同时下节课会详细介绍。<br> [python爬虫] Selenium常见元素定位方法和操作的学习介绍<br><br> 第一个基于Selenium爬虫的代码,通过调用Firefox浏览器:</span>
<br>
<pre><code class="language-python">#coding=utf-8
import os
import urllib
from selenium import webdriver
from selenium.webdriver.common.keys import Keys
#Open PhantomJS
#driver = webdriver.PhantomJS(executable_path="phantomjs-1.9.1-windows\phantomjs.exe")
driver = webdriver.Firefox()
#访问url
driver.get("https://www.baidu.com/")
print u'URL:'
print driver.current_url
#当前链接: https://www.baidu.com/
print u'标题:'
print driver.title
#标题: 百度一下, 你就知道
#print driver.page_source
#源代码
#定位元素,注意u1(数字1)和ul(字母L)区别
print u'\n\n定位元素id:'
info1 = driver.find_element_by_id("u1").text
print info1
#定位元素
print u'\n\n定位元素xpath:'
info3 = driver.find_element_by_xpath("//div[@id='u1']/a")
print info3.text
</code></pre>
<span style="font-family:'Microsoft YaHei';font-size:18px;"> 输出如下图所示:<br></span>
<br>
<div style="text-align:center;">
<a href="http://img.e-com-net.com/image/info8/2aee9b5abfbe4995b56cf1d345ca504b.jpg" target="_blank"><img src="http://img.e-com-net.com/image/info8/2aee9b5abfbe4995b56cf1d345ca504b.jpg" width="650" height="355" alt="【Python数据挖掘课程】一.安装Python及爬虫入门介绍_第43张图片" style="border:1px solid black;"></a>
</div>
<span style="font-family:'Microsoft YaHei';font-size:18px;"><br><br> <span style="color:#ff0000;"> 希望这篇文章对你有所帮助,主要是介绍基本的安装过程及体会下Python爬虫知识,后面会陆续详细介绍相关内容。非常想上好这门课,因为是我的专业方向,另外学生们真的好棒,好认真,用手机录像、问问题、配环境等等,只要有用心的学生,我定不负你!同时,自己授课思路有些乱,还需加强,但还是挺享受的,毕竟9800,哈哈哈!</span><br> <span style="color:rgb(51,51,51);line-height:26px;font-family:'Microsoft YaHei';font-size:18px;"> </span><span style="line-height:26px;font-family:'Microsoft YaHei';font-size:18px;">(By:Eastmount 2016-09-19 晚上10点</span><span style="line-height:26px;font-family:'Microsoft YaHei';font-size:18px;"> </span><span style="color:rgb(51,51,51);line-height:26px;font-family:'Microsoft YaHei';font-size:18px;"> </span>http://blog.csdn.net/eastmount/<span style="color:rgb(51,51,51);line-height:26px;font-family:'Microsoft YaHei';font-size:18px;"> </span><span style="line-height:26px;font-family:'Microsoft YaHei';font-size:18px;">)</span><br></span>
<br>
<p><br><br><br></p>
</div>
</div>
</div>
</div>
</div>
<!--PC和WAP自适应版-->
<div id="SOHUCS" sid="1177208727703449600"></div>
<script type="text/javascript" src="/views/front/js/chanyan.js"></script>
<!-- 文章页-底部 动态广告位 -->
<div class="youdao-fixed-ad" id="detail_ad_bottom"></div>
</div>
<div class="col-md-3">
<div class="row" id="ad">
<!-- 文章页-右侧1 动态广告位 -->
<div id="right-1" class="col-lg-12 col-md-12 col-sm-4 col-xs-4 ad">
<div class="youdao-fixed-ad" id="detail_ad_1"> </div>
</div>
<!-- 文章页-右侧2 动态广告位 -->
<div id="right-2" class="col-lg-12 col-md-12 col-sm-4 col-xs-4 ad">
<div class="youdao-fixed-ad" id="detail_ad_2"></div>
</div>
<!-- 文章页-右侧3 动态广告位 -->
<div id="right-3" class="col-lg-12 col-md-12 col-sm-4 col-xs-4 ad">
<div class="youdao-fixed-ad" id="detail_ad_3"></div>
</div>
</div>
</div>
</div>
</div>
</div>
<div class="container">
<h4 class="pt20 mb15 mt0 border-top">你可能感兴趣的:(Python数据挖掘课程,知识图谱,web数据挖掘及NLP)</h4>
<div id="paradigm-article-related">
<div class="recommend-post mb30">
<ul class="widget-links">
<li><a href="/article/1835511912843014144.htm"
title="理解Gunicorn:Python WSGI服务器的基石" target="_blank">理解Gunicorn:Python WSGI服务器的基石</a>
<span class="text-muted">范范0825</span>
<a class="tag" taget="_blank" href="/search/ipython/1.htm">ipython</a><a class="tag" taget="_blank" href="/search/linux/1.htm">linux</a><a class="tag" taget="_blank" href="/search/%E8%BF%90%E7%BB%B4/1.htm">运维</a>
<div>理解Gunicorn:PythonWSGI服务器的基石介绍Gunicorn,全称GreenUnicorn,是一个为PythonWSGI(WebServerGatewayInterface)应用设计的高效、轻量级HTTP服务器。作为PythonWeb应用部署的常用工具,Gunicorn以其高性能和易用性著称。本文将介绍Gunicorn的基本概念、安装和配置,帮助初学者快速上手。1.什么是Gunico</div>
</li>
<li><a href="/article/1835511542284644352.htm"
title="学点心理知识,呵护孩子健康" target="_blank">学点心理知识,呵护孩子健康</a>
<span class="text-muted">静候花开_7090</span>
<div>昨天听了华中师范大学教育管理学系副教授张玲老师的《哪里才是学生心理健康的最后庇护所,超越教育与技术的思考》的讲座。今天又重新学习了一遍,收获匪浅。张玲博士也注意到了当今社会上的孩子由于心理问题导致的自残、自杀及伤害他人等恶性事件。她向我们普及了一个重要的命题,她说心理健康的一些基本命题,我们与我们通常的一些教育命题是不同的,她还举了几个例子,让我们明白我们原来以为的健康并非心理学上的健康。比如如果</div>
</li>
<li><a href="/article/1835508758042734592.htm"
title="我校举行新老教师师徒结对仪式暨名师专业工作室工作交流活动" target="_blank">我校举行新老教师师徒结对仪式暨名师专业工作室工作交流活动</a>
<span class="text-muted">李蕾1229</span>
<div>为促进我校教师专业发展,发挥骨干教师的引领带头作用,11月6日下午,我校举行新老教师师徒结对仪式暨名师专业工作室工作交流活动。图片发自App会议由教师发展处李蕾主任主持,首先,由范校长宣读新老教师结对名单及双方承担职责。随后,两位新调入教师陈玉萍、莫正杰分别和他们的师傅鲍元美、刘召彬老师签订了师徒结对协议书。图片发自App图片发自App师徒拥抱、握手。有了师傅就有了目标有了方向,相信两位新教师在师</div>
</li>
<li><a href="/article/1835508630959517696.htm"
title="向内而求" target="_blank">向内而求</a>
<span class="text-muted">陈陈_19b4</span>
<div>10月27日,阴。阅读书目:《次第花开》。作者:希阿荣博堪布,是当今藏传佛家宁玛派最伟大的上师法王,如意宝晋美彭措仁波切颇具影响力的弟子之一。多年以来,赴海内外各地弘扬佛法,以正式授课、现场开示、发表文章等多种方法指导佛学弟子修行佛法。代表作《寂静之道》、《生命这出戏》、《透过佛法看世界》自出版以来一直是佛教类书籍中的畅销书。图片发自App金句:1.佛陀说,一切痛苦的根源在于我们长期以来对自身及外</div>
</li>
<li><a href="/article/1835505606245576704.htm"
title="Python中os.environ基本介绍及使用方法" target="_blank">Python中os.environ基本介绍及使用方法</a>
<span class="text-muted">鹤冲天Pro</span>
<a class="tag" taget="_blank" href="/search/%23/1.htm">#</a><a class="tag" taget="_blank" href="/search/Python/1.htm">Python</a><a class="tag" taget="_blank" href="/search/python/1.htm">python</a><a class="tag" taget="_blank" href="/search/%E6%9C%8D%E5%8A%A1%E5%99%A8/1.htm">服务器</a><a class="tag" taget="_blank" href="/search/%E5%BC%80%E5%8F%91%E8%AF%AD%E8%A8%80/1.htm">开发语言</a>
<div>文章目录python中os.environos.environ简介os.environ进行环境变量的增删改查python中os.environ的使用详解1.简介2.key字段详解2.1常见key字段3.os.environ.get()用法4.环境变量的增删改查和判断是否存在4.1新增环境变量4.2更新环境变量4.3获取环境变量4.4删除环境变量4.5判断环境变量是否存在python中os.envi</div>
</li>
<li><a href="/article/1835504218178416640.htm"
title="Google earth studio 简介" target="_blank">Google earth studio 简介</a>
<span class="text-muted">陟彼高冈yu</span>
<a class="tag" taget="_blank" href="/search/%E6%97%85%E6%B8%B8/1.htm">旅游</a>
<div>GoogleEarthStudio是一个基于Web的动画工具,专为创作使用GoogleEarth数据的动画和视频而设计。它利用了GoogleEarth强大的三维地图和卫星影像数据库,使用户能够轻松地创建逼真的地球动画、航拍视频和动态地图可视化。网址为https://www.google.com/earth/studio/。GoogleEarthStudio是一个基于Web的动画工具,专为创作使用G</div>
</li>
<li><a href="/article/1835502578050363392.htm"
title="PHP环境搭建详细教程" target="_blank">PHP环境搭建详细教程</a>
<span class="text-muted">好看资源平台</span>
<a class="tag" taget="_blank" href="/search/%E5%89%8D%E7%AB%AF/1.htm">前端</a><a class="tag" taget="_blank" href="/search/php/1.htm">php</a>
<div>PHP是一个流行的服务器端脚本语言,广泛用于Web开发。为了使PHP能够在本地或服务器上运行,我们需要搭建一个合适的PHP环境。本教程将结合最新资料,介绍在不同操作系统上搭建PHP开发环境的多种方法,包括Windows、macOS和Linux系统的安装步骤,以及本地和Docker环境的配置。1.PHP环境搭建概述PHP环境的搭建主要分为以下几类:集成开发环境:例如XAMPP、WAMP、MAMP,这</div>
</li>
<li><a href="/article/1835502451877310464.htm"
title="基于社交网络算法优化的二维最大熵图像分割" target="_blank">基于社交网络算法优化的二维最大熵图像分割</a>
<span class="text-muted">智能算法研学社(Jack旭)</span>
<a class="tag" taget="_blank" href="/search/%E6%99%BA%E8%83%BD%E4%BC%98%E5%8C%96%E7%AE%97%E6%B3%95%E5%BA%94%E7%94%A8/1.htm">智能优化算法应用</a><a class="tag" taget="_blank" href="/search/%E5%9B%BE%E5%83%8F%E5%88%86%E5%89%B2/1.htm">图像分割</a><a class="tag" taget="_blank" href="/search/%E7%AE%97%E6%B3%95/1.htm">算法</a><a class="tag" taget="_blank" href="/search/php/1.htm">php</a><a class="tag" taget="_blank" href="/search/%E5%BC%80%E5%8F%91%E8%AF%AD%E8%A8%80/1.htm">开发语言</a>
<div>智能优化算法应用:基于社交网络优化的二维最大熵图像阈值分割-附代码文章目录智能优化算法应用:基于社交网络优化的二维最大熵图像阈值分割-附代码1.前言2.二维最大熵阈值分割原理3.基于社交网络优化的多阈值分割4.算法结果:5.参考文献:6.Matlab代码摘要:本文介绍基于最大熵的图像分割,并且应用社交网络算法进行阈值寻优。1.前言阅读此文章前,请阅读《图像分割:直方图区域划分及信息统计介绍》htt</div>
</li>
<li><a href="/article/1835502282603589632.htm"
title="509. 斐波那契数(每日一题)" target="_blank">509. 斐波那契数(每日一题)</a>
<span class="text-muted">lzyprime</span>
<div>lzyprime博客(github)创建时间:2021.01.04qq及邮箱:2383518170leetcode笔记题目描述斐波那契数,通常用F(n)表示,形成的序列称为斐波那契数列。该数列由0和1开始,后面的每一项数字都是前面两项数字的和。也就是:F(0)=0,F(1)=1F(n)=F(n-1)+F(n-2),其中n>1给你n,请计算F(n)。示例1:输入:2输出:1解释:F(2)=F(1)+</div>
</li>
<li><a href="/article/1835498925755297792.htm"
title="DIV+CSS+JavaScript技术制作网页(旅游主题网页设计与制作)云南大理" target="_blank">DIV+CSS+JavaScript技术制作网页(旅游主题网页设计与制作)云南大理</a>
<span class="text-muted">STU学生网页设计</span>
<a class="tag" taget="_blank" href="/search/%E7%BD%91%E9%A1%B5%E8%AE%BE%E8%AE%A1/1.htm">网页设计</a><a class="tag" taget="_blank" href="/search/%E6%9C%9F%E6%9C%AB%E7%BD%91%E9%A1%B5%E4%BD%9C%E4%B8%9A/1.htm">期末网页作业</a><a class="tag" taget="_blank" href="/search/html%E9%9D%99%E6%80%81%E7%BD%91%E9%A1%B5/1.htm">html静态网页</a><a class="tag" taget="_blank" href="/search/html5%E6%9C%9F%E6%9C%AB%E5%A4%A7%E4%BD%9C%E4%B8%9A/1.htm">html5期末大作业</a><a class="tag" taget="_blank" href="/search/%E7%BD%91%E9%A1%B5%E8%AE%BE%E8%AE%A1/1.htm">网页设计</a><a class="tag" taget="_blank" href="/search/web%E5%A4%A7%E4%BD%9C%E4%B8%9A/1.htm">web大作业</a>
<div>️精彩专栏推荐作者主页:【进入主页—获取更多源码】web前端期末大作业:【HTML5网页期末作业(1000套)】程序员有趣的告白方式:【HTML七夕情人节表白网页制作(110套)】文章目录二、网站介绍三、网站效果▶️1.视频演示2.图片演示四、网站代码HTML结构代码CSS样式代码五、更多源码二、网站介绍网站布局方面:计划采用目前主流的、能兼容各大主流浏览器、显示效果稳定的浮动网页布局结构。网站程</div>
</li>
<li><a href="/article/1835496310099243008.htm"
title="春季养肝正当时" target="_blank">春季养肝正当时</a>
<span class="text-muted">dxn悟</span>
<div>重温快乐2023年2月4日立春。春天来了,春暖花开,小鸟欢唱,那在这样的季节我们如何养肝呢?自然界的春季对应中医五行的木,人体五脏肝属木,“木曰曲直”,是以树干曲曲直直地向上、向外伸长舒展的生发姿态,来形容具有生长、升发、条达、舒畅等特征的食物及现象。根据中医天人相应的理念,肝五行属木,喜条达,主疏泄,与春天相应,所以春天最适合养肝。养肝首先要少生气,因为肝喜条达恶抑郁。人体五志肝为怒,生气发怒最</div>
</li>
<li><a href="/article/1835496149843275776.htm"
title="关于城市旅游的HTML网页设计——(旅游风景云南 5页)HTML+CSS+JavaScript" target="_blank">关于城市旅游的HTML网页设计——(旅游风景云南 5页)HTML+CSS+JavaScript</a>
<span class="text-muted">二挡起步</span>
<a class="tag" taget="_blank" href="/search/web%E5%89%8D%E7%AB%AF%E6%9C%9F%E6%9C%AB%E5%A4%A7%E4%BD%9C%E4%B8%9A/1.htm">web前端期末大作业</a><a class="tag" taget="_blank" href="/search/javascript/1.htm">javascript</a><a class="tag" taget="_blank" href="/search/html/1.htm">html</a><a class="tag" taget="_blank" href="/search/css/1.htm">css</a><a class="tag" taget="_blank" href="/search/%E6%97%85%E6%B8%B8/1.htm">旅游</a><a class="tag" taget="_blank" href="/search/%E9%A3%8E%E6%99%AF/1.htm">风景</a>
<div>⛵源码获取文末联系✈Web前端开发技术描述网页设计题材,DIV+CSS布局制作,HTML+CSS网页设计期末课程大作业|游景点介绍|旅游风景区|家乡介绍|等网站的设计与制作|HTML期末大学生网页设计作业,Web大学生网页HTML:结构CSS:样式在操作方面上运用了html5和css3,采用了div+css结构、表单、超链接、浮动、绝对定位、相对定位、字体样式、引用视频等基础知识JavaScrip</div>
</li>
<li><a href="/article/1835496148601761792.htm"
title="HTML网页设计制作大作业(div+css) 云南我的家乡旅游景点 带文字滚动" target="_blank">HTML网页设计制作大作业(div+css) 云南我的家乡旅游景点 带文字滚动</a>
<span class="text-muted">二挡起步</span>
<a class="tag" taget="_blank" href="/search/web%E5%89%8D%E7%AB%AF%E6%9C%9F%E6%9C%AB%E5%A4%A7%E4%BD%9C%E4%B8%9A/1.htm">web前端期末大作业</a><a class="tag" taget="_blank" href="/search/web%E8%AE%BE%E8%AE%A1%E7%BD%91%E9%A1%B5%E8%A7%84%E5%88%92%E4%B8%8E%E8%AE%BE%E8%AE%A1/1.htm">web设计网页规划与设计</a><a class="tag" taget="_blank" href="/search/html/1.htm">html</a><a class="tag" taget="_blank" href="/search/css/1.htm">css</a><a class="tag" taget="_blank" href="/search/javascript/1.htm">javascript</a><a class="tag" taget="_blank" href="/search/dreamweaver/1.htm">dreamweaver</a><a class="tag" taget="_blank" href="/search/%E5%89%8D%E7%AB%AF/1.htm">前端</a>
<div>Web前端开发技术描述网页设计题材,DIV+CSS布局制作,HTML+CSS网页设计期末课程大作业游景点介绍|旅游风景区|家乡介绍|等网站的设计与制作HTML期末大学生网页设计作业HTML:结构CSS:样式在操作方面上运用了html5和css3,采用了div+css结构、表单、超链接、浮动、绝对定位、相对定位、字体样式、引用视频等基础知识JavaScript:做与用户的交互行为文章目录前端学习路线</div>
</li>
<li><a href="/article/1835495517774245888.htm"
title="python八股文面试题分享及解析(1)" target="_blank">python八股文面试题分享及解析(1)</a>
<span class="text-muted">Shawn________</span>
<a class="tag" taget="_blank" href="/search/python/1.htm">python</a>
<div>#1.'''a=1b=2不用中间变量交换a和b'''#1.a=1b=2a,b=b,aprint(a)print(b)结果:21#2.ll=[]foriinrange(3):ll.append({'num':i})print(11)结果:#[{'num':0},{'num':1},{'num':2}]#3.kk=[]a={'num':0}foriinrange(3):#0,12#可变类型,不仅仅改变</div>
</li>
<li><a href="/article/1835495170972413952.htm"
title="git - Webhook让部署自动化" target="_blank">git - Webhook让部署自动化</a>
<span class="text-muted">大猪大猪</span>
<div>我们现在有一个需求,将项目打包上传到gitlab或者github后,程序能自动部署,不用手动地去服务器中进行项目更新并运行,如何做到?这里我们可以使用gitlab与github的挂钩,挂钩的原理就是,每当我们有请求到gitlab与github服务器时,这时他俩会根据我们配置的挂钩地扯进行访问,webhook挂钩程序会一直监听着某个端口请求,一但收到他们发过来的请求,这时就知道用户有请求提交了,这时</div>
</li>
<li><a href="/article/1835494257746604032.htm"
title="MYSQL面试系列-04" target="_blank">MYSQL面试系列-04</a>
<span class="text-muted">king01299</span>
<a class="tag" taget="_blank" href="/search/%E9%9D%A2%E8%AF%95/1.htm">面试</a><a class="tag" taget="_blank" href="/search/mysql/1.htm">mysql</a><a class="tag" taget="_blank" href="/search/%E9%9D%A2%E8%AF%95/1.htm">面试</a>
<div>MYSQL面试系列-0417.关于redolog和binlog的刷盘机制、redolog、undolog作用、GTID是做什么的?innodb_flush_log_at_trx_commit及sync_binlog参数意义双117.1innodb_flush_log_at_trx_commit该变量定义了InnoDB在每次事务提交时,如何处理未刷入(flush)的重做日志信息(redolog)。它</div>
</li>
<li><a href="/article/1835493267907637248.htm"
title="webpack图片等资源的处理" target="_blank">webpack图片等资源的处理</a>
<span class="text-muted">dmengmeng</span>
<div>需要的loaderfile-loader(让我们可以引入这些资源文件)url-loader(其实是file-loader的二次封装)img-loader(处理图片所需要的)在没有使用任何处理图片的loader之前,比如说css中用到了背景图片,那么最后打包会报错的,因为他没办法处理图片。其实你只想能够使用图片的话。只加一个file-loader就可以,打开网页能准确看到图片。{test:/\.(p</div>
</li>
<li><a href="/article/1835492740536823808.htm"
title="node.js学习" target="_blank">node.js学习</a>
<span class="text-muted">小猿L</span>
<a class="tag" taget="_blank" href="/search/node.js/1.htm">node.js</a><a class="tag" taget="_blank" href="/search/node.js/1.htm">node.js</a><a class="tag" taget="_blank" href="/search/%E5%AD%A6%E4%B9%A0/1.htm">学习</a><a class="tag" taget="_blank" href="/search/vim/1.htm">vim</a>
<div>node.js学习实操及笔记温故node.js,node.js学习实操过程及笔记~node.js学习视频node.js官网node.js中文网实操笔记githubcsdn笔记为什么学node.js可以让别人访问我们编写的网页为后续的框架学习打下基础,三大框架vuereactangular离不开node.jsnode.js是什么官网:node.js是一个开源的、跨平台的运行JavaScript的运行</div>
</li>
<li><a href="/article/1835492487783870464.htm"
title="CX8836:小体积大功率升降压方案推荐(附Demo设计指南)" target="_blank">CX8836:小体积大功率升降压方案推荐(附Demo设计指南)</a>
<span class="text-muted">诚芯微科技</span>
<a class="tag" taget="_blank" href="/search/%E7%A4%BE%E4%BA%A4%E7%94%B5%E5%AD%90/1.htm">社交电子</a>
<div>CX8836是一颗同步四开关单向升降压控制器,在4.5V-40V宽输入电压范围内稳定工作,持续负载电流10A,能够在输入高于或低于输出电压时稳定调节输出电压,可适用于USBPD快充、车载充电器、HUB、汽车启停系统、工业PC电源等多种升降压应用场合,为大功率TYPE-CPD车载充电器提供最优解决方案。提供CX8836Demo测试、CX8836样品申请及CX8836方案开发技术支持。CX8836同升</div>
</li>
<li><a href="/article/1835489208152715264.htm"
title="Rust基础知识" target="_blank">Rust基础知识</a>
<span class="text-muted">GRKF15</span>
<a class="tag" taget="_blank" href="/search/rust/1.htm">rust</a><a class="tag" taget="_blank" href="/search/%E5%BC%80%E5%8F%91%E8%AF%AD%E8%A8%80/1.htm">开发语言</a><a class="tag" taget="_blank" href="/search/%E5%90%8E%E7%AB%AF/1.htm">后端</a>
<div>1.Rust语言简介1.1基础语法变量声明:let关键字用于声明变量,可以指定或不指定类型,如leta=10;和letmutc=30i32;。函数定义:使用fn关键字定义函数,并指定参数类型及返回类型,如fnadd(i:i32,j:i32)->i32{i+j}。控制流:包括if、else等,控制语句后需要使用;来结束语句。1.2数据类型整数类型:i8、i16、i32、i64、i128,以及无符号的</div>
</li>
<li><a href="/article/1835483915071090688.htm"
title="【华为OD技术面试真题 - 技术面】- python八股文真题题库(1)" target="_blank">【华为OD技术面试真题 - 技术面】- python八股文真题题库(1)</a>
<span class="text-muted">算法大师</span>
<a class="tag" taget="_blank" href="/search/%E5%8D%8E%E4%B8%BAod/1.htm">华为od</a><a class="tag" taget="_blank" href="/search/%E9%9D%A2%E8%AF%95/1.htm">面试</a><a class="tag" taget="_blank" href="/search/python/1.htm">python</a>
<div>华为OD面试真题精选专栏:华为OD面试真题精选目录:2024华为OD面试手撕代码真题目录以及八股文真题目录文章目录华为OD面试真题精选1.数据预处理流程数据预处理的主要步骤工具和库2.介绍线性回归、逻辑回归模型线性回归(LinearRegression)模型形式:关键点:逻辑回归(LogisticRegression)模型形式:关键点:参数估计与评估:3.python浅拷贝及深拷贝浅拷贝(Shal</div>
</li>
<li><a href="/article/1835483159630802944.htm"
title="nosql数据库技术与应用知识点" target="_blank">nosql数据库技术与应用知识点</a>
<span class="text-muted">皆过客,揽星河</span>
<a class="tag" taget="_blank" href="/search/NoSQL/1.htm">NoSQL</a><a class="tag" taget="_blank" href="/search/nosql/1.htm">nosql</a><a class="tag" taget="_blank" href="/search/%E6%95%B0%E6%8D%AE%E5%BA%93/1.htm">数据库</a><a class="tag" taget="_blank" href="/search/%E5%A4%A7%E6%95%B0%E6%8D%AE/1.htm">大数据</a><a class="tag" taget="_blank" href="/search/%E6%95%B0%E6%8D%AE%E5%88%86%E6%9E%90/1.htm">数据分析</a><a class="tag" taget="_blank" href="/search/%E6%95%B0%E6%8D%AE%E7%BB%93%E6%9E%84/1.htm">数据结构</a><a class="tag" taget="_blank" href="/search/%E9%9D%9E%E5%85%B3%E7%B3%BB%E5%9E%8B%E6%95%B0%E6%8D%AE%E5%BA%93/1.htm">非关系型数据库</a>
<div>Nosql知识回顾大数据处理流程数据采集(flume、爬虫、传感器)数据存储(本门课程NoSQL所处的阶段)Hdfs、MongoDB、HBase等数据清洗(入仓)Hive等数据处理、分析(Spark、Flink等)数据可视化数据挖掘、机器学习应用(Python、SparkMLlib等)大数据时代存储的挑战(三高)高并发(同一时间很多人访问)高扩展(要求随时根据需求扩展存储)高效率(要求读写速度快)</div>
</li>
<li><a href="/article/1835482277870661632.htm"
title="简介Shell、zsh、bash" target="_blank">简介Shell、zsh、bash</a>
<span class="text-muted">zhaosuningsn</span>
<a class="tag" taget="_blank" href="/search/Shell/1.htm">Shell</a><a class="tag" taget="_blank" href="/search/zsh/1.htm">zsh</a><a class="tag" taget="_blank" href="/search/bash/1.htm">bash</a><a class="tag" taget="_blank" href="/search/shell/1.htm">shell</a><a class="tag" taget="_blank" href="/search/linux/1.htm">linux</a><a class="tag" taget="_blank" href="/search/bash/1.htm">bash</a>
<div>Shell是Linux和Unix的外壳,类似衣服,负责外界与Linux和Unix内核的交互联系。例如接收终端用户及各种应用程序的命令,把接收的命令翻译成内核能理解的语言,传递给内核,并把内核处理接收的命令的结果返回给外界,即Shell是外界和内核沟通的桥梁或大门。Linux和Unix提供了多种Shell,其中有种bash,当然还有其他好多种。Mac电脑中不但有bash,还有一个zsh,预装的,据说</div>
</li>
<li><a href="/article/1835481316326469632.htm"
title="舜公郑金锋书辛丑自剪扇面书法作品(四O六)" target="_blank">舜公郑金锋书辛丑自剪扇面书法作品(四O六)</a>
<span class="text-muted">舜公郑金锋</span>
<div>辛丑小阳春,新自剪扇面400品,大多为各色撒金、撒银、描金、描银、水印、彩绘、荧光等亚粉、色宣纸,以及域外包装填充纸等;王一品长锋羊毫秃笔;一得阁云头艳墨、宿墨、水等。书体有甲骨文,金文(商周金文、春秋战国金文、中山王厝器金文、汉金文……),楚简帛书,侯马盟书,温县盟书,小篆,果蝙书等,隶书(秦简、汉简帛书、汉碑……),草书(章草、小草、大草……),行书(行楷、行草),楷书(魏碑及北朝墓志、隋朝墓</div>
</li>
<li><a href="/article/1835474315991150592.htm"
title="2021-07-31" target="_blank">2021-07-31</a>
<span class="text-muted">比峰</span>
<div>七月的最后一天,过了今天,就是八月,心脏在颤抖……昨天两点半才睡,一直在以两倍的语速的听之前的课程,虽然隔得时间不长,但是很多知识点已经忘了差不多了,为了让自己能够掌握的稍微全面一点,还是磨刀不误砍柴工的比较好。正因为晚上睡得晚,今天一上午的状态都不好,也可能因为上午都是待在家里,所以多数时间自己是在补觉。既然太累,那就睡觉吧,总比浪费时间的好。下午到咖啡馆做题,一道差错更正一下子让自己的实力暴露</div>
</li>
<li><a href="/article/1835470931783413760.htm"
title="「豆包Marscode体验官」 | 云端 IDE 启动 & Rust 体验" target="_blank">「豆包Marscode体验官」 | 云端 IDE 启动 & Rust 体验</a>
<span class="text-muted">张风捷特烈</span>
<a class="tag" taget="_blank" href="/search/ide/1.htm">ide</a><a class="tag" taget="_blank" href="/search/rust/1.htm">rust</a><a class="tag" taget="_blank" href="/search/%E5%BC%80%E5%8F%91%E8%AF%AD%E8%A8%80/1.htm">开发语言</a><a class="tag" taget="_blank" href="/search/%E5%90%8E%E7%AB%AF/1.htm">后端</a>
<div>theme:cyanosis我正在参加「豆包MarsCode初体验」征文活动MarsCode可以看作一个运行在服务端的远程VSCode开发环境。对于我这种想要学习体验某些语言,但不想在电脑里装环境的人来说非常友好。本文就来介绍一下在MarsCode里,我的体验rust开发体验。一、MarsCode是什么它的本质是:提供代码助手和云端IDE服务的web网站,可通过下面的链接访问https://www</div>
</li>
<li><a href="/article/1835465006758588416.htm"
title="2023-08-08" target="_blank">2023-08-08</a>
<span class="text-muted">2023梦启支教团张牧泽</span>
<div>学汉字历史,行传统书法——中国矿业大学梦启支教团梦启三班开展书法文化课7月20日上午8时,中国矿业大学梦启支教团在贵州省金沙县西洛街道彩虹小学开展了“书法文化”课程。该课程意在向孩子们传授汉字演变的相关知识,围绕书法发展历史讲解不同时期的字形字体特点。此课程由梦启支教团成员王耀民讲授,梦启三班全体成员参加。中国文字的发展有数千年的历史,从早期雏形的象形文字到殷商时期的甲骨文、金文,再到西周、秦朝的</div>
</li>
<li><a href="/article/1835458367057915904.htm"
title="今日有感,坚持分享第913天,2019.07.13" target="_blank">今日有感,坚持分享第913天,2019.07.13</a>
<span class="text-muted">ZAF峰回路转</span>
<div>本周是假日里最忙碌的一周,连续四天晚上的课程,让我感觉到身体明显透支。昨天晚上读书会结束回到家,已经是十点半之后啦,忽然感觉身体不舒服,勉强支撑着洗漱完毕,没等上床休息,强烈的不适感警告我该吃药啦!感谢老公半夜到医院給我抓了药,今天早上当我对老公表达谢意的时候,老公说,不用感谢,我不是一直都是这样做的吗?多少年啦,今天竟然还谢谢!老公说的没错,可是以前总感觉那是他应该做的,如今感觉到,身边有一个在</div>
</li>
<li><a href="/article/1835457443690278912.htm"
title="[Python] 数据结构 详解及代码" target="_blank">[Python] 数据结构 详解及代码</a>
<span class="text-muted">AIAdvocate</span>
<a class="tag" taget="_blank" href="/search/%E7%AE%97%E6%B3%95/1.htm">算法</a><a class="tag" taget="_blank" href="/search/python/1.htm">python</a><a class="tag" taget="_blank" href="/search/%E6%95%B0%E6%8D%AE%E7%BB%93%E6%9E%84/1.htm">数据结构</a><a class="tag" taget="_blank" href="/search/%E9%93%BE%E8%A1%A8/1.htm">链表</a>
<div>今日内容大纲介绍数据结构介绍列表链表1.数据结构和算法简介程序大白话翻译,程序=数据结构+算法数据结构指的是存储,组织数据的方式.算法指的是为了解决实际业务问题而思考思路和方法,就叫:算法.2.算法的5大特性介绍算法具有独立性算法是解决问题的思路和方式,最重要的是思维,而不是语言,其(算法)可以通过多种语言进行演绎.5大特性有输入,需要传入1或者多个参数有输出,需要返回1个或者多个结果有穷性,执行</div>
</li>
<li><a href="/article/1835456598517051392.htm"
title="趁吾身未老" target="_blank">趁吾身未老</a>
<span class="text-muted">逍遥书生111</span>
<div>趁吾身未老池非2020年,一场突如其来的新冠脑炎疫情,打破了原有的状态。工作与生活的轨迹发生了不确定的变化。01因为隔离防疫,正常的教学不能进行,线上网课成为教学的新形式,年过五十的我面对新的教学形式有些应不暇。只得退而求次,不再负责高考班级的课程。这样,就不用上网课做直播了。感觉很轻松很闲的同时,也感觉到了英雄迟暮。不得不承认,老了。该交班了。因为不能出门,整天呆在家里,一开始还很兴奋,终于可以</div>
</li>
<li><a href="/article/59.htm"
title="html" target="_blank">html</a>
<span class="text-muted">周华华</span>
<a class="tag" taget="_blank" href="/search/html/1.htm">html</a>
<div>js
1,数组的排列
var arr=[1,4,234,43,52,];
for(var x=0;x<arr.length;x++){
for(var y=x-1;y<arr.length;y++){
if(arr[x]<arr[y]){
&</div>
</li>
<li><a href="/article/186.htm"
title="【Struts2 四】Struts2拦截器" target="_blank">【Struts2 四】Struts2拦截器</a>
<span class="text-muted">bit1129</span>
<a class="tag" taget="_blank" href="/search/struts2%E6%8B%A6%E6%88%AA%E5%99%A8/1.htm">struts2拦截器</a>
<div>Struts2框架是基于拦截器实现的,可以对某个Action进行拦截,然后某些逻辑处理,拦截器相当于AOP里面的环绕通知,即在Action方法的执行之前和之后根据需要添加相应的逻辑。事实上,即使struts.xml没有任何关于拦截器的配置,Struts2也会为我们添加一组默认的拦截器,最常见的是,请求参数自动绑定到Action对应的字段上。
Struts2中自定义拦截器的步骤是:</div>
</li>
<li><a href="/article/313.htm"
title="make:cc 命令未找到解决方法" target="_blank">make:cc 命令未找到解决方法</a>
<span class="text-muted">daizj</span>
<a class="tag" taget="_blank" href="/search/linux/1.htm">linux</a><a class="tag" taget="_blank" href="/search/%E5%91%BD%E4%BB%A4%E6%9C%AA%E7%9F%A5/1.htm">命令未知</a><a class="tag" taget="_blank" href="/search/make+cc/1.htm">make cc</a>
<div>安装rz sz程序时,报下面错误:
[root@slave2 src]# make posix
cc -O -DPOSIX -DMD=2 rz.c -o rz
make: cc:命令未找到
make: *** [posix] 错误 127
系统:centos 6.6
环境:虚拟机
错误原因:系统未安装gcc,这个是由于在安</div>
</li>
<li><a href="/article/440.htm"
title="Oracle之Job应用" target="_blank">Oracle之Job应用</a>
<span class="text-muted">周凡杨</span>
<a class="tag" taget="_blank" href="/search/oracle+job/1.htm">oracle job</a>
<div>
最近写服务,服务上线后,需要写一个定时执行的SQL脚本,清理并更新数据库表里的数据,应用到了Oracle 的 Job的相关知识。在此总结一下。
一:查看相关job信息
1、相关视图
dba_jobs
all_jobs
user_jobs
dba_jobs_running 包含正在运行</div>
</li>
<li><a href="/article/567.htm"
title="多线程机制" target="_blank">多线程机制</a>
<span class="text-muted">朱辉辉33</span>
<a class="tag" taget="_blank" href="/search/%E5%A4%9A%E7%BA%BF%E7%A8%8B/1.htm">多线程</a>
<div>转至http://blog.csdn.net/lj70024/archive/2010/04/06/5455790.aspx
程序、进程和线程:
程序是一段静态的代码,它是应用程序执行的蓝本。进程是程序的一次动态执行过程,它对应了从代码加载、执行至执行完毕的一个完整过程,这个过程也是进程本身从产生、发展至消亡的过程。线程是比进程更小的单位,一个进程执行过程中可以产生多个线程,每个线程有自身的</div>
</li>
<li><a href="/article/694.htm"
title="web报表工具FineReport使用中遇到的常见报错及解决办法(一)" target="_blank">web报表工具FineReport使用中遇到的常见报错及解决办法(一)</a>
<span class="text-muted">老A不折腾</span>
<a class="tag" taget="_blank" href="/search/web%E6%8A%A5%E8%A1%A8/1.htm">web报表</a><a class="tag" taget="_blank" href="/search/finereport/1.htm">finereport</a><a class="tag" taget="_blank" href="/search/java%E6%8A%A5%E8%A1%A8/1.htm">java报表</a><a class="tag" taget="_blank" href="/search/%E6%8A%A5%E8%A1%A8%E5%B7%A5%E5%85%B7/1.htm">报表工具</a>
<div>FineReport使用中遇到的常见报错及解决办法(一)
这里写点抛砖引玉,希望大家能把自己整理的问题及解决方法晾出来,Mark一下,利人利己。
出现问题先搜一下文档上有没有,再看看度娘有没有,再看看论坛有没有。有报错要看日志。下面简单罗列下常见的问题,大多文档上都有提到的。
1、address pool is full:
含义:地址池满,连接数超过并发数上</div>
</li>
<li><a href="/article/821.htm"
title="mysql rpm安装后没有my.cnf" target="_blank">mysql rpm安装后没有my.cnf</a>
<span class="text-muted">林鹤霄</span>
<a class="tag" taget="_blank" href="/search/%E6%B2%A1%E6%9C%89my.cnf/1.htm">没有my.cnf</a>
<div>Linux下用rpm包安装的MySQL是不会安装/etc/my.cnf文件的,
至于为什么没有这个文件而MySQL却也能正常启动和作用,在这儿有两个说法,
第一种说法,my.cnf只是MySQL启动时的一个参数文件,可以没有它,这时MySQL会用内置的默认参数启动,
第二种说法,MySQL在启动时自动使用/usr/share/mysql目录下的my-medium.cnf文件,这种说法仅限于r</div>
</li>
<li><a href="/article/948.htm"
title="Kindle Fire HDX root并安装谷歌服务框架之后仍无法登陆谷歌账号的问题" target="_blank">Kindle Fire HDX root并安装谷歌服务框架之后仍无法登陆谷歌账号的问题</a>
<span class="text-muted">aigo</span>
<a class="tag" taget="_blank" href="/search/root/1.htm">root</a>
<div>原文:http://kindlefireforkid.com/how-to-setup-a-google-account-on-amazon-fire-tablet/
Step 4: Run ADB command from your PC
On the PC, you need install Amazon Fire ADB driver and instal</div>
</li>
<li><a href="/article/1075.htm"
title="javascript 中var提升的典型实例" target="_blank">javascript 中var提升的典型实例</a>
<span class="text-muted">alxw4616</span>
<a class="tag" taget="_blank" href="/search/JavaScript/1.htm">JavaScript</a>
<div>// 刚刚在书上看到的一个小问题,很有意思.大家一起思考下吧
myname = 'global';
var fn = function () {
console.log(myname); // undefined
var myname = 'local';
console.log(myname); // local
};
fn()
// 上述代码实际上等同于以下代码
m</div>
</li>
<li><a href="/article/1202.htm"
title="定时器和获取时间的使用" target="_blank">定时器和获取时间的使用</a>
<span class="text-muted">百合不是茶</span>
<a class="tag" taget="_blank" href="/search/%E6%97%B6%E9%97%B4%E7%9A%84%E8%BD%AC%E6%8D%A2/1.htm">时间的转换</a><a class="tag" taget="_blank" href="/search/%E5%AE%9A%E6%97%B6%E5%99%A8/1.htm">定时器</a>
<div>定时器:定时创建任务在游戏设计的时候用的比较多
Timer();定时器
TImerTask();Timer的子类 由 Timer 安排为一次执行或重复执行的任务。
定时器类Timer在java.util包中。使用时,先实例化,然后使用实例的schedule(TimerTask task, long delay)方法,设定</div>
</li>
<li><a href="/article/1329.htm"
title="JDK1.5 Queue" target="_blank">JDK1.5 Queue</a>
<span class="text-muted">bijian1013</span>
<a class="tag" taget="_blank" href="/search/java/1.htm">java</a><a class="tag" taget="_blank" href="/search/thread/1.htm">thread</a><a class="tag" taget="_blank" href="/search/java%E5%A4%9A%E7%BA%BF%E7%A8%8B/1.htm">java多线程</a><a class="tag" taget="_blank" href="/search/Queue/1.htm">Queue</a>
<div>JDK1.5 Queue
LinkedList:
LinkedList不是同步的。如果多个线程同时访问列表,而其中至少一个线程从结构上修改了该列表,则它必须 保持外部同步。(结构修改指添加或删除一个或多个元素的任何操作;仅设置元素的值不是结构修改。)这一般通过对自然封装该列表的对象进行同步操作来完成。如果不存在这样的对象,则应该使用 Collections.synchronizedList 方</div>
</li>
<li><a href="/article/1456.htm"
title="http认证原理和https" target="_blank">http认证原理和https</a>
<span class="text-muted">bijian1013</span>
<a class="tag" taget="_blank" href="/search/http/1.htm">http</a><a class="tag" taget="_blank" href="/search/https/1.htm">https</a>
<div>一.基础介绍
在URL前加https://前缀表明是用SSL加密的。 你的电脑与服务器之间收发的信息传输将更加安全。
Web服务器启用SSL需要获得一个服务器证书并将该证书与要使用SSL的服务器绑定。
http和https使用的是完全不同的连接方式,用的端口也不一样,前者是80,后</div>
</li>
<li><a href="/article/1583.htm"
title="【Java范型五】范型继承" target="_blank">【Java范型五】范型继承</a>
<span class="text-muted">bit1129</span>
<a class="tag" taget="_blank" href="/search/java/1.htm">java</a>
<div>定义如下一个抽象的范型类,其中定义了两个范型参数,T1,T2
package com.tom.lang.generics;
public abstract class SuperGenerics<T1, T2> {
private T1 t1;
private T2 t2;
public abstract void doIt(T</div>
</li>
<li><a href="/article/1710.htm"
title="【Nginx六】nginx.conf常用指令(Directive)" target="_blank">【Nginx六】nginx.conf常用指令(Directive)</a>
<span class="text-muted">bit1129</span>
<a class="tag" taget="_blank" href="/search/Directive/1.htm">Directive</a>
<div>1. worker_processes 8;
表示Nginx将启动8个工作者进程,通过ps -ef|grep nginx,会发现有8个Nginx Worker Process在运行
nobody 53879 118449 0 Apr22 ? 00:26:15 nginx: worker process </div>
</li>
<li><a href="/article/1837.htm"
title="lua 遍历Header头部" target="_blank">lua 遍历Header头部</a>
<span class="text-muted">ronin47</span>
<a class="tag" taget="_blank" href="/search/lua+header+%E9%81%8D%E5%8E%86%E3%80%80/1.htm">lua header 遍历 </a>
<div>
local headers = ngx.req.get_headers()
ngx.say("headers begin", "<br/>")
ngx.say("Host : ", he</div>
</li>
<li><a href="/article/1964.htm"
title="java-32.通过交换a,b中的元素,使[序列a元素的和]与[序列b元素的和]之间的差最小(两数组的差最小)。" target="_blank">java-32.通过交换a,b中的元素,使[序列a元素的和]与[序列b元素的和]之间的差最小(两数组的差最小)。</a>
<span class="text-muted">bylijinnan</span>
<a class="tag" taget="_blank" href="/search/java/1.htm">java</a>
<div>
import java.util.Arrays;
public class MinSumASumB {
/**
* Q32.有两个序列a,b,大小都为n,序列元素的值任意整数,无序.
*
* 要求:通过交换a,b中的元素,使[序列a元素的和]与[序列b元素的和]之间的差最小。
* 例如:
* int[] a = {100,99,98,1,2,3</div>
</li>
<li><a href="/article/2091.htm"
title="redis" target="_blank">redis</a>
<span class="text-muted">开窍的石头</span>
<a class="tag" taget="_blank" href="/search/redis/1.htm">redis</a>
<div>在redis的redis.conf配置文件中找到# requirepass foobared
把它替换成requirepass 12356789 后边的12356789就是你的密码
打开redis客户端输入config get requirepass
返回
redis 127.0.0.1:6379> config get requirepass
1) "require</div>
</li>
<li><a href="/article/2218.htm"
title="[JAVA图像与图形]现有的GPU架构支持JAVA语言吗?" target="_blank">[JAVA图像与图形]现有的GPU架构支持JAVA语言吗?</a>
<span class="text-muted">comsci</span>
<a class="tag" taget="_blank" href="/search/java%E8%AF%AD%E8%A8%80/1.htm">java语言</a>
<div>
无论是opengl还是cuda,都是建立在C语言体系架构基础上的,在未来,图像图形处理业务快速发展,相关领域市场不断扩大的情况下,我们JAVA语言系统怎么从这么庞大,且还在不断扩大的市场上分到一块蛋糕,是值得每个JAVAER认真思考和行动的事情
</div>
</li>
<li><a href="/article/2345.htm"
title="安装ubuntu14.04登录后花屏了怎么办" target="_blank">安装ubuntu14.04登录后花屏了怎么办</a>
<span class="text-muted">cuiyadll</span>
<a class="tag" taget="_blank" href="/search/ubuntu/1.htm">ubuntu</a>
<div>这个情况,一般属于显卡驱动问题。
可以先尝试安装显卡的官方闭源驱动。
按键盘三个键:CTRL + ALT + F1
进入终端,输入用户名和密码登录终端:
安装amd的显卡驱动
sudo
apt-get
install
fglrx
安装nvidia显卡驱动
sudo
ap</div>
</li>
<li><a href="/article/2472.htm"
title="SSL 与 数字证书 的基本概念和工作原理" target="_blank">SSL 与 数字证书 的基本概念和工作原理</a>
<span class="text-muted">darrenzhu</span>
<a class="tag" taget="_blank" href="/search/%E5%8A%A0%E5%AF%86/1.htm">加密</a><a class="tag" taget="_blank" href="/search/ssl/1.htm">ssl</a><a class="tag" taget="_blank" href="/search/%E8%AF%81%E4%B9%A6/1.htm">证书</a><a class="tag" taget="_blank" href="/search/%E5%AF%86%E9%92%A5/1.htm">密钥</a><a class="tag" taget="_blank" href="/search/%E7%AD%BE%E5%90%8D/1.htm">签名</a>
<div>SSL 与 数字证书 的基本概念和工作原理
http://www.linuxde.net/2012/03/8301.html
SSL握手协议的目的是或最终结果是让客户端和服务器拥有一个共同的密钥,握手协议本身是基于非对称加密机制的,之后就使用共同的密钥基于对称加密机制进行信息交换。
http://www.ibm.com/developerworks/cn/webspher</div>
</li>
<li><a href="/article/2599.htm"
title="Ubuntu设置ip的步骤" target="_blank">Ubuntu设置ip的步骤</a>
<span class="text-muted">dcj3sjt126com</span>
<a class="tag" taget="_blank" href="/search/ubuntu/1.htm">ubuntu</a>
<div>在单位的一台机器完全装了Ubuntu Server,但回家只能在XP上VM一个,装的时候网卡是DHCP的,用ifconfig查了一下ip是192.168.92.128,可以ping通。
转载不是错:
Ubuntu命令行修改网络配置方法
/etc/network/interfaces打开后里面可设置DHCP或手动设置静态ip。前面auto eth0,让网卡开机自动挂载.
1. 以D</div>
</li>
<li><a href="/article/2726.htm"
title="php包管理工具推荐" target="_blank">php包管理工具推荐</a>
<span class="text-muted">dcj3sjt126com</span>
<a class="tag" taget="_blank" href="/search/PHP/1.htm">PHP</a><a class="tag" taget="_blank" href="/search/Composer/1.htm">Composer</a>
<div>http://www.phpcomposer.com/
Composer是 PHP 用来管理依赖(dependency)关系的工具。你可以在自己的项目中声明所依赖的外部工具库(libraries),Composer 会帮你安装这些依赖的库文件。
中文文档
入门指南
下载
安装包列表
Composer 中国镜像 </div>
</li>
<li><a href="/article/2853.htm"
title="Gson使用四(TypeAdapter)" target="_blank">Gson使用四(TypeAdapter)</a>
<span class="text-muted">eksliang</span>
<a class="tag" taget="_blank" href="/search/json/1.htm">json</a><a class="tag" taget="_blank" href="/search/gson/1.htm">gson</a><a class="tag" taget="_blank" href="/search/Gson%E8%87%AA%E5%AE%9A%E4%B9%89%E8%BD%AC%E6%8D%A2%E5%99%A8/1.htm">Gson自定义转换器</a><a class="tag" taget="_blank" href="/search/gsonTypeAdapter/1.htm">gsonTypeAdapter</a>
<div>转载请出自出处:http://eksliang.iteye.com/blog/2175595 一.概述
Gson的TypeAapter可以理解成自定义序列化和返序列化 二、应用场景举例
例如我们通常去注册时(那些外国网站),会让我们输入firstName,lastName,但是转到我们都</div>
</li>
<li><a href="/article/2980.htm"
title="JQM控件之Navbar和Tabs" target="_blank">JQM控件之Navbar和Tabs</a>
<span class="text-muted">gundumw100</span>
<a class="tag" taget="_blank" href="/search/html/1.htm">html</a><a class="tag" taget="_blank" href="/search/xml/1.htm">xml</a><a class="tag" taget="_blank" href="/search/css/1.htm">css</a>
<div>在JQM中使用导航栏Navbar是简单的。
只需要将data-role="navbar"赋给div即可:
<div data-role="navbar">
<ul>
<li><a href="#" class="ui-btn-active&qu</div>
</li>
<li><a href="/article/3107.htm"
title="利用归并排序算法对大文件进行排序" target="_blank">利用归并排序算法对大文件进行排序</a>
<span class="text-muted">iwindyforest</span>
<a class="tag" taget="_blank" href="/search/java/1.htm">java</a><a class="tag" taget="_blank" href="/search/%E5%BD%92%E5%B9%B6%E6%8E%92%E5%BA%8F/1.htm">归并排序</a><a class="tag" taget="_blank" href="/search/%E5%A4%A7%E6%96%87%E4%BB%B6/1.htm">大文件</a><a class="tag" taget="_blank" href="/search/%E5%88%86%E6%B2%BB%E6%B3%95/1.htm">分治法</a><a class="tag" taget="_blank" href="/search/Merge+sort/1.htm">Merge sort</a>
<div>
归并排序算法介绍,请参照Wikipeida
zh.wikipedia.org/wiki/%E5%BD%92%E5%B9%B6%E6%8E%92%E5%BA%8F
基本思想:
大文件分割成行数相等的两个子文件,递归(归并排序)两个子文件,直到递归到分割成的子文件低于限制行数
低于限制行数的子文件直接排序
两个排序好的子文件归并到父文件
直到最后所有排序好的父文件归并到输入</div>
</li>
<li><a href="/article/3234.htm"
title="iOS UIWebView URL拦截" target="_blank">iOS UIWebView URL拦截</a>
<span class="text-muted">啸笑天</span>
<a class="tag" taget="_blank" href="/search/UIWebView/1.htm">UIWebView</a>
<div>本文译者:candeladiao,原文:URL filtering for UIWebView on the iPhone说明:译者在做app开发时,因为页面的javascript文件比较大导致加载速度很慢,所以想把javascript文件打包在app里,当UIWebView需要加载该脚本时就从app本地读取,但UIWebView并不支持加载本地资源。最后从下文中找到了解决方法,第一次翻译,难免有</div>
</li>
<li><a href="/article/3361.htm"
title="索引的碎片整理SQL语句" target="_blank">索引的碎片整理SQL语句</a>
<span class="text-muted">macroli</span>
<a class="tag" taget="_blank" href="/search/sql/1.htm">sql</a>
<div>SET NOCOUNT ON
DECLARE @tablename VARCHAR (128)
DECLARE @execstr VARCHAR (255)
DECLARE @objectid INT
DECLARE @indexid INT
DECLARE @frag DECIMAL
DECLARE @maxfrag DECIMAL
--设置最大允许的碎片数量,超过则对索引进行碎片</div>
</li>
<li><a href="/article/3488.htm"
title="Angularjs同步操作http请求with $promise" target="_blank">Angularjs同步操作http请求with $promise</a>
<span class="text-muted">qiaolevip</span>
<a class="tag" taget="_blank" href="/search/%E6%AF%8F%E5%A4%A9%E8%BF%9B%E6%AD%A5%E4%B8%80%E7%82%B9%E7%82%B9/1.htm">每天进步一点点</a><a class="tag" taget="_blank" href="/search/%E5%AD%A6%E4%B9%A0%E6%B0%B8%E6%97%A0%E6%AD%A2%E5%A2%83/1.htm">学习永无止境</a><a class="tag" taget="_blank" href="/search/AngularJS/1.htm">AngularJS</a><a class="tag" taget="_blank" href="/search/%E7%BA%B5%E8%A7%82%E5%8D%83%E8%B1%A1/1.htm">纵观千象</a>
<div>// Define a factory
app.factory('profilePromise', ['$q', 'AccountService', function($q, AccountService) {
var deferred = $q.defer();
AccountService.getProfile().then(function(res) {
</div>
</li>
<li><a href="/article/3615.htm"
title="hibernate联合查询问题" target="_blank">hibernate联合查询问题</a>
<span class="text-muted">sxj19881213</span>
<a class="tag" taget="_blank" href="/search/sql/1.htm">sql</a><a class="tag" taget="_blank" href="/search/Hibernate/1.htm">Hibernate</a><a class="tag" taget="_blank" href="/search/HQL/1.htm">HQL</a><a class="tag" taget="_blank" href="/search/%E8%81%94%E5%90%88%E6%9F%A5%E8%AF%A2/1.htm">联合查询</a>
<div>最近在用hibernate做项目,遇到了联合查询的问题,以及联合查询中的N+1问题。
针对无外键关联的联合查询,我做了HQL和SQL的实验,希望能帮助到大家。(我使用的版本是hibernate3.3.2)
1 几个常识:
(1)hql中的几种join查询,只有在外键关联、并且作了相应配置时才能使用。
(2)hql的默认查询策略,在进行联合查询时,会产</div>
</li>
<li><a href="/article/3742.htm"
title="struts2.xml" target="_blank">struts2.xml</a>
<span class="text-muted">wuai</span>
<a class="tag" taget="_blank" href="/search/struts/1.htm">struts</a>
<div><?xml version="1.0" encoding="UTF-8" ?>
<!DOCTYPE struts PUBLIC
"-//Apache Software Foundation//DTD Struts Configuration 2.3//EN"
"http://struts.apache</div>
</li>
</ul>
</div>
</div>
</div>
<div>
<div class="container">
<div class="indexes">
<strong>按字母分类:</strong>
<a href="/tags/A/1.htm" target="_blank">A</a><a href="/tags/B/1.htm" target="_blank">B</a><a href="/tags/C/1.htm" target="_blank">C</a><a
href="/tags/D/1.htm" target="_blank">D</a><a href="/tags/E/1.htm" target="_blank">E</a><a href="/tags/F/1.htm" target="_blank">F</a><a
href="/tags/G/1.htm" target="_blank">G</a><a href="/tags/H/1.htm" target="_blank">H</a><a href="/tags/I/1.htm" target="_blank">I</a><a
href="/tags/J/1.htm" target="_blank">J</a><a href="/tags/K/1.htm" target="_blank">K</a><a href="/tags/L/1.htm" target="_blank">L</a><a
href="/tags/M/1.htm" target="_blank">M</a><a href="/tags/N/1.htm" target="_blank">N</a><a href="/tags/O/1.htm" target="_blank">O</a><a
href="/tags/P/1.htm" target="_blank">P</a><a href="/tags/Q/1.htm" target="_blank">Q</a><a href="/tags/R/1.htm" target="_blank">R</a><a
href="/tags/S/1.htm" target="_blank">S</a><a href="/tags/T/1.htm" target="_blank">T</a><a href="/tags/U/1.htm" target="_blank">U</a><a
href="/tags/V/1.htm" target="_blank">V</a><a href="/tags/W/1.htm" target="_blank">W</a><a href="/tags/X/1.htm" target="_blank">X</a><a
href="/tags/Y/1.htm" target="_blank">Y</a><a href="/tags/Z/1.htm" target="_blank">Z</a><a href="/tags/0/1.htm" target="_blank">其他</a>
</div>
</div>
</div>
<footer id="footer" class="mb30 mt30">
<div class="container">
<div class="footBglm">
<a target="_blank" href="/">首页</a> -
<a target="_blank" href="/custom/about.htm">关于我们</a> -
<a target="_blank" href="/search/Java/1.htm">站内搜索</a> -
<a target="_blank" href="/sitemap.txt">Sitemap</a> -
<a target="_blank" href="/custom/delete.htm">侵权投诉</a>
</div>
<div class="copyright">版权所有 IT知识库 CopyRight © 2000-2050 E-COM-NET.COM , All Rights Reserved.
<!-- <a href="https://beian.miit.gov.cn/" rel="nofollow" target="_blank">京ICP备09083238号</a><br>-->
</div>
</div>
</footer>
<!-- 代码高亮 -->
<script type="text/javascript" src="/static/syntaxhighlighter/scripts/shCore.js"></script>
<script type="text/javascript" src="/static/syntaxhighlighter/scripts/shLegacy.js"></script>
<script type="text/javascript" src="/static/syntaxhighlighter/scripts/shAutoloader.js"></script>
<link type="text/css" rel="stylesheet" href="/static/syntaxhighlighter/styles/shCoreDefault.css"/>
<script type="text/javascript" src="/static/syntaxhighlighter/src/my_start_1.js"></script>
</body>
</html> 


