对于cocos,我能先喷两句么!!从没见过如此厚颜无耻的团队,不负责任到极点,开始是引擎改版,编辑器改版,不兼容,不兼容,还是不兼容,后来官网改版,之前的文章教程通通不见了,我也不知道干嘛要学这个傻逼软件,但是既然学了,就TM多学点。。。
- 本文环境
版本:cocos3.10
编译器版本:vs2012
语言:lua
首先我们要从官网下载3.10的版本,一切next安装,不需要自己选择,安装好了之后,有两个目录是我们要注意的
插件目录C:\Users\user\Documents\Cocos\CocosStudio2
安装目录C:\Cocos\Cocos Studio
插件目录是我们接下来要工作的目录,而安装目录是因为cocos团队的疏忽导致我们需要手动拷贝其中的dll出来,这点我们等下详细说。
对于编辑器,其作用就是方便我们少写代码,我们往编辑器里拖一个Node进去,放在point(0,0)点,编辑器就能自动帮我们把这些设定转化为代码,从而减少我们的代码编写量;对于自定义控件来说,无非也是为了达到这个目的,有些官方的控件我们觉得不够完善,或者我们想把两种空间组合成一个控件,这都是可以通过自定义控件来实现的。
在开始真正的例子之前,我们需要先了解以下cocostudio的工作流程,它是如何将我们在编辑器里填上的数值变成代码的

以锚点为例子,我们在这里填上了0.5,我们想要的代码是什么?
Image_11:setAnchorPoint(0.5,0.5)
这段代码,有三个部分是变动的
- Image_11:控件的名字
- 0.5 :锚点x
- 0.5:锚点Y
那么问题就清晰了,编辑器只要记录下这三个值,然后就可以很容易的生成想要的代码了
这是从数据到代码的思路,但是怎么知道哪个0.5是x哪个是y呢?这就是视图到数据的思路了,我们需要知道左边的输入框代表的是锚点x,右边的是代表锚点y,如此才能将输入的数据最后变成正确的代码。
所以在整个流程中实际上只有两步,将编辑区域和对应的数据绑定,第二步将数据通过模板转化为代码,至于想要什么样的代码,就取决于你用什么模板了。
估计看了上个阶段的描述还是一头雾水,没关系,用例子来看,一切都很清楚了
- 设计目标
假如我们要这样一个控件,它表示一座城池,我们要在编辑器里编辑它的id,难易程度,我们可能会先想到node,image,或者layout,其实都是可以的对吧,但是这些控件都没有id和难以程度这样的属性,所以我们的扩展主要是扩展这两个属性
首先我们找到目录
C:\Users\user\Documents\Cocos\CocosStudio2
有一个叫做Samples的文件夹,这个是一个官方的扩展示例,为了保证我们有重来的机会,我们复制一份重命名为Samples_1,进入Addins,这个目录下有一个叫做Library的文件夹,打开发现里面有N多个dll文件,但是版本却是很老的,还记得上面提到的2个目录么,我们要做的就是从那个安装目录拷贝出对应的dll文件覆盖掉Library下的dll文件,这个工作我已经做好了,你们只需要下载下来覆盖就行
Library 密码: qicq
下载覆盖后,我们打开Addins.sln

右键工程属性-生成-输出路径 设置成
文档\Cocos\CocosStudio2\Addins
然后右键工程生成,在上头这个目录下就会生成一个名叫Addins.Sample.dll的文件,接着找到
文档\Cocos\CocosStudio2\Samples_2\Addins\Addins.Sample\Lua
这个目录下有一个叫做LuaScript的文件夹,讲这个文件夹复制到文档\Cocos\CocosStudio2\Addins下,此时,这个目录下应该是这个样子

然后我们打开cocostudio
左边红色就是我们的自定义控件了,右边红色则是我们新添加的属性编辑区域,我们拖动一个我们的自定义控件到编辑区域,然后导出一份lua文件,这份文件就是最终在我们的游戏工程要用到的文件了
--------------------------------------------------------------
-- This file was automatically generated by Cocos Studio.
-- Do not make changes to this file.
-- All changes will be lost.
--------------------------------------------------------------

local luaExtend = require "LuaExtend"

-- using for layout to decrease count of local variables
local layout = nil
local localLuaFile = nil
local innerCSD = nil
local innerProject = nil
local localFrame = nil

local Result = {}
------------------------------------------------------------
-- function call description
-- create function caller should provide a function to
-- get a callback function in creating scene process.
-- the returned callback function will be registered to
-- the callback event of the control.
-- the function provider is as below :
-- Callback callBackProvider(luaFileName, node, callbackName)
-- parameter description:
-- luaFileName  : a string, lua file name
-- node         : a Node, event source
-- callbackName : a string, callback function name
-- the return value is a callback function
------------------------------------------------------------
function Result.create(callBackProvider)

local result={}
setmetatable(result, luaExtend)

--Create Layer
local Layer=cc.Node:create()
Layer:setName("Layer")
layout = ccui.LayoutComponent:bindLayoutComponent(Layer)
layout:setSize({width = 960.0000, height = 640.0000})

--Create LuaSprite_1
local luaScript = require("LuaScript.sprite0")
local LuaSprite_1 = luaScript.CreateCustomNode()
LuaSprite_1:setName("LuaSprite_1")
LuaSprite_1:setTag(2)
LuaSprite_1:setCascadeColorEnabled(true)
LuaSprite_1:setCascadeOpacityEnabled(true)
LuaSprite_1:setPosition(475.0359, 344.5591)
layout = ccui.LayoutComponent:bindLayoutComponent(LuaSprite_1)
layout:setPositionPercentX(0.4948)
layout:setPositionPercentY(0.5384)
layout:setPercentWidth(0.2813)
layout:setPercentHeight(0.1469)
layout:setSize({width = 270.0000, height = 94.0000})
layout:setLeftMargin(340.0359)
layout:setRightMargin(349.9641)
layout:setTopMargin(248.4409)
layout:setBottomMargin(297.5591)
LuaSprite_1:setBlendFunc({src = 1, dst = 771})
luaScript.SetLabelText(LuaSprite_1, "sprite0 Label from Lua")
luaScript.SetLabelFont(LuaSprite_1, 24)
luaScript.GetLabelVisible(LuaSprite_1, true)
luaScript.SetMixedColor(LuaSprite_1, {r = 255, g = 255, b = 255})
Layer:addChild(LuaSprite_1)

--Create Animation
result['animation'] = ccs.ActionTimeline:create()

result['animation']:setDuration(0)
result['animation']:setTimeSpeed(1.0000)
--Create Animation List

result['root'] = Layer
return result;
end

return Result
我们主要看自定义控件那段,也就是--Create LuaSprite_1那一段
--Create LuaSprite_1
local luaScript = require("LuaScript.sprite0")
local LuaSprite_1 = luaScript.CreateCustomNode()
LuaSprite_1:setName("LuaSprite_1")
LuaSprite_1:setTag(2)
LuaSprite_1:setCascadeColorEnabled(true)
LuaSprite_1:setCascadeOpacityEnabled(true)
LuaSprite_1:setPosition(475.0359, 344.5591)
layout = ccui.LayoutComponent:bindLayoutComponent(LuaSprite_1)
layout:setPositionPercentX(0.4948)
layout:setPositionPercentY(0.5384)
layout:setPercentWidth(0.2813)
layout:setPercentHeight(0.1469)
layout:setSize({width = 270.0000, height = 94.0000})
layout:setLeftMargin(340.0359)
layout:setRightMargin(349.9641)
layout:setTopMargin(248.4409)
layout:setBottomMargin(297.5591)
LuaSprite_1:setBlendFunc({src = 1, dst = 771})
luaScript.SetLabelText(LuaSprite_1, "sprite0 Label from Lua")
luaScript.SetLabelFont(LuaSprite_1, 24)
luaScript.GetLabelVisible(LuaSprite_1, true)
luaScript.SetMixedColor(LuaSprite_1, {r = 255, g = 255, b = 255})
Layer:addChild(LuaSprite_1)
注意这四行
luaScript.SetLabelText(LuaSprite_1, "sprite0 Label from Lua")
luaScript.SetLabelFont(LuaSprite_1, 24)
luaScript.GetLabelVisible(LuaSprite_1, true)
luaScript.SetMixedColor(LuaSprite_1, {r = 255, g = 255, b = 255})
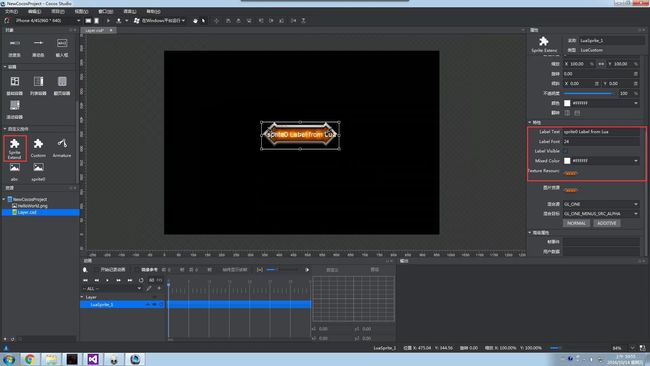
这四行,就是在图cocostudio_1.jpg右边红色对应五项的代码表现,你会问,那边五个,这边怎么才4个?这个问题等下在来解释。
经过上面的操作,我们已经看到了从编辑里的数值到代码的转换,但是具体完成这个过程,就是我们制作自定义控件的关键了。
回到我们的插件工程,对于我们来说,我们主要是在Lua这个文件夹下工作
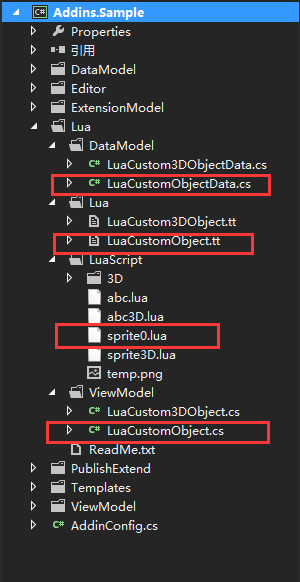
可以看到这个目录下,也是对应了4个文件夹
DataModel,Lua,LuaScript,ViewModel,这四个文件下各有两个文件,这也是官方提供的两个例子,而其中红色圈中的文件便构成了一个自定义控件需要的所有文件,要开发一个自定义控件,我们需要编写4个文件,我们来看看这四个文件是怎么工作的
在图cocostudio_1.jpg里面右边红色框中有五个可编辑的区域,这五个区域是如何来的?
- LuaCustomObject
编辑器视图类,用来编写控制编辑框在编辑器中的位置,以及绑定到对应的数据上
/*
Copyright (c) 2015 Chukong Technologies Inc.
http://www.cocos.org
This program is free software: you can redistribute it and/or modify
it under the terms of the GNU General Public License as published by
the Free Software Foundation, either version 3 of the License, or
(at your option) any later version.
This program is distributed in the hope that it will be useful,
but WITHOUT ANY WARRANTY; without even the implied warranty of
MERCHANTABILITY or FITNESS FOR A PARTICULAR PURPOSE. See the
GNU General Public License for more details.
You should have received a copy of the GNU General Public License
along with this program. If not, see
/// get lua file path according to current running assembly.
/// lua script file should in a folder "LuaScript" which is in current running assembly parent folder.
/// e.g. current running assembly is in "Addins", lua file path is "Addins/LuaScript/sprite0.lua"
///
/// Addins
/// ├─Addins.Sample.dll (current running assembly)
/// └─LuaScript
/// ├─ sprite0.lua
///
/// you can modify "LuaScript" or lua file name "sprite0.lua" to other name as you like.
/// NOTICE: only Addins/LuaScript folder will be copied to target folder. if lua script is in other
/// folder, user should write extra codes to copy it to target folder, e.g. use CustomSerializer to do the job.
///
/// lua file path
private static string GetLuaFilePath()
{
string assemblyFolder = Path.GetDirectoryName(Assembly.GetExecutingAssembly().Location);
string luaScriptFolder = Path.Combine(assemblyFolder, "LuaScript");
// make sure luaFile exists, if not, please copy it from source folder to target.
// you can find the lua script file in "../LuaScript/" folder as "."(current folder) is the one
// who contains current file LuaCustomObject.cs.(here "." is "Addins.Sample/Lua/ViewModel")
//
// ├─LuaScript
// │ ├─ sprite0.lua
// │
// └─ViewModel
// ├─ LuaCustomObject.cs (current file)
//
string luaFilePath = Path.Combine(luaScriptFolder, "sprite0.lua");
return luaFilePath;
}
protected override string GetNamePrefix()
{
return "LuaSprite_";
}
        [UndoProperty]
        [DefaultValue("abc")]
        [DisplayName("Label Text")]
        [Category("Group_Feature")]
        [Browsable(true)]
        [PropertyOrder(0)]
        public string LabelText
        {
            get
            {
                return luaValueConverter.GetStringValue("GetLabelText");
            }
            set
            {
                luaValueConverter.SetStringValue("SetLabelText", value);
                this.RaisePropertyChanged(() => this.LabelText);
            }
        }
[UndoProperty]
[DisplayName("Label Font")]
[Category("Group_Feature")]
[Description("Int value description")]
[PropertyOrder(1)]
[Browsable(true)]
public int LabelFont
{
get
{
return luaValueConverter.GetIntValue("GetLabelFont");
}
set
{
luaValueConverter.SetIntValue("SetLabelFont", value);
this.RaisePropertyChanged(() => this.LabelFont);
}
}
[UndoProperty]
[DisplayName("Label Visible")]
[Category("Group_Feature")]
[Description("Bool value description")]
[PropertyOrder(2)]
[Browsable(true)]
public bool LabelVisible
{
get
{
return luaValueConverter.GetBoolValue("GetLabelVisible");
}
set
{
luaValueConverter.SetBoolValue("SetLabelVisible", value);
this.RaisePropertyChanged(() => this.LabelVisible);
}
}
[UndoProperty]
[DisplayName("Mixed Color")]
[Category("Group_Feature")]
[Editor(typeof(ColorEditor), typeof(ColorEditor))]
[Description("Color value description")]
[PropertyOrder(3)]
[Browsable(true)]
public System.Drawing.Color MixedColor
{
get
{
return luaValueConverter.GetColorValue("GetMixedColor");
}
set
{
luaValueConverter.SetColorValue("SetMixedColor", value);
this.RaisePropertyChanged(() => this.MixedColor);
}
}
ResourceFile fileData;
///
/// Gets the FilePath property.
/// ]
[UndoProperty]
[ResourceFilter("png", "jpg")]
[Editor(typeof(ResourceImageEditor), typeof(ResourceImageEditor))]
[DefaultValue(null)]
[Description("NewFileData description")]
[DisplayName("Texture Resource")]
[Category("Group_Feature")]
[Browsable(true)]
[PropertyOrder(4)]
public ResourceFile TextureResource
{
get
{
if (fileData == null)
{
fileData = GetResourceFile();
}
return fileData;
}
set
{
fileData = value;
if (fileData == null || fileData == ResourceFile.DefaultMarker || fileData.DataError != null)
{
fileData = GetResourceFile();
}
luaValueConverter.SetResourceDataValue("SetTextureResource", fileData.GetResourceData());
this.RaisePropertyChanged(() => this.TextureResource);
}
}
private ResourceFile GetResourceFile()
{
var resourceData = new ResourceData(EnumResourceType.Addin, luaValueConverter.GetStringValue("GetSetTextureResource"));
return Services.ProjectsService.CurrentResourceGroup.FindResourceItem(resourceData) as ResourceFile;
}
#region methods for clone
// set value to the object, used in clone.
protected override void SetValue(object cObject)
{
base.SetValue(cObject);
LuaCustomObject nObject = cObject as LuaCustomObject;
if (nObject == null)
return;
nObject.LabelText = this.LabelText;
nObject.LabelFont = this.LabelFont;
nObject.LabelVisible = this.LabelVisible;
nObject.MixedColor = this.MixedColor;
nObject.TextureResource = this.TextureResource;
}
#endregion methods for clone
}
}
这是一个c#文件,和java挺类似的,你看不懂也没关系,这个类里有五段这样的代码
[UndoProperty]
[DefaultValue("abc")]
[DisplayName("Label Text")]
[Category("Group_Feature")]
[Browsable(true)]
[PropertyOrder(0)]
public string LabelText
{
get
{
return luaValueConverter.GetStringValue("GetLabelText");
}
set
{
luaValueConverter.SetStringValue("SetLabelText", value);
this.RaisePropertyChanged(() => this.LabelText);
}
}
以LabelText为例,它在编辑器中对应的是
上面[]里头是一些LabelText的描述
| 内容 | 含义 |
|---|---|
| [DefaultValue("abc")] | 编辑框中默认显示abc |
| [DisplayName("Label Text")] | 编辑框前的显示的名称是Label Text |
| [Category("Group_Feature")] | 编辑框所在的分组,也就是编辑器,这里是指特性这个分组 |
| [Browsable(true)] | 是否在编辑器中显示 |
| [PropertyOrder(0)] | 在分组种的位置,越小越靠前 |
这些可以帮你把编辑框放到你想让他出现的位置,这个属性对应有get和set方法,其中在get方法中写道
luaValueConverter.GetStringValue("GetLabelText")
这句话的意思就是去调用一个lua文件的GetLabelText方法,至于调用的是哪个lua文件?
string luaFilePath = Path.Combine(luaScriptFolder, "sprite0.lua");
调用的正是sprite0.lua这个文件,打开这个文件来看下
--[[
一个简单的示例,新建一个精灵,并在精灵上放置了一个文本。
当调用 CreateCustomNode 时,会生成这个精灵并返回。
]]

-- 新建一个精灵。
-- 新建精灵时传入了一个图片路径作为参数。
local function CreateSprite()
    return cc.Sprite:create('temp.png') --图片资源请放在本文件所在目录 (LuaScript 目录)
end

-- 新建一个 Label,用以显示文字
local function CreateLabel()
    local label = cc.Label:create()
    label:setString('sprite0 Label from Lua')
    label:setSystemFontSize(24)
    label:setPosition(140, 50)
    label:setName('labelName') --设置 label 的名字,这个 label 的名字在下面会用到。
    label:retain()
    return label
end

-- 新建一个 table,避免全局变量污染。用以包括脚本中所定义的所有的全局方法。
local container = {}

-- 新建根节点 Node,目前这个方法的名字为固定的,必须为 CreateCustomNode。
-- 方法的最后一句必须是一个 return 语句,把新建的结点返回。
function container.CreateCustomNode()
    local rootNode = CreateSprite()
    rootNode:addChild(CreateLabel())
    return rootNode
end

-- 返回该插件所扩展的基础类型。
function container.GetBaseType()
    return 'Sprite'
end

-- 取得精灵上文本的内容。
-- root 参数即为调用 CreateCustomNode 时返回的根结点。
function container.GetLabelText(root)
    -- 在父控件中查找名字为 'labelName' 的子控件。
    local child = root:getChildByName('labelName')
    return child:getString()
end

-- 设置精灵上文本的内容。
-- root 参数即为调用 CreateCustomNode 时返回的根结点。
-- value 所赋的字符串的值。
function container.SetLabelText(root, value)
    -- 在父控件中查找名字为 'labelName' 的子控件。
    local child = root:getChildByName('labelName')
    child:setString(value)
end

-- 取得精灵上文本的字体大小。
function container.GetLabelFont(root)
    local child = root:getChildByName('labelName')
    return child:getSystemFontSize()
end

-- 设置精灵上文本的字体大小。
function container.SetLabelFont(root, value)
    local child = root:getChildByName('labelName')
    child:setSystemFontSize(value)
end

-- 取得精灵上文本是否显示。
function container.GetLabelVisible(root)
    local child = root:getChildByName('labelName')
    return child:isVisible()
end

-- 设置精灵上文本是否显示。
function container.SetLabelVisible(root, value)
    local child = root:getChildByName('labelName')
    child:setVisible(value)
end

-- 取得精灵的混合颜色。
function container.GetMixedColor(root)
    return root:getColor()
end

-- 设置精灵的混合颜色。
function container.SetMixedColor(root, value)
    root:setColor(value)
end

-- 返回纹理文件名字
function container.GetSetTextureResource(root)
    return 'temp.png'
end

-- 设置纹理
-- value 为资源的路径
-- resType 是 TextureResType 类型
-- enum class TextureResType
-- {
--     LOCAL = 0,
--     PLIST = 1
-- };
-- 这里仅为了展示接口的签名。传入的 resType 为 0。
function container.SetTextureResource(root, value, resType)
    if value == '' then -- 没有给资源,则用默认图片处理。
        root:setTexture('temp.png')
        return
    end
    if resType == 0 then -- 如果资源为 LOCAL 类型,设置纹理。
        root:setTexture(value)
    else
        root:setTexture(value)
    end
end

-- 返回这个包含所有全局方法的表
return container
这个文件有两个方法是必须要实现的
- CreateCustomNode
创建我们的自定义控件 -
GetBaseType
返回我们自定义控件是继承自哪个基础控件,这张图片给出了对应的控件和返回名
 控件名和返回.jpg
对于LuaCustomObject的get方法,在编辑器要显示值的时候会调用,而对于set方法,在编辑器里更改值的时候会调用,他们最终还是调用到了我们的sprite0.lua文件中,这就把编辑器的操作最终和脚本联系起来了,你可以通过这个接口去完成你想要的任何操作
这里对应的是文本
-- 取得精灵上文本是否显示。
function container.GetLabelVisible(root)
    local child = root:getChildByName('labelName')
    return child:isVisible()
end

-- 设置精灵上文本是否显示。
function container.SetLabelVisible(root, value)
    local child = root:getChildByName('labelName')
    child:setVisible(value)
end
这两个函数将编辑器里编辑的值最终和控件名叫labeName的控件关联起来了,你在编辑器中改变值,其实就是对这个控件操作,所以你在改变text的时候,编辑器中这个控件也会跟着改变
接下来,我们就要生成我们的代码了,生成代码是依靠一个c#文件,这个c#文件我们一般是用一个模板类来生成它,打开LuaCustomObject.tt文件,这是一个t4模板,我们最后需要的c#文件就是通过它来生成的。
<#@ template debug="false" inherits="LuaSpriteObject" language="C#" linePragmas="false"#>
<#@ assembly name="System.Core" #>
<#@ import namespace="System.Linq" #>
<#@ import namespace="System.Text" #>
<#@ import namespace="System.Collections.Generic" #>
<#@ import namespace="CocoStudio.Model.DataModel" #>
<#@ import namespace="Addins.Sample.Lua.DataModel"#>
<#@ import namespace="CocoStudio.Model.Lua.Templates" #>
<#@ import namespace="Mono.Addins" #>

<#+
        public override bool CanSerialize(BaseObjectData objectData)
        {
            bool isOK = typeof(LuaCustomObjectData) == objectData.GetType();
            return isOK;
        }

        public override void CreateObject(BaseObjectData objectData)
        {
            LuaCustomObjectData data = objectData as LuaCustomObjectData;
#>
local luaScript = require("<#= CocoStudio.Basic.Option.luaScriptFolderName #>/<#= System.IO.Path.GetFileName(data.ScriptData.RelativeScriptFile) #>")
<#= GetNameDeclaration(objectData.Name) #> = luaScript.CreateCustomNode()
<#+
        }

        public override void InitializeObject(BaseObjectData objectData)
        {
            LuaCustomObjectData data = objectData as LuaCustomObjectData;
            base.InitializeObject(data);
#>
luaScript.SetLabelText(<#= data.Name #>, "<#= data.LabelText #>")
luaScript.SetLabelFont(<#= data.Name #>, <#=data.LabelFont#>)
luaScript.GetLabelVisible(<#= data.Name #>, <#=data.LabelVisible.ToString().ToLower()#>)
luaScript.SetMixedColor(<#= data.Name #>, <#=data.MixedColor.ToLuaString()#>)
<#+
        }
#>
我们需要注意的地方来看这张图片

看到红色方框内都是需要修改的,第一个方框的修改成你自己 继承的类,可以参考这张表的T4模板类这一列

而对于剩下的你需要换成你自己的数据类
数据类是什么?怎么写?天,不要太简单,我们还是看这个例子的数据类是怎么写的
/*
Copyright (c) 2015 Chukong Technologies Inc.
http://www.cocos.org
This program is free software: you can redistribute it and/or modify
it under the terms of the GNU General Public License as published by
the Free Software Foundation, either version 3 of the License, or
(at your option) any later version.
This program is distributed in the hope that it will be useful,
but WITHOUT ANY WARRANTY; without even the implied warranty of
MERCHANTABILITY or FITNESS FOR A PARTICULAR PURPOSE. See the
GNU General Public License for more details.
You should have received a copy of the GNU General Public License
along with this program. If not, see 对,就这么简单,对应五个属性的get,set方法,和java中的javabean差不多的意思,这个类最终会把对应的属性序列化并持久保存,这就是为什么你在重新打开cocostudio的时候,还是你关闭时候的样子,这个类的基类帮你干的。
修改完这几个地方,我们看图中绿色的方框,是不是有点印象?没错,这里就是编写最后代码要什么成样子的地方,可还记得我们之前留下一个问题,为何编辑器中有五个属性,但是只生成了4句对应的代码?原因就在这里,这里只编写了4句。对于T4模板的语法,你可能需要自己额外的去看下,但也算简单的,很容易学,工程最后用的文件是这个模板生成的c#文件
// ------------------------------------------------------------------------------
//
//     此代码由工具生成。
//     运行时版本: 12.0.0.0
//
//     对此文件的更改可能会导致不正确的行为。此外,如果
//     重新生成代码,这些更改将会丢失。
//
// ------------------------------------------------------------------------------
namespace Addins.Sample.Lua.Lua
{
    using System.Linq;
    using System.Text;
    using System.Collections.Generic;
    using CocoStudio.Model.DataModel;
    using Addins.Sample.Lua.DataModel;
    using CocoStudio.Model.Lua.Templates;
    using Mono.Addins;
    using System;

    ///
    /// Class to produce the template output
    ///
    [global::System.CodeDom.Compiler.GeneratedCodeAttribute("Microsoft.VisualStudio.TextTemplating", "12.0.0.0")]
    public partial class LuaCustomObject : LuaSpriteObject
    {
        ///
        /// Create the template output
        ///
        public override string TransformText()
        {
            this.Write("\r\n");
            return this.GenerationEnvironment.ToString();
        }

        public override bool CanSerialize(BaseObjectData objectData)
        {
            bool isOK = typeof(LuaCustomObjectData) == objectData.GetType();
            return isOK;
        }

        public override void CreateObject(BaseObjectData objectData)
        {
            LuaCustomObjectData data = objectData as LuaCustomObjectData;

            this.Write("local luaScript = require(\"");

            this.Write(this.ToStringHelper.ToStringWithCulture(CocoStudio.Basic.Option.luaScriptFolderName));

            this.Write("/");

            this.Write(this.ToStringHelper.ToStringWithCulture(System.IO.Path.GetFileName(data.ScriptData.RelativeScriptFile)));

            this.Write("\")\r\n");

            this.Write(this.ToStringHelper.ToStringWithCulture(GetNameDeclaration(objectData.Name)));

            this.Write(" = luaScript.CreateCustomNode()\r\n");


        }

        public override void InitializeObject(BaseObjectData objectData)
        {
            LuaCustomObjectData data = objectData as LuaCustomObjectData;
            base.InitializeObject(data);

            this.Write("luaScript.SetLabelText(");

            this.Write(this.ToStringHelper.ToStringWithCulture(data.Name));

            this.Write(", \"");

            this.Write(this.ToStringHelper.ToStringWithCulture(data.LabelText));

            this.Write("\")\r\nluaScript.SetLabelFont(");

            this.Write(this.ToStringHelper.ToStringWithCulture(data.Name));

            this.Write(", ");

            this.Write(this.ToStringHelper.ToStringWithCulture(data.LabelFont));

            this.Write(")\r\nluaScript.GetLabelVisible(");

            this.Write(this.ToStringHelper.ToStringWithCulture(data.Name));

            this.Write(", ");

            this.Write(this.ToStringHelper.ToStringWithCulture(data.LabelVisible.ToString().ToLower()));

            this.Write(")\r\nluaScript.SetMixedColor(");

            this.Write(this.ToStringHelper.ToStringWithCulture(data.Name));

            this.Write(", ");

            this.Write(this.ToStringHelper.ToStringWithCulture(data.MixedColor.ToLuaString()));

            this.Write(")\r\n");


        }

    }
}
我们最终导出的代码,便是依靠这个文件来生成的,你可以看到这个类里面用到我们之前提到的数据类,而数据类的数据是从何而来?
视图类LuaCustomObject.cs给你答案
   #region methods for clone

        // set value to the object, used in clone.
        protected override void SetValue(object cObject)
        {
            base.SetValue(cObject);

            LuaCustomObject nObject = cObject as LuaCustomObject;
            if (nObject == null)
                return;
            nObject.LabelText = this.LabelText;
            nObject.LabelFont = this.LabelFont;
            nObject.LabelVisible = this.LabelVisible;
            nObject.MixedColor = this.MixedColor;
            nObject.TextureResource = this.TextureResource;
        }

        #endregion methods for clone
这个类最后部分有这么一段代码,将对应的数据赋值给了数据类,从而数据类拥有了你在编辑器里所编辑的值,如此这般,从编辑器带代码的生成过程,你心中应该有了一个比较深刻清晰的认识,文章还是比较长的,也有些逻辑不是很舒畅,下一篇,我们就来实战我们开头说到的自定义一个城池
参考文章
Cocos Studio 扩展说明