理论
var imageEdgeInsets: UIEdgeInsets { get set }
Use this property to resize and reposition the effective drawing rectangle for the button image. You can specify a different value for each of the four insets (top, left, bottom, right). A positive value shrinks, or insets, that edge—moving it closer to the center of the button. A negative value expands, or outsets, that edge. Use the UIEdgeInsetsMake(::::) function to construct a value for this property. The default value is UIEdgeInsetsZero.
var titleEdgeInsets: UIEdgeInsets { get set }
Use this property to resize and reposition the effective drawing rectangle for the button title. You can specify a different value for each of the four insets (top, left, bottom, right). A positive value shrinks, or insets, that edge—moving it closer to the center of the button. A negative value expands, or outsets, that edge. Use the UIEdgeInsetsMake(::::) function to construct a value for this property. The default value is UIEdgeInsetsZero.
官方文档对于这个两个属性的解释如上,老实说,非常不直观,看完依然不懂。要理解titleEdgeInsets,可以从以下几方面考虑(imageEdgeInsets的理解与titleEdgeInsets完全一致):
- 首先,最重要的是将它理解为title的新位置与title旧位置之间的相对关系!而不是title与button中心的相对关系。
-
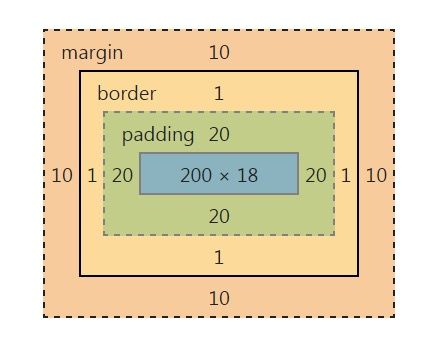
其次,要理解正值和负值对position的影响,可以参考CSS的padding。在CSS中,padding为正时,意味着view向内收缩,padding为负,意味着view向外扩张。
借用CSS中Padding的概念,对于titleEdgeInsets.left,
- 为0时,titleLabel的左侧不动
- 为正值时,titleLabel的左侧向内收缩,表现出来的就是→→→(右移)
- 为负值时,titleLabel的左侧向外扩张,表现出来的就是←←←(左移)
对于titleEdgeInsets.right,
- 为0时,titleLabel的右侧不动
- 为正值时,titleLabel的右侧向内收缩,表现出来的就是←←←(左移)
- 为负值时,titleLabel的左侧向外扩张,表现出来的就是→→→(右移)
对于titleEdgeInsets.top,
- 为0时,titleLabel的上侧不动
- 为正值时,titleLabel的上侧向内收缩,表现出来的就是↓↓↓(下移)
- 为负值时,titleLabel的上侧向外扩张,表现出来的就是↑↑↑(上移)
对于titleEdgeInsets.bottom,
- 为0时,titleLabel的下侧不动
- 为正值时,titleLabel的下侧向内收缩,表现出来的就是↑↑↑(上移)
- 为负值时,titleLabel的下侧向外扩张,表现出来的就是↓↓↓(下移)
实际使用
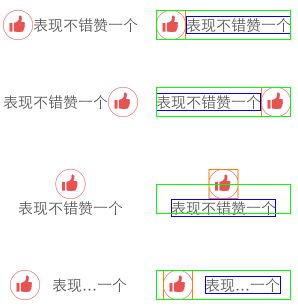
当button同时存在image和title时,默认image在左,title在右,两者之间无空隙(如下图第一个)。但我们拿到的UI设计却可能是下图的后三个。如何实现后三个设计?最简单粗暴的方式就是直接用自定义一个UIView/UIControl,在上面加上UILable和UIImageView。但比较优雅的方式就是配置imageEdgeInsets与titleEdgeInsets。
实现titleLabel在左,imageView在右
首先不考虑两者之间的spacing,答案就是
button.imageEdgeInsets = UIEdgeInsets(top: 0, left: titleLabel.width, bottom: 0, right: -titleLabel.width)
button.titleEdgeInsets = UIEdgeInsets(top: 0, left: -imageView.width, bottom: 0, right: imageView.width)
imageView右移,相当于它的左侧向内收缩了titleLabel.width(正值),它的右侧向外扩张了titleLabel.width(负值)。
titleLabel左移,相当于它的左侧向外扩张了imageView.width(负值)它的右侧向内收缩了imageView.width(正值)。
实际使用时,我们可以编写一个UIButton的extension,方便使用。实现时需要考虑title和image之间的spacing,以及增加spacing后若button宽度不够导致的image和title的压缩。下面的代码给出了alignHorizontal()的两种实现,第一个是完全按照我们上面所讲概念编写的,第二个是一种更优雅的写法。
extension UIButton {

    func alignHorizontal2(spacing: CGFloat, imageFirst: Bool) {
        let edgeOffset = spacing / 2
        if imageFirst {
            imageEdgeInsets = UIEdgeInsets(top: 0,
                                           left: -edgeOffset,
                                           bottom: 0,
                                           right: edgeOffset)
            titleEdgeInsets = UIEdgeInsets(top: 0,
                                           left: edgeOffset,
                                           bottom: 0,
                                           right: -edgeOffset)
        } else {
            guard let imageSize = self.imageView?.image?.size,
                let text = self.titleLabel?.text,
                let font = self.titleLabel?.font
                else {
                    return
            }
            let labelString = NSString(string: text)
            let titleSize = labelString.size(attributes: [NSFontAttributeName: font])
            imageEdgeInsets = UIEdgeInsets(top: 0,
                                           left: titleSize.width + edgeOffset,
                                           bottom: 0,
                                           right: -titleSize.width - edgeOffset)
            titleEdgeInsets = UIEdgeInsets(top: 0,
                                           left: -imageSize.width - edgeOffset,
                                           bottom: 0,
                                           right: imageSize.width + edgeOffset)
        }

        // increase content width to avoid clipping
        contentEdgeInsets = UIEdgeInsets(top: 0, left: edgeOffset, bottom: 0, right: edgeOffset)
    }

    func alignHorizontal(spacing: CGFloat, imageFirst: Bool) {
        let edgeOffset = spacing / 2
        imageEdgeInsets = UIEdgeInsets(top: 0,
                                       left: -edgeOffset,
                                       bottom: 0,
                                       right: edgeOffset)
        titleEdgeInsets = UIEdgeInsets(top: 0,
                                       left: edgeOffset,
                                       bottom: 0,
                                       right: -edgeOffset)

        if !imageFirst {
            self.transform = CGAffineTransform(scaleX: -1, y: 1)
            imageView?.transform = CGAffineTransform(scaleX: -1, y: 1)
            titleLabel?.transform = CGAffineTransform(scaleX: -1, y: 1)
        }

        // increase content width to avoid clipping
        contentEdgeInsets = UIEdgeInsets(top: 0, left: edgeOffset, bottom: 0, right: edgeOffset)
    }

}
实现titleLabel和imageView垂直居中
若imageView在上,titleLabel在下,且不考虑两者之间的spacing,答案是
let imageVerticalOffset = (titleSize.height + spacing)/2
let titleVerticalOffset = (imageSize.height + spacing)/2
let imageHorizontalOffset = (titleSize.width)/2
let titleHorizontalOffset = (imageSize.width)/2

imageEdgeInsets = UIEdgeInsets(top: -imageVerticalOffset,
                               left: imageHorizontalOffset,
                               bottom: imageVerticalOffset,
                               right: -imageHorizontalOffset)
titleEdgeInsets = UIEdgeInsets(top: titleVerticalOffset,
                               left: -titleHorizontalOffset,
                               bottom: -titleVerticalOffset,
                               right: titleHorizontalOffset)
对于imageView,是右移+上移,以button的中心为原点,原imageView中心坐标是(titleWidth/2, 0),新imageView中心坐标是(0, titleHeight/2),因此水平方向的位移是titleWidth/2,垂直方向上的是titleHeight/2。相当于它的左侧向内收缩了titleWidth/2(正值),它的右侧向外扩张了titleWidth/2(负值),上侧向上扩张了titleHeight/2(负值),下侧向内收缩了titleHeight/2(正值)。
对于titleLabel,是左移+下移,以button的中心为原点,原titleLabel中心坐标是(imageWidth/2, 0),新titleLabel中心坐标是(0, -imageHeight/2),,因此水平方向的位移是imageWidth/2,垂直方向上的是imageHeight/2。相当于它的左侧向外扩张了imageWidth/2(负值),它的右侧向内收缩了imageWidth/2(正值),上侧向内收缩了imageHeight/2(正值),下侧向外扩张了imageHeight/2(负值)。
实际使用使用的代码如下,该代码考虑title和image之间的spacing,以及增加spacing后若button高度不够导致的image和title的压缩。
extension UIButton {

    func alignVertical(spacing: CGFloat, imageTop: Bool) {
        guard let imageSize = self.imageView?.image?.size,
            let text = self.titleLabel?.text,
            let font = self.titleLabel?.font
            else {
                return
        }
        let labelString = NSString(string: text)
        let titleSize = labelString.size(attributes: [NSFontAttributeName: font])

        let imageVerticalOffset = (titleSize.height + spacing)/2
        let titleVerticalOffset = (imageSize.height + spacing)/2
        let imageHorizontalOffset = (titleSize.width)/2
        let titleHorizontalOffset = (imageSize.width)/2
        let sign: CGFloat = imageTop ? 1 : -1

        imageEdgeInsets = UIEdgeInsets(top: -imageVerticalOffset * sign,
                                       left: imageHorizontalOffset,
                                       bottom: imageVerticalOffset * sign,
                                       right: -imageHorizontalOffset)
        titleEdgeInsets = UIEdgeInsets(top: titleVerticalOffset * sign,
                                       left: -titleHorizontalOffset,
                                       bottom: -titleVerticalOffset * sign,
                                       right: titleHorizontalOffset)

        // increase content height to avoid clipping
        let edgeOffset = (min(imageSize.height, titleSize.height) + spacing)/2
        contentEdgeInsets = UIEdgeInsets(top: edgeOffset, left: 0, bottom: edgeOffset, right: 0)
    }

}
最好“成对”EdgeInsets
我们上面讲的都是titleEdgeInset的标准用法,即left与right,top与bottom都是成对设置,且它们的值互为相反数。我们最好一直使用这种方式,否则可能导致未知bug。
若仅设置titleEdgeInsets.left,不设置titleEdgeInsets.right会怎样?
若仅设置titleEdgeInsets.left = -imageWidth,title会居中,而不是靠左!即相当于titleEdgeInsets.left = -imageWidth/2,titleEdgeInsets.right = -imageWidth/2。
这样看起来似乎是一种设置edgeInsets的简便写法,即不需要设置4个值,仅需要设置翻倍的2个就好了。但最好不要这样写,因为测试过程中发现,使用这种方式实现alignVertical(spacing: CGFloat, imageTop: Bool) 时,若button的高度正好囊括image和title时,imageTop为true或false时,总会有一种情况下image会被压缩。
搜了很多文章也没找到titleEdgeInset和imageEdgeInset实现机制,所有人都是在猜它是怎么实现的,因此也无法确定这个bug的原因。
若设置titleEdgeInsets.left == titleEdgeInsets.right会怎样?
标准用法中,titleEdgeInsets.left和titleEdgeInsets.right总是互为相反数,因为当title向一个方向移动时,必然是一侧收缩,一侧扩张。那么titleEdgeInsets.left == titleEdgeInsets.right时会怎样呢?测试显示结果不确定。
当titleEdgeInsets.left == titleEdgeInsets.right == titleWidth/2时,按理说title肯定会被完全折叠,消失,但实际上
- 若button宽度正好囊括image和title,title才会完全折叠起来。
- 若button宽度比较大时,title只会部分折叠。
因为EdgeInset的机制未知,所以也无法猜透它的原因。总之,最好按标准方式操作titleEdgeInset和imageEdgeInset,不然会有很多莫名其妙的问题。
其他
- 使用Xib时,imageEdgeInsets和titleEdgeInsets的right都不能设置为负数,经测试,通过代码方式设置负数是有效的,Xib中无法设置应该是Bug。
参考
详解UIButton的imageEdgeInsets和titleEdgeInsets属性
UIButton的titleEdgeInsets属性和imageEdgeInsets属性实现图片文字按要求排列
UIButton: how to center an image and a text using imageEdgeInsets and titleEdgeInsets?