对于现在的App应用来说,扫描二维码和条形码这个功能是再正常不过的一个功能了,在早期开发这些功能的时候,大家或多或少的都接触过ZXing和ZBar这类的第三方库,但从iOS7以后,苹果就给我们提供了系统原生的API来支持我们扫描获取二维码,ZXing和ZBar在使用中或多或少有不尽如人意的地方,再之停止更新很久了,所以今天我们就来聊聊如何用系统原生的方法扫描获取二维码,强大的AVFoundation框架给我们提供了扫描私有方法和代理方法。
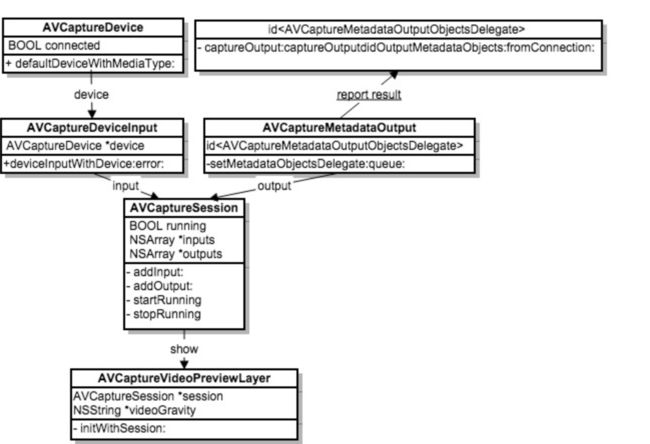
首先获取流媒体信息我们需要AVCaptureSession对象来管理输入流和输出流,AVCaptureVideoPreviewLayer对象来显示信息,基本流程如下图所示
AVCaptureSession管理输入(AVCaptureInput)和输出(AVCaptureOutput)流,包含开启和停止会话方法。
AVCaptureDeviceInput是AVCaptureInput的子类,可以作为输入捕获会话,用AVCaptureDevice实例初始化。
AVCaptureDevice代表了物理捕获设备如:摄像机。用于配置等底层硬件设置相机的自动对焦模式。
AVCaptureMetadataOutput是AVCaptureOutput的子类,处理输出捕获会话。捕获的对象传递给一个委托实现AVCaptureMetadataOutputObjectsDelegate协议。协议方法在指定的派发队列(dispatch queue)上执行。
AVCaptureVideoPreviewLayerCALayer的一个子类,显示捕获到的相机输出流。
好了看下实现过程:
添加代理
/** 设备 */
@property (nonatomic, strong) AVCaptureDevice * device;
/** 输入输出的中间桥梁 */
@property (nonatomic, strong) AVCaptureSession * session;
/** 相机图层 */
@property (nonatomic, strong) AVCaptureVideoPreviewLayer * previewLayer;
/** 扫描支持的编码格式的数组 */
@property (nonatomic, strong) NSMutableArray * metadataObjectTypes;
/** 遮罩层 */
@property (nonatomic, strong) ZFMaskView * maskView;
@property(nonatomic,strong) AVCaptureMetadataOutput * metadataOutput ;//输出流
@property(nonatomic,strong)AVCaptureDeviceInput * input;//创建输入流
这里介绍下扫描支持的编码格式
/*
//设置支持的扫描类型
由于本项目只支持条形码扫描,故先屏蔽掉二维码扫描功能
AVMetadataObjectTypeQRCode,AVMetadataObjectTypeAztecCode,
*/
- (NSMutableArray *)metadataObjectTypes{
if (!_metadataObjectTypes) {
_metadataObjectTypes = [NSMutableArray arrayWithObjects:AVMetadataObjectTypeCode128Code, AVMetadataObjectTypeCode39Code, AVMetadataObjectTypeCode39Mod43Code, AVMetadataObjectTypeCode93Code, AVMetadataObjectTypeEAN13Code, AVMetadataObjectTypeEAN8Code, / /我国商品码主要就是这和 EAN8
AVMetadataObjectTypePDF417Code, AVMetadataObjectTypeUPCECode, nil];
// >= iOS 8
if (floor(NSFoundationVersionNumber) > NSFoundationVersionNumber_iOS_7_1) {
[_metadataObjectTypes addObjectsFromArray:@[AVMetadataObjectTypeInterleaved2of5Code, AVMetadataObjectTypeITF14Code, AVMetadataObjectTypeDataMatrixCode]];
}
}
return _metadataObjectTypes;
}
/**
* 扫描初始化
*/
- (void)capture{
//获取摄像设备
self.device = [AVCaptureDevice defaultDeviceWithMediaType:AVMediaTypeVideo];
//创建输入流
AVCaptureDeviceInput * input = [AVCaptureDeviceInput deviceInputWithDevice:self.device error:nil];
//创建输出流
_metadataOutput = [[AVCaptureMetadataOutput alloc] init];
//设置代理 在主线程里刷新
[_metadataOutput setMetadataObjectsDelegate:self queue:dispatch_get_main_queue()];
//初始化链接对象
self.session = [[AVCaptureSession alloc] init];
//高质量采集率
self.session.sessionPreset = AVCaptureSessionPresetHigh;
[self.session addInput:input];
[self.session addOutput:_metadataOutput];
self.previewLayer = [AVCaptureVideoPreviewLayer layerWithSession:self.session];
self.previewLayer.frame = CGRectMake(0, 0, SCREEN_WIDTH, SCREEN_HEIGHT);
self.previewLayer.videoGravity = AVLayerVideoGravityResizeAspectFill;
self.previewLayer.backgroundColor = [UIColor yellowColor].CGColor;
[self.view.layer addSublayer:self.previewLayer];
//设置扫描支持的编码格式(如下设置条形码和二维码兼容)
_metadataOutput.metadataObjectTypes = self.metadataObjectTypes;
//开始捕获
[self.session startRunning];
}
下一步,获取扫描结果
#pragma mark - AVCaptureMetadataOutputObjectsDelegate-(void)captureOutput:(AVCaptureOutput*)captureOutput didOutputMetadataObjects:(NSArray*)metadataObjects fromConnection:(AVCaptureConnection*)connection
{if(metadataObjects.count>0) {
[self.session stopRunning];
AVMetadataMachineReadableCodeObject*metadataObject = metadataObjects[0];
NSLog(@"%@",metadataObject.stringValue);
}}
小结一下:
如果你的项目只需要扫描二维码,不考虑条形码,metadataObjectTypes只需要AVMetadataObjectTypeQRCode就够了,反之把这个去掉
下面我主要讲讲怎么把镜头拉近,提高扫描效果,你之前在界面中添加一个按钮,添加事件。
#pragma mark - 焦距
- (void)CameraScaleAction:(UIButton *)sender{
kCameraScale+=0.5; //去定义一个float类型,默认值为1.0
if(kCameraScale>2.5)
kCameraScale=1.0;
//改变焦距 记住这里的输出链接类型要选中这个类型,否则屏幕会花的
AVCaptureConnection *connect=[_metadataOutput connectionWithMediaType:AVMediaTypeVideo];
[CATransaction begin];
[CATransaction setAnimationDuration:0.2];
[sender setTitle:[NSString stringWithFormat:@"%.1fX",(float)kCameraScale] forState:UIControlStateNormal];
//主要是改变相机图层的大小
[_previewLayer setAffineTransform:CGAffineTransformMakeScale(kCameraScale, kCameraScale)];
connect.videoScaleAndCropFactor= kCameraScale;
[CATransaction commit];
//超出的部分切掉,否则影响扫描效果
self.view.clipsToBounds=YES;
self.view.layer.masksToBounds=YES;
}
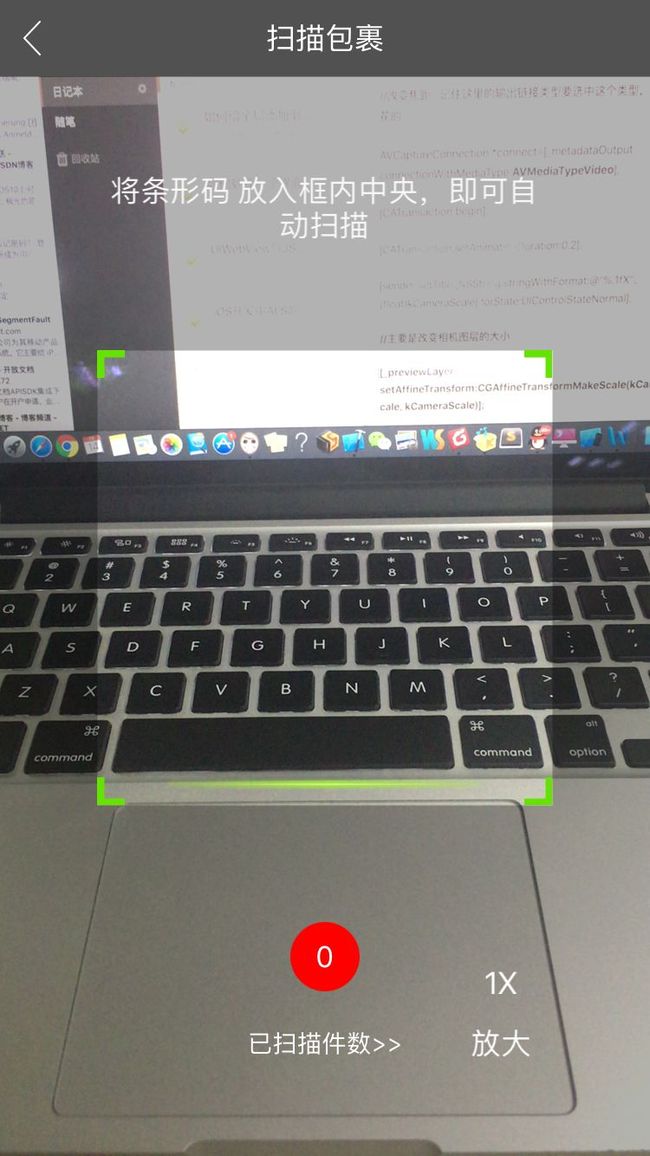
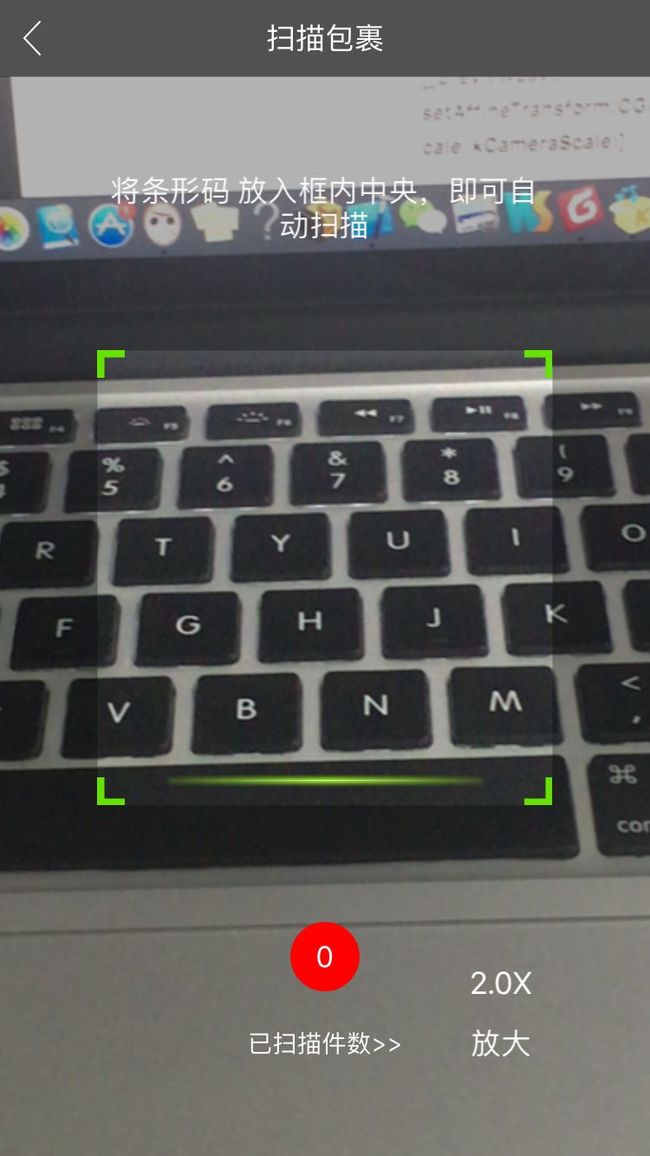
这是对比图,
如果想获取焦点需要给view添加一个手势
////对焦
-(void)foucus:(UITapGestureRecognizer *)sender
{
if(_input.device.position==AVCaptureDevicePositionFront)
return;
if(sender.state==UIGestureRecognizerStateRecognized)
{
CGPoint location=[sender locationInView:self.view];
//对焦
__weak typeof(self) weakSelf=self;
[self focusOnPoint:location completionHandler:^{
weakSelf.focalReticule.center=location;
weakSelf.focalReticule.alpha=0.0;
weakSelf.focalReticule.hidden=NO;
[UIView animateWithDuration:0.3 animations:^{
weakSelf.focalReticule.alpha=1.0;
}completion:^(BOOL finished) {
[UIView animateWithDuration:0.3 animations:^{
weakSelf.focalReticule.alpha=0.0;
}];
}];
}];
}
}
////对某一点对焦
-(void)focusOnPoint:(CGPoint)point completionHandler:(void(^)())completionHandler{
AVCaptureDevice *device = [AVCaptureDevice defaultDeviceWithMediaType:AVMediaTypeVideo];;
CGPoint pointOfInterest = CGPointZero;
CGSize frameSize = self.view.bounds.size;
pointOfInterest = CGPointMake(point.y / frameSize.height, 1.f - (point.x / frameSize.width));
if ([device isFocusPointOfInterestSupported] && [device isFocusModeSupported:AVCaptureFocusModeAutoFocus])
{
NSError *error;
if ([device lockForConfiguration:&error])
{
if ([device isWhiteBalanceModeSupported:AVCaptureWhiteBalanceModeAutoWhiteBalance])
{
[device setWhiteBalanceMode:AVCaptureWhiteBalanceModeAutoWhiteBalance];
}
if ([device isFocusModeSupported:AVCaptureFocusModeContinuousAutoFocus])
{
[device setFocusMode:AVCaptureFocusModeAutoFocus];
[device setFocusPointOfInterest:pointOfInterest];
}
if([device isExposurePointOfInterestSupported] && [device isExposureModeSupported:AVCaptureExposureModeContinuousAutoExposure])
{
[device setExposurePointOfInterest:pointOfInterest];
[device setExposureMode:AVCaptureExposureModeContinuousAutoExposure];
}
[device unlockForConfiguration];
if(completionHandler)
completionHandler();
}
}
else{
if(completionHandler)
completionHandler();
}
}
好了,欢迎大家指正


