1,打印View所有子视图
po [[selfview]recursiveDescription]
2,layoutSubviews调用的调用时机
*当视图第一次显示的时候会被调用*当这个视图显示到屏幕上了,点击按钮*添加子视图也会调用这个方法*当本视图的大小发生改变的时候是会调用的*当子视图的frame发生改变的时候是会调用的*当删除子视图的时候是会调用的
3,NSString过滤特殊字符
// 定义一个特殊字符的集合NSCharacterSet*set = [NSCharacterSetcharacterSetWithCharactersInString:@"@/:;()¥「」"、[]{}#%-*+=_\\|~<>$€^•'@#$%^&*()_+'\""];// 过滤字符串的特殊字符NSString*newString = [trimString stringByTrimmingCharactersInSet:set];
4,TransForm属性
//平移按钮CGAffineTransformtransForm =self.buttonView.transform;self.buttonView.transform=CGAffineTransformTranslate(transForm,10,0);//旋转按钮CGAffineTransformtransForm =self.buttonView.transform;self.buttonView.transform=CGAffineTransformRotate(transForm, M_PI_4);//缩放按钮self.buttonView.transform=CGAffineTransformScale(transForm,1.2,1.2);//初始化复位self.buttonView.transform=CGAffineTransformIdentity;
5,去掉分割线多余15像素
首先在viewDidLoad方法加入以下代码:if([self.tableViewrespondsToSelector:@selector(setSeparatorInset:)]) { [self.tableViewsetSeparatorInset:UIEdgeInsetsZero]; }if([self.tableViewrespondsToSelector:@selector(setLayoutMargins:)]) { [self.tableViewsetLayoutMargins:UIEdgeInsetsZero];}然后在重写willDisplayCell方法- (void)tableView:(UITableView*)tableView willDisplayCell:(UITableViewCell*)cell forRowAtIndexPath:(NSIndexPath*)indexPath{if([cell respondsToSelector:@selector(setSeparatorInset:)]) { [cell setSeparatorInset:UIEdgeInsetsZero]; }if([cell respondsToSelector:@selector(setLayoutMargins:)]) { [cell setLayoutMargins:UIEdgeInsetsZero]; }}
6,计算方法耗时时间间隔
// 获取时间间隔#defineTICK CFAbsoluteTime start = CFAbsoluteTimeGetCurrent();#defineTOCK NSLog(@"Time: %f", CFAbsoluteTimeGetCurrent() - start)
7,Color颜色宏定义
// 随机颜色#defineRANDOM_COLOR [UIColor colorWithRed:arc4random_uniform(256) /255.0green:arc4random_uniform(256) /255.0blue:arc4random_uniform(256) /255.0alpha:1]// 颜色(RGB)#defineRGBCOLOR(r, g, b) [UIColor colorWithRed:(r)/255.0fgreen:(g)/255.0fblue:(b)/255.0falpha:1]// 利用这种方法设置颜色和透明值,可不影响子视图背景色#defineRGBACOLOR(r, g, b, a) [UIColor colorWithRed:(r)/255.0fgreen:(g)/255.0fblue:(b)/255.0falpha:(a)]
8,Alert提示宏定义
#defineAlert(_S_, ...)[[[UIAlertView alloc]initWithTitle:@"提示"message:[NSString stringWithFormat:(_S_), ##__VA_ARGS__] delegate:nil cancelButtonTitle:@"确定"otherButtonTitles:nil] show]
8,让 iOS 应用直接退出
- (void)exitApplication { AppDelegate *app = [UIApplicationsharedApplication].delegate;UIWindow*window = app.window; [UIViewanimateWithDuration:1.0f animations:^{ window.alpha=0; } completion:^(BOOLfinished) { exit(0); }];}
8,NSArray 快速求总和 最大值 最小值 和 平均值
NSArray*array = [NSArrayarrayWithObjects:@"2.0",@"2.3",@"3.0",@"4.0",@"10",nil];CGFloatsum = [[array valueForKeyPath:@"@sum.floatValue"] floatValue];CGFloatavg = [[array valueForKeyPath:@"@avg.floatValue"] floatValue];CGFloatmax =[[array valueForKeyPath:@"@max.floatValue"] floatValue];CGFloatmin =[[array valueForKeyPath:@"@min.floatValue"] floatValue];NSLog(@"%f\n%f\n%f\n%f",sum,avg,max,min);
9,修改Label中不同文字颜色
- (void)touchesEnded:(NSSet *)touches withEvent:(UIEvent*)event{ [selfeditStringColor:self.label.texteditStr:@"好"color:[UIColorblueColor]];}- (void)editStringColor:(NSString*)string editStr:(NSString*)editStr color:(UIColor*)color {// string为整体字符串, editStr为需要修改的字符串NSRangerange = [string rangeOfString:editStr];NSMutableAttributedString*attribute = [[NSMutableAttributedStringalloc] initWithString:string];// 设置属性修改字体颜色UIColor与大小UIFont[attribute addAttributes:@{NSForegroundColorAttributeName:color} range:range];self.label.attributedText= attribute;}
10,播放声音
#import// 1.获取音效资源的路径NSString*path = [[NSBundlemainBundle]pathForResource:@"pour_milk"ofType:@"wav"];// 2.将路劲转化为urlNSURL*tempUrl = [NSURLfileURLWithPath:path];// 3.用转化成的url创建一个播放器NSError*error =nil;AVAudioPlayer*play = [[AVAudioPlayeralloc]initWithContentsOfURL:tempUrl error:&error];self.player= play;// 4.播放[play play];
11,检测是否IPad Pro和其它设备型号
- (BOOL)isIpadPro{ UIScreen *Screen = [UIScreen mainScreen]; CGFloat width = Screen.nativeBounds.size.width/Screen.nativeScale; CGFloat height = Screen.nativeBounds.size.height/Screen.nativeScale; BOOL isIpad =[[UIDevice currentDevice] userInterfaceIdiom] == UIUserInterfaceIdiomPad; BOOL hasIPadProWidth =fabs(width -1024.f) < DBL_EPSILON; BOOL hasIPadProHeight =fabs(height -1366.f) < DBL_EPSILON;returnisIpad && hasIPadProHeight && hasIPadProWidth;}#defineUI_IS_LANDSCAPE ([UIDevice currentDevice].orientation == UIDeviceOrientationLandscapeLeft || [UIDevice currentDevice].orientation == UIDeviceOrientationLandscapeRight)#defineUI_IS_IPAD ([[UIDevice currentDevice] userInterfaceIdiom] == UIUserInterfaceIdiomPad)#defineUI_IS_IPHONE ([[UIDevice currentDevice] userInterfaceIdiom] == UIUserInterfaceIdiomPhone)#defineUI_IS_IPHONE4 (UI_IS_IPHONE && [[UIScreen mainScreen] bounds].size.height <568.0)#defineUI_IS_IPHONE5 (UI_IS_IPHONE && [[UIScreen mainScreen] bounds].size.height ==568.0)#defineUI_IS_IPHONE6 (UI_IS_IPHONE && [[UIScreen mainScreen] bounds].size.height ==667.0)#defineUI_IS_IPHONE6PLUS (UI_IS_IPHONE && [[UIScreen mainScreen] bounds].size.height ==736.0|| [[UIScreen mainScreen] bounds].size.width ==736.0)// Both orientations#define UI_IS_IOS8_AND_HIGHER ([[UIDevice currentDevice].systemVersion floatValue] >= 8.0)文/Originalee(作者)原文链接:http://www.jianshu.com/p/9d36aa12429f著作权归作者所有,转载请联系作者获得授权,并标注“作者”。
11,修改Tabbar Item的属性
// 修改标题位置self.tabBarItem.titlePositionAdjustment=UIOffsetMake(0, -10);// 修改图片位置self.tabBarItem.imageInsets=UIEdgeInsetsMake(-3,0,3,0);// 批量修改属性for(UIBarItem*iteminself.tabBarController.tabBar.items) { [item setTitleTextAttributes:[NSDictionarydictionaryWithObjectsAndKeys: [UIFontfontWithName:@"Helvetica"size:19.0],NSFontAttributeName,nil] forState:UIControlStateNormal]; }// 设置选中和未选中字体颜色[[UITabBarappearance] setShadowImage:[[UIImagealloc] init]];//未选中字体颜色[[UITabBarItemappearance] setTitleTextAttributes:@{NSForegroundColorAttributeName:[UIColorgreenColor]} forState:UIControlStateNormal];//选中字体颜色[[UITabBarItemappearance] setTitleTextAttributes:@{NSForegroundColorAttributeName:[UIColorcyanColor]} forState:UIControlStateSelected];
12,NULL - nil - Nil - NSNULL的区别
*nil是OC的,空对象,地址指向空(0)的对象。对象的字面零值* Nil是Objective-C类的字面零值*NULL是C的,空地址,地址的数值是0,是个长整数*NSNull用于解决向NSArray和NSDictionary等集合中添加空值的问题
11,去掉BackBarButtonItem的文字
[[UIBarButtonItem appearance]setBackButtonTitlePositionAdjustment:UIOffsetMake(0, -60) forBarMetrics:UIBarMetricsDefault];
12,控件不能交互的一些原因
1,控件的userInteractionEnabled = NO2,透明度小于等于0.01,aplpha3,控件被隐藏的时候,hidden = YES4,子视图的位置超出了父视图的有效范围,子视图无法交互,设置了。5,需要交互的视图,被其他视图盖住(其他视图开启了用户交互)。
12,修改UITextField中Placeholder的文字颜色
[text setValue:[UIColor redColor]forKeyPath:@"_placeholderLabel.textColor"];}
13,视图的生命周期
1、 alloc 创建对象,分配空间2、 init (initWithNibName) 初始化对象,初始化数据3、 loadView 从nib载入视图 ,除非你没有使用xib文件创建视图4、 viewDidLoad 载入完成,可以进行自定义数据以及动态创建其他控件5、 viewWillAppear视图将出现在屏幕之前,马上这个视图就会被展现在屏幕上了6、 viewDidAppear 视图已在屏幕上渲染完成1、viewWillDisappear 视图将被从屏幕上移除之前执行2、viewDidDisappear 视图已经被从屏幕上移除,用户看不到这个视图了3、dealloc 视图被销毁,此处需要对你在init和viewDidLoad中创建的对象进行释放.viewVillUnload- 当内存过低,即将释放时调用;viewDidUnload-当内存过低,释放一些不需要的视图时调用。
14,应用程序的生命周期
1,启动但还没进入状态保存 :- (BOOL)application:(UIApplication*)application willFinishLaunchingWithOptions:(NSDictionary*)launchOptions2,基本完成程序准备开始运行:- (BOOL)application:(UIApplication*)application didFinishLaunchingWithOptions:(NSDictionary*)launchOptions3,当应用程序将要入非活动状态执行,应用程序不接收消息或事件,比如来电话了:- (void)applicationWillResignActive:(UIApplication*)application4,当应用程序入活动状态执行,这个刚好跟上面那个方法相反:- (void)applicationDidBecomeActive:(UIApplication*)application5,当程序被推送到后台的时候调用。所以要设置后台继续运行,则在这个函数里面设置即可:- (void)applicationDidEnterBackground:(UIApplication*)application6,当程序从后台将要重新回到前台时候调用,这个刚好跟上面的那个方法相反:- (void)applicationWillEnterForeground:(UIApplication*)application7,当程序将要退出是被调用,通常是用来保存数据和一些退出前的清理工作:- (void)applicationWillTerminate:(UIApplication*)application
15,判断view是不是指定视图的子视图
BOOLisView = [textView isDescendantOfView:self.view];
16,判断对象是否遵循了某协议
if([self.selectedControllerconformsToProtocol:@protocol(RefreshPtotocol)]){ [self.selectedControllerperformSelector:@selector(onTriggerRefresh)];}
17,页面强制横屏
#pragma mark - 强制横屏代码- (BOOL)shouldAutorotate{//是否支持转屏returnNO;}- (UIInterfaceOrientationMask)supportedInterfaceOrientations{//支持哪些转屏方向returnUIInterfaceOrientationMaskLandscape;}- (UIInterfaceOrientation)preferredInterfaceOrientationForPresentation{returnUIInterfaceOrientationLandscapeRight;}- (BOOL)prefersStatusBarHidden{returnNO;}
18,系统键盘通知消息
1、UIKeyboardWillShowNotification-将要弹出键盘2、UIKeyboardDidShowNotification-显示键盘3、UIKeyboardWillHideNotification-将要隐藏键盘4、UIKeyboardDidHideNotification-键盘已经隐藏5、UIKeyboardWillChangeFrameNotification-键盘将要改变frame6、UIKeyboardDidChangeFrameNotification-键盘已经改变frame
19,关闭navigationController的滑动返回手势
self.navigationController.interactivePopGestureRecognizer.enabled=NO;
20,设置状态栏背景为任意的颜色
- (void)setStatusColor{UIView*statusBarView = [[UIViewalloc] initWithFrame:CGRectMake(0,0,[UIScreenmainScreen].bounds.size.width,20)]; statusBarView.backgroundColor= [UIColororangeColor]; [self.viewaddSubview:statusBarView];}
21,让Xcode的控制台支持LLDB类型的打印
打开终端输入三条命令: touch ~/.lldbinitechodisplay @import UIKit >> ~/.lldbinitechotarget stop-hook add -o \"target stop-hook disable\" >> ~/.lldbinit
下次重新运行项目,然后就不报错了。
22,Label行间距
-(void)test{NSMutableAttributedString*attributedString = [[NSMutableAttributedStringalloc] initWithString:self.contentLabel.text];NSMutableParagraphStyle*paragraphStyle = [[NSMutableParagraphStylealloc] init]; [paragraphStyle setLineSpacing:3];//调整行间距[attributedString addAttribute:NSParagraphStyleAttributeNamevalue:paragraphStyle range:NSMakeRange(0, [self.contentLabel.textlength])];self.contentLabel.attributedText= attributedString;}
23,UIImageView填充模式
@"UIViewContentModeScaleToFill",// 拉伸自适应填满整个视图@"UIViewContentModeScaleAspectFit",// 自适应比例大小显示@"UIViewContentModeScaleAspectFill",// 原始大小显示@"UIViewContentModeRedraw",// 尺寸改变时重绘@"UIViewContentModeCenter",// 中间@"UIViewContentModeTop",// 顶部@"UIViewContentModeBottom",// 底部@"UIViewContentModeLeft",// 中间贴左@"UIViewContentModeRight",// 中间贴右@"UIViewContentModeTopLeft",// 贴左上@"UIViewContentModeTopRight",// 贴右上@"UIViewContentModeBottomLeft",// 贴左下@"UIViewContentModeBottomRight",// 贴右下
24,宏定义检测block是否可用
#defineBLOCK_EXEC(block, ...)if(block) { block(__VA_ARGS__); };// 宏定义之前的用法if(completionBlock) { completionBlock(arg1, arg2); }// 宏定义之后的用法BLOCK_EXEC(completionBlock, arg1, arg2);
25,Debug栏打印时自动把Unicode编码转化成汉字
// 有时候我们在xcode中打印中文,会打印出Unicode编码,还需要自己去一些在线网站转换,有了插件就方便多了。DXXcodeConsoleUnicodePlugin 插件
26,设置状态栏文字样式颜色
[[UIApplication sharedApplication]setStatusBarHidden:NO];[[UIApplication sharedApplication]setStatusBarStyle:UIStatusBarStyleLightContent];
26,自动生成模型代码的插件
// 可自动生成模型的代码,省去写模型代码的时间ESJsonFormat-for-Xcode
27,iOS中的一些手势
轻击手势(TapGestureRecognizer)
轻扫手势(SwipeGestureRecognizer)
长按手势(LongPressGestureRecognizer)
拖动手势(PanGestureRecognizer)
捏合手势(PinchGestureRecognizer)
旋转手势(RotationGestureRecognizer)
27,iOS 开发中一些相关的路径
模拟器的位置:/Applications/Xcode.app/Contents/Developer/Platforms/iPhoneSimulator.platform/Developer/SDKs 文档安装位置:/Applications/Xcode.app/Contents/Developer/Documentation/DocSets插件保存路径:~/Library/ApplicationSupport/Developer/Shared/Xcode/Plug-ins自定义代码段的保存路径:~/Library/Developer/Xcode/UserData/CodeSnippets/ 如果找不到CodeSnippets文件夹,可以自己新建一个CodeSnippets文件夹。证书路径~/Library/MobileDevice/Provisioning Profiles
28,获取 iOS 路径的方法
获取家目录路径的函数NSString*homeDir =NSHomeDirectory();获取Documents目录路径的方法NSArray*paths =NSSearchPathForDirectoriesInDomains(NSDocumentDirectory,NSUserDomainMask,YES);NSString*docDir = [paths objectAtIndex:0];获取Documents目录路径的方法NSArray*paths =NSSearchPathForDirectoriesInDomains(NSCachesDirectory,NSUserDomainMask,YES);NSString*cachesDir = [paths objectAtIndex:0];获取tmp目录路径的方法:NSString*tmpDir =NSTemporaryDirectory();
29,字符串相关操作
去除所有的空格[str stringByReplacingOccurrencesOfString:@" "withString:@""]去除首尾的空格[str stringByTrimmingCharactersInSet:[NSCharacterSetwhitespaceCharacterSet]];- (NSString*)uppercaseString; 全部字符转为大写字母- (NSString*)lowercaseString 全部字符转为小写字母
30, CocoaPods pod install/pod update更新慢的问题
podinstall--verbose --no-repo-updatepodupdate--verbose --no-repo-update如果不加后面的参数,默认会升级CocoaPods的spec仓库,加一个参数可以省略这一步,然后速度就会提升不少。
31,MRC和ARC混编设置方式
在XCode中targets的build phases选项下CompileSources下选择 不需要arc编译的文件双击输入 -fno-objc-arc 即可MRC工程中也可以使用ARC的类,方法如下:在XCode中targets的build phases选项下CompileSources下选择要使用arc编译的文件双击输入 -fobjc-arc 即可
32,把tableview里cell的小对勾的颜色改成别的颜色
_mTableView.tintColor= [UIColorredColor];
33,调整tableview的separaLine线的位置
tableView.separatorInset = UIEdgeInsetsMake(0,100,0,0);
34,设置滑动的时候隐藏navigationbar
navigationController.hidesBarsOnSwipe = Yes
35,自动处理键盘事件,实现输入框防遮挡的插件
IQKeyboardManagerhttps://github.com/hackiftekhar/IQKeyboardManager
36,Quartz2D相关
图形上下是一个CGContextRef类型的数据。图形上下文包含:1,绘图路径(各种各样图形)2,绘图状态(颜色,线宽,样式,旋转,缩放,平移)3,输出目标(绘制到什么地方去?UIView、图片)1,获取当前图形上下文CGContextRef ctx = UIGraphicsGetCurrentContext();2,添加线条CGContextMoveToPoint(ctx,20,20);3,渲染CGContextStrokePath(ctx);CGContextFillPath(ctx);4,关闭路径CGContextClosePath(ctx);5,画矩形CGContextAddRect(ctx, CGRectMake(20,20,100,120));6,设置线条颜色[[UIColor redColor] setStroke];7, 设置线条宽度CGContextSetLineWidth(ctx,20);8,设置头尾样式CGContextSetLineCap(ctx, kCGLineCapSquare);9,设置转折点样式CGContextSetLineJoin(ctx, kCGLineJoinBevel);10,画圆CGContextAddEllipseInRect(ctx, CGRectMake(30,50,100,100));11,指定圆心CGContextAddArc(ctx,100,100,50,0, M_PI *2,1);12,获取图片上下文UIGraphicsGetImageFromCurrentImageContext();13,保存图形上下文CGContextSaveGState(ctx)14,恢复图形上下文CGContextRestoreGState(ctx)
37,屏幕截图
// 1. 开启一个与图片相关的图形上下文UIGraphicsBeginImageContextWithOptions(self.view.bounds.size,NO,0.0);// 2. 获取当前图形上下文CGContextRefctx =UIGraphicsGetCurrentContext();// 3. 获取需要截取的view的layer[self.view.layerrenderInContext:ctx];// 4. 从当前上下文中获取图片UIImage*image =UIGraphicsGetImageFromCurrentImageContext();// 5. 关闭图形上下文UIGraphicsEndImageContext();// 6. 把图片保存到相册UIImageWriteToSavedPhotosAlbum(image,nil,nil,nil);
37,左右抖动动画
//1, 创建核心动画CAKeyframeAnimation *keyAnima = [CAKeyframeAnimation animation];//2, 告诉系统执行什么动画。keyAnima.keyPath = @"transform.rotation"; keyAnima.values = @[@(-M_PI_4 /90.0*5),@(M_PI_4 /90.0*5),@(-M_PI_4 /90.0*5)];// 3, 执行完之后不删除动画keyAnima.removedOnCompletion = NO;// 4, 执行完之后保存最新的状态keyAnima.fillMode = kCAFillModeForwards;// 5, 动画执行时间keyAnima.duration =0.2;// 6, 设置重复次数。keyAnima.repeatCount = MAXFLOAT;// 7, 添加核心动画[self.iconView.layer addAnimation:keyAnima forKey:nil];
38,CALayer 的知识
CALayer负责视图中显示内容和动画UIView负责监听和响应事件创建UIView对象时,UIView内部会自动创建一个图层(既CALayer)UIView本身不具备显示的功能,是它内部的层才有显示功能.CALayer属性:position 中点(由anchorPoint决定)anchorPoint 锚点borderColor 边框颜色borderWidth 边框宽度cornerRadius 圆角半径shadowColor 阴影颜色contents 内容opacity 透明度shadowOpacity 偏移shadowRadius 阴影半径shadowColor 阴影颜色masksToBounds 裁剪
39,性能相关
1.视图复用,比如UITableViewCell,UICollectionViewCell.2.数据缓存,比如用SDWebImage实现图片缓存。3.任何情况下都不能堵塞主线程,把耗时操作尽量放到子线程。4.如果有多个下载同时并发,可以控制并发数。5.在合适的地方尽量使用懒加载。6.重用重大开销对象,比如:NSDateFormatter、NSCalendar。7.选择合适的数据存储。8.避免循环引用。避免delegate用retain、strong修饰,block可能导致循环引用,NSTimer也可能导致内存泄露等。9.当涉及到定位的时候,不用的时候最好把定位服务关闭。因为定位耗电、流量。10.加锁对性能有重大开销。11.界面最好不要添加过多的subViews.12.TableView 如果不同行高,那么返回行高,最好做缓存。13.Viewdidload 里尽量不要做耗时操作。
40,验证身份证号码
//验证身份证号码- (BOOL)checkIdentityCardNo:(NSString*)cardNo{if(cardNo.length!=18) {returnNO; }NSArray* codeArray = [NSArrayarrayWithObjects:@"7",@"9",@"10",@"5",@"8",@"4",@"2",@"1",@"6",@"3",@"7",@"9",@"10",@"5",@"8",@"4",@"2",nil];NSDictionary* checkCodeDic = [NSDictionarydictionaryWithObjects:[NSArrayarrayWithObjects:@"1",@"0",@"X",@"9",@"8",@"7",@"6",@"5",@"4",@"3",@"2",nil] forKeys:[NSArrayarrayWithObjects:@"0",@"1",@"2",@"3",@"4",@"5",@"6",@"7",@"8",@"9",@"10",nil]];NSScanner* scan = [NSScannerscannerWithString:[cardNo substringToIndex:17]];intval;BOOLisNum = [scan scanInt:&val] && [scan isAtEnd];if(!isNum) {returnNO; }intsumValue =0;for(inti =0; i<17; i++) { sumValue+=[[cardNo substringWithRange:NSMakeRange(i ,1) ] intValue]* [[codeArray objectAtIndex:i] intValue]; }NSString* strlast = [checkCodeDic objectForKey:[NSStringstringWithFormat:@"%d",sumValue%11]];if([strlast isEqualToString: [[cardNo substringWithRange:NSMakeRange(17,1)]uppercaseString]]) {returnYES; }returnNO;}
41,响应者链条顺序
1> 当应用程序启动以后创建 UIApplication 对象2> 然后启动“消息循环”监听所有的事件3> 当用户触摸屏幕的时候,"消息循环"监听到这个触摸事件4>"消息循环"首先把监听到的触摸事件传递了 UIApplication 对象5> UIApplication 对象再传递给 UIWindow 对象6> UIWindow 对象再传递给 UIWindow 的根控制器(rootViewController)7> 控制器再传递给控制器所管理的 view8> 控制器所管理的 View 在其内部搜索看本次触摸的点在哪个控件的范围内(调用Hit test检测是否在这个范围内)9> 找到某个控件以后(调用这个控件的 touchesXxx 方法), 再一次向上返回, 最终返回给"消息循环"10>"消息循环"知道哪个按钮被点击后, 在搜索这个按钮是否注册了对应的事件, 如果注册了, 那么就调用这个"事件处理"程序。(一般就是执行控制器中的"事件处理"方法)
42,使用函数式指针执行方法和忽略performSelector方法的时候警告
不带参数的:SEL selector =NSSelectorFromString(@"someMethod");IMP imp = [_controller methodForSelector:selector];void(*func)(id, SEL) = (void*)imp;func(_controller, selector);带参数的:SEL selector =NSSelectorFromString(@"processRegion:ofView:");IMP imp = [_controller methodForSelector:selector];CGRect(*func)(id, SEL,CGRect,UIView*) = (void*)imp;CGRectresult = func(_controller, selector, someRect, someView);忽略警告:#pragma clang diagnostic push#pragma clang diagnostic ignored"-Warc-performSelector-leaks"[someController performSelector:NSSelectorFromString(@"someMethod")]#pragma clang diagnostic pop如果需要忽视的警告有多处,可以定义一个宏:#define SuppressPerformSelectorLeakWarning(Stuff) \do{\ _Pragma("clang diagnostic push") \ _Pragma("clang diagnostic ignored \"-Warc-performSelector-leaks\"") \ Stuff; \ _Pragma("clang diagnostic pop") \ }while(0)使用方法:SuppressPerformSelectorLeakWarning( [_target performSelector:_action withObject:self]);
43,UIApplication的简单使用
--------设置角标数字--------//获取UIApplication对象UIApplication*ap = [UIApplicationsharedApplication];//在设置之前, 要注册一个通知,从ios8之后,都要先注册一个通知对象.才能够接收到提醒.UIUserNotificationSettings*notice = [UIUserNotificationSettingssettingsForTypes:UIUserNotificationTypeBadgecategories:nil];//注册通知对象[ap registerUserNotificationSettings:notice];//设置提醒数字ap.applicationIconBadgeNumber=20;--------设置联网状态--------UIApplication*ap = [UIApplicationsharedApplication]; ap.networkActivityIndicatorVisible=YES;--------------------------
44, UITableView隐藏空白部分线条
self.tableView.tableFooterView= [[UIViewalloc]init];
45,显示git增量的Xcode插件:GitDiff
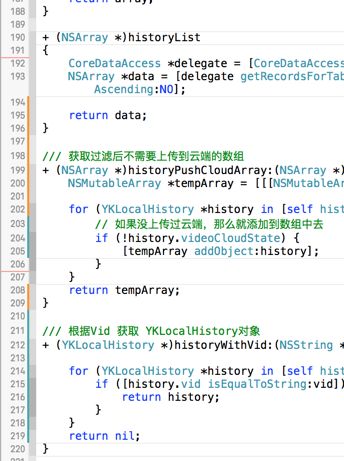
下载地址:https://github.com/johnno1962/GitDiff这款插件的名字是GitDiff,作用就是可以显示表示出git增量提交的代码行,比如下图会在Xcode左边标识出来:
46,各种收藏的网址
unicode编码转换http://tool.chinaz.com/tools/unicode.aspxJSON字符串格式化http://www.runoob.com/jsontoolRGB 颜色值转换http://www.sioe.cn/yingyong/yanse-rgb-16/短网址生成http://dwz.wailian.work/MAC 软件下载http://www.waitsun.com/objc 中国http://objccn.io/
文/品味_生活(作者)
原文链接:http://www.jianshu.com/p/7c3ee5e67d03
著作权归作者所有,转载请联系作者获得授权,并标注“作者”。

