Android下的沉浸式状态栏+折叠TitleBar(CoordinatorLayout+CollapsingToolbarLayout)+ViewPager切换实现
Android下的沉浸式状态栏+折叠TitleBar(CoordinatorLayout+CollapsingToolbarLayout)+ViewPager切换实现
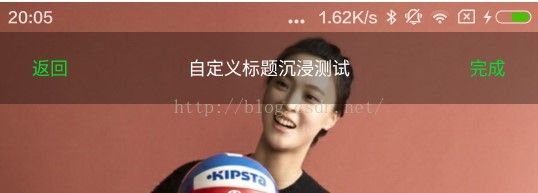
最终效果以及过程中出现的问题如下:(简单解决在ViewPager+Fragment的组合中实现该效果时出现有页面视图偏移一个状态栏高度问题)
android:theme="@style/AppNoTitleTheme"
          <style name="AppNoTitleTheme" parent="Theme.AppCompat.Light.DarkActionBar">


                <item name="colorPrimary">@color/colorPrimaryitem>


                <item name="windowNoTitle">trueitem>


                <item name="colorPrimaryDark">@color/colorPrimaryDarkitem>


                <item name="colorAccent">@color/colorAccentitem>


            style>
android:theme="@style/Theme.AppCompat.Light.NoActionBar"
       protected void onCreate(Bundle savedInstanceState) {


              super.onCreate(savedInstanceState);


              if (Build.VERSION.SDK_INT >= Build.VERSION_CODES.KITKAT) {


                  this.getWindow().addFlags(WindowManager.LayoutParams.FLAG_TRANSLUCENT_STATUS);//此FLAG可使状态栏透明,且当前视图在绘制时,从屏幕顶端开始即top = 0开始绘制,这也是实现沉浸效果的基础


                  this.getWindow().addFlags(WindowManager.LayoutParams.FLAG_TRANSLUCENT_NAVIGATION);//可不加


              }


              setContentView(R.layout.activity_main);//在此之前添加以上FLAG


              initView();


              initEvent();


          }
       <RelativeLayout


                          android:fitsSystemWindows="true"


                          android:clipToPadding="false"


                          android:layout_width="match_parent"


                          android:layout_height="match_parent">
<RelativeLayout android:layout_width="match_parent" android:layout_height="match_parent"> <ImageView android:id="@+id/textdemo_image" android:src="@drawable/bg3" android:layout_width="match_parent" android:layout_height="match_parent" /> <LinearLayout android:layout_width="match_parent" android:layout_height="match_parent" android:orientation="vertical">-
<View android:id="@+id/textdemo_titleholderview" android:layout_width="match_parent" android:layout_height="0dp" />
<include layout="@layout/titlebar_view">include>
<View android:layout_width="match_parent" android:layout_height="0dp" android:layout_weight="1" /> <LinearLayout android:layout_width="match_parent" android:layout_height="wrap_content" android:orientation="vertical"> <include layout="@layout/line_mode_view">include> <include layout="@layout/line_mode_view">include> LinearLayout> LinearLayout> RelativeLayout>
      ViewGroup.LayoutParams layoutParams = titlebarHolder.getLayoutParams();//titlebarHolder为添加的顶部的(标题栏上方)占位控件


              layoutParams.height = getStatueBarHeight();


              titlebarHolder.setLayoutParams(layoutParams);


              titlebarHolder.setBackgroundColor(Color.TRANSPARENT);//此处也可设置自定义的颜色,设置为透明则会直接看到底层的图片
xmlns:app="http://schemas.android.com/apk/res-auto"//以便引用其他包下定义的属性值, e.g. app:layout_scrollFlags="
xml version="1.0" encoding="utf-8"?><LinearLayout xmlns:android="http://schemas.android.com/apk/res/android" xmlns:app="http://schemas.android.com/apk/res-auto" android:id="@+id/activity_main" android:layout_width="match_parent" android:layout_height="match_parent"> <android.support.design.widget.CoordinatorLayout android:layout_width="match_parent" android:layout_height="match_parent"> <android.support.design.widget.AppBarLayout android:layout_width="match_parent" android:layout_height="match_parent"> <android.support.design.widget.CollapsingToolbarLayout android:id="@+id/collapsingToolbarLayout" android:layout_width="match_parent" android:layout_height="match_parent" android:minHeight="200dp" app:layout_scrollFlags="scroll|snap|exitUntilCollapsed"> <RelativeLayout android:layout_width="match_parent" android:layout_height="match_parent"> <ImageView android:id="@+id/textdemo_image" android:layout_width="match_parent" android:layout_height="match_parent" android:scaleType="centerCrop" android:src="@drawable/bg3" /> <LinearLayout android:layout_width="match_parent" android:layout_height="match_parent" android:orientation="vertical"> <View android:layout_width="match_parent" android:layout_height="0dp" android:layout_weight="1" /> <LinearLayout android:layout_width="match_parent" android:layout_height="wrap_content" android:orientation="vertical"> <include layout="@layout/line_mode_view">include> <include layout="@layout/line_mode_view">include> LinearLayout> LinearLayout> RelativeLayout> <LinearLayout android:layout_width="match_parent" android:layout_height="wrap_content" android:orientation="vertical" app:layout_collapseMode="pin"> <View android:id="@+id/textdemo_titleholderview" android:layout_width="match_parent" android:layout_height="0dp" /> <include layout="@layout/titlebar_view">include> LinearLayout> android.support.design.widget.CollapsingToolbarLayout> android.support.design.widget.AppBarLayout> <android.support.v7.widget.RecyclerView android:id="@+id/textdemo_recyclerview" android:layout_width="match_parent" android:layout_height="match_parent" app:layout_behavior="@string/appbar_scrolling_view_behavior"> android.support.v7.widget.RecyclerView> android.support.design.widget.CoordinatorLayout>LinearLayout>
public class MainActivity extends AppCompatActivity { private RecyclerView recyclerview; private LinearLayout titlebar; private View titlebarHolder; private ImageView textdemo_image; private CollapsingToolbarLayout collapsingToolbarLayout; @Override protected void onCreate(Bundle savedInstanceState) { super.onCreate(savedInstanceState); if (Build.VERSION.SDK_INT >= Build.VERSION_CODES.KITKAT) { this.getWindow().addFlags(WindowManager.LayoutParams.FLAG_TRANSLUCENT_STATUS);//沉浸式状态栏实现的前提 this.getWindow().addFlags(WindowManager.LayoutParams.FLAG_TRANSLUCENT_NAVIGATION);//可不加 } else { } setContentView(R.layout.activity_main); initView(); initEvent(); } private void initView() { recyclerview = (RecyclerView) findViewById(R.id.textdemo_recyclerview); titlebar = (LinearLayout) findViewById(R.id.textdemo_titlebar); titlebarHolder = findViewById(R.id.textdemo_titleholderview); textdemo_image = (ImageView) findViewById(R.id.textdemo_image); collapsingToolbarLayout = (CollapsingToolbarLayout) findViewById(R.id.collapsingToolbarLayout); } private void initEvent() { LinearLayoutManager manager = new LinearLayoutManager(getApplicationContext()); textdemo_image.setScaleType(ImageView.ScaleType.CENTER_CROP); ViewGroup.LayoutParams layoutParams = titlebarHolder.getLayoutParams(); layoutParams.height = getStatueBarHeight(); titlebarHolder.setLayoutParams(layoutParams); RecyclerView.Adapter adapter = new MyAdapter(); recyclerview.setLayoutManager(manager); recyclerview.setAdapter(adapter); //fitSystemWindow(); } //private void fitSystemWindow() { //bug相关解决代码 // ViewCompat.setOnApplyWindowInsetsListener(collapsingToolbarLayout, new OnApplyWindowInsetsListener() { // @Override // public WindowInsetsCompat onApplyWindowInsets(View v, WindowInsetsCompat insets) { // insets.replaceSystemWindowInsets(0, 0, 0, 0); // return insets.consumeSystemWindowInsets(); // return insets; // } // }); //} private int getStatueBarHeight() {//拿取状态栏的高度 int identifier = getResources().getIdentifier("status_bar_height", "dimen", "android"); if (identifier > 0) { return (int) getResources().getDimension(identifier); } return 0; } class MyAdapter extends RecyclerView.Adapter { @Override public RecyclerView.ViewHolder onCreateViewHolder(ViewGroup parent, int viewType) { return new MyViewholder(new TextView(getApplicationContext())); } @Override public void onBindViewHolder(RecyclerView.ViewHolder holder, int position) { ((MyViewholder) holder).updateData("我是模拟条目文本:::::" + position); } @Override public int getItemCount() { return 50; } } class MyViewholder extends RecyclerView.ViewHolder { public MyViewholder(View itemView) { super(itemView); } public void updateData(String str) { ((TextView) itemView).setText(str); } }}
- == 》滑动时候的行为:app:layout_collapseMode="pin",设置相关view的行为模式(也可设置CollapsingToolbarLayout 的子view)
- pin-当滑动时,在CollapsingToolbarLayout 控件可见时,其一直会位于布局位置,不随其他view一块滑动(一般给子View中充当toolbar的布局添加该属性)
- parallax -设置为这个模式时,在滑动中CollapsingToolbarLayout中的该View(比如ImageView)也可以同时滚动,实现视差滚动效果,通常和layout_collapseParallaxMultiplier(设置视差因子)搭配使用。
- ==》视差因子:layout_collapseParallaxMultiplier:会在滚动中与相关联动的view一起滚动,但有视差效果,取值从0-1表示,滑动结束时,联动控件之间相互重叠的比例
- ==》对什么动作响应,什么时候响应:该属性有标志位决定:app:layout_scrollFlags="scroll|exitUntilCollapsed"
- scroll - 想滚动就必须设置这个(也可以说是设置其对滚动事件)
-
enterAlways - 实现quick return效果, 当向下移动时,立即显示该View(即初始时该View为全部折叠位于屏幕之外,当下拉动作时该控件会首先做出反应,直接显示出该view)
-
enterAlwaysCollapsed - 当你的View已经设置minHeight属性又使用此标志时,你的View只能以最小高度进入,只有当滚动视图到达顶部时才扩大到完整高度。(此属性值与上面属性配合使用)
exitUntilCollapsed - 向上滚动时收缩View,但可以固定Toolbar一直在上面。
- ==》折叠前的控件高度大小:就是控件的layout_height属性值。
- ==》折叠后的最小高度:android:minHeight e.g. android:minHeight="200dp";****注意:该属性值只有在其子view中没有使用Toolbar控件时才有用。当子view中使用了android.support.v7.widget.Toolbar则会以该Toolbar的高度为准。
- ==》在折叠的时候 状态栏的背景颜色:android.support.design:statusBarScrim e.g. app:statusBarScrim="#123456" (The drawable to use as a scrim for the status bar content when the CollapsingToolbarLayout has been scrolled sufficiently off screen. )
- ==》折叠后该layout的背景色:android.support.design:contentScrim e.g. app:contentScrim="#ff5252",The drawable to use as a scrim on top of the CollapsingToolbarLayouts content when it has been scrolled sufficiently off screen.
4.该该可滑动控件可以是RecyclerView或者v4包中的NestedScrollView,但是对于Listview无效。
具体更为详细的这几个控件的介绍可参考:http://blog.csdn.net/lxk_1993/article/details/51443045
下面是踩坑时间可跳过(在design包版本为:com.android.suport:design:23.4.0时会出现以下状况):
此时加上上面介绍的沉浸式页面的实现按说已经可以实现所需效果,但是发现
1.在KITKAT版本手机上运行时效果已经正常,
2.但在Lollipop版本的系统上运行时会出现如下效果:review代码可知此时关于沉浸式状态栏的设置,只有在Activity中添加的Flag(this.getWindow().addFlags(WindowManager.LayoutParams.FLAG_TRANSLUCENT_STATUS);)
鉴于此参考大部分的做法,在CollapsingToolbarLayout直接子View添加属性fitsSystemWindows = true;(回顾此属性的意义为系统自动适配状态栏高度到控件,给设置此属性的View添加paddingTop值,以适应系统窗口 比如:状态栏/导航栏),所以按说不应该添加此属性值才对。
但实际效果为:
1.Lollipop版本的系统运行已经达到预期的效果。
2.但是,KITKAT版本的系统运行效果却又出现了和上面类似效果如下(有部分差别,此时KITKAT版本只有CollapsingToolbarLayout下的第一个设置了fitsSystemWindows = true的View会下移一个状栏的高度,其他的不会下移,在此表现即为CollapsingToolbarLayout子View中的第一个RelativeLayout会下移,但是作为TitleBar使用的第二个子View却不会下移)
      for (int i = 0; i < collapsingToolbarLayout.getChildCount(); i++) {//拿取CollapsingToolbarLayout的子View并根据版本设置其fitsSystemWindows的属性


                  if (Build.VERSION.SDK_INT > Build.VERSION_CODES.KITKAT) {


                      collapsingToolbarLayout.getChildAt(i).setFitsSystemWindows(true);


                  } else if (Build.VERSION.SDK_INT == Build.VERSION_CODES.KITKAT) {


                      collapsingToolbarLayout.getChildAt(i).setFitsSystemWindows(false);


                  } else {//不支持沉浸式状态栏的版本,要把使View向下偏移的占位控件的高度设置为0


                      //设置充当TitleBar使用的控件里面的占位空间的高度为0,


                  }


              }
        // Update our child view offset helpers


          for (int i = 0, z = getChildCount(); i < z; i++) {


              final View child = getChildAt(i);


              if (mLastInsets != null && !ViewCompat.getFitsSystemWindows(child)) {


                  final int insetTop = mLastInsets.getSystemWindowInsetTop();


                  if (child.getTop() < insetTop) {


                      // If the child isn't set to fit system windows but is drawing within the inset


                      // offset it down


                      ViewCompat.offsetTopAndBottom(child, insetTop);


                  }


              }


              getViewOffsetHelper(child).onViewLayout();


          }
          private WindowInsetsCompat setWindowInsets(WindowInsetsCompat insets) {


              if (mLastInsets != insets) {


                  mLastInsets = insets;


                  requestLayout();


              }


              return insets.consumeSystemWindowInsets();


          }
       ViewCompat.setOnApplyWindowInsetsListener(this,


                      new android.support.v4.view.OnApplyWindowInsetsListener() {


                          @Override


                          public WindowInsetsCompat onApplyWindowInsets(View v,


                                  WindowInsetsCompat insets) {


                              return setWindowInsets(insets);


                          }


                      });
           /**


           *方法的相关声明


            * Set an {@link OnApplyWindowInsetsListener} to take over the policy for applying


            * window insets to this view. This will only take effect on devices with API 21 or above.


            */


           public static void setOnApplyWindowInsetsListener(View v,


                   OnApplyWindowInsetsListener listener) {


               IMPL.setOnApplyWindowInsetsListener(v, listener);


           }
          static final ViewCompatImpl IMPL;


          static {


              final int version = android.os.Build.VERSION.SDK_INT;


              if (BuildCompat.isAtLeastN()) {


                  IMPL = new Api24ViewCompatImpl();


              } else if (version >= 23) {


                  IMPL = new MarshmallowViewCompatImpl();


              } else if (version >= 21) {


                  IMPL = new LollipopViewCompatImpl();


              } else if (version >= 19) {


                  IMPL = new KitKatViewCompatImpl();


              } else if (version >= 18) {


                  IMPL = new JbMr2ViewCompatImpl();


              } else if (version >= 17) {


                  IMPL = new JbMr1ViewCompatImpl();


              } else if (version >= 16) {


                  IMPL = new JBViewCompatImpl();


              } else if (version >= 15) {


                  IMPL = new ICSMr1ViewCompatImpl();


              } else if (version >= 14) {


                  IMPL = new ICSViewCompatImpl();


              } else if (version >= 11) {


                  IMPL = new HCViewCompatImpl();


              } else {


                  IMPL = new BaseViewCompatImpl();


              }


          }
        // Update our child view offset helpers


          for (int i = 0, z = getChildCount(); i < z; i++) {


              final View child = getChildAt(i);


              if (mLastInsets != null && !ViewCompat.getFitsSystemWindows(child)) {


                  final int insetTop = mLastInsets.getSystemWindowInsetTop();


                  if (child.getTop() < insetTop) {


                      // If the child isn't set to fit system windows but is drawing within the inset


                      // offset it down


                      ViewCompat.offsetTopAndBottom(child, insetTop);


                  }


              }


              getViewOffsetHelper(child).onViewLayout();


          }
        ViewCompat.setOnApplyWindowInsetsListener(collapsingToolbarLayout, new OnApplyWindowInsetsListener() {


                  @Override


                  public WindowInsetsCompat onApplyWindowInsets(View v, WindowInsetsCompat insets) {


                      //insets.replaceSystemWindowInsets(0, 0, 0, 0); 该行代码无效


                      //  return insets.consumeSystemWindowInsets();


                      return insets;


                  }


              });


