深度学习实战之汉字识别的CNN-AlexNet网络实现
一.数据集制作
我们用到的数据集是一个2982张关于10个汉字的图片库,下载地址:链接:https://pan.baidu.com/s/1NqjYlRRizf4zzl0TjhgvOA
提取码:hpgj
我们通过PIL库读取图片数据,并生成标签,最终得到一个2982*784的图片数据集和2982*10的标签列表。一下是代码:
path_ = 'E:\\中文字符识别\\'
classes = ['0', '1', '2', '3', '4', '5', '6', '7', '8', '9']
all = []
# 遍历主文件夹下所有的类别文件夹
for index, name in enumerate(classes):
    path = path_ + name + '\\'
    # 获取所有该类别文件夹下所有的图片路径
    path_all = glob.glob(path + '*.png')
    # 生成label标签
    label = [0, 0, 0, 0, 0, 0, 0, 0, 0, 0]
    label[index] = 1
    # 读取该文件夹下所有的图片并添加进列表中
    for img_path in path_all:
        img = Image.open(img_path)
        # RGB三色图转化为灰度图
        img = img.convert('L')
        # 尺寸不同的图片全部改为28*28大小的
        img = img.resize((28, 28))
        # 0-255的色值取反
        img = img.point(lambda i: 255 - i)
        # 将28*28的图像转化为784的一维列表,并合并其标签
        data_i = [np.array(img).flatten().tolist(), label]
        all.append(data_i)
# 打乱数据集
random.shuffle(all)
all = np.array(all)
# 分别取出图片数据和label数据
img = all[:, 0]
label = all[:, 1]
# 最终获得2982*784的图片list数据集,和2982*10的标签的list数据集
img = img.tolist()
label = label.tolist()
二、构建网络
定义网络之前,我们需要设置一些超参,放在程序的开头,这样方便以后调整模型,超参如下:
# 定义网络的超参数
learning_rate=0.0005  # 学习率
batch_size=16  # 每次训练多少数据
display_step=1  # 每多少次显示一下当前状态
n_input=784  # 图片长乘宽
n_classes=10  # 类别数
dropout=0.8
我定义的网络每次向网络输入batch_size=16的数据,也就是16个样本,16*784的二维数组,这个数据可以自由设置。数据进来后开始搭建网络
1、定义X、Y以及dropout占位符
代码如下:
# X第一维None表示可以是任意长度的输入,这一维表示batch_size,方便我们之后# 更改batch,第二位n_input=784,也就是图片的长宽乘积。
# 同理Y也是一样的,以及其中的name,是自定义的节点名字,方便之后管理图
# keep_prob,也就是droput=0.8,一个0-1的值,表示图中每个节点保留的概率
x=tf.placeholder(tf.float32,[None,n_input], name='input_x')
y=tf.placeholder(tf.float32,[None,n_classes], name='input_y')
keep_prob=tf.placeholder(tf.float32,)
2、将16*784的二维数组转化为16*28*28*1的图片数据
其中16表示样本数,28*28表示图片的长和宽,1表示图片是通道数为1灰度图,代码如下:
x = tf.reshape(x, shape=[-1, 28, 28, 1])
3、定义卷积核、全连接层参数w、偏置b,以及卷积、池化,局部响应归一化等函数
weights={
    'wc1':tf.Variable(tf.random_normal([11,11,1,96],stddev=0.01)),
    'wc2':tf.Variable(tf.random_normal([5,5,96,256],stddev=0.01)),
    'wc3':tf.Variable(tf.random_normal([3,3,256,384],stddev=0.01)),
    'wc4':tf.Variable(tf.random_normal([3,3,384,384],stddev=0.01)),
    'wc5':tf.Variable(tf.random_normal([3,3,384,256],stddev=0.01)),
    'wd1':tf.Variable(tf.random_normal([2*2*256,4096],stddev=0.01)),
    'wd2':tf.Variable(tf.random_normal([4096,4096],stddev=0.01)),
    'out':tf.Variable(tf.random_normal([4096,n_classes],stddev=0.01))
}
biases={
    'bc1':tf.Variable(tf.random_normal([96],stddev=0.01)),
    'bc2':tf.Variable(tf.random_normal([256],stddev=0.01)),
    'bc3':tf.Variable(tf.random_normal([384],stddev=0.01)),
    'bc4':tf.Variable(tf.random_normal([384],stddev=0.01)),
    'bc5':tf.Variable(tf.random_normal([256],stddev=0.01)),
    'bd1':tf.Variable(tf.random_normal([4096],stddev=0.01)),
    'bd2':tf.Variable(tf.random_normal([4096],stddev=0.01)),
    'out':tf.Variable(tf.random_normal([n_classes]))
}
# 卷积操作
def conv2d(x,W,b,strides=1):
    x=tf.nn.conv2d(x,W,strides=[1,strides,strides,1],padding='SAME')
    x=tf.nn.bias_add(x,b)
    return tf.nn.relu(x)
# 池化操作
def maxpool2d(x,k=2):
    return tf.nn.max_pool(x,ksize=[1,k,k,1],strides=[1,k,k,1],padding='SAME')
# 局部归一化
def norm(pool1,lsize=4):
    return tf.nn.lrn(pool1,lsize,bias=1.0,alpha=0.001/9.0,beta=0.75)
由于我们卷积操作我们选择的padding=‘SAME’,所以卷积后的图片尺寸等于原始尺寸/步长,又因为所有的卷积步长都为一,所以所有的卷积并不改变图片的尺寸。所有的池化层为2*2,且步长为2*2,所有每次池化图片大小减一半。28*28的原图,第一次池化得到14*14的图像,第二次7*7,第三次向上取整得4*4,第四次2*2。具体见下面流程图:
第一层卷积与池化:
第二层卷积与池化:
第三层卷积与池化:
第四层卷积,无池化:
第五层卷积与池化:
其代码如下,其中‘norm’为局部响应归一化,不改变数据尺寸:
    conv1 = conv2d(x, weights['wc1'], biases['bc1'])
    pool1 = maxpool2d(conv1, k=2)
    norm1 = norm(pool1)
    conv2 = conv2d(norm1, weights['wc2'], biases['bc2'])
    pool2 = maxpool2d(conv2, k=2)
    norm2 = norm(pool2)
    conv3 = conv2d(norm2, weights['wc3'], biases['bc3'])
    pool3 = maxpool2d(conv3, k=2)
    norm3 = norm(pool3)
    conv4 = conv2d(norm3, weights['wc4'], biases['bc4'])
    conv5 = conv2d(conv4, weights['wc5'], biases['bc5'])
    pool5 = maxpool2d(conv5, k=2)
    norm5 = norm(pool5)
4、构建全连接成
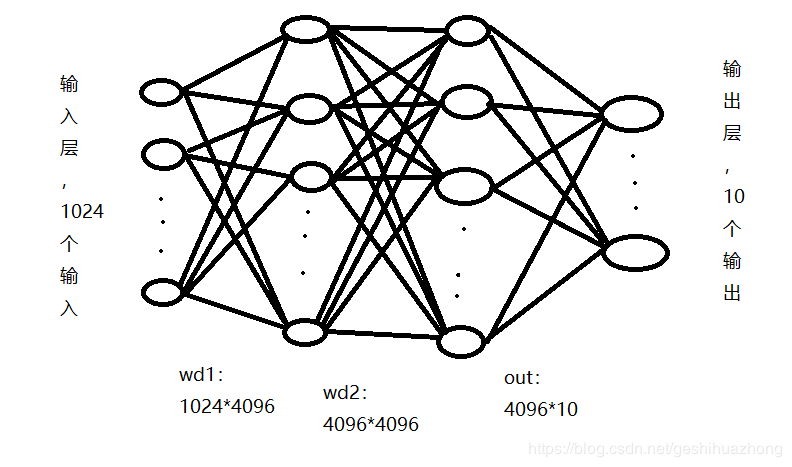
卷积层输出为2*2*256形状的输出,也就是全连接层输入层为2*2*256=1024个输入。接着构建两个隐藏层,都为4096个节点。最后是输出层,因为我们是10分类,所以输出层为10个输出。见下面流程图:

具体代码如下:
    fc1 = tf.reshape(norm5, [-1, weights['wd1'].get_shape().as_list()[0]])
    fc1 = tf.add(tf.matmul(fc1, weights['wd1']), biases['bd1'])
    fc1 = tf.nn.relu(fc1)
    fc1 = tf.nn.dropout(fc1, dropout)

    fc2 = tf.reshape(fc1, [-1, weights['wd2'].get_shape().as_list()[0]])
    fc2 = tf.add(tf.matmul(fc2, weights['wd2']), biases['bd2'])
    fc2 = tf.nn.relu(fc2)
    fc2 = tf.nn.dropout(fc2, dropout)

    pred = tf.add(tf.matmul(fc2, weights['out']), biases['out'],name='pred')
网络搭建好后,现在构建损失函数与评估函数。损失函数我们使用交叉熵,评估函数我们用准确率。具体代码如下:
#  损失函数和优化器
cost=tf.reduce_mean(tf.nn.softmax_cross_entropy_with_logits_v2(logits=pred,labels=y))
optim=tf.train.AdamOptimizer(learning_rate=learning_rate).minimize(cost)
#  评估函数
correct_pred=tf.equal(tf.argmax(pred,1),tf.argmax(y,1))
acc=tf.reduce_mean(tf.cast(correct_pred,tf.float32))
网络搭建好后最后只需运行迭代就好了,实测迭代约2000个样本以后准确率基本在90%以上。下面贴上完整代码:
import numpy as np
import glob
import tensorflow as tf
from PIL import Image
from tensorflow.python.framework import graph_util
import random

path_ = 'E:\\中文字符识别\\'
classes = ['0', '1', '2', '3', '4', '5', '6', '7', '8', '9']
all = []
for index, name in enumerate(classes):
    path = path_ + name + '\\'
    path_all = glob.glob(path + '*.png')
    label = [0, 0, 0, 0, 0, 0, 0, 0, 0, 0]
    label[index] = 1
    for img_name in path_all:
        print(img_name, index)
        img = Image.open(img_name)
        img = img.convert('L')
        img = img.resize((28, 28))
        img = img.point(lambda i: 255 - i)
        data_i = [np.array(img).flatten().tolist(), label]
        all.append(data_i)
random.shuffle(all)
all = np.array(all)
img = all[:, 0]
label = all[:, 1]
np.save('img.npy', img)
np.save('label.npy', label)
img = img.tolist()
label = label.tolist()
print(img)
print(label)

# 定义网络的超参数
learning_rate=0.0005 #学习率
batch_size=16 #每次训练多少数据
display_step=1  #每多少次显示一下当前状态

# 定义网络的结构参数
n_input=784
n_classes=10
dropout=0.8

#设定数据占位符
x=tf.placeholder(tf.float32,[None,n_input], name='input_x')
y=tf.placeholder(tf.float32,[None,n_classes], name='input_y')
keep_prob=tf.placeholder(tf.float32,)

# 定义卷积操作(Conv layer)
def conv2d(x,W,b,strides=1):
    x=tf.nn.conv2d(x,W,strides=[1,strides,strides,1],padding='SAME')
    x=tf.nn.bias_add(x,b)
    return tf.nn.relu(x)
# 定义池化操作
def maxpool2d(x,k=2):
    return tf.nn.max_pool(x,ksize=[1,k,k,1],strides=[1,k,k,1],padding='SAME')

#局部归一化
def norm(pool1,lsize=4):
    return tf.nn.lrn(pool1,lsize,bias=1.0,alpha=0.001/9.0,beta=0.75)

# 定义网络的权重和偏置参数
weights={
    'wc1':tf.Variable(tf.random_normal([11,11,1,96],stddev=0.01)),
    'wc2':tf.Variable(tf.random_normal([5,5,96,256],stddev=0.01)),
    'wc3':tf.Variable(tf.random_normal([3,3,256,384],stddev=0.01)),
    'wc4':tf.Variable(tf.random_normal([3,3,384,384],stddev=0.01)),
    'wc5':tf.Variable(tf.random_normal([3,3,384,256],stddev=0.01)),
    'wd1':tf.Variable(tf.random_normal([2*2*256,4096],stddev=0.01)),
    'wd2':tf.Variable(tf.random_normal([4096,4096],stddev=0.01)),
    'out':tf.Variable(tf.random_normal([4096,n_classes],stddev=0.01))
}
biases={
    'bc1':tf.Variable(tf.random_normal([96],stddev=0.01)),
    'bc2':tf.Variable(tf.random_normal([256],stddev=0.01)),
    'bc3':tf.Variable(tf.random_normal([384],stddev=0.01)),
    'bc4':tf.Variable(tf.random_normal([384],stddev=0.01)),
    'bc5':tf.Variable(tf.random_normal([256],stddev=0.01)),
    'bd1':tf.Variable(tf.random_normal([4096],stddev=0.01)),
    'bd2':tf.Variable(tf.random_normal([4096],stddev=0.01)),
    'out':tf.Variable(tf.random_normal([n_classes]))
}


# 定义Alexnet网络结构
def alex_net(x, weights, biases, dropout):
    # 输出的数据做reshape
    x = tf.reshape(x, shape=[-1, 28, 28, 1])

    # 第一层卷积计算(conv+relu+pool)
    # 卷积
    conv1 = conv2d(x, weights['wc1'], biases['bc1'])
    # 池化
    pool1 = maxpool2d(conv1, k=2)
    # 规范化,局部归一化
    # 局部归一化是仿造生物学上的活跃的神经元对相邻神经元的抑制现象
    norm1 = norm(pool1)

    # 第二层卷积
    conv2 = conv2d(norm1, weights['wc2'], biases['bc2'])
    # 池化
    pool2 = maxpool2d(conv2, k=2)
    norm2 = norm(pool2)

    # 第三层卷积
    conv3 = conv2d(norm2, weights['wc3'], biases['bc3'])
    # 池化
    pool3 = maxpool2d(conv3, k=2)
    norm3 = norm(pool3)

    # 第四层卷积
    conv4 = conv2d(norm3, weights['wc4'], biases['bc4'])
    # 第五层卷积
    conv5 = conv2d(conv4, weights['wc5'], biases['bc5'])
    # 池化
    pool5 = maxpool2d(conv5, k=2)
    norm5 = norm(pool5)
    # 可以再加上dropout

    # 全连接1
    # 向量化
    fc1 = tf.reshape(norm5, [-1, weights['wd1'].get_shape().as_list()[0]])
    fc1 = tf.add(tf.matmul(fc1, weights['wd1']), biases['bd1'])
    fc1 = tf.nn.relu(fc1)
    # dropout
    fc1 = tf.nn.dropout(fc1, dropout)

    # 全连接2
    # 向量化
    fc2 = tf.reshape(fc1, [-1, weights['wd2'].get_shape().as_list()[0]])
    fc2 = tf.add(tf.matmul(fc2, weights['wd2']), biases['bd2'])
    fc2 = tf.nn.relu(fc2)
    # dropout
    fc2 = tf.nn.dropout(fc2, dropout)

    # out
    return tf.add(tf.matmul(fc2, weights['out']), biases['out'],name='pred')

# 1.定义损失函数和优化器,并构建评估函数
# (1)构建模型
pred=alex_net(x,weights,biases,keep_prob)
# (2)损失函数和优化器
cost = tf.reduce_mean(tf.nn.softmax_cross_entropy_with_logits_v2(logits=pred,labels=y))
optim=tf.train.AdamOptimizer(learning_rate=learning_rate).minimize(cost)
#(3)评估函数
correct_pred=tf.equal(tf.argmax(pred,1),tf.argmax(y,1))
acc=tf.reduce_mean(tf.cast(correct_pred,tf.float32))

# 训练
init=tf.global_variables_initializer()
with tf.Session() as sess:
    sess.run(init)
    step = 1
    while step*batch_size < len(label):
        batch_x,batch_y = img[(step-1)*batch_size:step*batch_size], label[(step-1)*batch_size:step*batch_size]
        sess.run(optim,feed_dict={x:batch_x,y:batch_y,keep_prob:dropout})
        if step % display_step==0:
            # 显示一下当前的损失和正确率
            loss, acc_num = sess.run([cost,acc],feed_dict={x:batch_x,y:batch_y,keep_prob:dropout})
            print('Iter:%d,Loss:%f,Train Acc:%f'%(step*batch_size,loss,acc_num))
        step+=1


    print('Optimization finished')