华为实验3RIP协议
华为实验3RIP协议
实验目的
熟悉在华为设备上配置 RIP 协议,汇总 RIP 路由,做明文的及 MD5 的认证,设置被动接
口等
掌握 RIPv2 的配置方式
掌握 RIPv2 的汇总方式
掌握 RIPv2 的认证配置方式
掌握 RIPv2 中被动接口的配置及效果
掌握 RIPv2 不 RIPv1 的兼容配置
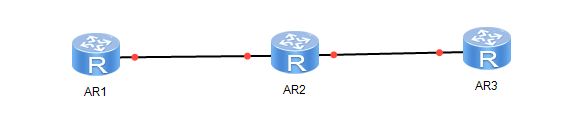
1:首先请配置好 IP 地址,或上面静态路由实验中的配置方法。
再为每个路由器配置一个环回口:
[R1]interface LoopBack 1
[R1-LoopBack2]ip address 11.1.1.1 255.255.255.0
[R2-LoopBack1]ip address 22.1.1
[R2-LoopBack1]ip address 22.1.1.1 255.255.255.0
[R3]interface LoopBack 1
[R3-LoopBack1]ip address 33.1.1.1 255.255.255.0
2:配置 RIP,设置版本为 V2,关闭自动汇总
[R1]rip 1 //进程号可以用来区分本地的 RIP 进程。以限定路由传递的区域
[R1-rip-1]version 2 // 确定 RIP 的版本
[R1-rip-1]undo summary //关闭自动汇总
[R1-rip-1]network 11.0.0.0 //主类宣告网段
[R1-rip-1]network 12.0.0.0
[R2]rip 1
[R2-rip-1]version 2
[R2-rip-1]undo summary
[R2-rip-1]network 12.0.0.0
[R2-rip-1]network 22.0.0.0
[R2-rip-1]network 23.0.0.0
[R3]rip 1
[R3-rip-1]version 2
[R3-rip-1]undo summary
[R3-rip-1]network 23.0.0.0
[R3-rip-1]network 33.0.0.0
3:查看路由的学习情况
[R1]display ip routing
4:测试连通性
[R1]ping 33.1.1.1 ip-forwarding
PING 33.1.1.1: 56 data bytes, press CTRL_C to break
Reply from 33.1.1.1: bytes=56 Sequence=1 ttl=254 time=50 ms
用环回口 PING。
[R1]ping -a 11.1.1.1 33.1.1.1
PING 33.1.1.1: 56 data bytes, press CTRL_C to break
Reply from 33.1.1.1: bytes=56 Sequence=1 ttl=254 time=40 ms
接着上面的实验
在 R3 上的回环口 loopback1 上配置多个子地址。
[R3]interface LoopBack1
[R3-LoopBack1]ip address 33.1.2.1 255.255.255.0 sub
[R3-LoopBack1]ip address 33.1.3.1 255.255.255.0 sub
由于是主类宣告,所以直接到 R1 上查看这些 RIP 的路由条目:
[R1]display ip routing protocol rip
可以收到这些明细的路由,与 CISCO 一样,在做汇总时都是到路由的出接口,这里在 R2
的出接口做:
[R2]interface e0/0/0
[R2-Ethernet0/0/0]rip summary-address 33.1.0.0 255.255.252.0
再到 R1 上去查看路由表:
[R1]display ip routing protocol rip
配置 RIP 明文与 与 MD5 认证
接着上面的实验:
在 R1 与 R2 之间做明文的认证:
[R1]interface Ethernet 0/0/0
[R1-Ethernet0/0/0]rip authentication-mode simple yeslab
过一会去查看 R1 上的路由表,因为 RIP 的收敛比较快,也可以 shutdownR1 与 R2 之间的接口加快路由表的收敛
[R1]interface Ethernet 0/0/0
[R1-Ethernet0/0/0]shutdown
[R1]display ip routing-table protocol rip
在 R1 上将看不到任何 RIP 的路由
再去 R2 上查看
[R2]display ip routing-table protocol rip
Destination/Mask Proto Pre Cost Flags NextHop Interface
33.1.1.0/24 RIP 100 1 D 23.1.1.3 Ethernet0/0/1
33.1.2.0/24 RIP 100 1 D 23.1.1.3 Ethernet0/0/1
33.1.3.0/24 RIP 100 1 D 23.1.1.3 Ethernet0/0/1
R2 上也看不到 R1 的路由,
用 debug 命令去观察报错的信息:
terminal debugging
debugging rip 1 packet
May 14 2013 19:44:19.970.3-08:00 R1 RIP/7/DBG: 6: 12371: Authentication-mode - Simple: yeslab
May 14 2013 19:44:19.250.8-08:00 R1 RIP/7/DBG: 6: 11386: RIP 1: Authentication failure
以上信息表明了是一个简单的认证,并且也带上了认证的密码。提示认证失败。
关闭 debug
undo debugging all
接着在 R2 上配置 RIP 的明文认证
[R2]interface Ethernet 0/0/0
[R2-Ethernet0/0/0]rip authentication-mode simple yeslab
做完认证后再去查看路由表:
display ip routing protocol rip
Destination/Mask Proto Pre Cost Flags NextHop Interface
22.1.1.0/24 RIP 100 1 D 12.1.1.2 Ethernet0/0/0
23.1.1.0/24 RIP 100 1 D 12.1.1.2 Ethernet0/0/0
33.1.0.0/22 RIP 100 2 D 12.1.1.2 Ethernet0/0/0
路由又重新学到了。
再去 R2 与 R3 之间使用 RIP 的 MD5 认证,
[R2]interface Ethernet 0/0/1
[R2-Ethernet0/0/1]rip authentication-mode md5 usual yeslab
查看路由表
[R2]display ip routing-table protocol rip
11.1.1.0/24 RIP 100 1 D 12.1.1.1 Ethernet0/0/0
看不到 R3 的路由信息了
再用 debug 查看信息:
terminal debugging
debugging rip 1 packet
May 14 2013 19:53:13.0.3-08:00 R2 RIP/7/DBG: 6: 12407: Authentication-mode - MD5 Digest:
143ff2b9.11bedfa1.6b6e47a0.9883cd6a
May 14 2013 19:53:12.610.6-08:00 R2 RIP/7/DBG: 6: 11386: RIP 1: Authentication failure
May 14 2013 19:53:12.610.7-08:00 R2 RIP/7/DBG: 6: 1676: RIP 1: Process message failed
//以上信息表明是一个 MD5 的认证,并且是由于认证不通过的原因造成的不能学习路由
到 R3 上做 MD5 的认证,
[R3]interface Ethernet 0/0/0
[R3-Ethernet0/0/0]rip authentication-mode md5 usual yeslab
做完后再去查看路由表:
[R2]display ip routing-table protocol rip
Destination/Mask Proto Pre Cost Flags NextHop Interface
11.1.1.0/24 RIP 100 1 D 12.1.1.1 Ethernet0/0/0
33.1.1.0/24 RIP 100 1 D 23.1.1.3 Ethernet0/0/1
33.1.2.0/24 RIP 100 1 D 23.1.1.3 Ethernet0/0/1
33.1.3.0/24 RIP 100 1 D 23.1.1.3 Ethernet0/0/1
//以上表明路由被重新学习到了
配置 RIP 的抑制接口
此命令与 CISCO 的被动(passive)接口一样效果
在 R2 上抑制掉连接 R1 的接口,然后去观查现像:
[R2]rip 1
[R2-rip-1]silent-interface Ethernet 0/0/0
等待一会或 shutdown 再 undo shutdown 接口后观察结果:
display ip routing protocol rip
//以上表明 R1 再也收不到 R2 的路由了
[R2]display ip routing protocol rip
Destination/Mask Proto Pre Cost Flags NextHop Interface
11.1.1.0/24 RIP 100 1 D 12.1.1.1 Ethernet0/0/0
33.1.1.0/24 RIP 100 1 D 23.1.1.3 Ethernet0/0/1
33.1.2.0/24 RIP 100 1 D 23.1.1.3 Ethernet0/0/1
33.1.3.0/24 RIP 100 1 D 23.1.1.3 Ethernet0/0/1
//以上表明 R2 能正常的接收 R1 的路由,也就是只收不发,与 CISCO 的被动接口是一样
的效果。
配置 RIPV1 与 与 V2 兼容
实验步骤
虽然 RIP 的 V1 己经不被使用,这里也演示一下 V1 与 V2 的兼容。
修改 R3 的 RIP 的版本 1
[R3]rip 1
[R3-rip-1]version 1
修改后去 R2 查看路由表:
[R2]display ip routing protocol rip
Destination/Mask Proto Pre Cost Flags NextHop Interface
11.1.1.0/24 RIP 100 1 D 12.1.1.1 Ethernet0/0/0
//以上表明 R2 再也收不到 R3 的路由了。
[R3]display ip routing protocol rip
同样 R3 也收不到 R2 的,因为 V1 与 V2 默认是不兼容的。
再去查看 debug 消息:
debugging rip 1 packet
May 14 2013 20:04:07.150.1-08:00 R3 RIP/7/DBG: 6: 12227: RIP 1: Sending response on interface Ethernet0/0/0
from 23.1.1.3 to 255.255.255.255
May 14 2013 20:40:03.440.2-08:00 R3 RIP/7/DBG: 6: 12247: Packet: Version 1, Cmd response, Length 24
May 14 2013 20:04:21.290.2-08:00 R3 RIP/7/DBG: 6: 12236: RIP 1: Receive response from 23.1.1.2 on Ethernet0/0/0
May 14 2013 20:04:21.290.3-08:00 R3 RIP/7/DBG: 6: 12247: Packet: Version 2, Cmd response, Length 108
May 14 2013 20:40:53.370.9-08:00 R3 RIP/7/DBG: 6: 2500: RIP 1: Ignoring packet. This version is not configured.
//以上表明 RIP 收到的是 Version2,而发送的是 Version1,不兼容。数据包被 ignore
去 R2 上配置兼容命令:
[R2]interface Ethernet 0/0/1
[R2-Ethernet0/0/1]rip version 1
再去查看路由表:
[R2]display ip routing protocol rip
Destination/Mask Proto Pre Cost Flags NextHop Interface
11.1.1.0/24 RIP 100 1 D 12.1.1.1 Ethernet0/0/0
33.0.0.0/8 RIP 100 1 D 23.1.1.3 Ethernet0/0/1
R3 上
display ip routing protocol rip
Destination/Mask Proto Pre Cost Flags NextHop Interface
11.0.0.0/8 RIP 100 2 D 23.1.1.2 Ethernet0/0/0
12.0.0.0/8 RIP 100 1 D 23.1.1.2 Ethernet0/0/0
22.0.0.0/8 RIP 100 1 D 23.1.1.2 Ethernet0/0/0
//以上表明双方都收到了对方的路由,但是都是汇总的,因为 V1 传递的是主类的路由