TensorFlow2.0 学习笔记 keras实战(上)
目录
- 简介
- 分类问题和回归问题
- 为什么需要目标函数
- one hot 编码
- 实战
- 2-3 实战分类模型之数据读取与展示
- 导入经常要用到的数据库
- 下载数据集
- 2-4构建模型
- 训练模型
- 显示学习曲线
- 对测试集 进行评估
- 2.5数据归一化
- 2.6回调函数
- 2.7回归模型
- 2.8神经网络讲解
- 2.9构建深度神经网络
- 2.10 批归一化,激活函数,dropout
简介
keras 是TensorFlow 的有个高级API
- Tf-keras 是TensorFlow集成在TensorFlow内部,结合更紧密,更适用于研究人员,可以SavedModel 实现跨平台.
- Keras 基本和Tf-keras基本相同,支持切换后端
分类问题和回归问题
分类问题预测的是类别,模型输出是概率分布
- 三分类问题输出例子 [0.2,0.7,0.1] 这个模型输出对应的就是0.7的类别
回归问题,预测的是一个值,比如房价 500万
为什么需要目标函数
- 参数是逐步调整的
- 目标函数可以把帮助衡量模型的好坏
one hot 编码
2->one_hot->[0,0,1]
分类问题的损失函数
- 平方差损失 1 n ∑ x , y 1 2 ( y − M o d e l ( x ) ) 2 \frac{1}{n}\sum_{x,y}\frac{1}{2}(y-Model(x))^{2} n1∑x,y21(y−Model(x))2
- 交叉熵损失 1 2 ∑ x , y y ln ( M e d e l ( x ) ) \frac{1}{2}\sum_{x,y}y\ln(Medel(x)) 21∑x,yyln(Medel(x))
举例
预测值:[0.2,0.7,0.1]
真实值:[0 , 0 , 1]
平方差损失: ( 0.2 − 0 ) 2 + ( 0.7 − 0 ) 2 + ( 0.1 − 1 ) 2 2 \frac{(0.2-0)^{2}+(0.7-0)^{2}+(0.1-1)^{2}}{2} 2(0.2−0)2+(0.7−0)2+(0.1−1)2
交叉熵损失: 0 ∗ ln 0.2 + 0 ∗ ln ( 0.7 ) + 1 ∗ ln ( 0.1 ) 2 \frac{0*\ln{0.2}+0*\ln(0.7)+1*\ln(0.1)}{2} 20∗ln0.2+0∗ln(0.7)+1∗ln(0.1)
回归问题的损失函数
- 平方差损失
- 绝对值损失
模型的训练就是调整参数,使得损失函数达到最小的过程
实战
- 搭建分类模型
- 实现回调函数
- 搭建回归模型
2-3 实战分类模型之数据读取与展示
导入经常要用到的数据库
import matplotlib as mpl
import matplotlib.pyplot as plt
%matplotlib inline
import numpy as np
import sklearn
import pandas as pd
import os
import sys
import time
import tensorflow as tf
from tensorflow import keras

print(tf.__version__)
print(sys.version_info)
for module in mpl,np,sklearn,pd,tf,keras:
    print(module.__name__,module.__version__)
2.0.0-alpha0
sys.version_info(major=3, minor=7, micro=3, releaselevel=‘final’, serial=0)
matplotlib 3.0.3
numpy 1.16.2
sklearn 0.20.3
pandas 0.24.2
tensorflow 2.0.0-alpha0
tensorflow.python.keras.api._v2.keras 2.2.4-tf
下载数据集
fashion_mnist = keras.datasets.fashion_mnist
(x_train_all,y_train_all),(x_test,y_test)=fashion_mnist.load_data()
x_vaild,x_train = x_train_all[:5000],x_train_all[5000:]  #把下载的数据分为训练集和验证集
y_vaild,y_train = y_train_all[:5000],y_train_all[5000:]

print(x_vaild.shape,y_vaild.shape)
print(x_train.shape,y_train.shape)
print(x_test.shape,y_test.shape)
(5000, 28, 28) (5000,)
(55000, 28, 28) (55000,)
(10000, 28, 28) (10000,)
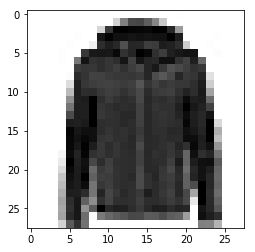
显示单个图像
def show_single_image(img_arr):
    plt.imshow(img_arr,cmap="binary")
    plt.show()
show_single_image(x_train[0])
def show_imgs(n_rows, n_cols, x_data, y_data, class_names):
    assert len(x_data) == len(y_data)
    assert n_rows * n_cols < len(x_data)
    plt.figure(figsize = (n_cols * 1.4, n_rows * 1.6))
    for row in range(n_rows):
        for col in range(n_cols):
            index = n_cols * row + col
            plt.subplot(n_rows, n_cols, index+1)			#subplot 对应的ID 是从1 开始
            plt.imshow(x_data[index], cmap="binary",		#cmap 这里显示对应的是 黑白图
                       interpolation = 'nearest')			#图像压缩是像素点取值方式
            plt.axis('off')									#关闭坐标显示
            plt.title(class_names[y_data[index]])			#显示title
    plt.show()												#这个show 要卸载对应第一个for循环结束,否则显示会出现大小不一的问题

class_names = ['T-shirt', 'Trouser', 'Pullover', 'Dress',
               'Coat', 'Sandal', 'Shirt', 'Sneaker',
               'Bag', 'Ankle boot']
show_imgs(3, 5, x_train, y_train, class_names)
2-4构建模型
# tf.keras.models.Sequential()

model  = keras.models.Sequential()
model.add(keras.layers.Flatten(input_shape=[28, 28]))
model.add(keras.layers.Dense(300, activation="relu"))
model.add(keras.layers.Dense(100, activation="relu"))
model.add(keras.layers.Dense(10, activation="softmax"))

"""
model
model = keras.models.Sequential([
    keras.layers.Flatten(input_shape=[28, 28]),
    keras.layers.Dense(300, activation='relu'),
    keras.layers.Dense(100, activation='relu'),
    keras.layers.Dense(10, activation='softmax')
])
"""
# relu: y = max(0, x)
# softmax: 将向量变成概率分布. x = [x1, x2, x3],
#          y = [e^x1/sum, e^x2/sum, e^x3/sum], sum = e^x1 + e^x2 + e^x3

# reason for sparse: y->index. y->one_hot->[] 当y为
model.compile(loss="sparse_categorical_crossentropy",
              optimizer = "sgd",
              metrics = ["accuracy"])
model.summary()
Model: “sequential”
| Layer (type) | Output Shape | Param |
|---|---|---|
| flatten (Flatten) | (None, 784) | 0 |
| dense (Dense) | (None, 300) | 235500 |
| dense_1 (Dense) | (None, 100) | 30100 |
| dense_2 (Dense) | (None, 10) | 1010 |
| Total params | 266,610 |
|---|---|
| Trainable params | 266,610 |
| Non-trainable params | 0 |
[ N o n e , 784 ] ∗ W + b − > [ N o n e , 300 ] W . s h a p e [ 784 , 300 ] , b = [ 300 ] [None, 784] * W + b -> [None, 300] W.shape [784, 300], b = [300] [None,784]∗W+b−>[None,300]W.shape[784,300],b=[300]
训练模型
history = model.fit(x_train, y_train, epochs=10,
                    validation_data=(x_valid, y_valid)
history.history
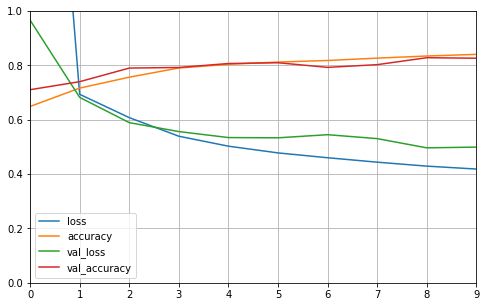
显示学习曲线
def plot_learning_curves(history):
    pd.DataFrame(history.history).plot(figsize=(8, 5))
    plt.grid(True)
    plt.gca().set_ylim(0, 1)
    plt.show()

plot_learning_curves(history)
对测试集 进行评估
model.evaluate(x_test, y_test)
10000/10000 [==============================] - 2s 167us/sample - loss: 0.5227 - accuracy: 0.8188
[0.5227188316345215, 0.8188]
2.5数据归一化
x = ( x − u ) / s t d x = (x - u) / std x=(x−u)/std
s c a l e r . f i t t r a n s f o r m scaler.fit_transform scaler.fittransform只能对2维数据进行操作,所以先变换成向量,归一化完成之后再重新reshape为 [ N o n e , 28 , 28 ] [None ,28,28] [None,28,28]
from sklearn.preprocessing import StandardScaler
scaler = StandardScaler()
# x_train: [None, 28, 28] -> [None, 784]
x_train_scaled = scaler.fit_transform(
    x_train.astype(np.float32).reshape(-1, 1)).reshape(-1, 28, 28)
x_valid_scaled = scaler.transform(
    x_valid.astype(np.float32).reshape(-1, 1)).reshape(-1, 28, 28)
x_test_scaled = scaler.transform(
    x_test.astype(np.float32).reshape(-1, 1)).reshape(-1, 28, 28)
2.6回调函数
tf.keras.callbacks:在训练模型的时候做一些事情
- Early stoping:在模型下降速度很慢的时候,提前停止训练
- Modle check point:每隔一段时间 保存 所有参数的中间状态
- tensorboard:模型的指标自动化显示
# Tensorboard, earlystopping, ModelCheckpoint
logdir = './callbacks'
if not os.path.exists(logdir):
    os.mkdir(logdir)
output_model_file = os.path.join(logdir,
                                 "fashion_mnist_model.h5")

callbacks = [
    keras.callbacks.TensorBoard(logdir),					#这里运行出错,暂时没有找到解决办法.暂时先屏蔽掉了.
    keras.callbacks.ModelCheckpoint(output_model_file,
                                    save_best_only = True),
    keras.callbacks.EarlyStopping(patience=5, min_delta=1e-3),
]
history = model.fit(x_train_scaled, y_train, epochs=10,
                    validation_data=(x_valid_scaled, y_valid),
                    callbacks = callbacks)
我的编译环境是windows 7 不知道是因为文件目录/ \ 不符还是其他原因,总之我TensorBoard 这里会运行出问题,这里先记载一下.
2.7回归模型
使用 房价预测的数据集
import matplotlib as mpl
import matplotlib.pyplot as plt
%matplotlib inline
import numpy as np
import sklearn
import pandas as pd
import os
import sys
import time
import tensorflow as tf

from tensorflow import keras

print(tf.__version__)
print(sys.version_info)
for module in mpl, np, pd, sklearn, tf, keras:
    print(module.__name__, module.__version__)
导入数据集
from sklearn.datasets import fetch_california_housing

housing = fetch_california_housing()
print(housing.DESCR)
print(housing.data.shape)
print(housing.target.shape)
显示部分数据
import pprint

pprint.pprint(housing.data[0:5])
pprint.pprint(housing.target[0:5])
拆分数据
from sklearn.model_selection import train_test_split

x_train_all, x_test, y_train_all, y_test = train_test_split(
    housing.data, housing.target, random_state = 7)
x_train, x_valid, y_train, y_valid = train_test_split(
    x_train_all, y_train_all, random_state = 11)
print(x_train.shape, y_train.shape)
print(x_valid.shape, y_valid.shape)
print(x_test.shape, y_test.shape)
数据归一化
from sklearn.preprocessing import StandardScaler

scaler = StandardScaler()
x_train_scaled = scaler.fit_transform(x_train)
x_valid_scaled = scaler.transform(x_valid)
x_test_scaled = scaler.transform(x_test)
构建模型
model = keras.models.Sequential([
    keras.layers.Dense(30, activation='relu',
                       input_shape=x_train.shape[1:]),
    keras.layers.Dense(1),
])
model.summary()
model.compile(loss="mean_squared_error", optimizer="sgd")
callbacks = [keras.callbacks.EarlyStopping(
    patience=5, min_delta=1e-2)]
开始训练
history = model.fit(x_train_scaled, y_train,
                    validation_data = (x_valid_scaled, y_valid),
                    epochs = 100,
                    callbacks = callbacks)
输出学习曲线
def plot_learning_curves(history):
    pd.DataFrame(history.history).plot(figsize=(8, 5))
    plt.grid(True)
    plt.gca().set_ylim(0, 1)
    plt.show()
plot_learning_curves(history)
在测试集完成验证
model.evaluate(x_test_scaled, y_test)
2.8神经网络讲解
-
归一化
批归一化:每层的激活值都做归一化处理:
使得每次梯度下降的方向都指向圆心 -
Dropout 随机的丢弃一些节点 增加的网络的鲁棒性
防止过拟合(训练集很好,测试集不好)
避免参数太多,记住样本
让每一个节点独立的去学习数据的规律
2.9构建深度神经网络
model = keras.models.Sequential()
model.add(keras.layers.Flatten(input_shape=[28, 28]))
for _ in range(20):
    model.add(keras.layers.Dense(100, activation="relu"))
model.add(keras.layers.Dense(10, activation="softmax"))

model.compile(loss="sparse_categorical_crossentropy",
              optimizer = "sgd",
              metrics = ["accuracy"])

在深度神经网络中,刚开始几次训练,参数变化很缓慢,原因如下.
- 深度神经网络,参数众多,训练不充分
- 梯度消失->链式法则->复合函数 f(g(x))
最终在测试集 上的验证结果如下:
10000/10000 [==============================] - 2s 232us/sample - loss: 0.9826 - accuracy: 0.6189
2.10 批归一化,激活函数,dropout
- 批归一化实现:在karas中批归一化是一个层次,只要加上这个层次就可以了
model = keras.models.Sequential()
model.add(keras.layers.Flatten(input_shape=[28, 28]))
for _ in range(20):
    model.add(keras.layers.Dense(100, activation="relu"))
    model.add(keras.layers.BatchNormalization())
model.add(keras.layers.Dense(10, activation="softmax"))

model.compile(loss="sparse_categorical_crossentropy",
              optimizer = "sgd",
              metrics = ["accuracy"])
在验证集测试结果:
10000/10000 [==============================] - 7s 717us/sample - loss: 0.5536 - accuracy: 0.7937
- 变更激活方式 relu->selu 自带归一化功能的 relu
activation(“relu”)->activation(“selu”) 同时删除 BatchNormalization 层
selu激活函数 在训练速度 和效果 都好于 relu
selu激活函数原理
s e l u ( x ) = β ∗ { x , if n is even α e x − α , if x is odd selu(x)=\beta* \begin{cases} x, & \text{if $n$ is even} \\ \alpha e^{x}-\alpha, & \text{if $x$ is odd} \end{cases} selu(x)=β∗{x,αex−α,if n is evenif x is odd
def selu(x):
    with ops.name_scope('elu') as scope:
        alpha = 1.6732632423543772848170429916717
        scale = 1.0507009873554804934193349852946
        return scale*tf.where(x>=0.0, x, alpha*tf.nn.elu(x))
在验证集测试结果:
10000/10000 [==============================] - 3s 298us/sample - loss: 0.3878 - accuracy: 0.8608
- dropout代码实现
- 一般dropout 都在最后几层添加
model.add(keras.layers.AlphaDropout(rate = 0.5))  #Alphadropout  rata设置的是 丢失多少 一般设置为0.5
model.add(keras.layers.Dropout(rate = 0.5))		  #普通版本的 dropout
| Alphadropout | dropout |
|---|---|
| 均值方差不变 | – |
| 归一化性质不变 | – |
这就使得 Alphadropout可以和selu一起使用,使得model 更强大


