实战六:手把手教你用TensorFlow进行手写数字识别
手把手教你用TensorFlow进行手写数字识别
github下载地址
目录
手写体数字MNIST数据集介绍
MNIST Softmax网络介绍
实战MNIST Softmax网络
MNIST CNN网络介绍
实战MNIST CNN网络
一、MNIST数据集介绍
1.MNIST数据集
MNIST是一套手写体数字的图像数据集,包括60000个训练样例和10000个测试样例,由纽约大学的Yann LeCun等人维护。
more info:http://yann.lecun.com/exdb/mnist/
2.MNIST手写体数字介绍
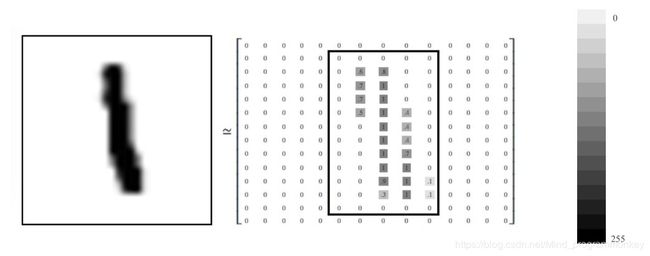
MNIST图像数据集使用形如[28,28]的二阶数组来表示每个手写体数字,数组中的每个元素对应一个像素点,即每张图像大小固定为28x28像素
MNIST数据集中的图像都是256阶灰度图,即灰度值0表示白色(背景),255表示黑色(前景),使用取值为[0,255]的uint8数据了诶下表示图像。为了加速训练,我们需要做数据规范化,将灰度值缩放为[0,1]的float32数据类型
由于每张图像的尺寸都是28x28像素,为了方便连续存储,我们可以将形如[28,28]的二阶数组“摊平”成形如[784,]的一阶数组,可以表示256256…*256 = 256^784张不同的图像。
但这些图像并非每一张都代表有效的手写体数字,其中绝大部分都是如下的噪声图:
3.下载和读取MNIST数据集
a.使用tf.contrib.learn模块加载MNIST数据集
一个曾广泛使用的方法,但如今已经被废弃的(deprecated)方法:
import tensorflow as tf
from tensorflow.examples.tutorials.mnist import input_data

# 导入数据
mnist = input_data.read_data_sets("./data/")
WARNING:tensorflow:From :5: read_data_sets (from tensorflow.contrib.learn.python.learn.datasets.mnist) is deprecated and will be removed in a future version.
Instructions for updating:
Please use alternatives such as official/mnist/dataset.py from tensorflow/models.
WARNING:tensorflow:From D:\software\Anaconda\workplace\lib\site-packages\tensorflow\contrib\learn\python\learn\datasets\mnist.py:260: maybe_download (from tensorflow.contrib.learn.python.learn.datasets.base) is deprecated and will be removed in a future version.
Instructions for updating:
Please write your own downloading logic.
WARNING:tensorflow:From D:\software\Anaconda\workplace\lib\site-packages\tensorflow\contrib\learn\python\learn\datasets\mnist.py:262: extract_images (from tensorflow.contrib.learn.python.learn.datasets.mnist) is deprecated and will be removed in a future version.
Instructions for updating:
Please use tf.data to implement this functionality.
Extracting ./data/train-images-idx3-ubyte.gz
WARNING:tensorflow:From D:\software\Anaconda\workplace\lib\site-packages\tensorflow\contrib\learn\python\learn\datasets\mnist.py:267: extract_labels (from tensorflow.contrib.learn.python.learn.datasets.mnist) is deprecated and will be removed in a future version.
Instructions for updating:
Please use tf.data to implement this functionality.
Extracting ./data/train-labels-idx1-ubyte.gz
Extracting ./data/t10k-images-idx3-ubyte.gz
Extracting ./data/t10k-labels-idx1-ubyte.gz
WARNING:tensorflow:From D:\software\Anaconda\workplace\lib\site-packages\tensorflow\contrib\learn\python\learn\datasets\mnist.py:290: DataSet.__init__ (from tensorflow.contrib.learn.python.learn.datasets.mnist) is deprecated and will be removed in a future version.
Instructions for updating:
Please use alternatives such as official/mnist/dataset.py from tensorflow/models.
因为,tf.contrib.learn整个模型均已被废弃了
b.使用Keras加载MNIST数据集
tf.kera.datasets.mnist.load_data(path=‘mnist.npz’)
from keras.datasets import mnist
path = "D:\\mnist data\mnist.npz"
(x_train,y_train),(x_test,y_test) = mnist.load_data(path)
Using TensorFlow backend.
# 查看mnist data的维度
print(x_train.shape,y_train.shape)
print(x_test.shape,y_test.shape)
(60000, 28, 28) (60000,)
(10000, 28, 28) (10000,)
# 查看数据
print(x_train[0])
print(y_train[0])
[[  0   0   0   0   0   0   0   0   0   0   0   0   0   0   0   0   0   0
    0   0   0   0   0   0   0   0   0   0]
 [  0   0   0   0   0   0   0   0   0   0   0   0   0   0   0   0   0   0
    0   0   0   0   0   0   0   0   0   0]
 [  0   0   0   0   0   0   0   0   0   0   0   0   0   0   0   0   0   0
    0   0   0   0   0   0   0   0   0   0]
 [  0   0   0   0   0   0   0   0   0   0   0   0   0   0   0   0   0   0
    0   0   0   0   0   0   0   0   0   0]
 [  0   0   0   0   0   0   0   0   0   0   0   0   0   0   0   0   0   0
    0   0   0   0   0   0   0   0   0   0]
 [  0   0   0   0   0   0   0   0   0   0   0   0   3  18  18  18 126 136
  175  26 166 255 247 127   0   0   0   0]
 [  0   0   0   0   0   0   0   0  30  36  94 154 170 253 253 253 253 253
  225 172 253 242 195  64   0   0   0   0]
 [  0   0   0   0   0   0   0  49 238 253 253 253 253 253 253 253 253 251
   93  82  82  56  39   0   0   0   0   0]
 [  0   0   0   0   0   0   0  18 219 253 253 253 253 253 198 182 247 241
    0   0   0   0   0   0   0   0   0   0]
 [  0   0   0   0   0   0   0   0  80 156 107 253 253 205  11   0  43 154
    0   0   0   0   0   0   0   0   0   0]
 [  0   0   0   0   0   0   0   0   0  14   1 154 253  90   0   0   0   0
    0   0   0   0   0   0   0   0   0   0]
 [  0   0   0   0   0   0   0   0   0   0   0 139 253 190   2   0   0   0
    0   0   0   0   0   0   0   0   0   0]
 [  0   0   0   0   0   0   0   0   0   0   0  11 190 253  70   0   0   0
    0   0   0   0   0   0   0   0   0   0]
 [  0   0   0   0   0   0   0   0   0   0   0   0  35 241 225 160 108   1
    0   0   0   0   0   0   0   0   0   0]
 [  0   0   0   0   0   0   0   0   0   0   0   0   0  81 240 253 253 119
   25   0   0   0   0   0   0   0   0   0]
 [  0   0   0   0   0   0   0   0   0   0   0   0   0   0  45 186 253 253
  150  27   0   0   0   0   0   0   0   0]
 [  0   0   0   0   0   0   0   0   0   0   0   0   0   0   0  16  93 252
  253 187   0   0   0   0   0   0   0   0]
 [  0   0   0   0   0   0   0   0   0   0   0   0   0   0   0   0   0 249
  253 249  64   0   0   0   0   0   0   0]
 [  0   0   0   0   0   0   0   0   0   0   0   0   0   0  46 130 183 253
  253 207   2   0   0   0   0   0   0   0]
 [  0   0   0   0   0   0   0   0   0   0   0   0  39 148 229 253 253 253
  250 182   0   0   0   0   0   0   0   0]
 [  0   0   0   0   0   0   0   0   0   0  24 114 221 253 253 253 253 201
   78   0   0   0   0   0   0   0   0   0]
 [  0   0   0   0   0   0   0   0  23  66 213 253 253 253 253 198  81   2
    0   0   0   0   0   0   0   0   0   0]
 [  0   0   0   0   0   0  18 171 219 253 253 253 253 195  80   9   0   0
    0   0   0   0   0   0   0   0   0   0]
 [  0   0   0   0  55 172 226 253 253 253 253 244 133  11   0   0   0   0
    0   0   0   0   0   0   0   0   0   0]
 [  0   0   0   0 136 253 253 253 212 135 132  16   0   0   0   0   0   0
    0   0   0   0   0   0   0   0   0   0]
 [  0   0   0   0   0   0   0   0   0   0   0   0   0   0   0   0   0   0
    0   0   0   0   0   0   0   0   0   0]
 [  0   0   0   0   0   0   0   0   0   0   0   0   0   0   0   0   0   0
    0   0   0   0   0   0   0   0   0   0]
 [  0   0   0   0   0   0   0   0   0   0   0   0   0   0   0   0   0   0
    0   0   0   0   0   0   0   0   0   0]]
5
4.MNIST数据集 样例可视化
import matplotlib.pyplot as plt

fig = plt.figure()
for i in range(15):
    plt.subplot(3,5,i+1) # 绘制前15个手写体数字,以三行5列子图形式展示
    plt.tight_layout # 自动适配子图尺寸
    plt.imshow(x_train[i],cmap="Greys") # 使用灰色显示像素灰度值
    plt.title("Label:{}".format(y_train[i])) # 设置标签为子图标题
    plt.xticks([]) # 删除x轴标记
    plt.yticks([]) # 删除y轴标记
二、MNIST Softmax网络介绍
1.前置知识
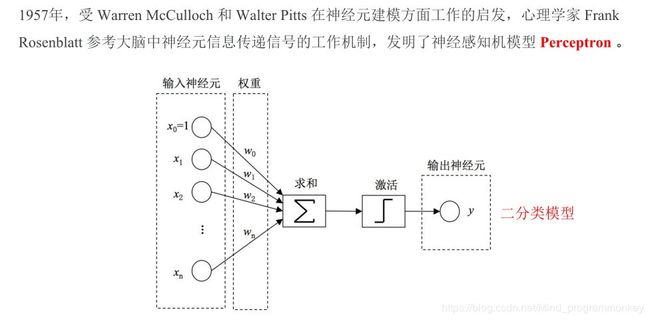
a.感知机模型
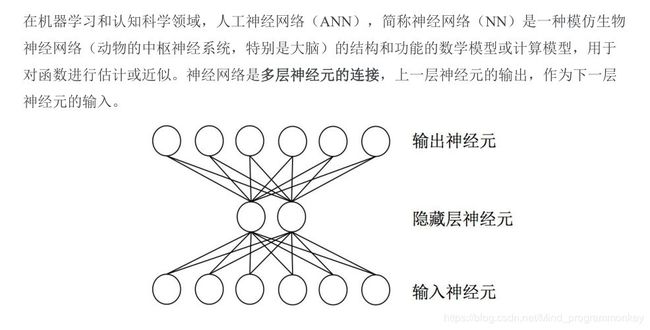
b.神经网络
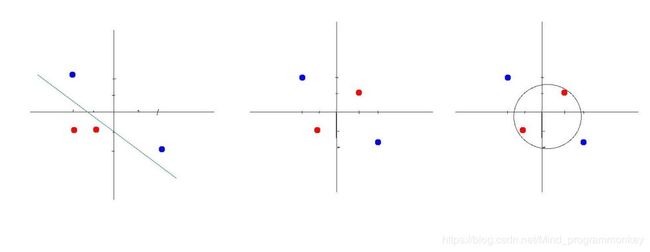
c.线性不可分
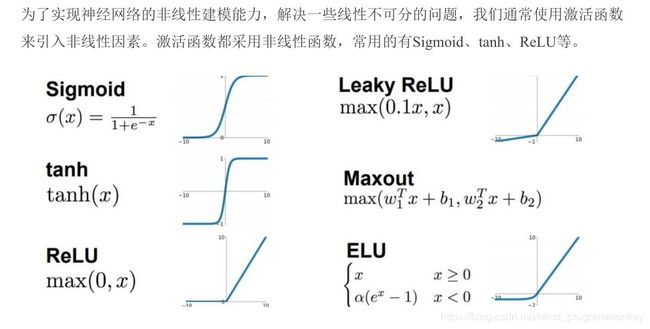
d.激活函数(Activation Function)
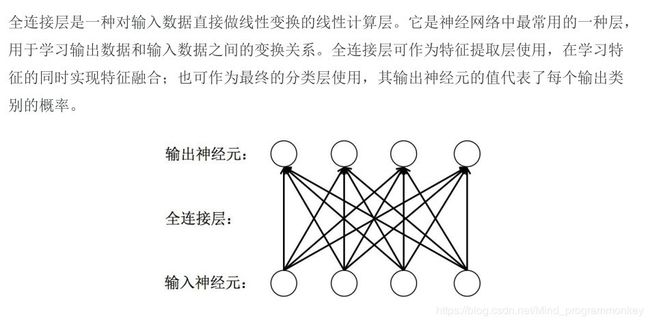
e.全连接层(fully connected layers,FC)
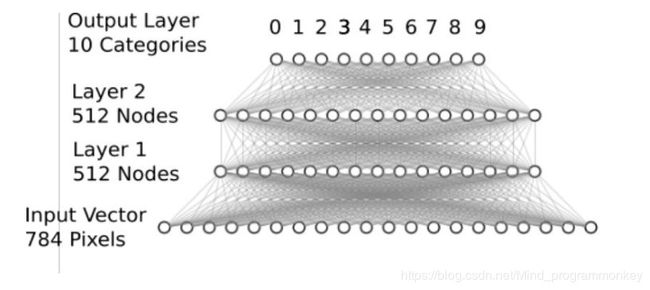
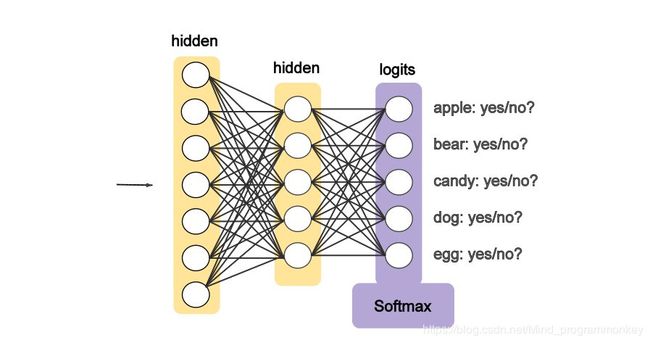
2.MNIST Softmax网络
将表示手写数字的形如[784]的一维向量作为输入;中间定义2层512个神经元隐藏层,具备一定的模型复杂度,足以识别手写体数字;最后定义1层10个神经元的全连接层,用于输出10个不同类别的“概率”。
三、实战MNIST Softmax网络
1.加载MNIST数据集
from keras.datasets import mnist
path = "D:\\mnist data\mnist.npz"

(x_train,y_train),(x_test,y_test) = mnist.load_data(path)
print(x_train.shape,type(x_train))
print(y_train.shape,type(y_train))
print(x_test.shape,type(x_test))
print(y_test.shape,type(y_test))
(60000, 28, 28)
(60000,)
(10000, 28, 28)
(10000,)
2.数据规范化
# 将图像本身从[28,28]转换为[784,]
X_train = x_train.reshape(60000,784)
X_test = x_test.reshape(10000,784)

print(X_train.shape,type(X_train))
print(X_test.shape,type(X_test))
(60000, 784)
(10000, 784)
# 将数据类型转换为float32,然后将其归一化处理
X_train = X_train.astype("float32")
X_test = X_test.astype("float32")
# 数据归一化
X_train /= 255
X_test /= 255
# 查看数据
print(X_train[0])
print(y_train[0])
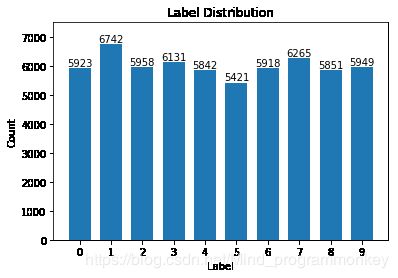
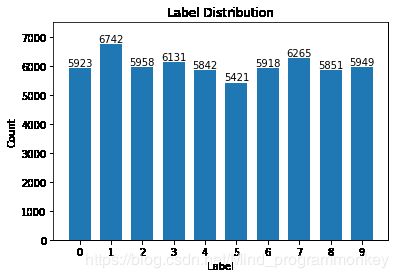
3.统计训练数据中各标签的数量
import numpy as np
import matplotlib.pyplot as plt

label,count = np.unique(y_train,return_counts=True)
print(label,count)
[0 1 2 3 4 5 6 7 8 9] [5923 6742 5958 6131 5842 5421 5918 6265 5851 5949]
fig = plt.figure()
plt.bar(label,count,width=0.7,align="center")
plt.title("Label Distribution")
plt.xlabel("Label")
plt.ylabel("Count")
plt.xticks(label)
plt.ylim(0,7500)

for a,b in zip(label,count):
    plt.text(a,b,"%d" %b,ha="center",va="bottom",fontsize=10)

plt.show()
4.one-hot 编码
a.几种编码方式的对比
| Binary | Gray code | One-hot |
|---|---|---|
| 000 | 000 | 00000001 |
| 001 | 001 | 00000010 |
| 010 | 011 | 00000100 |
| 011 | 010 | 00001000 |
| 100 | 110 | 00010000 |
| 101 | 111 | 00100000 |
| 110 | 101 | 01000000 |
| 111 | 100 | 10000000 |
b.对标签数据进行one-hot编码
from keras.utils import np_utils

n_classes = 10
print("Shape before one-hot encoding:",y_train.shape)
Y_train = np_utils.to_categorical(y_train,n_classes)
Y_test = np_utils.to_categorical(y_test,n_classes)
print("Shape after one-hot encoding:",Y_train.shape)
Shape before one-hot encoding: (60000,)
Shape after one-hot encoding: (60000, 10)
# 具体查看一下数据
print(y_train[0])
print(Y_train[0])
5
[0. 0. 0. 0. 0. 1. 0. 0. 0. 0.]
5.使用Keras sequential model来实现神经网络
a.定义模型 softmax网络层
from keras.models import Sequential
from keras.layers.core import Dense,Activation

model = Sequential()

model.add(Dense(512,input_shape=(784,)))
model.add(Activation("relu"))

model.add(Dense(512))
model.add(Activation("relu"))

model.add(Dense(10))
model.add(Activation("softmax"))
WARNING:tensorflow:From D:\software\Anaconda\workplace\lib\site-packages\tensorflow\python\framework\op_def_library.py:263: colocate_with (from tensorflow.python.framework.ops) is deprecated and will be removed in a future version.
Instructions for updating:
Colocations handled automatically by placer.
b.编译模型
model.compile()
compile(optimizer, loss=None, metrics=None, loss_weights=None, sample_weight_mode=None, weighted_metrics=None, target_tensors=None)
# loss:categorical_crossentropy 损失器采用交叉熵损失函数
# metrics:accuracy 衡量指标采用准确率
# optimizer:adam 优化器采用adam,结合AdaGrad和RMSProp两种优化算法的优点
model.compile(loss="categorical_crossentropy",metrics=["accuracy"],optimizer="adam")
c.训练模型,并将指标保存到history中
model.fit()
fit(x=None, y=None, batch_size=None, epochs=1, verbose=1, callbacks=None, validation_split=0.0, validation_data=None, shuffle=True, class_weight=None, sample_weight=None, initial_epoch=0, steps_per_epoch=None, validation_steps=None)
history = model.fit(X_train,
                    Y_train,
                    batch_size=128,
                    epochs=5,
                    verbose=2,
                    validation_data=(X_test,Y_test))
WARNING:tensorflow:From D:\software\Anaconda\workplace\lib\site-packages\tensorflow\python\ops\math_ops.py:3066: to_int32 (from tensorflow.python.ops.math_ops) is deprecated and will be removed in a future version.
Instructions for updating:
Use tf.cast instead.
Train on 60000 samples, validate on 10000 samples
Epoch 1/5
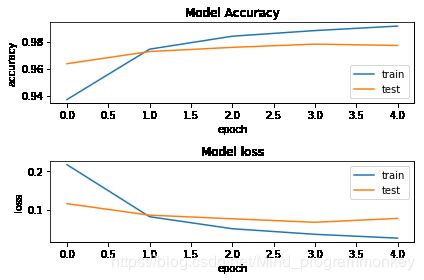
 - 5s - loss: 0.2158 - acc: 0.9371 - val_loss: 0.1152 - val_acc: 0.9637
Epoch 2/5
 - 5s - loss: 0.0815 - acc: 0.9745 - val_loss: 0.0856 - val_acc: 0.9727
Epoch 3/5
 - 6s - loss: 0.0505 - acc: 0.9841 - val_loss: 0.0762 - val_acc: 0.9758
Epoch 4/5
 - 6s - loss: 0.0361 - acc: 0.9882 - val_loss: 0.0672 - val_acc: 0.9782
Epoch 5/5
 - 5s - loss: 0.0263 - acc: 0.9916 - val_loss: 0.0772 - val_acc: 0.9772
d.可视化指标
fig = plt.figure()

plt.subplot(2,1,1)
plt.plot(history.history["acc"])
plt.plot(history.history["val_acc"])
plt.title("Model Accuracy")
plt.xlabel("epoch")
plt.ylabel("accuracy")
plt.legend(["train","test"],loc="lower right")

plt.subplot(2,1,2)
plt.plot(history.history["loss"])
plt.plot(history.history["val_loss"])
plt.title("Model loss")
plt.xlabel("epoch")
plt.ylabel("loss")
plt.legend(["train","test"],loc="upper right")
plt.tight_layout()

plt.show()
e.保存模型
model.save()
You can use model.save(filepath) to save a Keras model into a single HDF5 file which will contain:
- the architecture of the model, allowing to re-create the model
- the weights of the model
- the training configuration (loss, optimizer)
- the state of the optimizer, allowing to resume training exactly where you left off.
You can then use keras.models.load_model(filepath) to reinstantiate your model. load_model will also take care of compiling the model using the saved training configuration (unless the model was never compiled in the first place).
import os
import tensorflow.gfile as gfile

save_dir = "./model/"

if gfile.Exists(save_dir):
    gfile.DeleteRecursively(save_dir)
gfile.MakeDirs(save_dir)

model_name = "keras_mnist.h5"
model_path = os.path.join(save_dir,model_name)
model.save(model_path)
print("Saved trained model at %s" % model_path)
Saved trained model at ./model/keras_mnist.h5
f.加载模型
from keras.models import load_model

mnist_model = load_model(model_path)
g.统计模型在测试集上的分类结果
loss_and_metrics = mnist_model.evaluate(X_test,Y_test,verbose=2)

print("Test Loss:{}".format(loss_and_metrics[0]))
print("Test Accuracy:{}%".format(loss_and_metrics[1]*100))

predicted_classes = mnist_model.predict_classes(X_test)

correct_indices = np.nonzero(predicted_classes == y_test)[0]
incorrect_indices = np.nonzero(predicted_classes != y_test)[0]
print("Classified correctly count: {}".format(len(correct_indices)))
print("Classified incorrectly count: {}".format(len(incorrect_indices)))
Test Loss:0.07715968866588664
Test Accuracy:97.72%
Classified correctly count: 9772
Classified incorrectly count: 228
四、MNIST CNN网络介绍
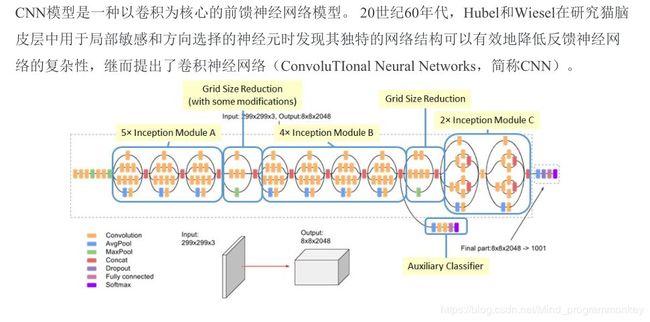
1.CNN简介
2.卷积
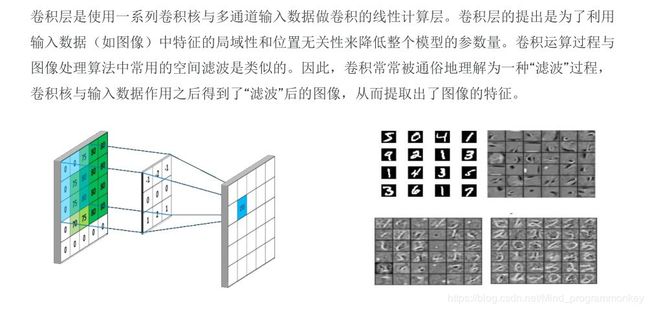
3.卷积层(Convolutional Layer,conv)
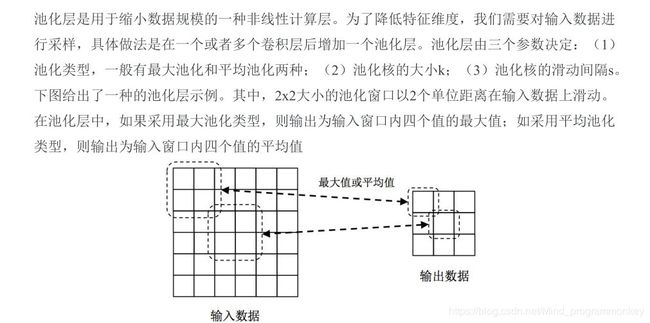
4.池化层(Pooling)
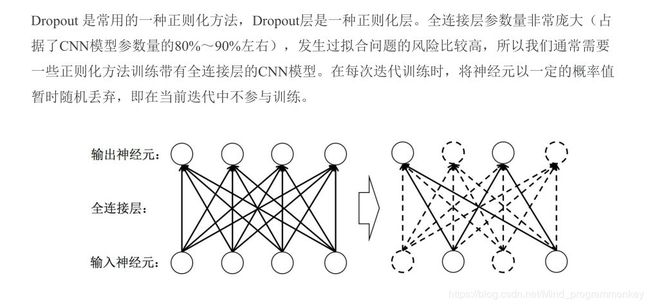
5.Dropout层
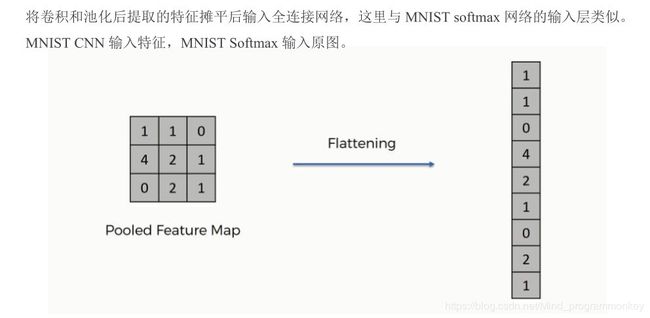
6.Flatten
五、实战MNIST CNN网络
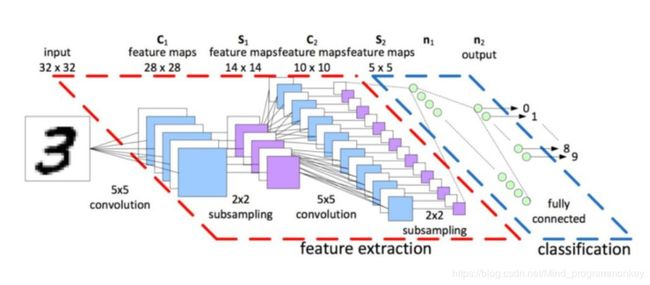
MNIST CNN示意图
1.加载MNIST数据集
from keras.datasets import mnist
path = "D:\mnist data\mnist.npz"

(x_train,y_train),(x_test,y_test) = mnist.load_data(path)

print(x_train.shape,type(x_train))
print(y_train.shape,type(y_train))
print(x_test.shape,type(x_test))
print(y_test.shape,type(y_test))
(60000, 28, 28)
(60000,)
(10000, 28, 28)
(10000,)
2.数据处理:规范化
channels_last corresponds to inputs with shape (batch, height, width, channels) while channels_first corresponds to inputs with shape (batch, channels, height, width).
It defaults to the image_data_format value found in your Keras config file at ~/.keras/keras.json. If you never set it, then it will be channels_last.
from keras import backend as K

img_rows,img_cols = 28,28

if K.image_data_format() == "channels_first":
    x_train = x_train.reshape(x_train.shape[0],1,img_rows,img_cols)
    x_test = x_test.reshape(x_test.shape[0],1,img_rows,img_cols)
    input_shape = (1,img_rows,img_cols)
else:
    x_train = x_train.reshape(x_train.shape[0],img_rows,img_cols,1)
    x_test = x_test.reshape(x_test.shape[0],img_rows,img_cols,1)
    input_shape = (img_rows,img_cols,1)

print(x_train.shape,type(x_train))
print(x_test.shape,type(x_test))
(60000, 28, 28, 1)
(10000, 28, 28, 1)
# 将数据类型转换为float32
X_train = x_train.astype("float32")
X_test = x_test.astype("float32")
# 数据归一化
X_train /= 255
X_test /= 255
3.统计训练数据中各标签数量
import numpy as np
import matplotlib.pyplot as plt

label,count = np.unique(y_train,return_counts=True)
print(label,count)
[0 1 2 3 4 5 6 7 8 9] [5923 6742 5958 6131 5842 5421 5918 6265 5851 5949]
fig = plt.figure()

plt.bar(label,count,width=0.7,align="center")
plt.title("Label Distribution")
plt.xlabel("Label")
plt.ylabel("Count")
plt.xticks(label)
plt.ylim(0,7500)

for a,b in zip(label,count):
    plt.text(a,b,"%d" %b,ha="center",va="bottom",fontsize=10)

plt.show()
4.数据处理:one-hot 编码
from keras.utils import np_utils

n_classes = 10
print("Shape before one-hot encoding:",y_train.shape)
Y_train = np_utils.to_categorical(y_train,n_classes)
Y_test = np_utils.to_categorical(y_test,n_classes)
print("Shape after one-hot encoding:",Y_train.shape)
Shape before one-hot encoding: (60000,)
Shape after one-hot encoding: (60000, 10)
print(y_train[0])
print(Y_train[0])
5
[0. 0. 0. 0. 0. 1. 0. 0. 0. 0.]
5.MNIST CNN网络实战
a.Keras sequential model定义MNIST CNN网络
from keras.models import Sequential
from keras.layers import Dense,Dropout,Flatten
from keras.layers import Conv2D,MaxPooling2D

model = Sequential()

# Feature Extraction
# 第一层卷积,32个3*3的卷积核,激活函数使用relu
model.add(Conv2D(filters=32,kernel_size=(3,3),activation="relu",input_shape=input_shape))

# 第二层卷积,64个3*3的卷积核,激活函数使用relu
model.add(Conv2D(filters=64,kernel_size=(3,3),activation="relu"))

# 最大池化层,池化窗口为2*2
model.add(MaxPooling2D(pool_size=(2,2)))

# Dropout 25%的输入神经元
model.add(Dropout(0.25))

# 将Pooled feature map摊平后输入全连接网络
model.add(Flatten())

# Classification
# 全联接层
model.add(Dense(128,activation="relu"))

# Dropout 50%的输入神经元
model.add(Dropout(0.5))

# 使用softmax激活函数做多分类,输出各数字的概率
model.add(Dense(n_classes,activation="softmax"))
WARNING:tensorflow:From D:\software\Anaconda\workplace\lib\site-packages\keras\backend\tensorflow_backend.py:3445: calling dropout (from tensorflow.python.ops.nn_ops) with keep_prob is deprecated and will be removed in a future version.
Instructions for updating:
Please use `rate` instead of `keep_prob`. Rate should be set to `rate = 1 - keep_prob`.
# 查看MNIST CNN模型网络结构
model.summary()
_________________________________________________________________
Layer (type)                 Output Shape              Param #
=================================================================
conv2d_1 (Conv2D)            (None, 26, 26, 32)        320
_________________________________________________________________
conv2d_2 (Conv2D)            (None, 24, 24, 64)        18496
_________________________________________________________________
max_pooling2d_1 (MaxPooling2 (None, 12, 12, 64)        0
_________________________________________________________________
dropout_1 (Dropout)          (None, 12, 12, 64)        0
_________________________________________________________________
flatten_1 (Flatten)          (None, 9216)              0
_________________________________________________________________
dense_4 (Dense)              (None, 128)               1179776
_________________________________________________________________
dropout_2 (Dropout)          (None, 128)               0
_________________________________________________________________
dense_5 (Dense)              (None, 10)                1290
=================================================================
Total params: 1,199,882
Trainable params: 1,199,882
Non-trainable params: 0
_________________________________________________________________
b.编译模型
model.compile()
compile(optimizer, loss=None, metrics=None, loss_weights=None, sample_weight_mode=None, weighted_metrics=None, target_tensors=None)
model.compile(loss='categorical_crossentropy', metrics=['accuracy'], optimizer='adam')
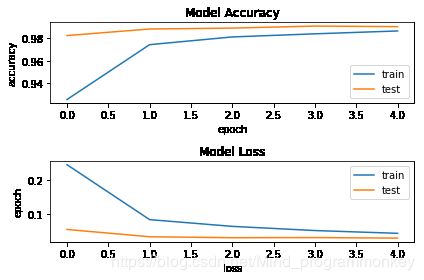
c.训练模型,并指标保存到history中
model.fit()
fit(x=None, y=None, batch_size=None, epochs=1, verbose=1, callbacks=None, validation_split=0.0, validation_data=None, shuffle=True, class_weight=None, sample_weight=None, initial_epoch=0, steps_per_epoch=None, validation_steps=None)
history = model.fit(X_train,
                    Y_train,
                    batch_size=128,
                    epochs=5,
                    verbose=2,
                    validation_data=(X_test,Y_test))
Train on 60000 samples, validate on 10000 samples
Epoch 1/5
 - 63s - loss: 0.2449 - acc: 0.9256 - val_loss: 0.0553 - val_acc: 0.9823
Epoch 2/5
 - 63s - loss: 0.0841 - acc: 0.9742 - val_loss: 0.0340 - val_acc: 0.9881
Epoch 3/5
 - 63s - loss: 0.0644 - acc: 0.9811 - val_loss: 0.0312 - val_acc: 0.9889
Epoch 4/5
 - 68s - loss: 0.0522 - acc: 0.9838 - val_loss: 0.0316 - val_acc: 0.9907
Epoch 5/5
 - 64s - loss: 0.0440 - acc: 0.9864 - val_loss: 0.0300 - val_acc: 0.9902
# 将history可视化
fig = plt.figure()

plt.subplot(2,1,1)
plt.plot(history.history["acc"])
plt.plot(history.history["val_acc"])
plt.title("Model Accuracy")
plt.xlabel("epoch")
plt.ylabel("accuracy")
plt.legend(["train","test"],loc="lower right")

plt.subplot(2,1,2)
plt.plot(history.history["loss"])
plt.plot(history.history["val_loss"])
plt.title("Model Loss")
plt.xlabel("loss")
plt.ylabel("epoch")
plt.legend(["train","test"],loc="upper right")
plt.tight_layout()

plt.show()
d.保存模型
model.save()
You can use model.save(filepath) to save a Keras model into a single HDF5 file which will contain:
- the architecture of the model, allowing to re-create the model
- the weights of the model
- the training configuration (loss, optimizer)
- the state of the optimizer, allowing to resume training exactly where you left off.
You can then use keras.models.load_model(filepath) to reinstantiate your model. load_model will also take care of compiling the model using the saved training configuration (unless the model was never compiled in the first place).
import os
import tensorflow.gfile as gfile

save_dir = "./model/"

if gfile.Exists(save_dir):
    gfile.DeleteRecursively(save_dir)
gfile.MakeDirs(save_dir)

model_name = "keras_mnist.h5"
model_path = os.path.join(save_dir,model_name)
model.save(model_path)

print("Saved trained model at %s"% model_path)
Saved trained model at ./model/keras_mnist.h5
e.加载模型
from keras.models import load_model

mnist_model = load_model(model_path)
f.统计模型在测试集上的分类结果
loss_and_metrics = mnist_model.evaluate(X_test,Y_test,verbose=2)

print("Test Loss:{}".format(loss_and_metrics[0]))
print("Test Accuracy:{}%".format(loss_and_metrics[1]*100))

predicted_classes = mnist_model.predict_classes(X_test)

correct_indices = np.nonzero(predicted_classes == y_test)[0]
incorrect_indices = np.nonzero(predicted_classes != y_test)[0]

print("Classified correctly count:{}".format(len(correct_indices)))
print("Classified incorrectly count:{}".format(len(incorrect_indices)))
Test Loss:0.02999471065380276
Test Accuracy:99.02%
Classified correctly count:9902
Classified incorrectly count:98


