TensorFlow+深度学习笔记6
TensorFlow+深度学习笔记6
标签(空格分隔): TensorFlow+深度学习笔记
1 本周掌握的内容:
- 使用 cityscapes 数据集重现 pix2pix 实验
- 学习CRN论文
- 对pix2pix与CRN两篇论文方法、结果的不同有了较深理解
2 学习清单
- 使用 cityscapes 数据集重现 pix2pix 实验
- 学习 Cascaded Refinement Networks(CRN)(ICCV 2017 论文),并与 pix2pix方法做比较
- 使用 pix2pix 提供的 cityscapes 数据集重现 CRN 论文实验,对两种方法的结果做比较
3 参考资料
- CRN主页
- 这梦一般的街景,全是AI伪造的 | 把GAN秒成渣渣的paper+code
- 如此逼真的高清图像居然是端到端网络生成的?GANs 自叹不如 | ICCV 2017
4 Cascaded Refinement Networks(CRN)论文学习报告
4.1 论文工作与贡献
在理解作者论文之前,有几个概念需要理解:
1 什么是end-to-end 神经网络?
简单来说就是神经网络的一端是输入图像,另一端是达到预期结果的输出图像,至于如何生成、中间的步骤如何全都不管。好处是方便快捷,缺点是这样的操作越来越像一个黑箱。
2 什么是前馈神经网络?
各神经元从输入层开始,接收前一级输入,并输出到下一级,直至输出层。整个网络中无反馈,可用一个有向无环图表示。
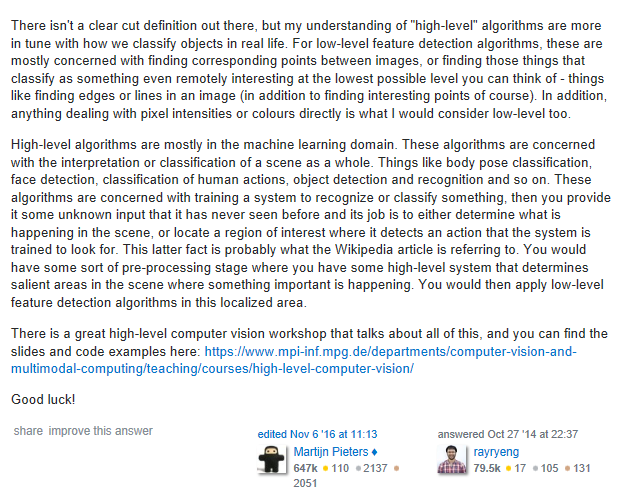
3 关于Low-Level Feature和High-Level Feature的理解:
下面是我在stack overflow找到的一个高分回答(笔记1的博客也有相应解释):
这篇论文的工作是生成与给定的语义布局图对应的“真实图像”,这里所说的语义布局图就是图像的High-Level Feature。提到图像生成,GAN会是我们首先联想到的网络,因为GAN具有“图像生成效果好”和“训练困难、效果不稳定”的特点。但是CRN作者并没有使用对抗式训练(adversarial training),而是采用了一个单向的端到端前馈网络来实现生成高分辨率、高真实感的图像,并且取得了很好的效果。
有两个因素激励作者研究:
激励作者研究的第一个重要因素:文章围有一个中心问题:“Given a semantic layout of a novel scene, can an artificial system synthesize an image that depicts this scene and looks like a photograph?”,这也是现今CG和AI的核心研究问题。作者认为如果找到一种“真实图像直接合成方法(A direct synthesis approach)”,将会是对计算机图形技术的一项重要补充;
激励作者研究的第二个重要因素:“the role of mental imagery and simulation in human cognition”。对mental imagery的研究(通俗说:人类脑部真实画面的这种能力)将会对AI的发展产生影响。
本文采用的研究方法:
本文是语义分割的逆向工作,采用有监督学习方式(真实图像和对应的语义分割图,其中label是语义分割图)。此外使用的是卷积神经网络。

论文的贡献:
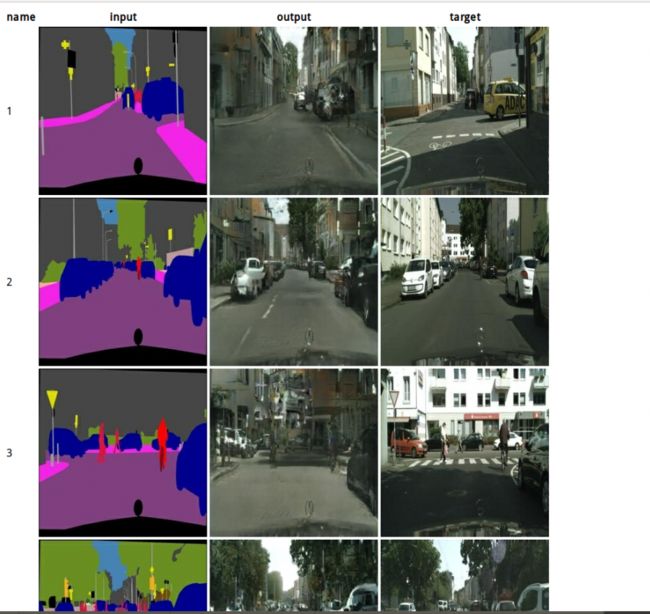
本文最大的贡献是:相对于当今其它方法,本文的方法所合成的图像的真实感最高。

4.2 相关工作
这篇文章列举了大量的相关工作,下面是我的总结(为了保留作者原意,表格部分内容使用英文):
图像方面:
| 序号 | 研究人员 | 研究内容 | 研究方法 |
|---|---|---|---|
| 1 | Goodfellow et al. | synthesize MNIST digits and 32×32 images that aimed to reproduce the appearance of different classes in the CIFAR-10 dataset | GAN |
| 2 | Denton et al. | proposed training multiple separate GANs, one for each level in a Laplacian pyramid. Each model is trained independently to synthesize details at its scale. Assembling separately trained models in this fashion enabled the authors to synthesize smoother images and to push resolution up to 96×96.这篇论文给作者很大启发,因为作者使用多尺度重构的灵感来自于这篇文章 | GAN |
| 3 | Radford et al. | remark that “Historical attempts to scale up GANs using CNNs to model images have been unsuccessful”and describe a number of modifications that enable scaling up adversarial training to 64×64 images. | / |
| 4 | Salimans et al. | tackle the instability of GAN training and describe a number of heuristics that encourage convergence. | GAN |
| 5 | Dosovitskiy et al. | train a ConvNet to generate images of 3D models, given a model ID and viewpoint.这篇文章也给了作者很大启发,因为作者使用单向前馈网络的灵感来自于这篇文章 | direct feedforward |
| 6 | Dosovitskiy and Brox | introduced a family of composite loss functions for image synthesis, which combine regression over the activations of a fixed “perceiver” network with a GAN loss. | GAN |
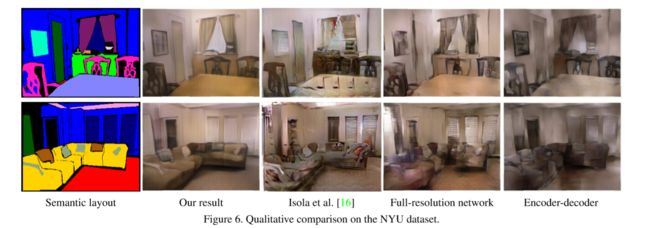
| 7 | Isola et al. | use a composite loss that combines a GAN and a regression term. The authors use the Cityscapes dataset andsynthesize 256×256 images for given semantic layouts.这篇论文的实验结果刚好可以与作者做对比 | GAN |
| 8 | Reed et al. | synthesize 64×64 images of scenes that are described by given sentences. | GAN |
| 9 | Mansimov et al. | describe a different model that generates 32×32 images that aim to fit sentences. | recurrent attention-based model |
| 10 | Yan et al. | generate 64×64 images of faces and birds with given attributes. | variational autoencoders |
| 11 | Reedetal. | synthesize 128×128 imagesofbirdsandpeopleconditionedon text descriptions and on spatial constraints such as bounding boxes or keypoints. | GAN |
| 12 | Wang and Gupta | synthesize 128×128 images of indoor scenes by factorizing the image generation process into synthesis of a normal map and subsequent synthesis of a corresponding color image. | GAN |
4.3 论文提出的网络架构与方法原理
模型3个特点:
作者们在根据其它现有的网络结构做了很多实验以后,列举出了三项他们认为非常重要的特点,模型要满足这三点才能有足够好的表现。
| 序号 | 重要特点 | 原因 |
|---|---|---|
| 1 | Global coordination | 照片中物体的结构要正确,许多物体的结构都不是在局部独立存在的,它们可能有对称性。比如如果一辆车左侧的刹车灯亮了,那右侧的刹车灯也要亮。 |
| 2 | High resolution | 为了达到足够高的分辨率,模型需要具有专门的分辨率倍增模块。 |
| 3 | Memory | 网络需要有足够大的容量才能复现出图像中物体足够多的细节。一个好的模型不仅在训练集中要有好的表现,也要有足够的泛化能力,都需要网络容量足够大。 |
网络架构:

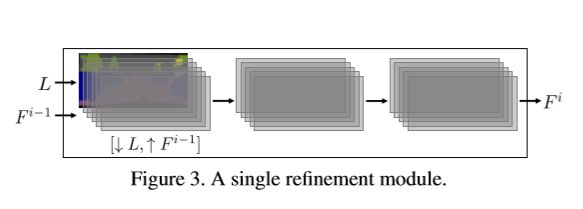
初始模块M0只有一个输入L(语义布局图),然后将L通过下采样产生F0;其它的模块Mi都有两个输入–> L(语义布局图)和Fi-1(上一个模块的输出),其中输入的L要进行下采样,Fi-1要进行上采样(达到Wi * Hi的要求),最后生成Fi。
每个分辨率增倍模块都在各自的分辨率下工作,它们的输入有两部分,一部分是降采样到当前模块分辨率的输入语义布局图像 L,另一部分是上一级模块的输出特征层 Fi-1 (最初的模块没有这一项输入),其中包含若干个 feature map。输出的 Fi 分辨率在输入 Fi-1 的基础上长宽都为2倍。
每个模块都由输入、中间、输出三个特征层组成,其中在输入层直接翻倍分辨率,并且没有使用升倍卷积,因为那样会带来特征的瑕疵。除了最后一个模块要输出最终结果外,每个模块的每个层后都跟着一个 3x3 卷积层、正则化层和LReLU非线性层。
对于论文中测试的输出分辨率为 1024 x 2048 的模型,一共用到了9个分辨率增倍模块。在每个模块的特征层中包含 feature map 数目的选择上,第一个到第五个模块为1024,第六到第七为512,第八个为128,最后一个为32。
此外作者还提到,级联模块的数量取决于期望输出图像的resolution。也就是说想要越高像素的图像,就需要越多的级联模块,但同时对计算资源的要求也会增加。
损失函数的设计:
CRN是有监督学习,其中输入的是L(语句布局图),输出的是I(真实感图像)。这样的过程就相当于“语义分割逆过程”,是欠约束的1对多问题。所以作者在文章中没有将输出图像I称作”ground truth”,而是”reference image”。
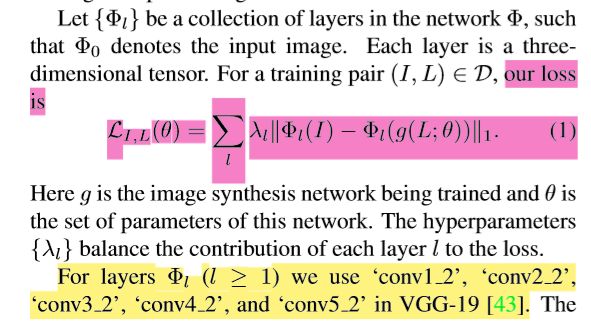

对于这样的欠约束训练问题,作者想找出一个最合适的损失函数。如果直接对训练输出图像和reference image(而不是ground truth)的对应像素进行对比,这样的效果并不好。这是因为如果输出的图像某个物体的颜色是黑色,而reference image的是白色,这样就会对生成的物体的颜色造成很大惩罚,但这是不必要的。作者最后选择了内容表征的方法(感知缺失、特征匹配的方法),跟视觉网络中的特征匹配激活对应,这样就与参考图像的低级特征保持了足够的距离。作者借助一个 VGG-19 图像感知模型,提取它识别的图像特征中高低不同的某几层作为计算训练损失的依据,从而同时涵盖了图像特征中边缘、颜色等低级细粒度特征和物体、类别等高级总体布局特征,从而构建了全面、强力的损失函数。
作者认为从语义布局图生成真实感图像是一个1对多的过程,因此作者也让他们的模型能够生成多个不同的结果。作者首先尝试了让网络生成多张不同的图像然后从中选出最好的一张,这样初步得到的损失函数如下:

作者最终更换为了一个更强大的损失函数,它起到的作用类似于在所有生成图像中分别选择每个语义类别对应的图像中最真实的那部分,然后把它们全部拼在一起,从而让最终的输出图像得到了非常高的真实度。这样最终的损失函数如下:

4.4 论文实验细节
作者选择的几个Baselines:
- GAN and semantic segmentation: GANs(修改了鉴别器加入了语意分割损失)
- Full-resolution network:全分辨率网络(中间层也是全分辨率,与 CRN 相同损失函数)
- Encoder-decoder:自动编解码器
- Image-spaceloss:只使用低级图像空间损失的CRN
- Image-to-image translation:图到图转换GAN(论文中以Isola et al.指代)
作者们把所提的CRN网络与在同样的测试条件下与其它网络做了对比,对比的网络如上所示
此外作者还通过Amazon MTurk众包平台平台进行了量化对比测试:

全分辨率网络(采用了相同的损失函数)取得了与 CRN 接近的成绩,这说明作者选择的损失函数效果非常好。但是CRN相比于全分辨率网络需要的计算资源更少,CRN更胜一筹(计算资源要求和真实度)。
5 论文实验重现详细记录
5.1 结合代码解释论文要点
from __future__ import division
import os,helper,time,scipy.io
import tensorflow as tf
import tensorflow.contrib.slim as slim
import numpy as np

def lrelu(x):
    return tf.maximum(0.2*x,x)

#这个函数使用在VGG19网络中,对应卷积和池化操作
def build_net(ntype,nin,nwb=None,name=None):
    if ntype=='conv':
        return tf.nn.relu(tf.nn.conv2d(nin,nwb[0],strides=[1,1,1,1],padding='SAME',name=name)+nwb[1])
    elif ntype=='pool':
        return tf.nn.avg_pool(nin,ksize=[1,2,2,1],strides=[1,2,2,1],padding='SAME')

#这个函数使用在VGG19网络中,用于获取已经训练好的VGG19模型的weights,bias参数
def get_weight_bias(vgg_layers,i):
    weights=vgg_layers[i][0][0][2][0][0]
    weights=tf.constant(weights)
    bias=vgg_layers[i][0][0][2][0][1]
    bias=tf.constant(np.reshape(bias,(bias.size)))
    return weights,bias

#作者借助一个 VGG-19 图像感知模型,提取它识别的图像特征中高低不同的某几层作为计算训练损失的依据,
#从而同时涵盖了图像特征中边缘、颜色等低级细粒度特征和物体、类别等高级总体布局特征,从而构建了全面、强力的损失函数。
#论文提到"we use ‘conv1_2’, ‘conv2_2’, ‘conv3_2’, ‘conv4_2’, and ‘conv5_2’ in VGG-19 ",这五个层分别代表图像不同level的feature,用于构建一个强大的损失函数
def build_vgg19(input,reuse=False):
    if reuse:
        tf.get_variable_scope().reuse_variables()
    net={}
    vgg_rawnet=scipy.io.loadmat('VGG_Model/imagenet-vgg-verydeep-19.mat')
    vgg_layers=vgg_rawnet['layers'][0]
    net['input']=input-np.array([123.6800, 116.7790, 103.9390]).reshape((1,1,1,3))
    net['conv1_1']=build_net('conv',net['input'],get_weight_bias(vgg_layers,0),name='vgg_conv1_1')
    net['conv1_2']=build_net('conv',net['conv1_1'],get_weight_bias(vgg_layers,2),name='vgg_conv1_2')
    net['pool1']=build_net('pool',net['conv1_2'])
    net['conv2_1']=build_net('conv',net['pool1'],get_weight_bias(vgg_layers,5),name='vgg_conv2_1')
    net['conv2_2']=build_net('conv',net['conv2_1'],get_weight_bias(vgg_layers,7),name='vgg_conv2_2')
    net['pool2']=build_net('pool',net['conv2_2'])
    net['conv3_1']=build_net('conv',net['pool2'],get_weight_bias(vgg_layers,10),name='vgg_conv3_1')
    net['conv3_2']=build_net('conv',net['conv3_1'],get_weight_bias(vgg_layers,12),name='vgg_conv3_2')
    net['conv3_3']=build_net('conv',net['conv3_2'],get_weight_bias(vgg_layers,14),name='vgg_conv3_3')
    net['conv3_4']=build_net('conv',net['conv3_3'],get_weight_bias(vgg_layers,16),name='vgg_conv3_4')
    net['pool3']=build_net('pool',net['conv3_4'])
    net['conv4_1']=build_net('conv',net['pool3'],get_weight_bias(vgg_layers,19),name='vgg_conv4_1')
    net['conv4_2']=build_net('conv',net['conv4_1'],get_weight_bias(vgg_layers,21),name='vgg_conv4_2')
    net['conv4_3']=build_net('conv',net['conv4_2'],get_weight_bias(vgg_layers,23),name='vgg_conv4_3')
    net['conv4_4']=build_net('conv',net['conv4_3'],get_weight_bias(vgg_layers,25),name='vgg_conv4_4')
    net['pool4']=build_net('pool',net['conv4_4'])
    net['conv5_1']=build_net('conv',net['pool4'],get_weight_bias(vgg_layers,28),name='vgg_conv5_1')
    net['conv5_2']=build_net('conv',net['conv5_1'],get_weight_bias(vgg_layers,30),name='vgg_conv5_2')
    net['conv5_3']=build_net('conv',net['conv5_2'],get_weight_bias(vgg_layers,32),name='vgg_conv5_3')
    net['conv5_4']=build_net('conv',net['conv5_3'],get_weight_bias(vgg_layers,34),name='vgg_conv5_4')
    net['pool5']=build_net('pool',net['conv5_4'])
    return net

def recursive_generator(label,sp):
    dim=512 if sp>=128 else 1024
    #输入模块的图像分辨率是4*8
    if sp==4:
        input=label
    else:
        downsampled=tf.image.resize_area(label,(sp//2,sp),align_corners=False)
        #这里采用递归的方式生成模块,每个模块都由输入、中间、输出三个特征层组成,其中在输入层直接翻倍分辨率,这里对应模块输入层
        #这里递归的方式对应论文提到的:如果输出的图像resolution越高,那么将会产生越多的模块。其中输入的图像的分辨率是4*8
        input=tf.concat([tf.image.resize_bilinear(recursive_generator(downsampled,sp//2),(sp,sp*2),align_corners=True),label],3)
    #tf.contrib.slim.conv2d (inputs,
                            #num_outputs,[卷积核个数]
                            #kernel_size,[高度,宽度]
                            #stride=1,步长
                            #padding='SAME',VALID)
    #除了最后一个模块要输出最终结果外,每个模块的每个层后都跟着一个 3x3 卷积层、正则化层和LReLU非线性层
    #每个模块都由输入、中间、输出三个特征层组成。这里对应模块中间层
    net=slim.conv2d(input,dim,[3,3],rate=1,normalizer_fn=slim.layer_norm,activation_fn=lrelu,scope='g_'+str(sp)+'_conv1')
    #每个模块都由输入、中间、输出三个特征层组成。这里对应模块输出层
    net=slim.conv2d(net,dim,[3,3],rate=1,normalizer_fn=slim.layer_norm,activation_fn=lrelu,scope='g_'+str(sp)+'_conv2')
    if sp==256:
        net=slim.conv2d(net,27,[1,1],rate=1,activation_fn=None,scope='g_'+str(sp)+'_conv100')
        net=(net+1.0)/2.0*255.0
        split0,split1,split2=tf.split(tf.transpose(net,perm=[3,1,2,0]),num_or_size_splits=3,axis=0)
        net=tf.concat([split0,split1,split2],3)
    return net

def compute_error(real,fake,label):
    return tf.reduce_mean(label*tf.expand_dims(tf.reduce_mean(tf.abs(fake-real),reduction_indices=[3]),-1),reduction_indices=[1,2])#diversity loss

#os.system('nvidia-smi -q -d Memory |grep -A4 GPU|grep Free >tmp')
#os.environ['CUDA_VISIBLE_DEVICES']=str(np.argmax([int(x.split()[2]) for x in open('tmp','r').readlines()]))#select a GPU with maximum available memory
#os.system('rm tmp')
#如果需要,这里应该配置GPU分配代码,因为tensorflow默认占用全部计算资源
sess=tf.Session()
#如果要训练,记得将is_training改为True
is_training=False
sp=256#spatial resolution: 256x512
with tf.variable_scope(tf.get_variable_scope()):
    label=tf.placeholder(tf.float32,[None,None,None,20])
    real_image=tf.placeholder(tf.float32,[None,None,None,3])
    fake_image=tf.placeholder(tf.float32,[None,None,None,3])
    generator=recursive_generator(label,sp)
    weight=tf.placeholder(tf.float32)
    vgg_real=build_vgg19(real_image)
    vgg_fake=build_vgg19(generator,reuse=True)
    #论文提到"we use ‘conv1_2’, ‘conv2_2’, ‘conv3_2’, ‘conv4_2’, and ‘conv5_2’ in VGG-19 ",
    #这五个层分别代表图像不同level的feature,用于构建一个强大的损失函数
    p0=compute_error(vgg_real['input'],vgg_fake['input'],label)
    p1=compute_error(vgg_real['conv1_2'],vgg_fake['conv1_2'],label)/1.6
    p2=compute_error(vgg_real['conv2_2'],vgg_fake['conv2_2'],tf.image.resize_area(label,(sp//2,sp)))/2.3
    p3=compute_error(vgg_real['conv3_2'],vgg_fake['conv3_2'],tf.image.resize_area(label,(sp//4,sp//2)))/1.8
    p4=compute_error(vgg_real['conv4_2'],vgg_fake['conv4_2'],tf.image.resize_area(label,(sp//8,sp//4)))/2.8
    p5=compute_error(vgg_real['conv5_2'],vgg_fake['conv5_2'],tf.image.resize_area(label,(sp//16,sp//8)))*10/0.8#weights lambda are collected at 100th epoch
    content_loss=p0+p1+p2+p3+p4+p5
    G_loss=tf.reduce_sum(tf.reduce_min(content_loss,reduction_indices=0))*0.999+tf.reduce_sum(tf.reduce_mean(content_loss,reduction_indices=0))*0.001
lr=tf.placeholder(tf.float32)
G_opt=tf.train.AdamOptimizer(learning_rate=lr).minimize(G_loss,var_list=[var for var in tf.trainable_variables() if var.name.startswith('g_')])
saver=tf.train.Saver(max_to_keep=1000)
sess.run(tf.global_variables_initializer())
#提取已经训练好的模型
ckpt=tf.train.get_checkpoint_state("result_256p")
if ckpt:
    print('loaded '+ckpt.model_checkpoint_path)
    saver.restore(sess,ckpt.model_checkpoint_path)

if is_training:
    g_loss=np.zeros(3000,dtype=float)
    input_images=[None]*3000
    label_images=[None]*3000
    for epoch in range(1,201):
        if os.path.isdir("result_256p/%04d"%epoch):
            continue
        cnt=0
        for ind in np.random.permutation(2975)+1:
            st=time.time()
            cnt+=1
            if input_images[ind] is None:
                #采用有监督学习方式,一个label对应一个真实感图像
                label_images[ind]=helper.get_semantic_map("data/cityscapes/Label256Full/%08d.png"%ind)#training label
                input_images[ind]=np.expand_dims(np.float32(scipy.misc.imread("data/cityscapes/RGB256Full/%08d.png"%ind)),axis=0)#training image
            _,G_current,l0,l1,l2,l3,l4,l5=sess.run([G_opt,G_loss,p0,p1,p2,p3,p4,p5],feed_dict={label:np.concatenate((label_images[ind],np.expand_dims(1-np.sum(label_images[ind],axis=3),axis=3)),axis=3),real_image:input_images[ind],lr:1e-4})#may try lr:min(1e-6*np.power(1.1,epoch-1),1e-4 if epoch>100 else 1e-3) in case lr:1e-4 is not good
            g_loss[ind]=G_current
            print("%d %d %.2f %.2f %.2f %.2f %.2f %.2f %.2f %.2f"%(epoch,cnt,np.mean(g_loss[np.where(g_loss)]),np.mean(l0),np.mean(l1),np.mean(l2),np.mean(l3),np.mean(l4),np.mean(l5),time.time()-st))
        os.makedirs("result_256p/%04d"%epoch)
        target=open("result_256p/%04d/score.txt"%epoch,'w')
        target.write("%f"%np.mean(g_loss[np.where(g_loss)]))
        target.close()
        saver.save(sess,"result_256p/model.ckpt")
        #每隔20个epoch保存模型
        if epoch%20==0:
            saver.save(sess,"result_256p/%04d/model.ckpt"%epoch)
        for ind in range(100001,100051):
            if not os.path.isfile("data/cityscapes/Label256Full/%08d.png"%ind):#test label
                continue
            semantic=helper.get_semantic_map("data/cityscapes/Label256Full/%08d.png"%ind)#test label
            output=sess.run(generator,feed_dict={label:np.concatenate((semantic,np.expand_dims(1-np.sum(semantic,axis=3),axis=3)),axis=3)})
            output=np.minimum(np.maximum(output,0.0),255.0)
            upper=np.concatenate((output[0,:,:,:],output[1,:,:,:],output[2,:,:,:]),axis=1)
            middle=np.concatenate((output[3,:,:,:],output[4,:,:,:],output[5,:,:,:]),axis=1)
            bottom=np.concatenate((output[6,:,:,:],output[7,:,:,:],output[8,:,:,:]),axis=1)
            scipy.misc.toimage(np.concatenate((upper,middle,bottom),axis=0),cmin=0,cmax=255).save("result_256p/%04d/%06d_output.jpg"%(epoch,ind))

if not os.path.isdir("result_256p/final"):
    os.makedirs("result_256p/final")
#infer
for ind in range(100001,100501):
    if not os.path.isfile("data/cityscapes/Label256Full/%08d.png"%ind):#test label
        continue
    semantic=helper.get_semantic_map("data/cityscapes/Label256Full/%08d.png"%ind)#test label
    output=sess.run(generator,feed_dict={label:np.concatenate((semantic,np.expand_dims(1-np.sum(semantic,axis=3),axis=3)),axis=3)})
    output=np.minimum(np.maximum(output, 0.0), 255.0)
    upper=np.concatenate((output[0,:,:,:],output[1,:,:,:],output[2,:,:,:]),axis=1)
    middle=np.concatenate((output[3,:,:,:],output[4,:,:,:],output[5,:,:,:]),axis=1)
    bottom=np.concatenate((output[6,:,:,:],output[7,:,:,:],output[8,:,:,:]),axis=1)
    scipy.misc.toimage(np.concatenate((upper,middle,bottom),axis=0),cmin=0,cmax=255).save("result_256p/final/%06d_output.jpg"%ind)
这个部分见MarkDown链接
5.2 train模型并做test和inference
训练集准备:
pix2pix没有提供将cityscapes数据集的图片分割的代码(我找不到),于是自己使用MATLAB对数据集进行了预处理:
file_path =  '.\train\';% 图像文件夹路径
img_path_list = dir(strcat(file_path,'*.jpg'));%获取该文件夹中所有jpg格式的图像
img_num = length(img_path_list);%获取图像总数量
if img_num > 0 %有满足条件的图像
        for j = 1:img_num %逐一读取图像
            image_name = img_path_list(j).name;% 图像名
            image =  imread(strcat(file_path,image_name));
            fprintf('%d %d %s\n',i,j,strcat(file_path,image_name));% 显示正在处理的图像名

            %分割图像
            aimage = image(:,1:256,:);
            bimage = image(:,257:512,:);

            %路径,格式转换
            names = size(image_name);
            namel = names(2);
            name = image_name(1:namel-4);
            i_name = strcat(name,'.png');
            apath = strcat('.\train1\',i_name);
            bpath = strcat('.\train2\',i_name);

            %resize处理
            a = imresize(aimage,[256 512],'bicubic');
            b = imresize(bimage,[256 512],'bicubic');

            %存储图像
            imwrite(a,apath);
            imwrite(b,bpath);
        end
end 

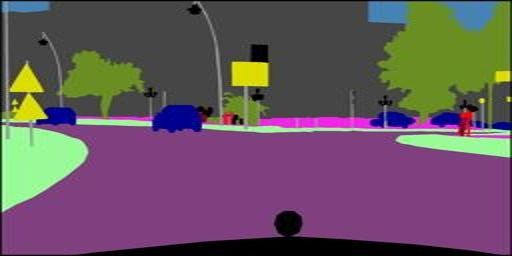
实验室GPU资源紧张,然后我使用CPU计算,发现速度太慢(算完估计一个月),之后就直接终止了
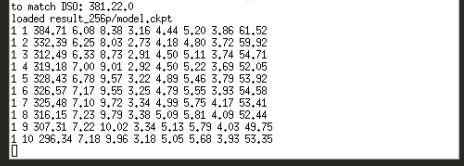
这部分持续更新
6 Pix2pix 与 CRN 的方法与实验结果的比较
6.1 方法比较
- pix2pix采用的cGAN模型,训练困难度要比一般的GAN模型简单。CRN使用的是单向前馈神经网络,训练起来更稳定可控。(GANs “remain remarkably difficult to train” and “approaches to attacking this problem still rely on heuristics that are extremely sensitive to modifications”. Our work demonstrates that these difficulties can be avoided in the setting we consider. )
- 分辨率: pix2pix在生成高分辨率图像的性能方面是比不上CRN的,理论上CRN只要提高计算资源就能提高图像分辨率。但是pix2pix不行,这是因为现阶段GAN只能在较低分辨率上取得很好的效果。
- pix2pix采用对抗式训练;CRN采用端到端训练方式(更像一个黑盒)。


