《基于ARM的多终端自助打印系统》是以前和控制工程学院的建斌同学和仪器与电子学院的培松同学一起做的一个创新项目。
最终产品可以完成微信客户端扫码打印。感觉构思不错,现把开发过程记录一下。
我们平时打印的一般流程是这样:
赶去打印店。在电脑上打开文档。然后打印。
这样存在一些缺点。
1. U盘很容易丢。
2. 浪费PC机资源。
打印店里面。每个人需要打印的话。都要占用一个台式机。而打印机只有一台。
用台式机作为打印的终端未免太过奢侈。可以说除了打印程序所占用的那点内存和CPU之外。其他资源都浪费了。
3. 边角零钱。
打印花的经常是1角2角的这种边角零钱。这种钱放在钱包里会感觉很不方便。于是考虑电子的支付方式。
这个系统的打印流程是这样的。
1. 用户上传文档到自己的账户。
2. 选择支付文档。
3. 扫二维码打印。
上面的缺点取反就是这个系统的优点了。
具体架构是这样的:
ARM板通过USB线和打印机连接。
这里采用的ARM板是TQ2440。打印机是惠普的一款激光打印机HP_LaserJet_1020。
完成后的系统可以每个ARM板连接一台打印机。
ARM板还有一个功能就是动态显示二维码。
客户端和服务器网络连接。
这保证了文档可以从终端传到服务器上。
服务器的主要功能是实现账户管理。还有激活在ARM板上运行的打印后台进程。
大概整理一下这个数据流。
首先手机关注微信公众号。可以登录自己的个人账户。
可以上传文档到个人账户。
通过支付来获得打印权限。
扫描平台随机产生的二维码。就可以发送请求到服务器。
服务器处理请求。这包括检查权限等。(看你有没有付款等)。
服务器激活各ARM板上的后台进程。(这里的后台进程是Linux下的cupsd。打印管理程序。)
cupsd调用特定于ARCH的驱动(这里的ARCH是指不同的打印机架构。)
发送字符流到USB。
cupsd控制打印队列。
当然。如果觉得我说的不够形象。可以下载演示的视频。
part1:
part2:
ARM板上运行Linux。Linux下的打印机分为几大类。PostScript打印机和其他的。。PS语言是PostScript打印机和计算机交流的方式。应用层程序将生成的PostScript文档直接发送给打印机。
如果打印机是PostScript的。就能打了。有些打印机不能打。
按照一贯的计算机思想。可以在中间加一层。就是GhostScript、他将PostScript转换成比较低级的打印机能识别的格式。
driver程序(驱动)将转化好的打印文件。按照各种打印机的不同格式发送给打印机。是应用层程序与底层打印机硬件交互的媒介。
不同打印机映射到的驱动程序是不同的。
我们使用的是HP_LaserJet_1020。CUPS版本是1.4.8、不附带特定的PPD文件。
PostScript Printer Description file是描述打印功能的文件,包含页面。字体。的一些描述数据结构。,简称PPD文件。与driver相对应。
必须找到特定打印机的PPD文件。并安装到打印管程上。
一旦牵涉到多进程。各种stuff都变得不那么简单。为了让打印作业之间不冲突。就需要打印管程。
在UNIX-like系统上。用的最多的就是CUPS了。她接收要打印的文件。判断是否需要将其转换成Postscript。一般是通过文件类型来判断的。
判断GhostScript应使用什么样的driver处理此PostScript文件。一般通过PPD文件中相应的字段。把Ghostscript处理的结果输出到打印设备上。
CUPS和Ghostscript之间。还有一个层面。就是打印过滤程序foomatic-rip。是一个用Perl编写的脚本程序。
CUPS通过它来调用Ghostscript程序。从而把PostScript作业转化成PPD文件描述的打印机自身能识别的格式。
在网上找了很长时间。才先一篇介绍CUPS原理的。
关于CUPS的详细原理:http://www.linuxidc.com/Linux/2010-12/30698.htm
好了关于这个软硬架构介绍到此为止。下面开始搭建环境。
嵌入式宿主机OS是RHEL6.3。
交叉编译器是arm-linux-gcc-4.3.2。
宿主机网络设置。IP配置为192.168.0.107。
修改网卡配置文件。
[root@bogon ~]# vi /etc/sysconfig/network-scripts/ifcfg-eth0
DEVICE="eth0"
BOOTPROTO=dhcp
NM_CONTROLLED="yes"
ONBOOT="no"
TYPE="Ethernet"
UUID="bb46e64b-53d1-4229-8a36-8b53297b3601"
DEFROUTE=yes
IPV4_FAILURE_FATAL=yes
IPV6INIT=no
NAME="System eth0"
HWADDR=00:23:5A:DD:1E:57
PEERDNS=yes
PEERROUTES=yes
LAST_CONNECT=1442248415
将ONBOOT字段改成"yes"。
关闭NetworkManger。
[root@bogon ~]# service NetworkManager stop
重启网络服务。
[root@bogon ~]# /etc/init.d/network restart
关闭防火墙。
[root@bogon ~]# /etc/init.d/iptables stop
关闭SELinux。
[root@bogon ~]# setenforce 0
在宿主机上启动tftp服务。
安装tftp服务器:
[root@bogon Packages]# rpm -ivh tftp-server-0.49-7.el6.i686.rpm
[root@bogon Packages]# rpm -ivh tftp-0.49-7.el6.i686.rpm
修改配置文件:
# default: off
# description: The tftp server serves files using the trivial file transfer \
# protocol. The tftp protocol is often used to boot diskless \
# workstations, download configuration files to network-aware printers, \
# and to start the installation process for some operating systems.
service tftp
{
socket_type = dgram
protocol = udp
wait = yes
user = root
server = /usr/sbin/in.tftpd
server_args = -s /
disable = yes
per_source = 11
cps = 100 2
flags = IPv4
}
将server_args改成-s /tftpboot,将disable字段改成no。
创建/tftpboot:
[root@bogon Packages]#mkdir /tftpboot
[root@bogon Packages]#chmod -R 777 /tftpboot
重启xinetd:
[root@bogon Packages]#/etc/init.d/xinetd restart
在宿主机上启动NFS服务。
[root@bogon ~]# vi /etc/exports
添加一项。
#/rootfs 192.168.0.*(rw,sync,no_root_squash)
重启NFS服务。
/etc/init.d/nfs restart
安装引导程序到NorFlash。
要下载程序到NandFlash。首先要安装开发板的启动引导程序到NorFlash。
连接JLink。这个不用介绍了吧。
然后打开J-Flash软件。如图所示。
然后就是操作JLink软件。下面是指令流。不展开说明了。
file->open project->2440.jflash
target->connect
file->open->u-boot
target->earse chip
target->program
现在启动引导程序已经安装好了。
在宿主机上安装交叉工具链。
交叉工具链采用的是arm-linux-gcc-4.3.2。
在开源社区下载arm-linux-gcc-4.3.2.tgz。
将交叉工具链解压到相应目录。
[root@bogon Cross_Compiler]# tar xvzf arm-linux-gcc-4.3.2.tgz -C /usr/local/Cross_Compiler/arm/4.3.2
修改~/.bashrc。
[root@bogon Cross_Compiler]# vi ~/.bashrc
# .bashrc
# User specific aliases and functions
alias rm='rm -i'
alias cp='cp -i'
alias mv='mv -i'
# Source global definitions
if [ -f /etc/bashrc ]; then
. /etc/bashrc
fi
export PATH=$PATH:/opt/arm-linux-gdb/bin
export PATH=$PATH:/opt/4.3.2/bin
#export PATH=$PATH:/opt/4.4.3/bin
vi ~/.bashrc{
export PATH=$PATH:/opt/4.3.2
}
扩展PATH字段。将交叉工具链中的bin目录也作为命令的搜索路径。
export PATH=$PATH:/usr/local/Cross_Compiler/arm/4.3.2/bin
使修改生效。
source ~/.bashrc
重新登录一下就可以使用arm-linux-gcc等交叉编译命令了。
嵌入式环境搭建:
设置网络环境。
Windows的IP是192.168.0.101,宿主机的IP是192.168.0.107,开发板的IP是192.168.0.110
烧写UBoot映像。
编译UBoot。
使用开发板提供的UBoot。
配置UBoot。
[root@bogon uboot_tq2440]# make TQ2440_config
Configuring for TQ2440 board...
[root@bogon uboot_tq2440]#
编译UBoot。
[root@bogon uboot_tq2440]# make ARCH=arm CROSS_COMPILE=arm-linux-
用USB线连接PC。
安装dnw驱动。
[root@bogon dnw1]# insmod dnw_usb.ko
[root@bogon dnw1]#
Message from syslogd@bogon at Jan 16 09:19:02 ...
kernel:GuoQian USB driver for DNW!
[root@bogon dnw1]#
使用dnw工具将编译生成的u-boot.bin下载到开发板。
[root@bogon dnw1]# ./dnw ../u-boot.bin 0x30008000
这之后从NandFlash启动就可以看到UBoot的启动界面。可以选择烧写内核映像了。
烧写内核映像。
使用开发板提供的内核。
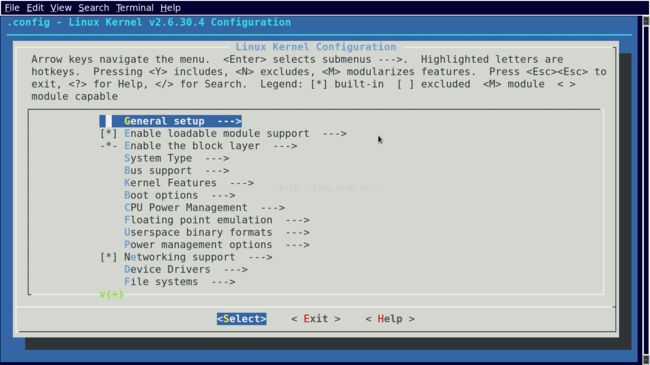
配置内核。只选择要用到的组件。
[root@bogon linux-tq2440]# make menuconfig ARCH=arm
选项很多。查找资料才能完成。这里不展开。
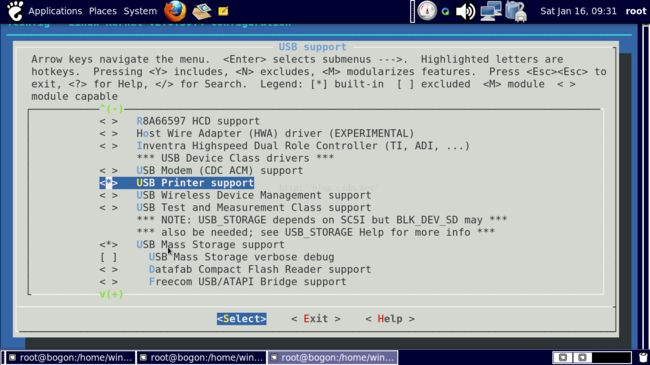
有一项需要说明的。我们要使用USB来驱动打印机。所以当然应该把打印机支持选上。如图所示。
需要
编译内核。
[root@bogon linux-tq2440]# make uImage ARCH=arm CROSS_COMPILE=arm-linux-
经过几十分钟的编译之后。得到内核映像。提示如下。
。。。。
SYSMAP System.map
SYSMAP .tmp_System.map
OBJCOPY arch/arm/boot/Image
Kernel: arch/arm/boot/Image is ready
GZIP arch/arm/boot/compressed/piggy.gz
AS arch/arm/boot/compressed/piggy.o
LD arch/arm/boot/compressed/vmlinux
OBJCOPY arch/arm/boot/zImage
Kernel: arch/arm/boot/zImage is ready
UIMAGE arch/arm/boot/uImage
Image Name: Linux-2.6.30.4-EmbedSky
Created: Sat Jan 16 09:35:43 2016
Image Type: ARM Linux Kernel Image (uncompressed)
Data Size: 2433840 Bytes = 2376.80 kB = 2.32 MB
Load Address: 30008000
Entry Point: 30008000
Image arch/arm/boot/uImage is ready
[root@bogon linux-tq2440]#
烧写内核。
下载内核:
tftp 0x31000000 uImage
制作根文件系统。
创建根目录rootfs
[root@bogon /]# mkdir rootfs
[root@bogon /]# cd rootfs
[root@bogon rootfs]# mkdir usr dev sys bin sbin etc mnt lib proc tmp var
[root@bogon rootfs]# mkdir usr/bin usr/sbin usr/lib lib/modules
创建必要的设备文件。
[root@bogon rootfs]# cd dev
[root@bogon dev]# mknod -m 666 console c 5 1
[root@bogon dev]# mknod -m 666 null c 1 3
创建配置文件。
写入相应字段需要查阅资料。这里不展开了。就是在etc目录下创建一些文件。
[root@bogon etc]# ls
fstab init.d inittab profile
[root@bogon etc]#
添加内核模块。
进入内核代码。编译模块。
[root@bogon etc]# cd /home/win/Kernel/TQ2440/linux-tq2440
[root@bogon linux-tq2440]# make modules ARCH=arm CROSS_COMPILE=arm-linux-
安装模块。
make modules_install ARCH=arm INSTALL_MOD_PATH=/rootfs
编译busybox。支持一些常用的命令。
在开源社区下载busybox-1.7.0。
进入busybox 根目录。
[root@bogon APP_Src]# ls
busybox-1.7.0 busybox-1.7.0.tar.bz2 diffutils-2.8.1 diffutils-2.8.1.tar.gz
配置busybox
[root@bogon busybox-1.7.0]# make menuconfig
scripts/kconfig/mconf Config.in
#
# using defaults found in .config
#
将Busybox配置成静态编译。
切记取消使用/usr的选项。不然会将宿主机的文件覆盖。配置选项以下面这种形式写出。以后或许也会用到这种方式。
make menuconfig {
busybox setting -> build option -> static
compile -> arm-linux-
install option -> donnot use /usr
prefix = /rootfs
}
安装busybox。
make && make install
HP_LaserJet_1020驱动的安装。下面有移植笔记。
很荣幸在开源社区找到了一些开源的打印机驱动:
http://www.openprinting.org/download/
关于Samba需要不需要。当时移植的时候还真没想过。不过Samba很常用。顺便把Samba交叉编译了一下。其过程出乎意料的痛苦。各种错误。
下面的交叉配置选项是经过很长时间才完成的。实在是懒得遍历这个过程了。下面是一些移植时候的记录。
====================================================================================================================================================
Samba的移植:
下载Samba-3.0.37
1.Samba的交叉编译
[root@bogon source]# pwd
/root/Desktop/Samba/samba-3.0.37/source
[root@bogon source]# ./configure CC=arm-linux-gcc LD=arm-linux-ld RANLIB=arm-linux-ranlib AR=arm-linux-ar --host=arm-linux --target=arm-linux --build=i686-linux --prefix=/root/Desktop/Tmp/Samba/samba-test SMB_BUILD_CC_NEGATIVE_ENUM_VALUES=yes
SAMBA VERSION: 3.0.37
LIBREPLACE_LOCATION_CHECKS: START
checking build system type... i686-pc-linux-gnu
checking host system type... arm-unknown-linux-gnu
checking target system type... arm-unknown-linux-gnu
LIBREPLACE_LOCATION_CHECKS: END
LIBREPLACE_CC_CHECKS: START
checking for arm-linux-gcc... arm-linux-gcc
checking for C compiler default output file name... a.out
checking whether the C compiler works... yes
checking whether we are cross compiling... yes
checking for suffix of executables...
checking for suffix of object files... o
checking whether we are using the GNU C compiler... yes
checking whether arm-linux-gcc accepts -g... ^C
。。。。。
[root@bogon source]# make --prefix=/rootfs.....
=======================================================================================================
交叉编译cups-1.4.8
[root@bogon cups-1.4.8]# ./configure --prefix=/rootfs/usr/local/cups CC=arm-linux-gcc CXX=arm-linux-g++ AR=arm-linux-ar LD=arm-linux-ld RANLIB=arm-linux-ranlib --host=arm-linux --target=arm-linux --build=i686-linux --disable-gnutls --disable-gssapi --disable-dbus
checking for gawk... gawk
checking for arm-linux-gcc... arm-linux-gcc
checking for C compiler default output file name... a.out
checking whether the C compiler works... yes
checking whether we are cross compiling... yes
checking for suffix of executables...
checking for suffix of object files... o
checking whether we are using the GNU C compiler... yes
checking whether arm-linux-gcc accepts -g... yes
checking for arm-linux-gcc option to accept ISO C89... none needed
checking how to run the C preprocessor... arm-linux-gcc -E
checking whether we are using the GNU C++ compiler... yes
checking whether arm-linux-g++ accepts -g... yes
checking for arm-linux-ranlib... arm-linux-ranlib
checking for ar... /usr/bin/ar
checking for chmod... /bin/chmod
在开发板上启动cupsd需要
./usr/local/cups/sbin/cupsd
./usr/local/cups/lib/cups/filter
./usr/local/cups/etc/cups/cupsd.conf
LogLevel info -> LogLevel debug
You can see some debug information in ./usr/local/cups/var/log/cups/error_log
=====================================================================================
交叉编译foo2zjs
wget -O foo2zjs.tar.gz http://foo2zjs.rkkda.com/foo2zjs.tar.gz
tar xvzf foo2zjs.tar.gz
cd foo2zjs
make
make install
make install-hotplug
make cups
./getweb 1020
./arm2hpdl sihp1020.img > sihp1020.dl
cp sihp1020.dl /usr/share/foo2zjs/firmware/
cp /usr/share/foo2zjs/firmware/sihp1020.dl > /dev/usb/lp0
./foo2zjs -p9 -r600x600 test.pbm > /dev/lp0
=================================================================================
lpadmin -p HP_LaserJet_1020 -E -v usb:/dev/lp0 -P ./usr/local/cups/share/cups/model/HP_LaserJet_1020.ppd
lpstat -t
lpoptions -d HP_LaserJet_1020
lpr -P HP_LaserJet_1020 /etc/passwd
cat /etc/passwd | lp -d HP_LaserJet_1020
================================================================================
Compile the foomatic-rip:
./configure CC=arm-linux-gcc CXX=arm-linux-g++ LD=arm-linux-ld RANLIB=arm-linux-ranlib AR=arm-linux-ar --host=arm-linux --target=arm-linux --build=i686-linux --prefix=/root/Desktop/Test/foomatic-rip-4.3.2-test
modify the "config.h"
在服务器上添加打印机。
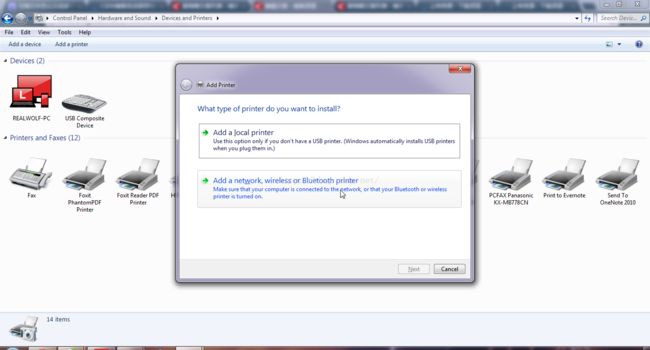
选择Devices and Printers下的add printer
选择鼠标所指的那一项。添加网络打印机。再选择我要的打印机不在列表内。
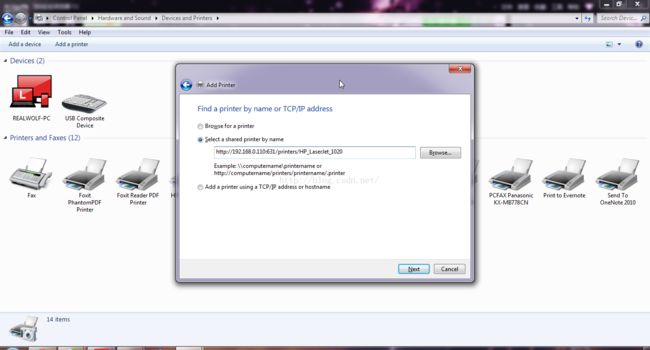
然后出现通过网络添加打印机的菜单。CUPS的端口号是631,所以然后写入目标打印机的地址。就是,
http://192.168.0.110:631/printers/HP_LaserJet_1020
如下所示。
从服务器上可以看到打印机的网络地址是多少。也是CUPS提供的一个界面。
在服务器上也能访问ARM板上的CUPS进程。然后服务器将打印任务发送到cups进程。cups管理打印任务。调用ARM板上移植好的驱动。通过USB驱动打印机。
HP_LaserJet_1020驱动的安装。
原来打算自己写一波Printer设备驱动,但是找了一个1020的代码,代码量超级大,其中核心部分移植起来耦合度也很大,所以就简单做了。
在开源社区找到了一些开源的打印机驱动:
http://www.openprinting.org/download/
行文至此,驱动项目算结束咯。感谢建斌同学和培松同学的配合~。~
***
Linkerist
2017年12月1日于北京酒仙桥


