Tensorflow实现循环神经网络——基于Fashion Mnist数据集
1、循环神经网络简介
循环神经网络主要用于自然语言处理(NLP),应用的一种网络模型,它不同与传统的前馈神经网络(FNN),循环神经网络在网络中添加了定性循环,使信号从一个神经元传递到另一个神经元,并不会马上消失,而是继续存活,也因此得到循环神经网络的名称。
循环神经网络解决方案为:隐藏层的输入不进包括上一层的输出,还包括上一时刻该隐藏层的输出。理论上,循环神经网络能够包含前面任意多时刻的输出状态,但是在实践中,为了降低训练的复杂度,一般只处理前面几个状态的输出。
2、学习单步的RNN:RNNCell
RNN是一个三层的网络,在隐藏层添加了上下文单元,上下文单元节点和隐藏层中的节点的连接及全职是固定的。
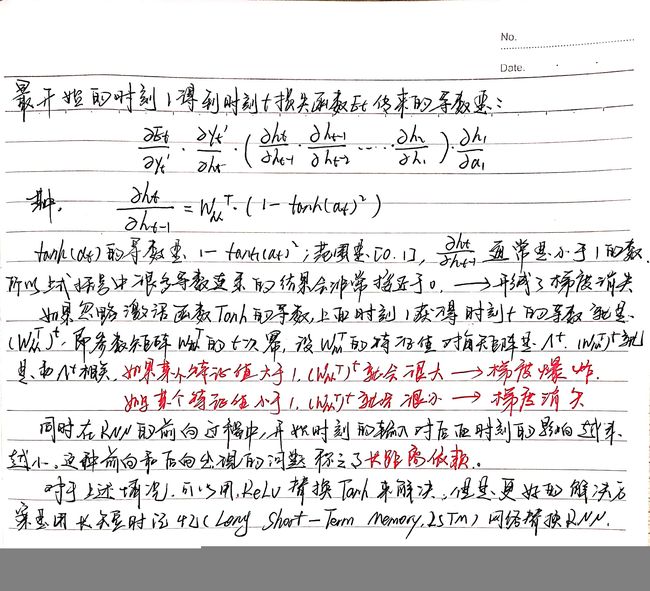
推导笔记:
- 如果要学习TensorFlow中的RNN,第一站应该就是去了解“RNNCell”,它是TensorFlow中实现RNN的基本单元,每个RNNCell都有一个call方法,使用方式是:(output, next_state) = call(input, state)。
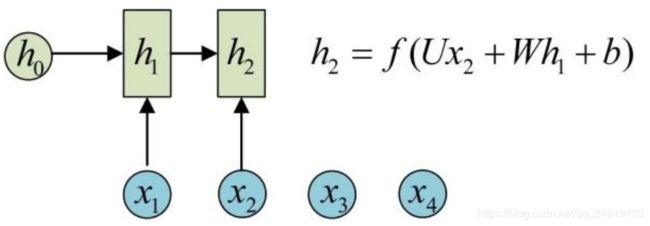
假设我们有一个初始状态h0,还有输入x1,调用call(x1, h0)后就可以得到(output1, h1):
再调用一次call(x2, h1)就可以得到(output2, h2):
也就是说,每调用一次RNNCell的call方法,就相当于在时间上“推进了一步”,这就是RNNCell的基本功能。
BasicRNNCell
- 这个cell是最基础的一个RNNCell,可以看做是对一般全连接层的拓展,除了在垂直方向,在水平方向加入时序关系,可以用下图表示:
tf.nn.rnn_cell.BasicRNNCell(num_units, activation=None, reuse=None, name=None)
output = new_state = activation(W x input + U x state + B)
num_units:inputs表示隐藏层的输入,
activation: 激活函数. 默认为:‘tanh’
state表示上个时间的隐藏层状态,也可以说是上一次隐藏层向自身的输出,对于第一次输入,则需要初始化state,对应初始化方法有很多种,可以使用tensorflow提供的各种初始化函数。
对输入inputs和state进行activation(wx+b),用作下次的输入。
GRUCell
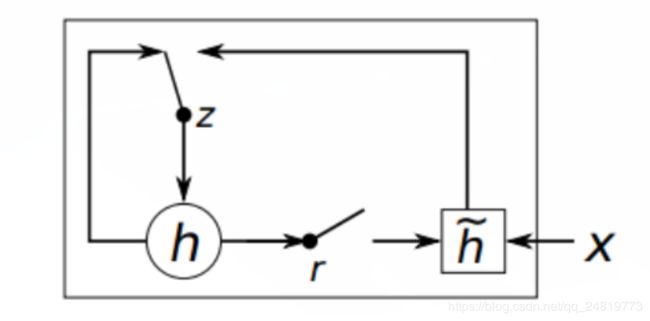
- GRU是对RNN的一种改进,相比LSTM来说,也可以看做是对LSTM的一种简化,是Bengio在14年提出来的,用作机器翻译。先看一下GRU的基本结构:
GRUCell的初始化与RNN一样,给出输入和初始化的state,在使用对象时,利用输入和前一个时间的隐藏层状态,得到对应的Gates: r, u, 然后利用r更新cell状态,最后利用u得到新的隐藏层状态。对于RNN的改进,最厉害的莫过于下面的,而且有很多变种,这里tensorflow中只有几个简单常见的cell。
tf.nn.rnn_cell.GRUCell(num_units, activation=None, reuse=None, kernel_initializer=None, bias_initializer=None, name=None)
Args:
  num_units: int, The number of units in the GRU cell.
  activation: Nonlinearity to use.  Default: `tanh`.
  reuse: (optional) Python boolean describing whether to reuse variables,in an existing scope. If not `True`,
         and the existing scope already has he given variables, an error is raised.
  kernel_initializer: (optional) The initializer to use for the weight and projection matrices.
  bias_initializer: (optional) The initializer to use for the bias.
  name: String,name of the layer.Layers with the same name will share weights, but to avoid mistakes we require reuse=True in such cases.
3、LSTM 学习
BasicLSTMCell
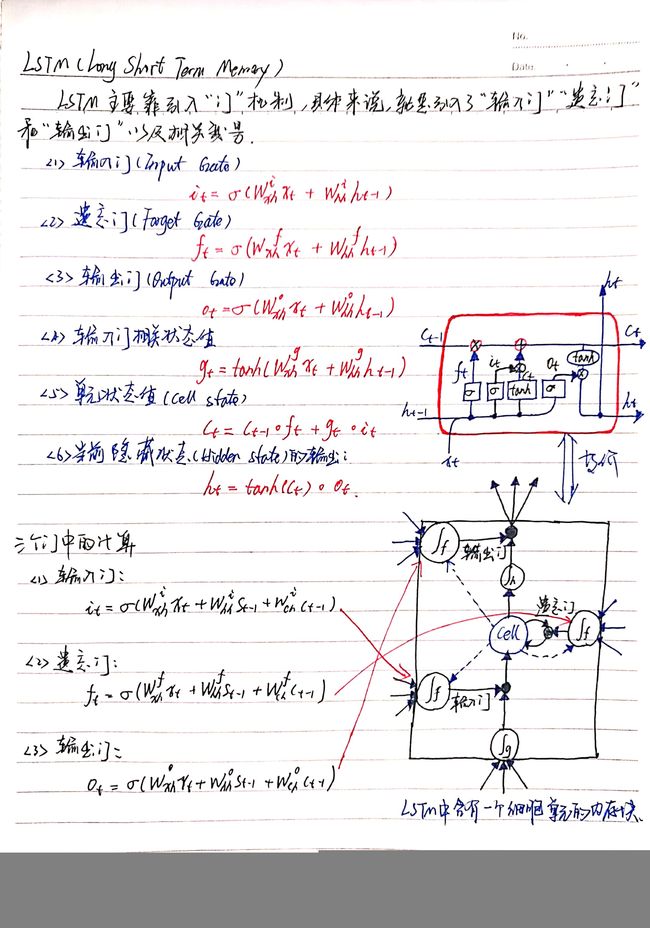
- 这个cell可以看做是最简单的LSTM,在每个连接中没有额外的链接,即其他变种在连接中加入各种改进。对于BasicLSTMCell,可以如下图所示:
tf.nn.rnn_cell.BasicLSTMCell(n_hidden, forget_bias=1.0, state_is_tuple=True)
n_hidden: 表示神经元的个数,
forget_bias: 就是LSTM们的忘记系数,如果等于1,就是不会忘记任何信息。如果等于0,就都忘记。
state_is_tuple: 默认就是True,官方建议用True,就是表示返回的状态用一个元祖表示。
状态初始化函数: zero_state(batch_size,dtype)两个参数:
batch_size: 就是输入样本批次的数目,
dtype: 就是数据类型。
实现 RNN/LSTM 的关键步骤:
1、RNN 的输入 shape = [batch_size, timestep_size, input_size]。
2、定义一个 LSTM_cell 的基本单元,在此只需要说明 hidden_size,它会自动匹配输入 X 的维度。
    lstm_cell = tf.nn.rnn_cell.BasicLSTMCell(num_units=hidden_size, forget_bias=1.0, state_is_tuple=True)
3、添加 dropout layer,一般只设置 out_keep_prob
    lstm_cell = tf.nn.rnn_cell.DropoutWrapper(cell_lstm_cell, input_keep_prob=1.0, output_keep_prob=keep_prob)
4、调用 tf.nn.rnn_cell.MultiRNNCell()实现多层LSTM
5、初始化 state 为全 0 状态
6、用 tf.nn.dynamic_rnn()来让构建好的网络运行起来
Multi_LSTM的使用:
def Multi_LSTM(hidden_size, keep_prob, batch_size, x):
    X = tf.reshape(x, [-1, 28, 28])
    lstm_cell = rnn.LSTMCell(hidden_size, reuse=tf.get_variable_scope().reuse)
    lstm_cell = rnn.DropoutWrapper(lstm_cell, output_keep_prob=keep_prob)
    m_lstm = rnn.MultiRNNCell([lstm_cell for _ in range(layer_num)], state_is_tuple=True)
    init_state = m_lstm.zero_state(batch_size, dtype=tf.float32)
    outputs, state = tf.nn.dynamic_rnn(m_lstm, inputs=X, initial_state=init_state, time_major=False)
    h_state = outputs[:, -1, :]
    return h_state
BasicLSTMCell的使用:
def Single_LSTM(hidden_size, batch_size, X):
    with tf.name_scope('cell_lstm'):
        with tf.name_scope('cell'):
            cell = tf.nn.rnn_cell.BasicLSTMCell(hidden_size, reuse=tf.get_variable_scope().reuse)

        init_state = cell.zero_state(batch_size, dtype=tf.float32)
        outputs, state = tf.nn.dynamic_rnn(cell, inputs=X, initial_state=init_state, time_major=False)
        with tf.name_scope('out-state'):
            h_state = outputs[:, -1, :]
            tf.summary.histogram('h_state', h_state)

        y_pre = tf.nn.softmax(tf.matmul(h_state, W) + bias)
    return y_pre
循环神经网络实现mnist数据集分类完整代码:
# -*- coding: utf-8 -*-
# @Time    : 2019/3/13 14:42
# @Author  : Chaucer_Gxm
# @Email   : [email protected]
# @File    : RNN_MNIST.py
# @GitHub  : https://github.com/Chaucergit/Code-and-Algorithm
# @blog    : https://blog.csdn.net/qq_24819773
# @Software: PyCharm
import tensorflow as tf
from tensorflow.examples.tutorials.mnist import input_data

mnist = input_data.read_data_sets('./data/MNIST_data', one_hot=True)

lr = 0.001
keep_prob = tf.placeholder(tf.float32, [])

# 在训练和测试的时候采用不同的 batch_size, 因此使用占位符的方式给数据
batch_size = tf.placeholder(tf.int32, [])

# 定义每个时刻输入的特征为 28 维的,就是每个时刻输入一行28个像素的数据
input_size = 28

# 定义每个隐藏层的节点数目
hidden_size = 256

# 定义时序持续的长度,即每做一次预测,需要先输入的行数
timestep_size = 28

# LSTM 的层数
layer_num = 2

# 最后输出的种类
classes_num = 10

x = tf.placeholder(tf.float32, [None, 784])
y = tf.placeholder(tf.float32, [None, classes_num])

'''
实现 RNN/LSTM 的关键步骤:
1、RNN 的输入 shape = [batch_size, timestep_size, input_size]。
2、定义一个 LSTM_cell 的基本单元,在此只需要说明 hidden_size,它会自动匹配输入 X 的维度。
    lstm_cell = tf.nn.rnn_cell.BasicLSTMCell(num_units=hidden_size, forget_bias=1.0, state_is_tuple=True)
3、添加 dropout layer,一般只设置 out_keep_prob
    lstm_cell = tf.nn.rnn_cell.DropoutWrapper(cell_lstm_cell, input_keep_prob=1.0, output_keep_prob=keep_prob)
4、调用 tf.nn.rnn_cell.MultiRNNCell()实现多层LSTM
5、初始化 state 为全 0 状态
6、用 tf.nn.dynamic_rnn()来让构建好的网络运行起来
'''


# def Multi_LSTM(hidden_size, keep_prob, batch_size, x):
#     X = tf.reshape(x, [-1, 28, 28])
#     lstm_cell = rnn.LSTMCell(hidden_size, reuse=tf.get_variable_scope().reuse)
#     lstm_cell = rnn.DropoutWrapper(lstm_cell, output_keep_prob=keep_prob)
#     m_lstm = rnn.MultiRNNCell([lstm_cell for _ in range(layer_num)], state_is_tuple=True)
#     init_state = m_lstm.zero_state(batch_size, dtype=tf.float32)
#     outputs, state = tf.nn.dynamic_rnn(m_lstm, inputs=X, initial_state=init_state, time_major=False)
#     h_state = outputs[:, -1, :]
#     return h_state

# h_state = Multi_LSTM(hidden_size, keep_prob, batch_size, x)
X = tf.reshape(x, [-1, 28, 28])
with tf.name_scope('weight'):
    W = tf.Variable(tf.truncated_normal([hidden_size, classes_num], stddev=0.1), dtype=tf.float32)
    tf.summary.histogram('weight', W)

with tf.name_scope('bias'):
    bias = tf.Variable(tf.constant(0.1, shape=[classes_num]), dtype=tf.float32)
    tf.summary.histogram('bias', bias)

# 多个LSTM的预测函数
# def Multi_LSTM():
#     cell = tf.nn.rnn_cell.MultiRNNCell([tf.nn.rnn_cell.BasicLSTMCell(hidden_size) for _ in range(layer_num)])
#     init_state = cell.zero_state(batch_size, dtype=tf.float32)
#     outputs, state = tf.nn.dynamic_rnn(cell, inputs=X, initial_state=init_state, time_major=False)
#     h_state = outputs[:, -1, :]
#     y_pre = tf.nn.softmax(tf.matmul(h_state, W) + bias)
#     return y_pre


# 多个LSTM的预测函数
def Single_LSTM(hidden_size, batch_size, X):
    with tf.name_scope('cell_lstm'):
        with tf.name_scope('cell'):
            cell = tf.nn.rnn_cell.BasicLSTMCell(hidden_size, reuse=tf.get_variable_scope().reuse)

        init_state = cell.zero_state(batch_size, dtype=tf.float32)
        outputs, state = tf.nn.dynamic_rnn(cell, inputs=X, initial_state=init_state, time_major=False)
        with tf.name_scope('out-state'):
            h_state = outputs[:, -1, :]
            tf.summary.histogram('h_state', h_state)
        y_pre = tf.nn.softmax(tf.matmul(h_state, W) + bias)
    return y_pre

# y_pre = Multi_LSTM()
with tf.name_scope('y_pre'):
    y_pre = Single_LSTM(hidden_size, batch_size, X)
    tf.summary.histogram('bias', bias)
# cross_entropy = -tf.reduce_mean(y * tf.log(y_pre))

with tf.name_scope('cross_entropy'):
    cross_entropy = tf.reduce_mean(tf.nn.softmax_cross_entropy_with_logits_v2(logits=y_pre, labels=y))
    tf.summary.scalar('cross_entropy', cross_entropy)

train_op = tf.train.AdamOptimizer(lr).minimize(cross_entropy)

correct_prediction = tf.equal(tf.argmax(y_pre, 1), tf.argmax(y, 1))
with tf.name_scope('accuracy_train'):
    accuracy = tf.reduce_mean(tf.cast(correct_prediction, 'float'))
    tf.summary.scalar('accuracy_train', accuracy)

with tf.name_scope('accuracy_test'):
    test_accuracy = tf.reduce_mean(tf.cast(correct_prediction, 'float'))
    tf.summary.scalar('accuracy_test', test_accuracy)

# saver = tf.train.Saver()
init = tf.global_variables_initializer()
writer_train = 'log/train/'
writer_test = 'log/test/'
sess = tf.InteractiveSession()
merged = tf.summary.merge_all()
writer_train = tf.summary.FileWriter(writer_train, sess.graph)
writer_test = tf.summary.FileWriter(writer_test)
# writer = tf.summary.FileWriter("log/", sess.graph)
sess.run(init)

for i in range(2000):
    batch = mnist.train.next_batch(128)
    if (i+1) % 20 == 0:
        train_accuracy = sess.run(accuracy, feed_dict={x: batch[0], y: batch[1], keep_prob: 1.0, batch_size: 128})
        print("Iter%d, step %d, 训练精度为: %g" % (mnist.train.epochs_completed, (i + 1), train_accuracy))
        print('测试精度为:', sess.run(test_accuracy, feed_dict={x: mnist.test.images, y: mnist.test.labels, keep_prob: 1.0,
                                                      batch_size: mnist.test.images.shape[0]}))
        result_train = sess.run(merged, feed_dict={x: batch[0], y: batch[1], keep_prob: 1.0, batch_size: 128})
        result_test = sess.run(merged, feed_dict={x: mnist.test.images, y: mnist.test.labels, keep_prob: 1.0,
                                                      batch_size: mnist.test.images.shape[0]})
        writer_train.add_summary(result_train, i)
        writer_test.add_summary(result_test, i)
    sess.run(train_op, feed_dict={x: batch[0], y: batch[1], keep_prob: 0.5, batch_size: 128})
# saver.save(sess, 'MNIST_DATA/save')
训练精度与测试精度:
......
Iter4, step 1780, 训练精度为: 0.992188
测试精度为: 0.9704
Iter4, step 1800, 训练精度为: 0.96875
测试精度为: 0.9595
Iter4, step 1820, 训练精度为: 0.992188
测试精度为: 0.969
Iter4, step 1840, 训练精度为: 0.984375
测试精度为: 0.9696
Iter4, step 1860, 训练精度为: 0.992188
测试精度为: 0.9674
Iter4, step 1880, 训练精度为: 0.976562
测试精度为: 0.9677
Iter4, step 1900, 训练精度为: 0.960938
测试精度为: 0.9701
Iter4, step 1920, 训练精度为: 0.976562
测试精度为: 0.9685
Iter4, step 1940, 训练精度为: 0.976562
测试精度为: 0.9667
Iter4, step 1960, 训练精度为: 0.992188
测试精度为: 0.9681
Iter4, step 1980, 训练精度为: 0.984375
测试精度为: 0.9714
Iter4, step 2000, 训练精度为: 0.960938
测试精度为: 0.9703
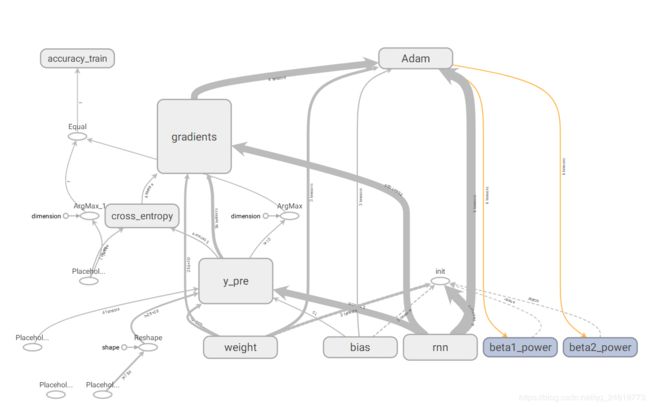
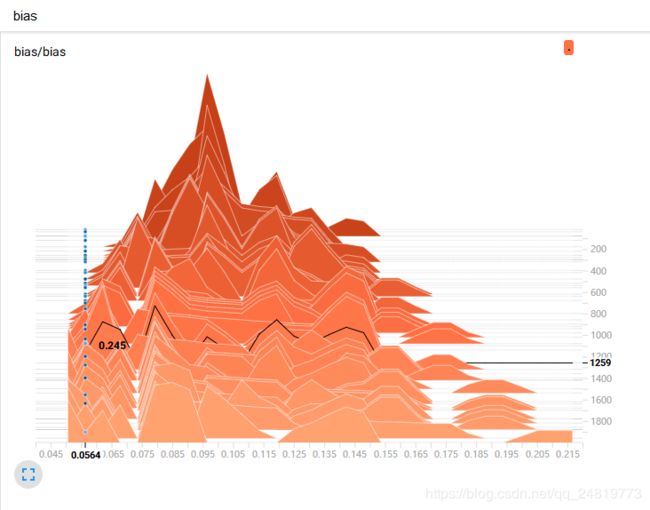
Tensorboard 得到的权重、计算图、误差曲线等:
计算图:
权重和偏置:
训练精度与测试精度:
Fashion-MNIST数据集下载:https://github.com/zalandoresearch/fashion-mnist/tree/master/data/fashion


