TensorFlow笔记(9) ResNet
TensorFlow笔记(9) ResNet
- 1. 残差网络分类问题
- 2. 数据读取
- 3. 构建模型
- 4. 训练模型
- 5. 评估模型
- 6. 模型预测
1. 残差网络分类问题
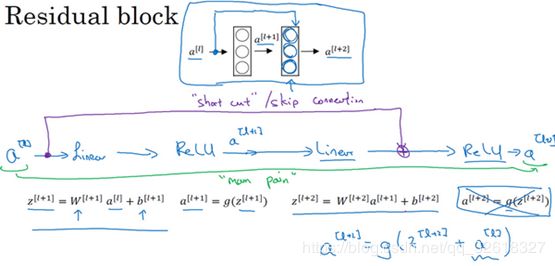
非常深的神经网络是很难训练的,因为存在梯度消失和梯度爆炸问题
根据 深度学习笔记(28) 残差网络 可以了解到
那么,还是以MNIST手写数字识别问题为例,采用ResNets模型来解决问题
以下有部分内容与 TensorFlow笔记(7) 多神经元分类 重复,如数据读取等可选择性跳过
2. 数据读取
利用网上的 MNIST 数据集 获取数据集压缩文件(切勿解压):
| 压缩文件 | 说明 |
|---|---|
| train-images-idx3-ubyte.gz | 6万张28x28大小的训练数字图像 |
| train-labels-idx1-ubyte.gz | 6万张训练图像的数字标记 |
| t10k-images-idx3-ubyte.gz | 1万张28x28大小的测试数字图像 |
| t10k-labels-idx1-ubyte.gz | 1万张测试图像的数字标记 |
-
载入数据集合查看数据集数量:
import tensorflow as tf
from tensorflow.examples.tutorials.mnist import input_data
import matplotlib.pyplot as plt
import numpy as np

# 载入数据集
mnist = input_data.read_data_sets("data/", one_hot=True)

# 显示数据集数量
print("训练集数量:", mnist.train.num_examples)
print("验证集数量:", mnist.validation.num_examples)
print("测试集数量:", mnist.test.num_examples)

# 训练集数量: 55000
# 验证集数量: 5000
# 测试集数量: 10000
其中,训练集 55000(78.6%),验证集 5000(7.1%),测试集 10000(14.3%)
one_hot=True 是使用独热(one hot)编码:
使用N位状态寄存器来对N个状态进行编码,一位为1,其余为0
常用于表示拥有有限个可能值的字符串或标识符如果直接用0-9表示标签的话,那如果实际标签是5
那能说预测的4比预测的9更接近5么?
很明显不能,所以使用独热编码更合理 -
查看数据大小
print("训练图像大小:", mnist.train.images.shape)
print("训练标签大小:", mnist.train.labels.shape)

# 训练图像大小: (55000, 784)
# 训练标签大小: (55000, 10)
55000个训练集
784 = 28 x 28 像素
10是10分类的独热编码 -
可视化图像:
# 可视化图像 def plot_image(image): plt.imshow(image.reshape(28, 28), cmap='binary') plt.show() # 可视化第二张训练图像 plot_image(mnist.train.images[2])cmap='binary’ 是对显示颜色参数的定义

具体取值参考matplotlib官网关于Choosing Colormaps的介绍 -
可视化第二张图像的标签
print(mnist.train.labels[2])

# [0. 0. 0. 0. 1. 0. 0. 0. 0. 0.]
由此可知,[0. 0. 0. 0. 0. 1. 0. 0. 0. 0.] 代表5,[0. 0. 0. 1. 0. 0. 0. 0. 0. 0.] 代表3,10个标签0 - 9以此类推
3. 构建模型
-
定义训练数据的占位符, x是784个像素点的特征值, y是10分类的标签值:
x = tf.placeholder(tf.float32, [None, 784], name="X")
y = tf.placeholder(tf.float32, [None, 10], name="Y")
shape中 None 表示行的数量未知
在实际训练时决定一次代入多少行样本 -
展开图片 x
为了使用卷积层,需把x变成一个4d向量
其第1维对应样本数, -1表示任意数量
其第2、第3维对应图片的宽、高,最后一维代表图片的颜色通道数x_image = tf.reshape(x, [-1, 28, 28, 1]) -
定义权重初始化函数:
- 定义权重W 初始化函数 :从标准差0.1的截断正态分布中输出随机值
标准正态分布生生成的数据在负无穷到正无穷
但是截断式正态分布生成的数据在均值-2倍的标准差,均值+2倍的标准差这个范围内def weight_variable(shape): initial = tf.truncated_normal(shape, stddev=0.1) return tf.Variable(initial) - 定义权重b 初始化函数 :数值为0.1
def bias_variable(shape): initial = tf.constant(0.1, shape=shape) return tf.Variable(initial) - 定义 same卷积 函数:步长为1
TensorFow的卷积函数:def conv2d(x, W): return tf.nn.conv2d(x, W, strides=[1, 1, 1, 1], padding='SAME')tf.nn.conv2d(input, filter, strides, padding, use_cudnn_on_gpu=None,name=None)- input:需要做卷积的输入数据
这是一个4维的张量([batch, in_height,in_width, in_channels])
要求类型为 float32 或 float64 其中之一 - filter:卷积核, [filter_height, filter_width, in_channels, out_channels]
- strides:图像每一维的步长,是一个一维向量,长度为4
- padding:定义元素边框与元素内容之间的空间
“SAME"或"VALID”,这个值决定了不同的卷积方式
当为"SAME"时,表示边缘填充,适用于全尺寸操作
当为"VALID"时,表示边缘不填充 - use_cudnn_on_gpu:bool类型,是否使用cudnn加速
- name:该操作的名称
- 返回值:返回一个tensor,即 feature map
- input:需要做卷积的输入数据
- 定义 max pooling 函数:步长为2,大小为2 x 2
TensorFow的最大池化函数:def max_pool_2x2(x): return tf.nn.max_pool(x, ksize=[1, 2, 2, 1], strides=[1, 2, 2, 1], padding='SAME')tf.nn.max_pool(value, ksize, strides, padding, name=None)- value:需要池化的输入
一般池化层接在卷积层后面
所以输入通常是conv2d所输出的feature map
依然是4维的张量([batch, height, width,channels]) - ksize:池化窗口的大小
由于一般不在batch和channel上做池化所以一般是[1,height, width,1] - strides:图像每一维的步长,是一个一维向量,长度为4
- padding:和卷积函数中padding含义一样
- name:该操作的名称
- 返回值:返回一个tensor
- value:需要池化的输入
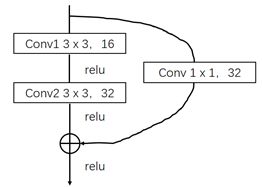
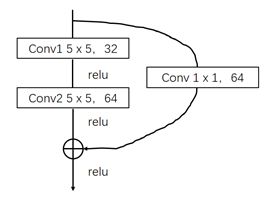
- 定义残差块:

kernal_size_x / y :卷积内核的长 / 宽def res_block(x, kernal_size_x, kernal_size_y, channel_in, channel_out): X_shortcut = x channel_out_half = int(channel_out / 2) # 第一卷积层 with tf.variable_scope("res_conv1"): res_w_conv1 = weight_variable([kernal_size_x, kernal_size_y, channel_in, channel_out_half]) res_b_conv1 = bias_variable([channel_out_half]) res_h_conv1 = tf.nn.relu(conv2d(x, res_w_conv1) + res_b_conv1) # 第二卷积层 with tf.variable_scope("res_conv2"): res_w_conv2 = weight_variable([kernal_size_x, kernal_size_y, channel_out_half, channel_out]) res_b_conv2 = bias_variable([channel_out]) res_h_conv2 = tf.nn.relu(conv2d(res_h_conv1, res_w_conv2) + res_b_conv2) # 残差块 with tf.variable_scope("shortcut"): # 输入层在线性激活之后,维持通道数与第二卷积层相同 res_w_shortcut = weight_variable([1, 1, channel_in, channel_out]) res_b_shortcut = bias_variable([channel_out]) X_shortcut = conv2d(X_shortcut, res_w_shortcut) + res_b_shortcut # 在ReLU激活之前,与第二卷积层相加,产生了一个残差块 res_add = tf.add(res_h_conv2, X_shortcut) res_b_shortcut = bias_variable([channel_out]) res_add_result = tf.nn.relu(res_add + res_b_shortcut) return res_add_result
channel_in : 输入通道数
channel_out : 输出通道数
- 定义权重W 初始化函数 :从标准差0.1的截断正态分布中输出随机值
-
h_res1 = res_block(x_image, 3, 3, 1, 32)
# 第一层池化
h_pool1 = max_pool_2x2(h_res1)
# 进行局部响应归一化操作
h1 = tf.nn.lrn(h_pool1, 4, bias=1.0, alpha=0.001 / 9.0, beta=0.75)
TensorFow的局部响应归一化函数:
tf.nn.lrn(input, depth_radius=5, bias=1, alpha=1, beta=0.5, name=None)- input:一个4D的tensor,类型必须为float
- depth_radius:一个类型为int的标量,表示囊括的kernel的范围
- bias:偏置
- alpha:乘积系数
- beta:指数系数
- name:操作名称
-
h_res2 = res_block(h1, 5, 5, 32, 64)
# 第二层池化
h_pool2 = max_pool_2x2(h_res2)
# 进行局部响应归一化操作
h2 = tf.nn.lrn(h_pool2, 4, bias=1.0, alpha=0.001 / 9.0, beta=0.75)
# 重新展开
h2_flat = tf.reshape(h2, shape=[-1, 7 * 7 * 64])
现在进过两次池化后,尺寸 28 / 2 / 2,最终尺寸为 7 * 7
通道数为最后一个残差块的通道数 64 -
第三阶段 全连接
加入一个有1024个神经元的全连接层,用于处理整个图片
把池化层输出的张量reshape成一些向量,乘上权重矩阵,加上偏置
然后对其使用ReLUW_fc1 = weight_variable([7 * 7 * 64, 1024]) b_fc1 = bias_variable([1024]) h_fc1 = tf.nn.relu(tf.matmul(h2_flat, W_fc1) + b_fc1) -
第四阶段 dropout层
随着模型深度的加深和学习次数的增多,可能存在过拟合问题
参考 深度学习笔记(7) 实践层面(二),使用 Dropout 随机忽略一部分神经元
以避免模型过拟合,并且减少网络误差dropout_rate = tf.placeholder("float") h_fc1_drop = tf.nn.dropout(h_fc1, rate=dropout_rate)TensorFow的 dropout 函数:
tf.nn.dropout(x, keep_prob=None, noise_shape=None, seed=None, name=None, rate=None)- x:一个浮点型Tensor,也就是所用的数据
- keep_prob:保留的概率,新版本建议使用rate
- noise_shape:类型为int32的1维Tensor,随机产生的保持/丢弃标志的形状
- seed:一个Python整数,用于创建随机种子
- name:操作名称
- rate:丢弃的概率
-
第五阶段 输出
softmax 输出10个数字的概率,概率和为1W_fc2 = weight_variable([1024, 10]) b_fc2 = bias_variable([10]) forward = tf.matmul(h_fc1_drop, W_fc2) + b_fc2 pred = tf.nn.softmax(forward) -
定义损失函数
使用TensoFlow提供的结合Softmax的交叉熵损失函数定义方法:softmax_cross_entropy_with_logits_v2
交叉熵损失函数其实就是逻辑回归损失函数的前半部 − y ∗ l o g ( p r e d ) - y * log(pred) −y∗log(pred)
忽略了 − ( 1 − y ) ∗ l o g ( 1 − p r e d ) -(1 - y) * log(1 - pred) −(1−y)∗log(1−pred)with tf.name_scope("LossFunction"): loss_function = tf.reduce_mean(tf.nn.softmax_cross_entropy_with_logits_v2(logits=forward, labels=y))logits:神经网络最后一层的输出
如果有batch的话,它的大小就是 [batchsize,num_classes]
单样本的话,大小就是num_classes
labels:实际的标签,大小同上
4. 训练模型
-
设置超参数:
train_epochs = 20 # 迭代次数 learning_rate = 0.001 # 学习率 -
定义Adam优化器,设置学习率和优化目标损失最小化:
optimizer = tf.train.AdamOptimizer(learning_rate).minimize(loss_function) -
定义预测类别匹配情况
correct_prediction = tf.equal(tf.argmax(pred, 1), tf.argmax(y, 1))tf.equal(A, B) :对比这两个矩阵或者向量的相等的元素,相等返回 True,相反返回 False
tf.argmax(input,axis) :根据axis取值的不同返回每行或者每列最大值的索引,axis 表示维度,0:第一维度(行),1:第二维度(列),-1:最后一个维度
其实,这里的最终求得的索引,恰好就表示图片上的数字 -
定义准确率,将布尔值转化成浮点数,再求平均值
accuracy = tf.reduce_mean(tf.cast(correct_prediction, tf.float32)) -
创建会话:
sess = tf.Session() # 建立会话 init = tf.global_variables_initializer() # 变量初始化 sess.run(init) -
设置批次大小和数量:
如果在处理完整个5.5万个训练图片的训练集之后才进行一次训练
这样的处理速度相对缓慢
如果在处理完整个5.5万个训练图片的训练集之前先让梯度下降法处理一部分
算法速度会更快
可以把训练集分割为小一点的子集训练
如100张训练图片,然后就进行梯度下降法处理
这种梯度下降法处理方法称之为Mini-batch 梯度下降
具体可参考深度学习笔记(9) 优化算法(一)# 每个批次的大小,每次放入的大小,每次放入 100张图片 以矩阵的方式 batch_size = 100 # 计算一共有多少个批次,数量整除大小训练出有多少批次 n_batch = mnist.train.num_examples // batch_sizemnist.train.next_batch 先打乱数据集,之后按数字的批次大小取值
直到数据集全部取完,重新打乱数据,重新取值 -
批次迭代训练,其中 dropout 随机丢弃的概率为0.5,显示迭代过程中的信息:
for epoch in range(train_epochs):
	for batch in range(n_batch):
    	xs, ys = mnist.train.next_batch(batch_size)
    	sess.run(optimizer, feed_dict={x: xs, y: ys, dropout_rate: 0.5})
    	# 批次训练完成之后,使用验证数据计算误差与准确率
	loss, acc = sess.run([loss_function, accuracy],
                     	  feed_dict={x: mnist.validation.images,
                                	 y: mnist.validation.labels},
                                	 dropout_rate: 0})
# 显示训练信息
print("Train Epoch", '%02d' % (epoch + 1), "Loss=", '{:.9f}'.format(loss),
      "Accuracy=", "{:.4f}".format(acc))

# Train Epoch 01 Loss= 0.103925243 Accuracy= 0.9712
# Train Epoch 02 Loss= 0.068904892 Accuracy= 0.9808
# ...
# Train Epoch 19 Loss= 0.031089630 Accuracy= 0.9920
# Train Epoch 20 Loss= 0.033109900 Accuracy= 0.9936
过俩遍数据就已经准确率就超过98%,并且由于采用了残差块和dropout正则化,避免了过拟合
最后代价为0.033109900 ,相对之前较小,而验证集的准确率提高到 99.36%
5. 评估模型
-
测试集上评估模型预测的准确率
accu_test = sess.run(accuracy, feed_dict={x: mnist.test.images, y: mnist.test.labels, dropout_rate: 0}) print("Test Accuracy = ", accu_test) # Test Accuracy = 0.9925 -
验证集上评估模型预测的准确率
accu_validation = sess.run(accuracy, feed_dict={x: mnist.validation.images,
                                            	y: mnist.validation.labels,
                                            	dropout_rate: 0})
print("Validation Accuracy = ", accu_validation)

# Validation Accuracy =  0.9936
这样的99%准确率应该比较满意了吧
6. 模型预测
-
查看预测结果
# 转换pred预测结果独热编码格式为数字0-9
prediction_result = sess.run(tf.argmax(pred, 1), feed_dict={x: mnist.test.images})

# # 查看第500-509张测试图片的预测结果
print(prediction_result[500:510])

# [3 9 5 2 1 3 1 3 6 5]
但是这样没办法知道,预测的到底是不是正确的
-
预测结果可视化比对
定义可视化函数:# 定义比对可视化函数 def plot_images_labels_prediction(images, # 图像列表 labels, # 标签列表 prediction, # 预测值列表 index, # 开始显示的索引 num=5): # 缺省一次显示5张 fig = plt.gcf() # 获取当前图表,get current figure fig.set_size_inches(10, 12) # 1英寸等于2.54cm if num > 25: # 最多显示25张图片 num = 25 for i in range(0, num): ax = plt.subplot(5, 5, i + 1) # 获取当前要处理的图片 ax.imshow(np.reshape(images[index], (28, 28)), cmap='binary') # 显示第index个图像 title = 'label = ' + str(np.argmax(labels[index])) # 显示标签的标题 if len(prediction) > 0: # 如果有预测结果的话,添加显示预测的标题 title += ',predict = ' + str(prediction[index]) ax.set_title(title, fontsize=10) # 显示图上的标题 # 不显示坐标轴 ax.set_xticks([]) ax.set_yticks([]) index += 1 plt.show() -
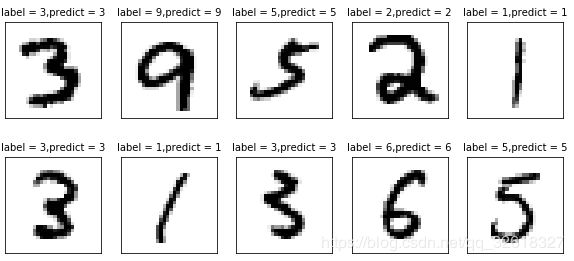
可视化第500-509张测试图片的预测结果对比
plot_images_labels_prediction(mnist.test.images,
                          	  mnist.test.labels,
                          	  prediction_result,
                          	  500, 10)
[1] python的代码地址:
https://github.com/JoveH-H/TensorFlow/blob/master/py/6.ResNet.py
[2] jupyter notebook的代码地址:
https://github.com/JoveH-H/TensorFlow/blob/master/ipynb/6.ResNet.ipynb
[3] MNIST 数据集 t10k-images-idx3-ubyte.gz
https://github.com/JoveH-H/TensorFlow/blob/master/data/t10k-images-idx3-ubyte.gz
[4] MNIST 数据集 t10k-labels-idx1-ubyte.gz
https://github.com/JoveH-H/TensorFlow/blob/master/data/t10k-labels-idx1-ubyte.gz
[5] MNIST 数据集 train-images-idx3-ubyte.gz
https://github.com/JoveH-H/TensorFlow/blob/master/data/train-images-idx3-ubyte.gz
[6] MNIST 数据集 train-labels-idx1-ubyte.gz
https://github.com/JoveH-H/TensorFlow/blob/master/data/train-labels-idx1-ubyte.gz
相关推荐:
深度学习笔记(28) 残差网络
深度学习笔记(26) 卷积神经网络
深度学习笔记(9) 优化算法(一)
深度学习笔记(7) 实践层面(二)
TensorFlow笔记(8) LeNet-5卷积神经网络
谢谢!


