Tensorflow学习笔记2—MNIST Dataset详解
MNIST是一个入门级的计算机视觉数据集,它包含各种手写数字图片:

我们使用Softmax Regression数学模型来预测其中的数字类型。
1、首先需要使用如下代码下载数据集:
import input_data
mnist = input_data.read_data_sets("MNIST_data/", one_hot=True)
其中input_data文件需要自行下载:https://tensorflow.googlesource.com/tensorflow/+/master/tensorflow/examples/tutorials/mnist/input_data.py
2、定义训练参数
learning_rate = 0.01
training_epochs  = 25
batch_size = 100  #每次训练选择的图片数量
display_step = 1
3、输入数据格式
每个MNIST数据单元包含两个部分:图片数据 and 对应的标签。
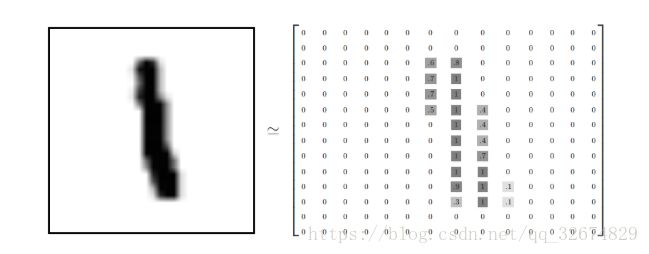
首先是图片数据的格式,每张图片的大小都为2828像素,可使用一个二维数组表示图片,如:

为表示简化,将数组展开成一维向量,长度为2828=784
因此,在MNIST训练数据集中,mnist.train.images 是一个形状为 [60000, 784] 的张量(一共60000张图片)
其次是图片对应的标签。相对应的MNIST数据集的标签是介于0到9的数字,用来描述给定图片里表示的数字。我们用一个一维向量表示标签,一个one-hot向量除了某一位的数字是1以外其余各维度数字都是0。比如,标签0将表示成([1,0,0,0,0,0,0,0,0,0,0])。因此, mnist.train.labels 是一个 [60000, 10] 的数字矩阵
x = tf.placeholder(tf.float32,[None,784])   #图片数据
y = tf.placeholder(tf.float32,[None,10])     #标签
x不是一个特定的值,而是一个占位符placeholder,我们在TensorFlow运行计算时输入这个值。我们希望能够输入任意数量的MNIST图像,每一张图展平成784维的向量。我们用2维的浮点数张量来表示这些图,这个张量的形状是[None,784 ]。(这里的None表示此张量的第一个维度可以是任何长度的。)
y同理
4、设置权重值和偏置值
W = tf.Variable(tf.zeros([784, 10]))
b = tf.Variable(tf.zeros([10]))
#y = Wx + b
5、构造模型
pred = tf.nn.softmax(tf.matmul(x,W)+b)
6、使用交叉熵定义损失函数
cost = tf.reduce_mean(-tf.reduce_sum(y*tf.log(pred), reduction_indices=1))
7、使用梯度下降算法进行优化
optimizer = tf.train.GradientDescentOptimizer(learning_rate).minimize(cost)
8、初始化变量
init = tf.global_variables_initializer()
接下来开始进行模型的训练。
9、训练模型
with tf.Session() as sess:
    sess.run(init)
# Training cycle
for epoch in range(training_epochs):
    avg_cost = 0.
    total_batch = int(mnist.train.num_examples/batch_size)
    # Loop over all batches
    for i in range(total_batch):
        batch_xs, batch_ys = mnist.train.next_batch(batch_size)
        # Fit training using batch data
        _, c = sess.run([optimizer, cost], feed_dict={x: batch_xs,
                                                      y: batch_ys})
        # Compute average loss
        avg_cost += c / total_batch
    # Display logs per epoch step
    if (epoch+1) % display_step == 0:
        print ("Epoch:", '%04d' % (epoch+1), "cost=", "{:.9f}".format(avg_cost))

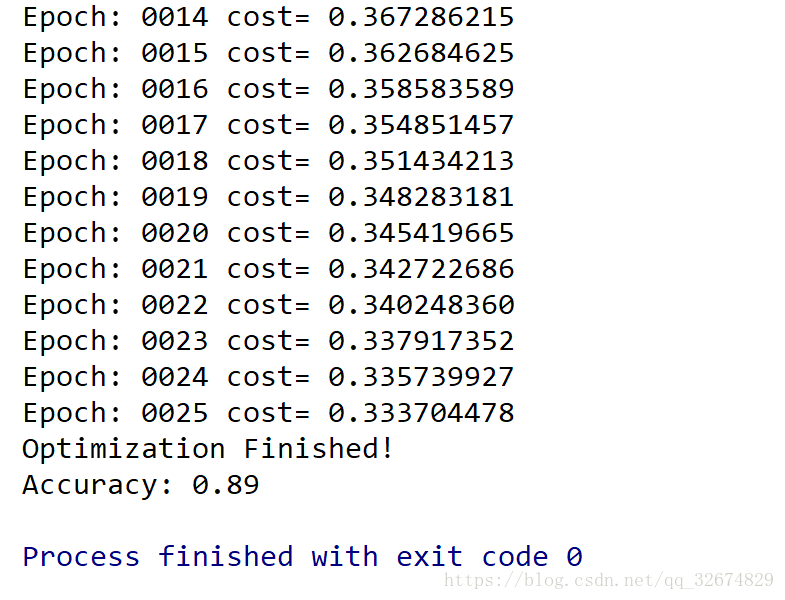
print( "Optimization Finished!")
10、测试模型质量
测试代码:
correct_prediction = tf.equal(tf.argmax(pred, 1), tf.argmax(y, 1))
accuracy = tf.reduce_mean(tf.cast(correct_prediction, tf.float32))
print ("Accuracy:", accuracy.eval({x: mnist.test.images[:3000], y: mnist.test.labels[:3000]}))
具体代码内容解释:
① tf.argmax 能给出某个tensor对象在某一维上的其数据最大值所在的索引值。由于标签向量是由0,1组成,因此最大值1所在的索引位置就是类别标签。
于是,tf.argmax(pres,1)返回的是模型对于任一输入x预测到的标签值,而 tf.argmax(y,1) 代表正确的标签。进而使用用 tf.equal 来检测我们的预测是否真实标签匹配(索引位置一样表示匹配)。
② tf.cast(x, dtype, name=None)
此函数是类型转换函数
参数
x:输入
dtype:转换目标类型
name:名称
返回:Tensor
③ 在Tensorflow中,Session.run()与Tensor.eval()都可以用来执行
如果你有一个Tensor t,在使用t.eval()时,等价于:tf.get_default_session().run(t).
如下面两段代码是相同的:
#Using `Session.run()`.
sess = tf.Session()
c = tf.constant(5.0)
print(sess.run(c))

#Using `Tensor.eval()`.
c = tf.constant(5.0)
with tf.Session():
	print(c.eval())
在第二个示例中,session充当上下文管理器,其作用是作为with块的生命周期的默认会话。 上下文管理器方法可以为简单用例(比如单元测试)提供更简洁的代码; 如果代码要处理多个graphs和sessions,则可以更直接地对Session.run()进行显式调用。简而言之:Session.run()常用于获取多个tensor中的值,而Tensor.eval()常用于单元测试、获取单个Tensor值。如:
t = tf.constant(42.0)
u = tf.constant(37.0)
tu = tf.mul(t, u)
ut = tf.mul(u, t)
with sess.as_default():
   tu.eval()  # runs one step
   ut.eval()  # runs one step
   sess.run([tu, ut])  # evaluates both tensors in a single step
OK,总的代码为:
(参考:https://github.com/aymericdamien/TensorFlow-Examples/blob/master/notebooks/2_BasicModels/logistic_regression.ipynb)
#-*- coding: utf-8 -*-
import input_data
import tensorflow as tf
mnist = input_data.read_data_sets("MNIST_data/", one_hot=True)

# Parameters
learning_rate = 0.01
training_epochs = 25
batch_size = 100
display_step = 1

# tf Graph Input
x = tf.placeholder(tf.float32, [None, 784]) # mnist data image of shape 28*28=784
y = tf.placeholder(tf.float32, [None, 10]) # 0-9 digits recognition => 10 classes

# Set model weights
W = tf.Variable(tf.zeros([784, 10]))
b = tf.Variable(tf.zeros([10]))

# Construct model
pred = tf.nn.softmax(tf.matmul(x, W) + b) # Softmax

# Minimize error using cross entropy
cost = tf.reduce_mean(-tf.reduce_sum(y*tf.log(pred), reduction_indices=1))
# Gradient Descent
optimizer = tf.train.GradientDescentOptimizer(learning_rate).minimize(cost)

# Initialize the variables (i.e. assign their default value)
init = tf.global_variables_initializer()

# Start training
with tf.Session() as sess:
    sess.run(init)

    # Training cycle
    for epoch in range(training_epochs):
        avg_cost = 0.
        total_batch = int(mnist.train.num_examples/batch_size)
        # Loop over all batches
        for i in range(total_batch):
            batch_xs, batch_ys = mnist.train.next_batch(batch_size)
            # Fit training using batch data
            _, c = sess.run([optimizer, cost], feed_dict={x: batch_xs,
                                                          y: batch_ys})
            # Compute average loss
            avg_cost += c / total_batch
        # Display logs per epoch step
        if (epoch+1) % display_step == 0:
            print("Epoch:", '%04d' % (epoch+1), "cost=", "{:.9f}".format(avg_cost))

    print ("Optimization Finished!")

    # Test model
    correct_prediction = tf.equal(tf.argmax(pred, 1), tf.argmax(y, 1))
    # Calculate accuracy for 3000 examples
    accuracy = tf.reduce_mean(tf.cast(correct_prediction, tf.float32))
    print ("Accuracy:", accuracy.eval({x: mnist.test.images[:3000], y: mnist.test.labels[:3000]}))
