SSH
SSH
- SSH框架的组成
- SSH整合方式
- 无障碍整合
- 创建web项目,引入jar包
- 配置文件
- 代码编写(一套action -> service -> dao)
- action
- service
- dao
- 不带hibernate配置文件的整合
- Hibernate模板的使用
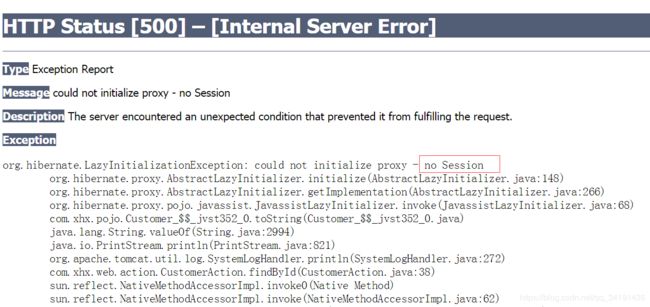
- 延迟加载的解决方案
- 在SHH整合开发中哪些地方会出现延迟加载
- Spring提供的延迟加载的解决方案
SSH框架的组成
- web层:Struts2
- 业务层:Spring
- 持久层:Hibernate
SSH整合方式
- 无障碍整合
- 将hibernate的配置交给Spring管理
无障碍整合
创建web项目,引入jar包
SSH jar包环境下载
在整合之前有必要介绍Struts2的三个重要的包
- struts2-convention-plugin-2.3.24.jar ----Struts2的注解开发包
- struts2-json-plugin-2.3.24.jar ---Sturts2的整合ajax的开发包
- struts2-spring-plugin-2.3.24.jar ---Sturts2整合Spring的开发包
配置文件
-
struts2相关配置
web.xml配置struts2的核心过滤器<filter> <filter-name>struts2filter-name> <filter-class>org.apache.struts2.dispatcher.ng.filter.StrutsPrepareAndExecuteFilterfilter-class> filter> <filter-mapping> <filter-name>struts2filter-name> <url-pattern>/*url-pattern> filter-mapping>struts.xml配置(注意:struts.xml必须放在src根目录下面)
<struts> struts> -
Hibernate配置文件(hibernate.cfg.xml也放在src根目录下)
- 配置数据库的四个基本参数
- 配置打印sql语句和格式化sql语句
- 配置hibernate方言
- 配置c3p0数据库连接池
<hibernate-configuration> <session-factory> <property name="hibernate.connection.driver_class">com.mysql.jdbc.Driverproperty> <property name="hibernate.connection.url">jdbc:mysql://localhost:3306/demo39property> <property name="hibernate.connection.username">rootproperty> <property name="hibernate.connection.password">cqrjxk39property> <property name="hibernate.show_sql">trueproperty> <property name="hibernate.format_sql">trueproperty> <property name="connection.provider_class">org.hibernate.c3p0.internal.C3P0ConnectionProviderproperty> <property name="c3p0.min_size">5property> <property name="c3p0.max_size">20property> <property name="c3p0.timeout">120property> <property name="c3p0.idle_test_period">3000property> <property name="hibernate.dialect">org.hibernate.dialect.MySQLDialectproperty> session-factory> hibernate-configuration> -
Spring相关配置(applicationContext.xml放在src根目录下)
- 注解扫描
- Spring 对 Hibernate 的整合
- 开启Hibernate的事务注解
	<beans xmlns="http://www.springframework.org/schema/beans"
   					xmlns:xsi="http://www.w3.org/2001/XMLSchema-instance"
   					xmlns:context="http://www.springframework.org/schema/context"
   					xmlns:tx="http://www.springframework.org/schema/tx"
   					xsi:schemaLocation="http://www.springframework.org/schema/beans
					http://www.springframework.org/schema/beans/spring-beans.xsd
					http://www.springframework.org/schema/context
					http://www.springframework.org/schema/context/spring-context.xsd
					http://www.springframework.org/schema/tx
					http://www.springframework.org/schema/tx/spring-tx.xsd">

		<context:component-scan base-package="com.xhx">context:component-scan>


		<bean id="sessionFactory" class="org.springframework.orm.hibernate5.LocalSessionFactoryBean">

			<property name="configLocation" value="classpath:hibernate.cfg.xml"/>
		bean>

		<bean id="transactionManager" class="org.springframework.orm.hibernate5.HibernateTransactionManager">
			<property name="sessionFactory" ref="sessionFactory">property>
		bean>

		<tx:annotation-driven transaction-manager="transactionManager">tx:annotation-driven>

	beans>
web.xml配置Spring的监听器
	<listener>
        <listener-class>org.springframework.web.context.ContextLoaderListenerlistener-class>
    listener>
代码编写(一套action -> service -> dao)
action
- 创建 action 并继承 ActionSupport 且实现 ModelDriven 接口, ModelDriven 的泛型为页面传过来的值的类型,重写 getModel() 方法
- 加上注解 @Controller 和 @Scope(“prototype”) , 将类交给Spring管理,并设置为多例
- 注入你需要的 service 和实体类
- 在struts.xml配置中配置对应的action
import com.opensymphony.xwork2.ActionSupport;
import com.opensymphony.xwork2.ModelDriven;
import org.springframework.beans.factory.annotation.Autowired;
import org.springframework.context.annotation.Scope;
import org.springframework.stereotype.Controller;

@Controller
@Scope("prototype")
public class CustomerAction extends ActionSupport implements ModelDriven<Customer> {
    @Autowired
    private Customer customer;

    @Autowired
    private CustomerService customerService;

    @Override
    public Customer getModel() {
        return customer;
    }

    public String save(){
        customerService.save(customer);
        System.out.println("Action中的save执行了");
        return NONE;
    }
}
	<package name="ss1" extends="struts-default" namespace="/">

		<action name="customer_*" class="customerAction" method="{1}">action>
	package>
service
添加注解 @Service 将 service 交给 Spring 管理,并添加事务注解 @Transactional
import org.springframework.beans.factory.annotation.Autowired;
import org.springframework.stereotype.Service;
import org.springframework.transaction.annotation.Transactional;

@Service
@Transactional
public class CustomerServiceImpl implements CustomerService {

    @Autowired
    private CustomerDao customerDao;

    @Override
    public void save(Customer customer) {
        customerDao.save(customer);
        System.out.println("调用service");
    }
}
dao
- 创建 dao 并继承 HibernateDaoSupport 类
- 添加注解 @Repository 将 dao 交给 Spring 管理
- 调用父类 HibernateDaoSupport 的方法 getHibernateTemplate() 去调用Hibernate的保存方法
- 在applicationContext中配置dao
import org.springframework.orm.hibernate5.support.HibernateDaoSupport;

public class CustomerDaoImpl extends HibernateDaoSupport implements CustomerDao {

    @Override
    public void save(Customer customer) {
        System.out.println("dao中的save方法执行了");
        this.getHibernateTemplate().save(customer);
    }
}
	<bean id="customerDaoImpl" class="com.xhx.dao.impl.CustomerDaoImpl">
		<property name="sessionFactory" ref="sessionFactory">property>
	bean>
不带hibernate配置文件的整合
- 创建db.properties文件,将数据库基本信息写入配置中
- applicationContext引入db.properties文件
- 配置c3p0数据库连接池
- 配置hibernate相关的属性和映射文件
	<context:property-placeholder location="classpath:db.properties">context:property-placeholder>

	<bean id="dataSource" class="com.mchange.v2.c3p0.ComboPooledDataSource">
		<property name="driverClass" value="${jdbc.driverClass}" />
		<property name="jdbcUrl" value="${jdbc.url}" />
		<property name="user" value="${jdbc.username}" />
		<property name="password" value="${jdbc.passoword}" />
		<property name="maxPoolSize" value="${jdbc.maxPoolSize}" />
		<property name="minPoolSize" value="${jdbc.minPoolSize}" />
		<property name="idleConnectionTestPeriod" value="${jdbc.idleConnectionTestPeriod}" />
	bean>


	<bean id="sessionFactory" class="org.springframework.orm.hibernate5.LocalSessionFactoryBean">
		<property name="dataSource" ref="dataSource" />
		<property name="hibernateProperties">
			<props>
				<prop key="hibernate.dialect">org.hibernate.dialect.MySQLDialectprop>
				<prop key="hibernate.show_sql">trueprop>
				<prop key="hibernate.format_sql">trueprop>
				<prop key="hibernate.hbm2ddl.auto">updateprop>
			props>
		property>

		<property name="mappingResources">
			<list>
				<value>com/xhx/pojo/Customer.hbm.xmlvalue>
			list>
		property>
	bean>
Hibernate模板的使用
-
保存
public void save(Customer customer) { this.getHibernateTemplate().save(customer); } -
修改
public void update(Customer customer) { this.getHibernateTemplate().update(customer); } -
删除
public void delete(Customer customer) { this.getHibernateTemplate().delete(customer); } -
通过id查询一个
public Customer findById(Long cust_id) { Customer customer = this.getHibernateTemplate().load(Customer.class, cust_id); return customer; } -
查询所有
//方法一 public List<Customer> findAllByHQL() { List<Customer> customers = (List<Customer>)this.getHibernateTemplate().find("from Customer"); return customers; } //方法二 public List<Customer> findAllByQBC() { DetachedCriteria criteria = DetachedCriteria.forClass(Customer.class); List<Customer> customers = (List<Customer>)this.getHibernateTemplate().findByCriteria(criteria); return customers; } -
分页
	public List<Customer> findAllpage(int nowPage, int pageSize) {
        DetachedCriteria criteria = DetachedCriteria.forClass(Customer.class);
        //nowPage为开头的记录,数据库的记录从0开始,pageSize为一页展示多少条记录
        List<Customer> customers = (List<Customer>)this.getHibernateTemplate().findByCriteria(criteria, nowPage, pageSize);
        return customers;
    }
延迟加载的解决方案
在SHH整合开发中哪些地方会出现延迟加载
- 使用load方法查询某一个对象的时候(不常用)
- 查询某个对象后,显示其关联对象(重点)
Spring提供的延迟加载的解决方案
在web.xml中配置OpenSessionInViewFilter过滤器,注意:此过滤器必须放在Struts2.xml核心过滤器StrutsPrepareAndExecuteFilter的前面
	<filter>
        <filter-name>OpenSessionInViewFilterfilter-name>
        <filter-class>org.springframework.orm.hibernate5.support.OpenSessionInViewFilterfilter-class>
    filter>
    <filter-mapping>
        <filter-name>OpenSessionInViewFilterfilter-name>
        <url-pattern>*.actionurl-pattern>
    filter-mapping>
