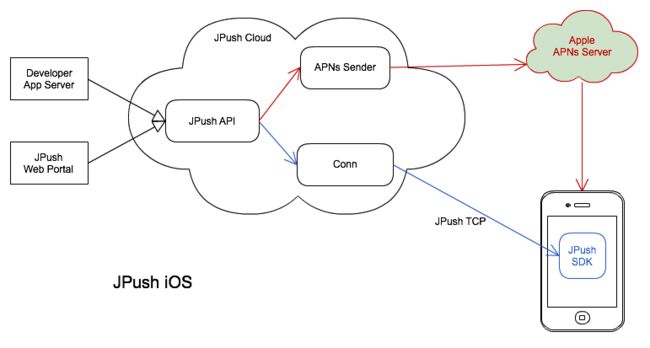
不得不说极光推送有一点做得是很不到位,swift都发布那么久了,官方提供的API尽然没有提供任何关于swift的API,友盟还象征性的在桥接文件中提一下,不过对于swift开发者都一样苦恼的进行翻译,而且翻译后根据各种报错修改,去警告,而且我发现极光有的API分散性太厉害,耦合性略高,下面结合代码给大家讲解一下
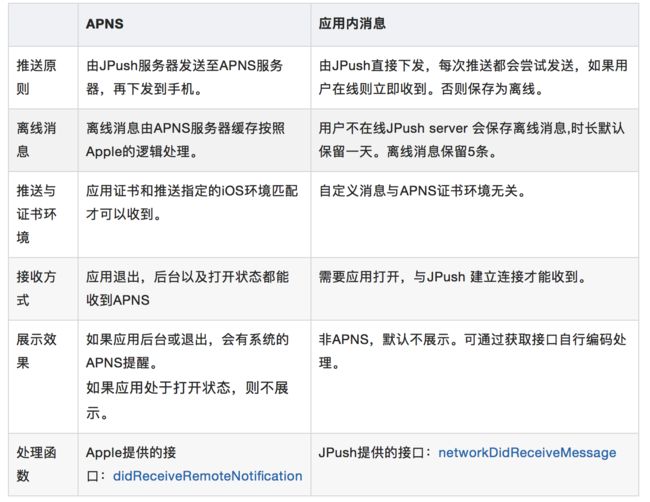
首先提一下极光推送的两大部分,APNs 推送(代理),与 JPush 应用内消息。关于两者的区别我已附图
经过对比不黑不擂,我感觉还是APNs 通知比较赞,如果按JPush 应用内消息来搞那不和安卓的推送一样了?iOS那么优势的推送,岂不浪费了?(安卓机不打开应用一般是收不到推送消息的,这时有的小伙儿可能会疑问了,没有啊,我这有的app在后台或者被杀死的也能收到啊?那是因为人家足够牛逼,和手机厂商谈好了合作,有绿色通道啊,哈哈,期待未来会不一样啊,若是安卓这边有大神有独到的见解或者解决方式,欢迎指点哈!)好的我们继续
首先我们进行应用的创建以及SDK的集成,这里我就不多说了看了一下极光的文档这一块还是不错的,文档够详细,我们主要谈swift的API,附上网址
https://docs.jiguang.cn/jpush/client/iOS/ios_guide_new/
这块我说一下,有的时候我们打开按钮的时候下边的两个对号会报错我们command + shift + k 清理一下,在重启xcode就好了
一起准备就绪我们开始代码部分:
首先为了能够吊起oc的API我们需要在桥接文件导入以下代码,桥接文件不会创建的自行谷歌或者欢迎私信
// 引入JPush功能所需头文件
#import "JPUSHService.h"
// iOS10注册APNs所需头文件
#ifdef NSFoundationVersionNumber_iOS_9_x_Max
#import
#endif
// 如果需要使用idfa功能所需要引入的头文件(可选)
#import
为AppDelegate添加Delegate。
参考代码:
class AppDelegate: UIResponder, UIApplicationDelegate,JPUSHRegisterDelegate
主意:我们添加代理头文件的话会报错,因为我们需要设置代理以及实现俩个代理方法,说到这会有一个梗,但我们暂时先不谈我们继续先把流程跑通
参考代码:
 func application(_ application: UIApplication, didFinishLaunchingWithOptions launchOptions: [UIApplicationLaunchOptionsKey: Any]?) -> Bool {
// 通知注册实体类
        if #available(iOS 10.0, *){
            let entiity = JPUSHRegisterEntity()
            entiity.types = Int(UNAuthorizationOptions.alert.rawValue |
                UNAuthorizationOptions.badge.rawValue |
                UNAuthorizationOptions.sound.rawValue)
            JPUSHService.register(forRemoteNotificationConfig: entiity, delegate: self)
        } else if #available(iOS 8.0, *) {
            let types = UIUserNotificationType.badge.rawValue |
                UIUserNotificationType.sound.rawValue |
                UIUserNotificationType.alert.rawValue
            JPUSHService.register(forRemoteNotificationTypes: types, categories: nil)
        }else {
            let type = UIRemoteNotificationType.badge.rawValue |
                UIRemoteNotificationType.sound.rawValue |
                UIRemoteNotificationType.alert.rawValue
            JPUSHService.register(forRemoteNotificationTypes: type, categories: nil)//兼容旧版本
        }

        // 注册极光推送
        JPUSHService.setup(withOption: launchOptions, appKey: "xxxxxxxxxxxxxxxxxxxxxxxx", channel:"Publish channel" , apsForProduction: false)
}
部分参数说明:
appKey填写管理Portal上创建应用后自动生成的AppKey值。请确保应用内配置的 AppKey 与 Portal 上创建应用后生成的 AppKey 一致。
channel指明应用程序包的下载渠道,为方便分渠道统计,具体值由你自行定义,如:App Store。
apsForProduction1.3.1版本新增,用于标识当前应用所使用的APNs证书环境。
0 (默认值)表示采用的是开发证书,1 表示采用生产证书发布应用。
注:此字段的值要与Build Settings的Code Signing配置的证书环境一致。
这里我们没有用到IDFA如果有需要你们自行添加参数
注册APNs成功并上报DeviceToken
  func application(_ application: UIApplication, didRegisterForRemoteNotificationsWithDeviceToken deviceToken: Data) {
        JPUSHService.registerDeviceToken(deviceToken)
    }
实现注册APNs失败接口(可选)
didFailToRegisterForRemoteNotificationsWithError error: Error) {
        print("APNs 注册失败")
    }
添加处理APNs通知回调方法
    //前台进来走这个方法
        @available(iOS 10.0, *)
    func jpushNotificationCenter(_ center: UNUserNotificationCenter!, willPresent notification: UNNotification!, withCompletionHandler completionHandler: ((Int) -> Void)!) {
        let userInfo = notification.request.content.userInfo as NSDictionary
        if (notification.request.trigger?.isKind(of: UNPushNotificationTrigger.classForCoder()))! {
            JPUSHService.handleRemoteNotification(userInfo as! [AnyHashable : Any])
        }
        completionHandler(Int(UNNotificationPresentationOptions.alert.rawValue))// 需要执行这个方法,选择是否提醒用户,有Badge、Sound、Alert三种类型可以选择设置
            print(userInfo)

    }

       //MARK: 后台进来走这个方法
    @available(iOS 10.0, *)
    func jpushNotificationCenter(_ center: UNUserNotificationCenter!, didReceive response: UNNotificationResponse!, withCompletionHandler completionHandler: (() -> Void)!) {
        let userInfo = response.notification.request.content.userInfo as NSDictionary
        if (response.notification.request.trigger?.isKind(of: UNPushNotificationTrigger.classForCoder()))! {
            JPUSHService.handleRemoteNotification(userInfo as! [AnyHashable : Any])
        }
        print(userInfo)

        //这里我们可以自定义方法,用于指定界面的跳转
        completionHandler()

    }
真机调试该项目,如果控制台输出以下日志则代表您已经集成成功。
2016-08-19 17:12:12.745823 219b28[1443:286814]  | JPUSH | I - [JPUSHLogin]
----- login result -----
uid:5460310207
registrationID:171976fa8a8620a14a4
ok写到这我们这就可以实现不报错了但是这API竟然支持iOS9以上,欢迎大神给与我指点,但是不支持iOS8啊!那么我们继续
添加以下代理方法
func application(_ application: UIApplication, didReceiveRemoteNotification userInfo: [AnyHashable : Any]) {
        //        print(userInfo)

        if #available(iOS 9.0, *){

            return
        }else{

            UIApplication.shared.applicationIconBadgeNumber = 0
            /**
             *  iOS的应用程序分为3种状态
             *      1、前台运行的状态UIApplicationStateActive;
             *      2、后台运行的状态UIApplicationStateInactive;
             *      3、app关闭状态UIApplicationStateBackground。
             */
            // 应用在前台 或者后台开启状态下,不跳转页面,让用户选择。|| (application.applicationState == UIApplicationState.background)
            if (application.applicationState == UIApplicationState.active){
                let alert = UIAlertController(title: "有推送發來的消息", message: "是否查看", preferredStyle: .alert)
                let alertAction1 = UIAlertAction(title: "確定", style: .cancel) { (action) in
                //相应代码........
                }
                let alertAction2 = UIAlertAction(title: "取消", style: .destructive, handler: nil)
                alert.addAction(alertAction1)
                alert.addAction(alertAction2)
                let resultVc = ZyzAuxiliary.getPresentedViewController()
                resultVc?.present(alert, animated: true, completion: nil)
            }else{
                //杀死状态下,直接跳转到跳转页面
            }
        }
    }
写到这里估计读者和我一样的疑惑那我们什么不直接用着一个代理方法把所有的iOS版本都支持?然而我把上两个代理方法去除以后JPUSHRegisterDelegate会报错啊!我想极光这块耦合性是不是高了点,这么来是不是让那个我们的代码工作量加大了?所以么有办法,我才再次做了一个判断iOS9作为分割点,这里我们需要注意的是当用户在前台的时候根据不同的版本合理调整跳转机制以免造成无法跳转或者重复跳转的bug
讲到这我大概的说一下后台的知识,我们后台一般需要registrationID,tags(标签), alias(别名)等等. tags这个标签,目前我们参数没有要,因为这是需要比较大的用户基数分析出来的,在推广之前我们考虑还是不要浪费我们大数据团队了,只加了alias,标签的话, tags就是为了区分群体的,比如女性,男性,游戏爱好者,这离不开出色的数据分析团队
和服务器交互的代理方法如下:
 JPUSHService.registrationIDCompletionHandler { (resCode, registrationID) in

            print("ID为\(String(describing: registrationID))" )
   //我们的接口回调,不删除了,参考一下吧
            let Jsonsecret = ZyzGetMD5.getMD5(apiStr: kAPI_jpush)
            let dic = ["secret":Jsonsecret,
                       "alias":NetworkRequestParameters.getIDFA(),
                      "registration_id":registrationID ?? ""
                       ........
            ]
ZyzAFNworkManger.sharedManager().post(kAPI_jpush, parameters: dic, progress: nil, success: { (Task, responseObject) in
//                print(" 服务器返回\(responseObject) ")
            }, failure: { (Task, error) in
            print(error)
            })
        }
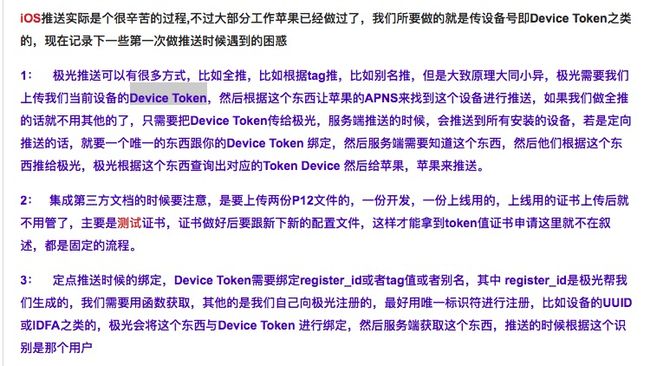
分享一个个推不错的文章截的图
先写到这吧,大家有什么疑问的欢迎私信,喜欢此文章的话欢迎大家点赞,分享,收藏或关注,有时间我会再给大家写一篇关于iOS,APNs的原生推送


