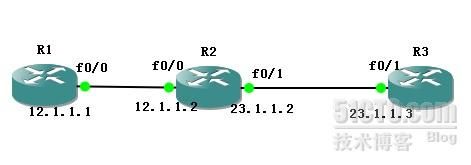
好久没有写日志了,上篇文章讲过lan-to-lan的ipsec ×××的配置,这次我们来测试 gre over ipsec ,试验拓扑如下
R3 lo10 ip: 172.16.1.3/24 lo11 172.16.2.3/24 lo13 172.16.3.3/24
首先为什么会出现gre over ipsec 这项技术,lan-to-lan的ipsec ×××虽然可以解决公司总部可以和分部通信的问题,但是他一个致命的缺陷,就是ipsec本身不支持加密组播,而我们的动态路由协议都要用到组播,所以lan-to-lan的ipsec ×××是,我们的动态路由协议就用不了,当公司规模比较大时,网段肯定会比较多,lan-to-lan的ipsec ×××就无法满足要求了,此时我们有另外一个协议gre ,它能够支持动态路由协议,但他有一个缺陷,就是不支持加密功能,而ipsec不支持动态路由协议,却支持加密功能,这两个一结合就诞生了gre over ipsec 技术,不知道大家想过没有为什么不用ipsec over gre呢 ,大家自己想想吧。
基本的ip地址配置,这里我们就不说了,我们开始IKE第一阶段的策略,这里为了看到数据包的实际封装结果,我们用AH来做测试。
R1(config)#crypto isakmp policy 1
R1(config-isakmp)#authentication pre-share
R1(config-isakmp)#encryption 3des
R1(config-isakmp)#hash md5
R1(config-isakmp)#group 2
IKE第一阶段配置完成,接下来我们配置IKE第二阶段策略,
R1(config)#crypto ipsec transform-set cisco ah-md5-hmac
R1(cfg-crypto-trans)#mode tunnel
上面选了预共享密钥来验证,那么我们就配置密钥,
R1(config)#crypto isakmp key 0 cisco address 23.1.1.3 255.255.255.0
接下来我们做map,
R1(config)#crypto map cisco 1 ipsec-isakmp
R1(config-crypto-map)#set peer 23.1.1.3
R1(config-crypto-map)#set transform-set cisco
R1(config-crypto-map)#match address 100
100指的是acl感兴趣流量的编号,
R1(config)#$ 100 permit ip 192.168.0.0 0.0.255.255 172.16.0.0 0.0.255.255
在接口下调用这个map
R1(config-if)#crypto map cisco
在R3做同样的配置
R3(config)#crypto isakmp policy 1
R3(config-isakmp)#authentication pre
R3(config-isakmp)#encryption 3des
R3(config-isakmp)#hash md5
R3(config-isakmp)#group 2
R3(config)#crypto ipsec transform-set cisco ah-md5-hmac
R3(cfg-crypto-trans)#mode tunnel
R3(config)#crypto isakmp key 0 cisco address 12.1.1.1
R3(config)#$ 100 permit ip 172.16.0.0 0.0.255.255 192.168.0.0 0.0.255.255
R3(config)#crypto map cisco 1 ipsec-isakmp
R3(config-crypto-map)#set peer 12.1.1.1
R3(config-crypto-map)#set transform-set cisco
R3(config-crypto-map)#match address 100
R3(config-if)#crypto map cisco
先测试基本的ipsec ××× 此时我们的gre还没有配置,
R1#ping 172.16.1.3 source 192.168.1.1
Type escape sequence to abort.
Sending 5, 100-byte ICMP Echos to 172.16.1.3, timeout is 2 seconds:
Packet sent with a source address of 192.168.1.1
.!!!! 可以看到我们的测试结果成功。
我们抓包来看看
可以看到他的封装格式和我们的理论一样,icmp|内部ip|AH|外部IP,这就是选择AH的好处,如果选择ESP的话,后面的数据都被加密了,我们抓包就看不出实际的封装格式,最后我会把这个包放到附件上去,有兴趣的可以自己看看,好了,基本的ipsec ×××测试完了,接下来我们来测试gre over ipsec ,
R1(config)#int tunnel 0
R1(config-if)#tunnel source 12.1.1.1
R1(config-if)#tunnel destination 23.1.1.3
R1(config-if)#ip add 100.100.100.1 255.255.255.0
gre隧道配置挺简单的,这里就不过多的解释了,但此时我们的感兴趣流量要改写,自己想想为什么??
R1(config)#access-list 100 permit gre host 12.1.1.1 host 23.1.1.3 自己想想感兴趣的流量为什么会这样写?
R3(config)#int tunnel 0
R3(config-if)#tunnel source 23.1.1.3
R3(config-if)#tunnel destination 12.1.1.1
R3(config-if)#ip add 100.100.100.3 255.255.255.0
R3(config)#access-list 100 permit gre host 23.1.1.3 host 12.1.1.1
接下来我们在R1和R3上面跑ospf
R1(config)#router os 1
R1(config-router)#router-id 1.1.1.1
R1(config-router)#net 100.100.100.0 0.0.0.255 a 0
R1(config-router)#net 192.168.1.0 0.0.0.255 a 0
R1(config-router)#net 192.168.2.0 0.0.0.255 a 0
R1(config-router)#net 192.168.3.0 0.0.0.255 a 0
R3(config)#router ospf 1
R3(config-router)#router-id 3.3.3.3
R3(config-router)#net 100.100.100.0 0.0.0.255 a 0
R3(config-router)#net 172.16.1.0 0.0.0.255 a 0
R3(config-router)#net 172.16.2.0 0.0.0.255 a 0
R3(config-router)#net 172.16.3.0 0.0.0.255 a 0
*Mar 1 01:07:01.431: %OSPF-5-ADJCHG: Process 1, Nbr 1.1.1.1 on Tunnel0 from LOADING to FULL, Loading Done 可以看到他们的邻居关系起来了
R1#sh ip rou ospf
172.16.0.0/32 is subnetted, 3 subnets
O 172.16.3.3 [110/11112] via 100.100.100.3, 00:02:10, Tunnel0
O 172.16.2.3 [110/11112] via 100.100.100.3, 00:02:10, Tunnel0
O 172.16.1.3 [110/11112] via 100.100.100.3, 00:02:10, Tunnel0
可以看到R1从Tunnel0学到了R3的lookback口地址,同理我们在R3看,
R3#sh ip rou os
192.168.1.0/32 is subnetted, 1 subnets
O 192.168.1.1 [110/11112] via 100.100.100.1, 00:03:40, Tunnel0
192.168.2.0/32 is subnetted, 1 subnets
O 192.168.2.1 [110/11112] via 100.100.100.1, 00:03:40, Tunnel0
192.168.3.0/32 is subnetted, 1 subnets
O 192.168.3.1 [110/11112] via 100.100.100.1, 00:03:40, Tunnel0
都学到了,我们来ping下测试效果,R1#ping 172.16.1.3 source 192.168.1.1
Type escape sequence to abort.
Sending 5, 100-byte ICMP Echos to 172.16.1.3, timeout is 2 seconds:
Packet sent with a source address of 192.168.1.1
!!!!!
Success rate is 100 percent (5/5), round-trip min/avg/max = 188/213/244 ms
可以看到测试结果正常,为了看到实际的封装效果我们来抓包看下,
看到数据的封装格式和我们预测的一样icmp|内部ip|gre|外部ip|AH|外部ip,我会把包上传到附件中,有兴趣的可以看看。
最后在提出一个问题,假如map在tunnel0中调用而不再物理接口调用会产生什么结果。下次我们再测试DM×××和EZ×××。


