| 项目 |
内容 |
| 这个作业属于哪个课程 |
|
| 这个作业的要求在哪里 |
|
| 作业学习目标 |
(1)掌握GUI布局管理器用法; (2)掌握Java Swing文本输入组件用途及常用API; (3)掌握Java Swing选择输入组件用途及常用API。 |
第一部分:总结第十二章本周理论知识
Swing和MVC设计模式
(1)设计模式(Design pattern)是设计者一种流行的 思考设计问题的方法,是一套被反复使用,多数人 知晓的,经过分类编目的,代码设计经验的总结。
(2)模型-视图-控制器设计模式(Model –ViewController )是Java EE平台下创建 Web 应用程序 的重要设计模式。
(3)MVC设计模式 – Model(模型):是程序中用于处理程序数据逻 辑的部分,通常模型负责在数据库中存取数据。
– View(视图):是程序中处理数据显示的部分, 通常视图依据模型存取的数据创建。
– Controller(控制器):是程序中处理用户交互 的部分。通常控制器负责从视图读取数据,控制 用户输入,并向模型发送数据。
(4)Java组件有内容、外观、行为三个主要元素;
布局管理器
(1)布局管理器是一组类。 – 实现 java.awt.LayoutManager 接口 – 决定容器中组件的位置和大小
Java.awt包中定义了5种布局管理类,每一种布 局管理类对应一种布局策略。
每个容器都有与之相关的默认布局管理器。
(2)5种布局管理器:(1)FlowLayout: 流布局(Applet和Panel的默认 布局管理器) (2)BorderLayout:边框布局( Window、Frame和 Dialog的默认布局管理器) (3)GridLayout: 网格布局 (4)GridBagLayout: 网格组布局 (5)CardLayout :卡片布局
3、GridLayout的构造函数如下:1、GridLayout():生成一个单行单列的网格布局
2、GridLayout(int rows,int cols):生成一个设定行数 和列数的网格布局
3、GridLayout(int rows,int columns,int hgap,int vgap): 可以设置组件之间的水平和垂直间隔
文本输入
(1)文本域(JTextField) : 用于获取单行文本输入。
(2)文本区(JTextArea)组件可让用户输入多行文 本。生成JTextArea组件对象时,可以指定文本 区的行数和列数: textArea = new JTextArea(8, 40);
(3)文本区与文本域的异同相同之处: 文本域和文本区组件都可用于获取文本输入。
不同之处: 文本域只能接受单行文本的输入; 文本区能够接受多行文本的输入。
(4)文本区JTextArea的常用API:Java.swing. JTextArea 1.2 – JTextArea(int rows, int cols)
构造一个rows行cols列的文本区对象 – JTextArea(String text,int rows, int cols)
用初始文本构造一个文本区对象 – void setRows(int rows)
设置文本域使用的行数 – void append(String newText)
将给定文本附加到文本区中已有文本的后面 – void setLineWrap(boolean wrap)
打开或关闭换行
(5)标签组件:标签是容纳文本的组件。它们没有任何修饰(如没有边界 ),也不响应用户输入。
标签的常用用途之一就是标识组件,例如标识文本域。其使用步骤如下:
1. 创建一个JLabel组件
2. 将标签组件放置在距离被标识组件足够近的地方。
(6)密码域:密码域是一种特殊类型的文本域。每个输入的字 符都用回显字符实现,典型的回显字符为*。
– JPassWordField(String text, int columns) 构造一个密码域对象
(7)滚动窗格:
Swing中文本区没有滚动条,若需要滚动条。将文 本区放入一个滚动窗格中即可。
常用API—Java.swing. JScrollPane(教材340页) – JScrollPane(Component c) 在组件c上添加滚动条,返回添加后的组件。
选择组件
复选框 单选按钮 边框 组合框 滑动条
(1)复选框构造器 1.bold = new JCheckBox("Bold"); 复选框自动地带有表示标签。
2. JCheckBox(String label,Icon icon); 构造带有标签与图标的复选框,默认初始未被选择。
3.JCheckBox(String label,boolean state); 用指定的标签和初始化选择状态构造一个复选框
(2)单选按钮的构造器(教材492页) 1.JRadioButton(String label,Icon icon); 创建一个带标签和图标的单选按钮
2.JRadioButton(String label,boolean state); 用指定的标签和初始化状态构造单选按钮
(3)按钮组:为单选按钮组构造一个ButtonGroup的对象。 然后,再将JRadioButton类型的对象添加到按钮 组中。按钮组负责在新按钮被按下的时,取消前一 个按钮的选择状态。
(4)如果在一个窗口中 有多组复选框或单选按 钮,就需要可视化的形 式指明哪些按钮属于同 一组。Swing提供了一 组很有用的边框
(5)如果有多个选择项,使用单选按钮占据的屏幕空 间太大时,就可以选择组合框。
faceCombo = new JComboBox(); faceCombo.setEditable(true);
让组合框可编辑 faceCombo.addItem("Serif"); faceCombo.insertItemAt("Monospace",0);
增加组合框选项 faceCombo.removeItem("Monospace");
faceCombo.removeItemAt(0); 删除组合框选项内容
(6)组合框的事件监听:为了判断组合框的哪个选项被选择,可通过 事件参数调用getSource方法来得到发送事件的组 合框引用,接着调用getSelectdeItem方法获取当 前选择的选项。
(7)滑动条:滑动条可以让用户从一组离散值中进行选择 ,并且它还允许进行连续值得选择。
菜单
菜单创建 菜单项中的图标 复选框和单选按钮菜单项 弹出菜单 快捷键和加速器 启用和禁用菜单项 工具栏 工具提示
网格组布局 (GridBagLayout):GridBagLayout与GridLayout有点相似,它也是 将组件排在格子里,但是GridBagLayout在网格 的基础上提供更复杂的布局。
GridBagLayout允许单个组件在一个单元中不填 满整个单元,而只是占用最佳大小,也允许单个 组件扩展成不止一个单元,并且可以用任意顺序 加入组件。
定制布局管理器: 程序员可通过自己设计LayoutManager类来实现 特殊的布局方式。
定制布局管理器需要实现LayoutManager接口, 并覆盖以下方法。
对话框
选项对话框 创建对话框 数据选择 文件对话框 颜色选择器
(1)对话框是一种大小不能变化、不能有菜单的容器窗口; 对话框不能作为一个应用程序的主框架,而必须包含在其 他的容器中。
(2)选项对话框:JOptionPane提供的对话框是模式对话框。当模 式对话框显示时,它不允许用户输入到程序的 其他的窗口。使用JOptionPane,可以创建和自 定义问题、信息、警告和错误等几种类型的对 话框。
(3)数据交换:输入对话框含有供用户输入文本的文本框、一个确认和取 消按钮,是有模式对话框。当输入对话框可见时,要求用户 输入一个字符串。
(4)文件对话框:专门用于对文件(或目录)进行浏览和选择的对 话框,常用的构造方法: – JFileChooser():根据用户的缺省目录创建文件对话框 – JFileChooser(File currentDirectory):根据File型参数 currentDirectory指定的目录创建文件对话框
(5)颜色对话框: javax.swing包中的JColorChooser类的静态方 法: public static Color showDialog(Component component, String title, Color initialColor)创建一个颜色对话框
(6)参数component指定对话框所依赖的组件,title 指定对话框的标题;initialColor 指定对话框返回 的初始颜色,即对话框消失后,返回的默认值。 颜色对话框可根据用户在颜色对话框中选择的颜 色返回一个颜色对象.
第二部分:实验部分
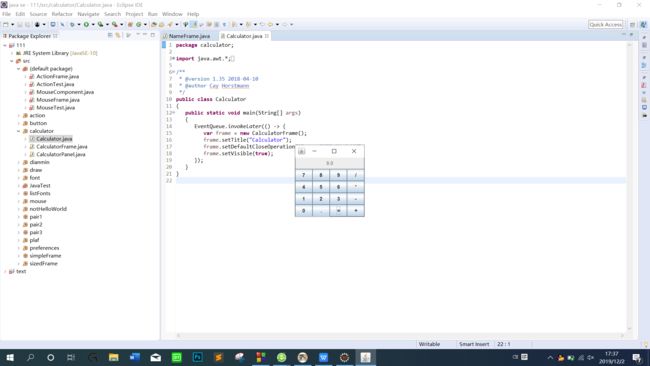
实验1: 导入第12章示例程序,测试程序并进行组内讨论。
测试程序1
在elipse IDE中运行教材479页程序12-1,结合运行结果理解程序;
掌握布局管理器的用法;
理解GUI界面中事件处理技术的用途。
在布局管理应用代码处添加注释;
实验程序如下:
 1 import java.awt.*;
 2 import javax.swing.*;
 3
 4 /**
 5  * @version 1.34 2015-06-12
 6  * @author Cay Horstmann
 7  */
 8 public class Calculator
 9 {
10    public static void main(String[] args)
11    {
12       EventQueue.invokeLater(() -> {
13          CalculatorFrame frame = new CalculatorFrame();
14          frame.setTitle("Calculator");
15          frame.setDefaultCloseOperation(JFrame.EXIT_ON_CLOSE);
16          frame.setVisible(true);
17       });
18    }
19 }
 1 import javax.swing.*;
 2
 3 /**
 4  * A frame with a calculator panel.
 5  */
 6 public class CalculatorFrame extends JFrame
 7 {
 8    public CalculatorFrame()
 9    {
10       add(new CalculatorPanel());
11       pack();
12    }
13 }
  1 import java.awt.*;
  2 import java.awt.event.*;
  3 import javax.swing.*;
  4
  5 /**
  6  * A panel with calculator buttons and a result display.
  7  */
  8 public class CalculatorPanel extends JPanel
  9 {
 10    private JButton display;
 11    private JPanel panel;
 12    private double result;
 13    private String lastCommand;
 14    private boolean start;
 15
 16    public CalculatorPanel()
 17    {
 18       setLayout(new BorderLayout());
 19
 20       result = 0;
 21       lastCommand = "=";
 22       start = true;
 23
 24       // 添加显示
 25
 26       display = new JButton("0");
 27       display.setEnabled(false);
 28       add(display, BorderLayout.NORTH);
 29
 30       ActionListener insert = new InsertAction();
 31       ActionListener command = new CommandAction();
 32
 33
 34
 35       panel = new JPanel();
 36       panel.setLayout(new GridLayout(4, 4));
 37
 38       addButton("7", insert);
 39       addButton("8", insert);
 40       addButton("9", insert);
 41       addButton("/", command);
 42
 43       addButton("4", insert);
 44       addButton("5", insert);
 45       addButton("6", insert);
 46       addButton("*", command);
 47
 48       addButton("1", insert);
 49       addButton("2", insert);
 50       addButton("3", insert);
 51       addButton("-", command);
 52
 53       addButton("0", insert);
 54       addButton(".", insert);
 55       addButton("=", command);
 56       addButton("+", command);
 57
 58       add(panel, BorderLayout.CENTER);
 59    }
 60
 61    /**
 62     * Adds a button to the center panel.
 63     * @param label the button label
 64     * @param listener the button listener
 65     */
 66    private void addButton(String label, ActionListener listener)
 67    {
 68       JButton button = new JButton(label);
 69       button.addActionListener(listener);
 70       panel.add(button);
 71    }
 72
 73
 76    private class InsertAction implements ActionListener//
 77    {
 78       public void actionPerformed(ActionEvent event)
 79       {
 80          String input = event.getActionCommand();
 81          if (start)
 82          {
 83             display.setText("");
 84             start = false;
 85          }
 86          display.setText(display.getText() + input);
 87       }
 88    }
 89
 90
 93    private class CommandAction implements ActionListener
 94    {
 95       public void actionPerformed(ActionEvent event)
 96       {
 97          String command = event.getActionCommand();
 98
 99          if (start)
100          {
101             if (command.equals("-"))
102             {
103                display.setText(command);
104                start = false;
105             }
106             else lastCommand = command;
107          }
108          else
109          {
110             calculate(Double.parseDouble(display.getText()));
111             lastCommand = command;
112             start = true;
113          }
114       }
115    }
116
117    /**
118     * Carries out the pending calculation.
119     * @param x the value to be accumulated with the prior result.
120     */
121    public void calculate(double x)
122    {
123       if (lastCommand.equals("+")) result += x;
124       else if (lastCommand.equals("-")) result -= x;
125       else if (lastCommand.equals("*")) result *= x;
126       else if (lastCommand.equals("/")) result /= x;
127       else if (lastCommand.equals("=")) result = x;
128       display.setText("" + result);
129    }
130 }
实验结果如下:
测试程序2
在elipse IDE中调试运行教材486页程序12-2,结合运行结果理解程序;
掌握文本组件的用法;
记录示例代码阅读理解中存在的问题与疑惑。
代码如下:
|
1
2
3
4
5
6
7
8
9
10
11
12
13
14
15
16
17
18
19
20
21
|
package
text;
import
java.awt.*;
import
javax.swing.*;
/**
* @version 1.42 2018-04-10
* @author Cay Horstmann
*/
public
class
TextComponentTest
{
public
static
void
main(String[] args)
{
EventQueue.invokeLater(() -> {
var frame =
new
TextComponentFrame();
frame.setTitle(
"TextComponentTest"
);
frame.setDefaultCloseOperation(JFrame.EXIT_ON_CLOSE);
frame.setVisible(
true
);
});
}
}
|
|
1
2
3
4
5
6
7
8
9
10
11
12
13
14
15
16
17
18
19
20
21
22
23
24
25
26
27
28
29
30
31
32
33
34
35
36
37
38
39
40
41
42
43
44
45
46
47
48
49
50
51
52
53
54
55
56
|
package
text;
import
java.awt.BorderLayout;
import
java.awt.GridLayout;
import
javax.swing.JButton;
import
javax.swing.JFrame;
import
javax.swing.JLabel;
import
javax.swing.JPanel;
import
javax.swing.JPasswordField;
import
javax.swing.JScrollPane;
import
javax.swing.JTextArea;
import
javax.swing.JTextField;
import
javax.swing.SwingConstants;
/**
* A frame with sample text components.
*/
public
class
TextComponentFrame
extends
JFrame
{
public
static
final
int
TEXTAREA_ROWS =
8
;
public
static
final
int
TEXTAREA_COLUMNS =
20
;
public
TextComponentFrame()
{
var textField =
new
JTextField();
var passwordField =
new
JPasswordField();
var northPanel =
new
JPanel();
northPanel.setLayout(
new
GridLayout(
2
,
2
));
northPanel.add(
new
JLabel(
"User name: "
, SwingConstants.RIGHT));
northPanel.add(textField);
northPanel.add(
new
JLabel(
"Password: "
, SwingConstants.RIGHT));
northPanel.add(passwordField);
add(northPanel, BorderLayout.NORTH);
var textArea =
new
JTextArea(TEXTAREA_ROWS, TEXTAREA_COLUMNS);
var scrollPane =
new
JScrollPane(textArea);
add(scrollPane, BorderLayout.CENTER);
// add button to append text into the text area
var southPanel =
new
JPanel();
var insertButton =
new
JButton(
"Insert"
);
southPanel.add(insertButton);
insertButton.addActionListener(event ->
textArea.append(
"User name: "
+ textField.getText() +
" Password: "
+
new
String(passwordField.getPassword()) +
"\n"
));
add(southPanel, BorderLayout.SOUTH);
pack();
}
}
|
运行结果如下:
测试程序3
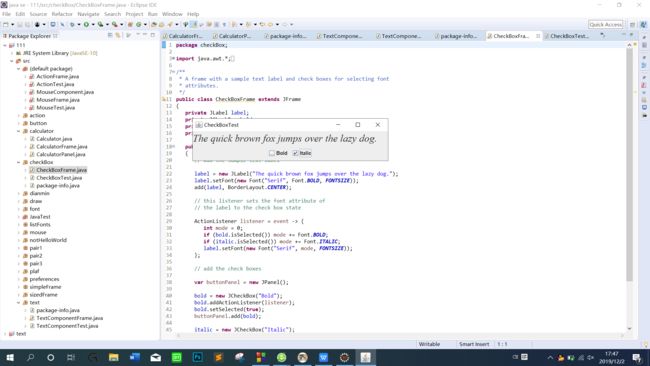
在elipse IDE中调试运行教材489页程序12-3,结合运行结果理解程序;
掌握复选框组件的用法;
记录示例代码阅读理解中存在的问题与疑惑。
实验程序如下:
 1 import java.awt.*;
 2 import javax.swing.*;
 3
 4 /**
 5  * @version 1.34 2015-06-12
 6  * @author Cay Horstmann
 7  */
 8 public class CheckBoxTest
 9 {
10    public static void main(String[] args)
11    {
12       EventQueue.invokeLater(() -> {
13          JFrame frame = new CheckBoxFrame();
14          frame.setTitle("CheckBoxTest");
15          frame.setDefaultCloseOperation(JFrame.EXIT_ON_CLOSE);
16          frame.setVisible(true);
17       });
18    }
19 }
 1 import java.awt.*;
 2 import java.awt.event.*;
 3 import javax.swing.*;
 4
 5 /**
 6  * A frame with a sample text label and check boxes for selecting font
 7  * attributes.
 8  */
 9 public class CheckBoxFrame extends JFrame
10 {
11    private JLabel label;
12    private JCheckBox bold;
13    private JCheckBox italic;
14    private static final int FONTSIZE = 24;
15
16    public CheckBoxFrame()
17    {
18       // add the sample text label
19
20       label = new JLabel("The quick brown fox jumps over the lazy dog.");
21       label.setFont(new Font("Serif", Font.BOLD, FONTSIZE));
22       add(label, BorderLayout.CENTER);
23
24       // this listener sets the font attribute of
25       // the label to the check box state
26
27       ActionListener listener = event -> {
28          int mode = 0;
29          if (bold.isSelected()) mode += Font.BOLD;
30          if (italic.isSelected()) mode += Font.ITALIC;
31          label.setFont(new Font("Serif", mode, FONTSIZE));
32       };
33
34
35
36       JPanel buttonPanel = new JPanel();
37       bold = new JCheckBox("Bold");
38       bold.addActionListener(listener);
39       bold.setSelected(true);
40       buttonPanel.add(bold);
41
42       italic = new JCheckBox("Italic");
43       italic.addActionListener(listener);
44       buttonPanel.add(italic);
45
46       add(buttonPanel, BorderLayout.SOUTH);
47       pack();
48    }
49 }
实验结果如下:
测试程序4
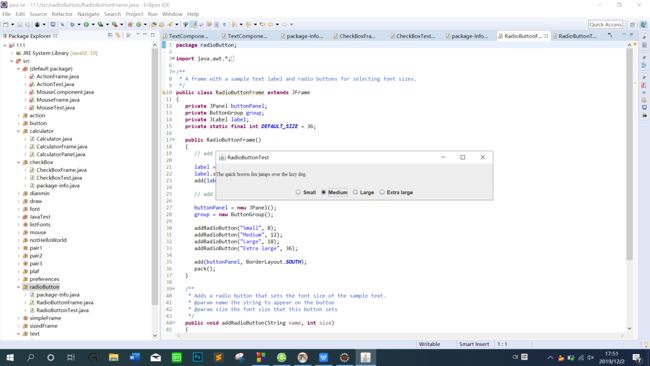
在elipse IDE中调试运行教材491页程序12-4,运行结果理解程序;
掌握单选按钮组件的用法;
记录示例代码阅读理解中存在的问题与疑惑。
 1 import java.awt.*;
 2 import javax.swing.*;
 3
 4 /**
 5  * @version 1.34 2015-06-12
 6  * @author Cay Horstmann
 7  */
 8 public class RadioButtonTest
 9 {
10    public static void main(String[] args)
11    {
12       EventQueue.invokeLater(() -> {
13          JFrame frame = new RadioButtonFrame();
14          frame.setTitle("RadioButtonTest");
15          frame.setDefaultCloseOperation(JFrame.EXIT_ON_CLOSE);
16          frame.setVisible(true);
17       });
18    }
 1 import java.awt.*;
 2 import java.awt.event.*;
 3 import javax.swing.*;
 4
 5
 8 public class RadioButtonFrame extends JFrame
 9 {
10    private JPanel buttonPanel;
11    private ButtonGroup group;
12    private JLabel label;
13    private static final int DEFAULT_SIZE = 36;
14
15    public RadioButtonFrame()
16    {
17       // add the sample text label
18
19       label = new JLabel("The quick brown fox jumps over the lazy dog.");
20       label.setFont(new Font("Serif", Font.PLAIN, DEFAULT_SIZE));
21       add(label, BorderLayout.CENTER);
25       buttonPanel = new JPanel();
26       group = new ButtonGroup();
28       addRadioButton("Small", 8);
29       addRadioButton("Medium", 12);
30       addRadioButton("Large", 18);
31       addRadioButton("Extra large", 36);
32
33       add(buttonPanel, BorderLayout.SOUTH);
34       pack();
35    }
36
37    /**
39     * @param name the string to appear on the button
40     * @param size the font size that this button sets
41     */
42    public void addRadioButton(String name, int size)
43    {
44       boolean selected = size == DEFAULT_SIZE;
45       JRadioButton button = new JRadioButton(name, selected);
46       group.add(button);
47       buttonPanel.add(button);
51       ActionListener listener = event -> label.setFont(new Font("Serif", Font.PLAIN, size));
52
53       button.addActionListener(listener);
54    }
55 }
运行结果如下:
测试程序5
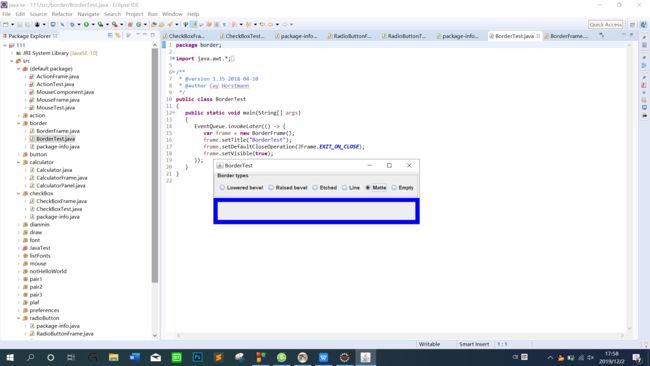
在elipse IDE中调试运行教材494页程序12-5,结合运行结果理解程序;
掌握边框的用法;
记录示例代码阅读理解中存在的问题与疑惑。
代码如下:
 1 import java.awt.*;
 2 import javax.swing.*;
 3
 4 /**
 5  * @version 1.34 2015-06-13
 6  * @author Cay Horstmann
 7  */
 8 public class BorderTest
 9 {
10    public static void main(String[] args)
11    {
12       EventQueue.invokeLater(() -> {
13          JFrame frame = new BorderFrame();
14          frame.setTitle("BorderTest");
15          frame.setDefaultCloseOperation(JFrame.EXIT_ON_CLOSE);
16          frame.setVisible(true);
17       });
18    }
19 }
 1 import java.awt.*;
 2 import javax.swing.*;
 3 import javax.swing.border.*;
 4
 5 /**
 6  * A frame with radio buttons to pick a border style.
 7  */
 8 public class BorderFrame extends JFrame
 9 {
10    private JPanel demoPanel;
11    private JPanel buttonPanel;
12    private ButtonGroup group;
13
14    public BorderFrame()
15    {
16       demoPanel = new JPanel();
17       buttonPanel = new JPanel();
18       group = new ButtonGroup();
21       addRadioButton("Lowered bevel", BorderFactory.createLoweredBevelBorder());
22       addRadioButton("Raised bevel", BorderFactory.createRaisedBevelBorder());
23       addRadioButton("Etched", BorderFactory.createEtchedBorder());
24       addRadioButton("Line", BorderFactory.createLineBorder(Color.BLUE));
25       addRadioButton("Matte", BorderFactory.createMatteBorder(10, 10, 10, 10, Color.BLUE));
26       addRadioButton("Empty", BorderFactory.createEmptyBorder());
27
28       Border etched = BorderFactory.createEtchedBorder();
29       Border titled = BorderFactory.createTitledBorder(etched, "Border types");
30       buttonPanel.setBorder(titled);
31
32       setLayout(new GridLayout(2, 1));
33       add(buttonPanel);
34       add(demoPanel);
35       pack();
36    }
37
38    public void addRadioButton(String buttonName, Border b)
39    {
40       JRadioButton button = new JRadioButton(buttonName);
41       button.addActionListener(event -> demoPanel.setBorder(b));
42       group.add(button);
43       buttonPanel.add(button);
44    }
45 }
实验结果如下:
测试程序6
在elipse IDE中调试运行教材498页程序12-6,结合运行结果理解程序;
掌握组合框组件的用法;
记录示例代码阅读理解中存在的问题与疑惑。
代码如下:
|
1
2
3
4
5
6
7
8
9
10
11
12
13
14
15
16
17
18
19
20
21
22
23
24
25
26
27
28
29
30
31
32
33
34
35
36
37
38
39
40
41
42
43
44
45
46
47
48
49
50
51
|
package
comboBox;
import
java.awt.BorderLayout;
import
java.awt.Font;
import
javax.swing.JComboBox;
import
javax.swing.JFrame;
import
javax.swing.JLabel;
import
javax.swing.JPanel;
/**
* A frame with a sample text label and a combo box for selecting font faces.
*/
public
class
ComboBoxFrame
extends
JFrame
{
private
JComboBox
private
JLabel label;
private
static
final
int
DEFAULT_SIZE =
24
;
public
ComboBoxFrame()
{
// add the sample text label
label =
new
JLabel(
"The quick brown fox jumps over the lazy dog."
);
label.setFont(
new
Font(
"Serif"
, Font.PLAIN, DEFAULT_SIZE));
add(label, BorderLayout.CENTER);
// make a combo box and add face names
faceCombo =
new
JComboBox<>();
faceCombo.addItem(
"Serif"
);
faceCombo.addItem(
"SansSerif"
);
faceCombo.addItem(
"Monospaced"
);
faceCombo.addItem(
"Dialog"
);
faceCombo.addItem(
"DialogInput"
);
// the combo box listener changes the label font to the selected face name
faceCombo.addActionListener(event ->
label.setFont(
new
Font(faceCombo.getItemAt(faceCombo.getSelectedIndex()),
Font.PLAIN, DEFAULT_SIZE)));
// add combo box to a panel at the frame's southern border
var comboPanel =
new
JPanel();
comboPanel.add(faceCombo);
add(comboPanel, BorderLayout.SOUTH);
pack();
}
}
|
|
1
2
3
4
5
6
7
8
9
10
11
12
13
14
15
16
17
18
19
20
21
|
package
comboBox;
import
java.awt.*;
import
javax.swing.*;
/**
* @version 1.36 2018-04-10
* @author Cay Horstmann
*/
public
class
ComboBoxTest
{
public
static
void
main(String[] args)
{
EventQueue.invokeLater(() -> {
var frame =
new
ComboBoxFrame();
frame.setTitle(
"ComboBoxTest"
);
frame.setDefaultCloseOperation(JFrame.EXIT_ON_CLOSE);
frame.setVisible(
true
);
});
}
}
|
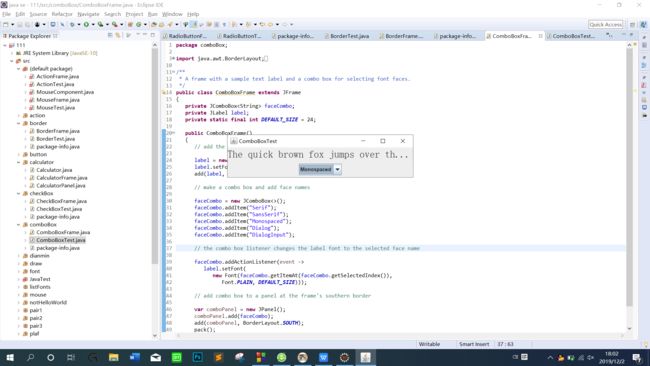
运行结果如下:
实验2:结对编程练习
利用所掌握的GUI技术,设计一个用户信息采集程序,要求如下:
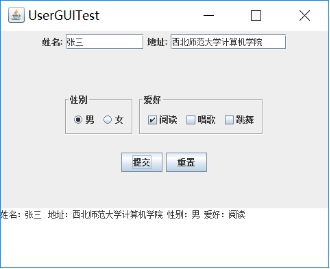
(1) 用户信息输入界面如下图所示:
(2) 用户点击提交按钮时,用户输入信息显示在录入信息显示区,格式如下:
(3)用户点击重置按钮后,清空用户已输入信息;
(4) 点击窗口关闭,程序退出。
结对编程练习包含以下4部分:
1) 程序设计思路简述;
运用GridLayout布局,北边放JTextField(用以处理姓名和地址)以及JLabel,还有性别按钮(此为单选按钮用以处理性别选择)和爱好按钮(此为复选按钮用以处理爱好选择),南边放一个JTextArea(用以打印提交后的信息显示),总归就是把前几个示例代码糅合在一起写出来的。
2) 程序代码;
package jd;
import java.awt.BorderLayout;
import java.awt.FlowLayout;
import java.awt.GridLayout;
import javax.swing.BorderFactory;
import javax.swing.ButtonGroup;
import javax.swing.JButton;
import javax.swing.JCheckBox;
import javax.swing.JFrame;
import javax.swing.JLabel;
import javax.swing.JPanel;
import javax.swing.JRadioButton;
import javax.swing.JScrollPane;
import javax.swing.JTextArea;
import javax.swing.JTextField;
import javax.swing.border.Border;
public class GUI extends JFrame{
public GUI() {
setSize(500,380);
JPanel northPanel = new JPanel(); //北面
add(northPanel,BorderLayout.NORTH);
//northPanel.setLayout(new GridLayout(1,4));
JLabel nameLabel = new JLabel("姓名:",JLabel.RIGHT);
JTextField nameText = new JTextField(8);
JLabel adressLabel = new JLabel("地址:",JLabel.RIGHT);
JTextField adressText = new JTextField(15);
northPanel.add(nameLabel);
northPanel.add(nameText);
northPanel.add(adressLabel);
northPanel.add(adressText);
JPanel centerPanel = new JPanel();
centerPanel.setLayout(new GridLayout(3,1));
add(centerPanel,BorderLayout.CENTER);
JPanel blankPanel = new JPanel();
centerPanel.add(blankPanel);
JPanel choosePanel = new JPanel();
choosePanel.setLayout(new FlowLayout());
centerPanel.add(choosePanel);
choosePanel.setSize(100,100);
JPanel sexPanel = new JPanel(); //性别按钮
choosePanel.add(sexPanel);
Border etched = BorderFactory.createEtchedBorder();
Border titled1 = BorderFactory.createTitledBorder(etched,"性别");
sexPanel.setBorder(titled1);
ButtonGroup sexGroup = new ButtonGroup();
JRadioButton manButton = new JRadioButton("男",true);
sexGroup.add(manButton);
JRadioButton womenButton = new JRadioButton("女",false);
sexGroup.add(womenButton);
sexPanel.add(manButton);
sexPanel.add(womenButton);
JPanel hobbyPanel = new JPanel(); //爱好按钮
choosePanel.add(hobbyPanel);
Border titled2 = BorderFactory.createTitledBorder(etched,"爱好");
hobbyPanel.setBorder(titled2);
JCheckBox read = new JCheckBox("阅读");
JCheckBox sing = new JCheckBox("唱歌");
JCheckBox dance = new JCheckBox("跳舞");
hobbyPanel.add(read);
hobbyPanel.add(sing);
hobbyPanel.add(dance);
JPanel ButtonPanel = new JPanel();
centerPanel.add(ButtonPanel);
JButton submit = new JButton("提交");
JButton reset = new JButton("重置");
ButtonPanel.add(submit);
ButtonPanel.add(reset);
JTextArea southText = new JTextArea("录入信息显示区!",6,10); //南面
JScrollPane scrollPane = new JScrollPane(southText); //滚动
southText.setLineWrap(true);
add(scrollPane,BorderLayout.SOUTH);
submit.addActionListener(event->{ //按钮监听器
String hobby="";
if(read.isSelected())
hobby=hobby+"阅读 ";
if(sing.isSelected())
hobby=hobby+"唱歌 ";
if(dance.isSelected())
hobby=hobby+"跳舞 ";
String sex="";
if(manButton.isSelected())
sex="男";
else
sex="女";
if(southText.getText().equals("录入信息显示区!")) //清空默认值
southText.setText("");
southText.append("姓名:"+nameText.getText()+" 地址:"+adressText.getText()+" 性别:"+sex+" 爱好:"+hobby+"\n");
});
reset.addActionListener(event->{
southText.setText("");
nameText.setText("");
adressText.setText("");
});
}
}
package jd;
import java.awt.EventQueue;
import javax.swing.JFrame;
public class Test {
public static void main(String[] args)
{
EventQueue.invokeLater(() -> {
JFrame frame = new GUI();
frame.setTitle("UserGUITest");
frame.setDefaultCloseOperation(JFrame.EXIT_ON_CLOSE);
frame.setVisible(true);
});
}
}
结对编程照片:
实验总结:
此课程在本学期学习中,前期问题教多,作为计算机专业学生,前提课程Java程序设计必不可少,没有良好的编程能力作为基础,此课程进行中,困难重重。但是在后期,不管我们每个人学习情况如何,我们基本对这些问题解决掉了,取长补短,达到了平衡状态。
