Solaris10
下Nagios安装
1.
前言
Nagios
是一个系统和网络监控软件,它可以监测所指定的主机和服务,并在出现问题以及问题恢复后发出报警。Nagios最早是被设计运行于Linux环境下的,但在大多数Unix操作系统下也可以使用。同时它是一个开源软件,我们可以免费获得它的源码,和使用它。Nagios是个不错的系统监控软件,应用的范围也比较广泛。
本文将介绍Nagios在Solaris10操做系统下的安装过程,其中包括,源码的编译、安装;Apache的安装、Nagios CGI的配置;Nagios监控配置等。
本文参考了Nagios的官方文档和Nagios社区的文章,以及互联网上其他人的相关帖子。
2.
环境、资源准备
要安装Nagios首先你得有一个能运行Nagios软件的操作系统,我选用的操作系统是Solaris10(x86),当然还要有Nagios源代码。nagios-plugins也是必不可少的,没有它Nagios就不能获得你要监控资源的任何信息。
在solaris10下安装Nagios,还需要C编译环境,一般选择gcc和make。还有一些必须的软件包。
需要的软件包如下:
|
gcc-3.4.6-sol10-x86-local.gz
|
|
libiconv-1.11-sol10-x86-local.gz
|
|
libintl-3.4.0-sol10-x86-local.gz
|
|
make-3.81-sol10-x86-local.gz
|
|
openssl-0.9.8h-sol10-x86-local.gz
|
|
gd-2.0.35-sol10-x86-local.gz
|
|
httpd-2.2.4.tar.gz
|
Nagios
和nagios-plugins的源码包如下:
|
nagios-3.0.3.tar.gz
|
|
nagios-plugins-1.4.11.tar.gz
|
|
nrpe-2.12.tar.gz
|
Nagios
的版本是3.0.3,plugins为1.4.11。
2.1.
安装gcc、make 配置C编译环境
2.1.1.
安装gcc
使用gcc需要安装libiconv和libintl。
|
# gunzip ./libiconv-1.11-sol10-x86-local.gz
# pkgadd -d ./libiconv-1.11-sol10-x86-local
# gunzip ./libintl-3.4.0-sol10-x86-local.gz
# pkgadd -d ./ libintl-3.4.0-sol10-x86-local
# gunzip ./gcc-3.4.6-sol10-x86-local.gz
# pkgadd -d ./gcc-3.4.6-sol10-x86-local
|
将/usr/local/bin 和 /usr/ccs/bin 添加到PATH中
|
# PATH=/usr/local/bin:/usr/ccs/bin:$PATH
|
设置LD_LIBRARY_PATH,加入/usr/local/lib
|
# LD_LIBRARY_PATH=/usr/local/lib:$LD_LIBRARY_PATH
|
2.1.2.
安装make和openssl
安装make
|
# gunzip ./make-3.81-sol10-x86-local.gz
# pkgadd -d ./make-3.81-sol10-x86-local
|
安装openssl
|
# gunzip ./openssl-0.9.8h-sol10-x86-local.gz
# pkgadd -d ./openssl-0.9.8h-sol10-x86-local
# LD_LIBRARY_PATH=/usr/local/ssl/lib:$LD_LIBRARY_PATH
|
3.
安装Nagios
当c编译环境准备完毕后,下一步就可以安装Nagios了。
一般来讲安装Nagios,需要安装如下几个软件包,一个是Nagios软件包;一个是Nagios Plugins,这是个插件,监控脚本和程序都在这个包里;还有,如果需要监控远程主机,那么NRPE也是必不可少的(对于Unix主机,Windows用的是NSCA)。
此外,Nagios还提供一个用cgi编写的web应用,可以将其部署到apache服务器下,提供一个可视化的监控情况的浏览界面。
下面逐步介绍一下安装和配置过程。
3.1.
安装Nagios
安装Nagios之前需要创建用户、用户组(默认nagios、nagios)。
确认/usr/ccs/bin存在于PATH中。
创建Nagios的安装目录 /usr/local/nagios
|
# groupadd nagios
# useradd -g nagios -d /usr/local/nagios nagios
|
安装Nagios
|
# gunzip ./nagios-3.0.3.tar.gz
# tar xvf ./nagios-3.0.3.tar
# cd ./nagios-3.0.3
# ./configure --prefix=/usr/local/nagios --with-nagios-user=nagios \
--with-nagios-group=nagios --with-gd-lib=/usr/sfw/lib \
--with-gd-inc=/usr/sfw/include
# make all
# make fullinstall
# make install-config
|
安装Nagios Plugins
|
# gunzip ./nagios-plugins-1.4.11.tar.gz
# tar xvf ./nagios-plugins-1.4.11.tar
# cd nagios-plugins-1.4.11
# ./configure --prefix=/usr/local/nagios --with-openssl=/usr/local/ssl
# make
# make install
# chown -R nagios:nagios /usr/local/nagios/libexec
|
3.2.
安装、配置Apache
安装Apache
|
# ./configure --prefix=/usr/local/apache2 --enable-mods-shared=all \
--enable-ssl=shared \
--enable-ssl --with-ssl=/usr/local/ssl
# make
# make install
|
配置/usr/local/apache2/conf/httpd.conf 文件。
修改apahce的执行用户、用户组为nagios、nagios。
配置Nagios的web应用。
|
#
# If you wish httpd to run as a different user or group, you must run
# httpd as root initially and it will switch.
#
# User/Group: The name (or #number) of the user/group to run httpd as.
# It is usually good practice to create a dedicated user and group for
# running httpd, as with most system services.
#
User nagios
Group nagios
|
在/usr/local/apache2/conf/httpd.conf文件追加如下内容。
|
#setting for nagios
.Alias /nagios/cgi-bin /usr/local/nagios/sbin
#Cgi
文件所在目录
AuthType Basic
Options ExecCGI
AllowOverride None
Order allow,deny
Allow from all
AuthName "Nagios Access"
#
验证文件路径
AuthUserFile /usr/local/nagios/etc/htpasswd
Require valid-user
Alias /nagios /usr/local/nagios/share
#nagios
页面文件目录
AuthType Basic
Options None
AllowOverride None
Order allow,deny
Allow from all
AuthName "nagios Access"
#
验证文件路径
AuthUserFile /usr/local/nagios/etc/htpasswd
Require valid-user
|
生成登录用户和验证口令。
|
# /usr/local/apache2/bin/htpasswd -c /usr/local/nagios/etc/htpasswd |
此处的user_name为登录Nagios Web应用需要输入的用户名。我所使用的是sky。
按照提示输入要设置的口令即可。
配置/usr/local/nagios/etc/cgi.cfg,添加用户sky。
|
................. .................
# SYSTEM/PROCESS INFORMATION ACCESS
# This option is a comma-delimited list of all usernames that
# have access to viewing the Nagios process information as
# provided by the Extended Information CGI (extinfo.cgi). By
# default, *no .e* has access to this unless you choose to
# not use authorization. You may use an asterisk (*) to
# authorize any user who has authenticated to the web server.
authorized_for_system_information=nagiosadmin,sky
# CONFIGURATION INFORMATION ACCESS
# This option is a comma-delimited list of all usernames that
# can view ALL configuration information (hosts, commands, etc).
# By default, users can .ly view configuration information
# for the hosts and services they are contacts for. You may use
# an asterisk (*) to authorize any user who has authenticated
# to the web server.
authorized_for_configuration_information=nagiosadmin,sky
# SYSTEM/PROCESS COMMAND ACCESS
# This option is a comma-delimited list of all usernames that
# can issue shutdown and restart commands to Nagios via the
# command CGI (cmd.cgi). Users in this list can also change
# the program mode to active or standby. By default, *no .e*
# has access to this unless you choose to not use authorization.
# You may use an asterisk (*) to authorize any user who has
# authenticated to the web server.
authorized_for_system_commands=nagiosadmin,sky
# GLOBAL HOST/SERVICE VIEW ACCESS
# These two options are comma-delimited lists of all usernames that
# can view information for all hosts and services that are being
# monitored. By default, users can .ly view information
# for hosts or services that they are contacts for (unless you
# you choose to not use authorization). You may use an asterisk (*)
# to authorize any user who has authenticated to the web server.
authorized_for_all_services=nagiosadmin,sky
authorized_for_all_hosts=nagiosadmin,sky
# GLOBAL HOST/SERVICE COMMAND ACCESS
# These two options are comma-delimited lists of all usernames that
# can issue host or service related commands via the command
# CGI (cmd.cgi) for all hosts and services that are being monitored.
# By default, users can .ly issue commands for hosts or services
# that they are contacts for (unless you you choose to not use
# authorization). You may use an asterisk (*) to authorize any
# user who has authenticated to the web server.
authorized_for_all_service_commands=nagiosadmin,sky
authorized_for_all_host_commands=nagiosadmin,sky
................. .................
|
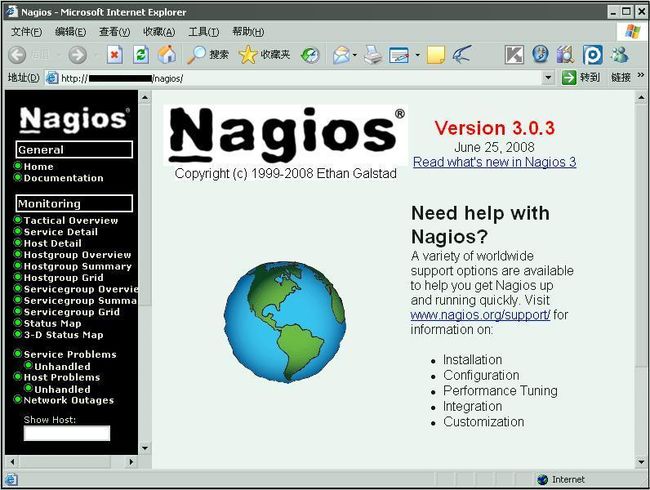
启动Apache登录[url]http:///nagios[/url] ,IP是主机ip地址,检查配置是否正确。
在IE地址栏输入[url]http:///nagios[/url]
|
|
|
|
如果可以看到如上界面,那么你的配置就成功了。
3.3.
配置、启动Nagios
在nagios的etc目录下存放的是配置文件,Nagios从nagios.cfg文件中读取配置信息,从而确定监控的内容。nagios.cfg文件仅仅是配置信息的入口,该文件中有很多指向(cfg_file=...),指定其余配置文件的路径,包括模板配置文件(templates.cfg)、命令配置文件(commands.cfg)、时间周期文件(timeperiods.cfg)等等。
3.3.1.
配置监控内容
编辑/usr/local/nagios/etc/objects/localhost.cfg文件,监控本机运行状况。
|
#
定义一个模板
define host{
name linux-box ; Name of this template
use generic-host ; Inherit default values
check_period 24x7
check_interval 5
retry_interval 1
max_check_attempts 10
check_command check-host-alive
notification_period 24x7
notification_interval 30
notification_options d,r
contact_groups admins
register 0 ; DONT REGISTER THIS - ITS A TEMPLATE
}
#
定义主机信息
define host{
use linux-server ; Name of host template to use
; This host definition will inherit all variables that are defined
; in (or inherited by) the linux-server host template definition.
host_name localhost
alias localhost
address 127.0.0.1
}
#
定义主机组,将
localhost
添加到该组中
define hostgroup{
hostgroup_name linux-servers ; The name of the hostgroup
alias Linux Servers ; Long name of the group
members localhost ; Comma separated list of hosts that belong to this group
}
#
定义监控的服务
# “ping”
define service{
use local-service ; Name of service template to use
host_name localhost
service_de.ion PING
check_command check_ping!100.0,20%!500.0,60%
}
# /
空间使用情况
define service{
use local-service ; Name of service template to use
host_name localhost
service_de.ion Root Partition
check_command check_local_disk!20%!10%!/
}
#
当前登录的用户数
define service{
use local-service ; Name of service template to use
host_name localhost
service_de.ion Current Users
check_command check_local_users!20!50
}
#
进程数
define service{
use local-service ; Name of service template to use
host_name localhost
service_de.ion Total Processes
check_command check_local_procs!250!400!RSZDT
}
#CPU
负载
define service{
use local-service ; Name of service template to use
host_name localhost
service_de.ion Current Load
check_command check_local_load!5.0,4.0,3.0!10.0,6.0,4.0
}
#
交换分区
define service{
use local-service ; Name of service template to use
host_name localhost
service_de.ion Swap Usage
check_command check_local_swap!20!10
}
#SSH
define service{
use local-service ; Name of service template to use
host_name localhost
service_de.ion SSH
check_command check_ssh
notifications_enabled 0
}
|
修改/usr/local/nagios/etc/nagios.cfg如下
|
...............
# Definitions for monitoring the local (Linux) host
cfg_file=/usr/local/nagios/etc/objects/localhost.cfg
...............
|
3.3.2.
启动Nagios
Nagios
的启动程序是/usr/local/nagios/bin/nagios
|
# ./nagios --help
Nagios 3.0.3
Copyright (c) 1999-2008 Ethan Galstad ([url]http://www.nagios.org[/url])
Last Modified: 06-25-2008
License: GPL
Usage: ./nagios [options]
Options:
-v, --verify-config Verify all configuration data
-s, --test-scheduling Shows projected/recommended check scheduling and other
diagnostic info based . the current configuration files.
-x, --dont-verify-paths Don't check for circular object paths - USE WITH CAUTION!
-p, --precache-objects Precache object configuration - use with -v or -s options
-u, --use-precached-objects Use precached object config file
-d, --daemon Starts Nagios in daemon mode, instead of as a foreground process
Visit the Nagios website at [url]http://www.nagios.org/[/url] for bug fixes, new
releases, .line documentation, FAQs, information . subscribing to
the mailing lists, and commercial support options for Nagios.
|
首先通过-v选项验证配置文件是否正确。
|
# cd /usr/lcoal/nagios/bin
# ./nagios -v ../etc/nagios.cfg
Nagios 3.0.3
Copyright (c) 1999-2008 Ethan Galstad ([url]http://www.nagios.org[/url])
Last Modified: 06-25-2008
License: GPL
Reading configuration data...
Running pre-flight check . configuration data...
Checking services...
.........................................................
.............................................
Total Warnings: 0
Total Errors: 0
Things look okay - No serious problems were detected during the pre-flight check
|
如果没有错误,就可以启动它了。
|
# cd /usr/local/nagios/bin
# ./nagios -d /usr/local/nagios/etc/nagios.cfg
|
查看/usr/local/nagios/var/nagios.log日志文件,观察启动是否正常。
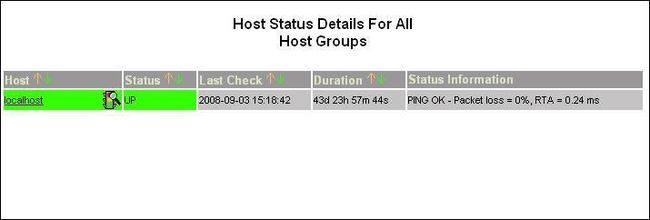
在IE浏览器中查看监控情况。
点击左边导航栏的 Host Detail
|
|
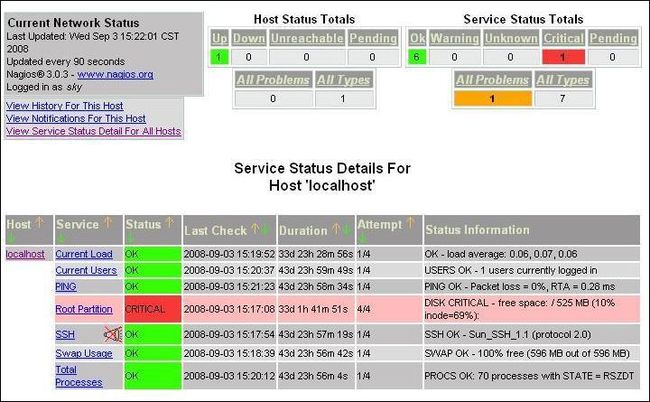
点击 localhost 查看详细情况。
|
|
3.4.
安装NRPE
通过Nagios的安装和配置,我们看到了本机(localhost)系统的运行状况。我们需要监控的不仅仅是我们本机,还应该可以监控网络中其它服务器的运行状况,NRPE就是用来解决这个问题的。简单的说NRPE就是运行在远程主机(被监控主机)上的进程,它负责与Nagios主监控进程进行通信,将监控的结果传给主监控机器(Nagios所在主机)。
Nagios
和NRPE之间的关系如下图所示
|
|
图中蓝色部分就是NRPE,它主要包括两个部分一个是NRPE程序(图中Remote Linux/Unix Host所包含的蓝色部分NRPE),另一个是NRPE插件(也就是check_nrpe程序)。Nagios通过调用check_nrpe和运行在远程主机上的NRPE程序来通讯,NRPE程序通过要调用Nagios的插件(Nagios Plugins)获得监控结果、信息,将其传回给监控主机(Monitoring Host)。
3.4.1.
NRPE
的安装
从NRPE原理图我们不难看出,安装NRPE软件需要安装如下几个部分,首先,在监控主机(Monitoring Host)也就是Nagios所在的主机上要安装NRPE插件(check_nrpe);其次,在远程主机(Remote Linux/Unix Host),即被监控主机上,安装NRPE程序(nrpe);最后,如果远程主机(Remote Linux/Unix Host)只有NRPE程序(nrpe)是不能监控本机的任何信息的,当然还要在远程主机上安装Nagios插件(Nagios Plugins)。
以下讲述一下NRPE和NRPE插件的安装过程,Nagios插件的安装参见之前的Nagios安装部分,这里就不重复了。
首先在远程主机上准备好C编译环境,参考之前的章节。创建nagios用户和nagios用户组,以及软件的安装目录/usr/local/nagios。
3.4.1.1.
Configuration
解压软件包
|
# gunzip ./nrpe-2.12.tar.gz
# tar xvf ./nrpe-2.12.tar
# cd ./nrpe-2.12
# ./configure --prefix=/usr/local/nagios/ --enable-ssl --with-ssl=/usr/local/ssl \
--with-ssl-lib=/usr/local/ssl/lib
|
当看到没有错误后就可以Make了。
3.4.1.2.
Make
在make之前,需要对./src/nrpe.c进行必要的修改,否则编译会报错。
|
# vi ./src/nrpe.c
/*
将这些代码注释掉,因为
solaris
不支持如下功能。
else if(!strcmp(varvalue,”authpriv”))
log_facility=LOG_AUTHPRIV;
else if(!strcmp(varvalue,”ftp”))
log_facility=LOG_FTP;
*/
|
编译
|
# make all
|
如果没有错误,则表明编译通过了,下一步就是安装了。在监控主机(Monitoring Host)和远程主机(Remote Host)上安装方法是不一样的,下面将逐一说明。
3.4.1.3.
在监控主机(Monitoring Host)安装NRPE插件
在监控主机上安装NRPE插件
|
# make install-plugin
|
这个过程实际上就是将编译好的check_nrpe拷贝到/usr/local/nagios/libexec下。
3.4.1.4.
在远程主机(Remote Host)安装NRPE程序和配置文件模板
在远程主机上安装NRPE和配置模板文件
|
# make install-daemon
# make install-daemon-config
|
nrpe
程序被拷贝到了/usr/local/nagios/bin下。
配置文件nrpe.cfg位于/usr/local/nagios/etc下。
3.4.2.
NRPE
的配置和启动(远程主机)
修改远程主机上的/usr/local/nagios/etc/nrpe.cfg文件。
|
# vi /usr/local/nagios/etc/nrpe.cfg
... ... ... ... ... ... ... ...
allowed_hosts=
... ... ... ... ... ... ... ...
# The following examples use hardcoded command arguments...
#
以下定义命令
command[check_users]=/usr/local/nagios//libexec/check_users -w 5 -c 10
command[check_load]=/usr/local/nagios//libexec/check_load -w 15,10,5 -c 30,25,20
command[check_hda1]=/usr/local/nagios//libexec/check_disk -w 20% -c 5% -p /dev/dsk/c0d0s0
#
将
-p
后面的分区参数更换成你本机真是环境的设备路径名。
command[check_zombie_procs]=/usr/local/nagios//libexec/check_procs -w 5 -c 10 -s Z
command[check_total_procs]=/usr/local/nagios//libexec/check_procs -w 150 -c 200
... ... ... ... ... ... ... ...
|
需修改allowed_hosts,设置为监控主机的IP。
启动NRPE(远程主机)
|
# export LD_LIBRARY_PATH=/usr/local/ssl/lib:$LD_LIBRARY_PATH
# cd /usr/local/nagios/bin
# ./nrpe -d -c /usr/local/nagios/nrpe.cfg
# ps -ef | grep nrpe
|
查看daemon的后台日志,检查是否启动正常。
通过在监控主机(Monitoring Host)运行check_nrpe命令检查访问是否正常。
|
# /usr/local/nagios/libexec/check_nrpe -H
NRPE v2.12
|
3.4.3.
配置监控主机(Monitoring Host),使其能监控远程主机(Remote Host)
首先修改/usr/local/nagios/etc/objects/commands.cfg,增加check_nrpe命令定义。
|
# vi /usr/local/nagios/etc/objects/commands.cfg
... ... ... ... ... ... ... ...
#
添加
# 'check_nrpe' command definition
define command{
command_name check_nrpe
command_line /usr/local/nagios/libexec/check_nrpe -H $HOSTADDRESS$ -c $ARG1$
}
... ... ... ... ... ... ... ...
|
创建一个新的主机监控配置文件,/usr/local/nagios/etc/objects/unixhost_
|
# vi /usr/local/nagios/etc/objects/unixhost_172.17.101.150.cfg
#################################################################
# 172.17.101.150
# HOST DEFINITION
#
#################################################################
# Define a host for the local machine
define host{
use linux-box ; Name of host template to use
; This host definition will inherit all variables that are defined
; in (or inherited by) the linux-server host template definition.
host_name solaris10_150
alias solaris10_150
address 172.17.101.150
}
#################################################################
# 172.17.101.150
# SERVICE DEFINITIONS
#
#################################################################
#CPU load
define service{
use generic-service
host_name solaris10_150
service_de.ion CPU Load
check_command check_nrpe!check_load
}
#the number of currently logged
define service{
use generic-service
host_name solaris10_150
service_de.ion Current Users
check_command check_nrpe!check_users
}
#the free drive space . /dev/hda1 . the remote host
define service{
use generic-service
host_name solaris10_150
service_de.ion / Free Space
check_command check_nrpe!check_hda1
}
#the total number of processes . the remote host.
define service{
use generic-service
host_name solaris10_150
service_de.ion Total Processes
check_command check_nrpe!check_total_procs
}
#the number of zombie processes . the remote host.
define service{
use generic-service
host_name solaris10_150
service_de.ion Zombie Processes
check_command check_nrpe!check_zombie_procs
}
|
将unixhost_172.17.101.150.cfg添加到nagios.cfg中。
|
# vi /usr/local/nagios/etc/nagios.cfg
... ... ... ... ... ... ... ...
cfg_file=/usr/local/nagios/etc/objects/localhost.cfg
cfg_file=/usr/local/nagios/etc/objects/unixhost_172.17.101.150.cfg
... ... ... ... ... ... ... ...
|
验证配置信息是否正确。
|
# cd /usr/local/nagios/bin
# ./nagios -v /usr/local/nagios/etc/nagios.cfg
|
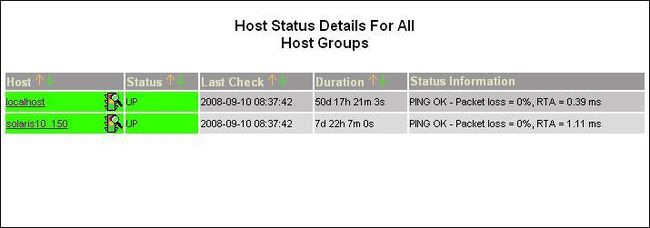
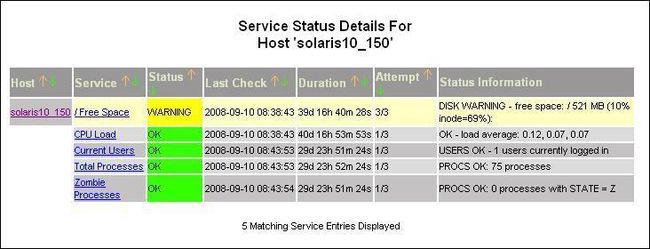
重新启动Nagios,查看远程主机是否已被添加进来。
主机列表
|
|
服务信息情况
|
|
4.
结语
以上内容仅是简单的介绍了一下Nagios在Solaris10上的安装、配置过程主要是Nagios、Nagios Plugins和NRPE的安装,以及Nagios和NRPE的配置过程。Nagios是一功能较强大的开源软件,其扩展性很好,通过Nagios Plugins新版本的方法其监控将更强大,当然你也可以根据API规则编写能够满足自己需要的监控方法。

