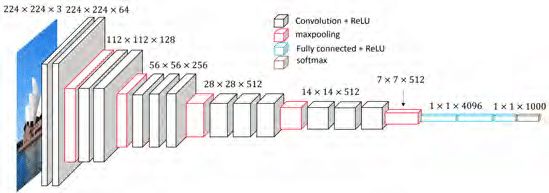
VGGNet
2014年,牛津大学计算机视觉组(Visual Geometry Group) 和 Google DeepMind公司的研究员一起研发出了新的深度卷积神经网络 (VGGNet),并取得了ILSVRC 2014 比赛分类项目的第 2 名(第一名是GoogLeNet,也是同年提出的)和定位项目的第 1 名。
VGGNet 的扩展性很强,迁移到其他图片数据上的泛化性非常好。
网络结构特点
我们分析 VGGNet 网络结构,然后通过分析网络结构来了解为什么作者来采用这样网络结构。
- 输入 224x224x3 的图片,经 64 个 3x3 的卷积核作 2 次卷积,激活函数采用 ReLU,卷积后的尺寸变为 224x224x64
- 最大化池化,池化单元尺寸为2x2(效果为图像尺寸减半),池化后的尺寸变为112x112x64
- 经 128 个 3x3 的卷积核作 2 次卷积,激活函数采用 ReLU,尺寸变为112x112x128
- 2x2 的池化层,尺寸变为56x56x128
- 经256个3x3的卷积核作 3 次卷积,激活函数采用 ReLU,尺寸变为 56x56x256
- 2x2 的池化层,尺寸变为 28x28x256
- 经512个3x3的卷积核作 3 次卷积,激活函数采用 ReLU,尺寸变为28x28x512
- 2x2 的池化层,尺寸变为 14x14x512
- 经512个3x3的卷积核作三次卷积+ReLU,尺寸变为 14x14x512
- 作2x2的max pooling池化,尺寸变为 7x7x512
- 与两层1x1x4096,一层1x1x1000进行全连接,激活函数采用 ReLU(共3层)
12、通过softmax输出1000个预测结果
在 VGGNet
结构简洁
VGG 拥有 5 段卷积层,卷积层全部使用 3x3 的卷积核、随后是 3 层全连接层、最后是 softmax 输出层,层与层之间使用最大化池(max-pooling)分开,所有隐层的激活单元都采用 ReLU 函数,ReLu 好处是简化计算。
多层连续 3x3 的小卷积核代替大的卷积核
VGG 使用多个较小卷积核(3x3)的卷积层代替一个卷积核较大的卷积层,一方面可以减少参数,另一方面相当于进行了更多的非线性映射,可以增加网络的拟合/表达能力。
采用较小卷积核是 VGGNet 的一个重要特点,在 VGGNet 将 AlexNet 中的 7x7 卷积核降低为 3x3 的卷积核,并且通过增加卷积子层数来达到同样的性能。在 VGGNet 是通过两个 3x3 的卷积堆叠获得的感受野大小,相当一个 5x5 的卷积层。而 3 个 3x3 卷积的堆叠获取到的感受野相当于一个 7x7 的卷积层。这样可以增加非线性映射,也能很好地减少参数(例如7x7的参数为49个,而3个3x3的参数为27)。
池化层
VGG全部采用较小 2x2 的池化核。
通道数多
VGG网络第一层的通道数为 64,后面每层都进行了翻倍,最多到 512 个通道,通道数的增加,使得更多的信息可以被提取出来。
更深层数
由于卷积核专注于扩大通道数、池化专注于缩小宽和高,使得模型架构上更深更宽的同时,控制了计算量的增加规模。
自己写一个简单 VGGNet 网络
- 输入层为 32 x 32 大小图片,是 3(RGB) 通道的图片
x_image = tf.reshape(x,[-1,3,32,32])
- 第 1 块经过两层 32 个3x3 卷积做两次 Relu 的卷积层,然后经过一个池化层将大小变为 16x16
conv1_1 = tf.layers.conv2d(x_image,32,(3,3),padding='same',activation=tf.nn.relu,name='conv1_1')
conv1_2 = tf.layers.conv2d(conv1_1,32,(3,3),padding='same',activation=tf.nn.relu,name='conv1_2')
# 16 * 16
pooling1 = tf.layers.max_pooling2d(conv1_2,(2,2),(2,2),name='pool1')
- 第 1 块经过两层 32 个3x3 卷积做两次 Relu 的卷积层,然后经过一个池化层将大小变为 8x8
conv2_1 = tf.layers.conv2d(pooling1,32,(3,3),padding='same',activation=tf.nn.relu,name='conv2_1')
conv2_2 = tf.layers.conv2d(conv2_1,32,(3,3),padding='same',activation=tf.nn.relu,name='conv2_2')
# 8 * 8
pooling2 = tf.layers.max_pooling2d(conv2_2,(2,2),(2,2),name='pool2')
- 第 1 块经过两层 32 个3x3 卷积做两次 Relu 的卷积层,然后经过一个池化层将大小变为 4x4
conv3_1 = tf.layers.conv2d(pooling2,32,(3,3),padding='same',activation=tf.nn.relu,name='conv3_1')
conv3_2 = tf.layers.conv2d(conv3_1,32,(3,3),padding='same',activation=tf.nn.relu,name='conv3_2')
# 4 * 4
pooling3 = tf.layers.max_pooling2d(conv3_2,(2,2),(2,2),name='pool3')
- 然后经过 flatten 层。
flatten = tf.layers.flatten(pooling3)
y_ = tf.layers.dense(flatten,10)
完整代码
import tensorflow as tf
# print(tf.__version__)
import numpy as np
import cPickle
import os
import utils
from utils import CifarData
# save file format as numpy
# file format as cPickle
CIFAR_DIR = "./cifar-10-batches"
os.environ['TF_CPP_MIN_LOG_LEVEL'] = '2'
# print(os.listdir(CIFAR_DIR))

train_filenames = [os.path.join(CIFAR_DIR, 'data_batch_%d' % i)
                   for i in range(1, 6)]
test_filenames = [os.path.join(CIFAR_DIR, 'test_batch')]
train_data = CifarData(train_filenames, True)
test_data = CifarData(test_filenames, False)

# None present confirm count of smaples
x = tf.placeholder(tf.float32,[None,3072])
y = tf.placeholder(tf.int64,[None])

x_image = tf.reshape(x,[-1,3,32,32])
# 32 * 32
x_image = tf.transpose(x_image,perm=[0,2,3,1])

# neru feature_map image output
conv1_1 = tf.layers.conv2d(x_image,32,(3,3),padding='same',activation=tf.nn.relu,name='conv1_1')
conv1_2 = tf.layers.conv2d(conv1_1,32,(3,3),padding='same',activation=tf.nn.relu,name='conv1_2')
# 16 * 16
pooling1 = tf.layers.max_pooling2d(conv1_2,(2,2),(2,2),name='pool1')

conv2_1 = tf.layers.conv2d(pooling1,32,(3,3),padding='same',activation=tf.nn.relu,name='conv2_1')
conv2_2 = tf.layers.conv2d(conv2_1,32,(3,3),padding='same',activation=tf.nn.relu,name='conv2_2')
# 8 * 8
pooling2 = tf.layers.max_pooling2d(conv2_2,(2,2),(2,2),name='pool2')

conv3_1 = tf.layers.conv2d(pooling2,32,(3,3),padding='same',activation=tf.nn.relu,name='conv3_1')
conv3_2 = tf.layers.conv2d(conv3_1,32,(3,3),padding='same',activation=tf.nn.relu,name='conv3_2')
# 4 * 4
pooling3 = tf.layers.max_pooling2d(conv3_2,(2,2),(2,2),name='pool3')

# [None , 4 * 4 * 32]
flatten = tf.layers.flatten(pooling3)
y_ = tf.layers.dense(flatten,10)

# simplify with tensorflow api
# y_ = tf.layers.dense(hidden3,10)

loss = tf.losses.sparse_softmax_cross_entropy(labels=y,logits=y_)

# indices
predict = tf.argmax(y_,1)
# equal
correct_prediction = tf.equal(predict,y)

# [1,0,0,1,1,]
accuracy = tf.reduce_mean(tf.cast(correct_prediction,tf.float64))

train_data = CifarData(train_filenames,True)
# test_data = CifarData(test_filenames,False)
batch_size = 20
train_steps = 10000
test_steps = 100
with tf.name_scope('train_op'):
    # learning rate le-3
    train_op = tf.train.AdamOptimizer(1e-3).minimize(loss)
init = tf.global_variables_initializer()

with tf.Session() as sess:
    sess.run(init)
    for i in range(train_steps):
        batch_data,batch_labels = train_data.next_batch(batch_size)
        loss_val, accu_val,_ = sess.run([loss,accuracy,train_op],feed_dict={x: batch_data,y: batch_labels})
        if (i+1) % 500 == 0:
            print '[Train] Step: %d, loss: %4.5f, acc: %4.5f' % (i, loss_val, accu_val)
        if (i+1) % 1000 == 0:
            test_data  = CifarData(test_filenames,False)
            all_test_acc_val = []
            for j in range(test_steps):
                test_batch_data,test_batch_labels = test_data.next_batch(batch_size)
                test_acc_val = sess.run([accuracy],
                    feed_dict={x: test_batch_data,y: test_batch_labels })
                all_test_acc_val.append(test_acc_val)
            test_acc = np.mean(all_test_acc_val)
            print '[Test ] Step: %d, acc: %4.5f ' % (i+1,test_acc)
代码
https://github.com/zideajang/tf_in_action/tree/master/cnn


