zookeeper简介
Zookeeper是一个分布式协调服务;就是为用户的分布式应用程序提供协调服务
A、zookeeper是为别的分布式程序服务的
B、Zookeeper本身就是一个分布式程序(只要有半数以上节点存活,zk就能正常服务)
C、Zookeeper所提供的服务涵盖:主从协调、服务器节点动态上下线、统一配置管理、分布式共享锁、统一名称服务……
D、虽然说可以提供各种服务,但是zookeeper在底层其实只提供了两个功能:
管理(存储,读取)用户程序提交的数据;
并为用户程序提供数据节点监听服务;
Zookeeper集群的角色: Leader 和 follower (Observer)
只要集群中有半数以上节点存活,集群就能提供服务
1、zookeeper的安装
这里我准备了一个纯净的linux来进行安装,另外zookeeper是java开发的所以先装好jdk(1.7及以上)。
1、将zookeeper-3.4.6.tar.gz上传到/root目录下。
2、创建apps文件夹,将zookeeper-3.4.6.tar.gz解压到apps文件夹下。
[root@localhost ~]# ll
总用量 17312
-rw-------. 1 root root     1131 9月  12 03:59 anaconda-ks.cfg
-rw-r--r--. 1 root root    12526 9月  12 03:59 install.log
-rw-r--r--. 1 root root     3482 9月  12 03:59 install.log.syslog
-rw-r--r--. 1 root root 17699306 6月  20 15:55 zookeeper-3.4.6.tar.gz
[root@localhost ~]# mkdir apps
[root@localhost ~]# tar -zxvf zookeeper-3.4.6.tar.gz -C apps/
3、进入apps/zookeeper-3.4.6.tar.gz/conf文件夹,复制zoo_example.cfg改名为zoo.cfg
[root@localhost apps]# ll
总用量 4
drwxr-xr-x. 10 1000 1000 4096 2月  20 2014 zookeeper-3.4.6
[root@localhost apps]# cd zookeeper-3.4.6/conf
[root@localhost conf]# ll
总用量 12
-rw-rw-r--. 1 1000 1000  535 2月  20 2014 configuration.xsl
-rw-rw-r--. 1 1000 1000 2161 2月  20 2014 log4j.properties
-rw-rw-r--. 1 1000 1000  922 2月  20 2014 zoo_sample.cfg
[root@localhost conf]# cp zoo_sample.cfg zoo.cfg
[root@localhost conf]# ll
总用量 16
-rw-rw-r--. 1 1000 1000  535 2月  20 2014 configuration.xsl
-rw-rw-r--. 1 1000 1000 2161 2月  20 2014 log4j.properties
-rw-r--r--. 1 root root  922 9月  12 18:05 zoo.cfg
-rw-rw-r--. 1 1000 1000  922 2月  20 2014 zoo_sample.cfg
4、修改配置文件zoo.cfg,这里只修改数据存储文件夹位置
# The number of milliseconds of each tick
tickTime=2000
# The number of ticks that the initial
# synchronization phase can take
initLimit=10
# The number of ticks that can pass between
# sending a request and getting an acknowledgement
syncLimit=5
# the directory where the snapshot is stored.
# do not use /tmp for storage, /tmp here is just
# example sakes.
dataDir=/opt/modules/app/zookeeper/zkdata
# the port at which the clients will connect
clientPort=2181
# the maximum number of client connections.
# increase this if you need to handle more clients
#maxClientCnxns=60
#
# Be sure to read the maintenance section of the
# administrator guide before turning on autopurge.
#
# http://zookeeper.apache.org/doc/current/zookeeperAdmin.html#sc_maintenance
#
# The number of snapshots to retain in dataDir
#autopurge.snapRetainCount=3
# Purge task interval in hours
# Set to "0" to disable auto purge feature
#autopurge.purgeInterval=1
server.1=ironman01:2888:3888
server.2=ironman02:2888:3888
server.3=ironman03:2888:3888
5、创建文件夹 /opt/modules/app/zookeeper/zkdata
6、进入/root/zookeeper-3.4.6/bin,启动zookeeper并且查看是否启动成功。
[root@localhost bin]# ll
总用量 36
-rwxr-xr-x. 1 1000 1000  238 2月  20 2014 README.txt
-rwxr-xr-x. 1 1000 1000 1937 2月  20 2014 zkCleanup.sh
-rwxr-xr-x. 1 1000 1000 1049 2月  20 2014 zkCli.cmd
-rwxr-xr-x. 1 1000 1000 1534 2月  20 2014 zkCli.sh
-rwxr-xr-x. 1 1000 1000 1333 2月  20 2014 zkEnv.cmd
-rwxr-xr-x. 1 1000 1000 2696 2月  20 2014 zkEnv.sh
-rwxr-xr-x. 1 1000 1000 1084 2月  20 2014 zkServer.cmd
-rwxr-xr-x. 1 1000 1000 5742 2月  20 2014 zkServer.sh
[root@localhost bin]# ./zkServer.sh start
JMX enabled by default
Using config: /root/apps/zookeeper-3.4.6/bin/../conf/zoo.cfg
Starting zookeeper ... STARTED
[root@localhost bin]# ./zkServer.sh status
JMX enabled by default
Using config: /root/apps/zookeeper-3.4.6/bin/../conf/zoo.cfg
Mode: standalone
到这就说明启动成功了。但是实际有可能会出现一些问题。比如查看状态就经常看到未启动成功
[root@itheima32 bin]# ./zkServer.sh status
JMX enabled by default
Using config: /usr/zookeeper-3.4.6/bin/../conf/zoo.cfg
Error contacting service. It is probably not running.
先关闭防火墙试试
[root@itheima32 bin]# service iptables stop
iptables:清除防火墙规则:                                 [确定]
iptables:将链设置为政策 ACCEPT:filter                    [确定]
iptables:正在卸载模块:                                   [确定]
或者
chkconfig iptables off(永久关闭(开机不启动防火墙))
如果不行,那么查看日志吧。
[root@localhost bin]# cat zookeeper.out
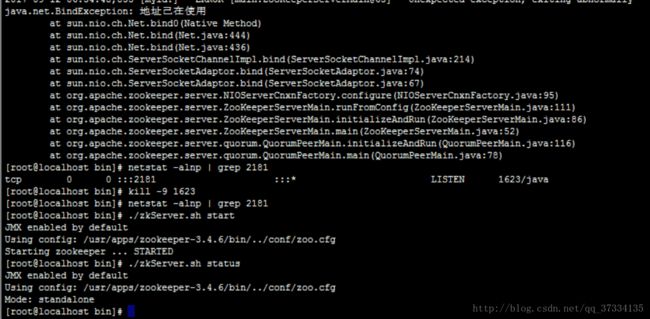
如果出现了java.net.BindException: Address already in use
地址被占用,那么先查看是否被占用,占用了则杀死进程再启动,建议去/root/zkdata下删除zookeeper_server.pid。
2、zookeeper的集群
zookeeper的安装很简单,zookeeper的集群也不难,主要还是改配置,准备三个纯净版的linux,还是得装好jdk配置好环境
zookeeper的集群
1、首先使用的是192.168.25.126这台服务器,前面6步与zookeeper安装一致,唯一区别就是配置文件修改不一样
# The number of milliseconds of each tick
tickTime=2000
# The number of ticks that the initial
# synchronization phase can take
initLimit=10
# The number of ticks that can pass between
# sending a request and getting an acknowledgement
syncLimit=5
# the directory where the snapshot is stored.
# do not use /tmp for storage, /tmp here is just
# example sakes.
dataDir=/opt/modules/app/zookeeper/zkdata
# the port at which the clients will connect
clientPort=2181
# the maximum number of client connections.
# increase this if you need to handle more clients
#maxClientCnxns=60
#
# Be sure to read the maintenance section of the
# administrator guide before turning on autopurge.
#
# http://zookeeper.apache.org/doc/current/zookeeperAdmin.html#sc_maintenance
#
# The number of snapshots to retain in dataDir
#autopurge.snapRetainCount=3
# Purge task interval in hours
# Set to "0" to disable auto purge feature
#autopurge.purgeInterval=1
server.1=ironman01:2888:3888
server.2=ironman02:2888:3888
server.3=ironman03:2888:3888
注:2888是leader与follower之间通信的端口,3888是投票使用的端口(数字不做要求,但应避免冲突)。
2、将配置好的apps下的zookeeper传到另外两台linux
[root@localhost ~]# scp -r apps 192.168.25.127:/root
[email protected]'s password:
...
[root@localhost ~]# scp -r apps 192.168.25.125:/root
[email protected]'s password:
...
3、zkdata文件夹下创建myid文件设置值为2
[root@localhost zkdata]# echo 2 > myid
[root@localhost zkdata]# cat myid
2
4、分别切换至192.168.25.127和192.168.25.125两台服务器,同样创建zkdata,zkdata下创建myid文件设置值分别为1,3。
注意:myid里面设置的值一定要与配置文件里设定的一致。
5、再分别启动三条服务器,查看是否启动成功
[root@localhost bin]# ./zkServer.sh status
JMX enabled by default
Using config: /root/apps/zookeeper-3.4.6/bin/../conf/zoo.cfg
Mode: follower
[root@localhost bin]# ./zkServer.sh status
JMX enabled by default
Using config: /root/apps/zookeeper-3.4.6/bin/../conf/zoo.cfg
Mode: leader
[root@localhost bin]# ./zkServer.sh status
JMX enabled by default
Using config: /root/apps/zookeeper-3.4.6/bin/../conf/zoo.cfg
Mode: follower
一个leader两个follower
如果启动的了查看状态发现没有启动成功。除了zookeeper安装时候出现的问题,这里主要的问题就是zkdata文件夹下的myid的值写的跟配置文件里面不一致,这个时候会出现ConnectionException:拒绝连接的异常,检查修改一下。如果是地址被占用那么就用上面介绍的方法。
