做这个的需求是要判断用户是否分享了这个链接?我们是要从浏览器端分享这个链接,但是又没有直接判断用户是否发送了,只有这个链接是在微信里面打开的才有接口可以调用是否分享成功了,所以,想到的一个办法就是给需要分享的页面生成二维码信息,用户扫一扫后引导用户到这个页面,此时这个页面也是在微信端打开的,就可以诱导(词不太好)用户分享链接了。
微信JS-SDK提供了很全的接口,运用场景还是很多的,比如:分享到朋友圈、QQ、QQ空间等,在这里,就不一一举例了,相信官方文档应该比我说的详细点。
官方文档
大致说下流程吧:
1. 绑定域名
2. 引入文件
3. 后台代码编写
4. 配置各种接口
5. 测试
绑定域名:
登录到网页微信公众号里面,在公众号设置-功能设置下的JS接口安全域名那配置,上面的说明需要看一下,每月就三次机会,珍惜一点!
域名是要备案的才可以的,不支持IP访问!
(题外话:我是用的ngrok做的内网穿透,可以用外网访问到本地的项目,方便调试。
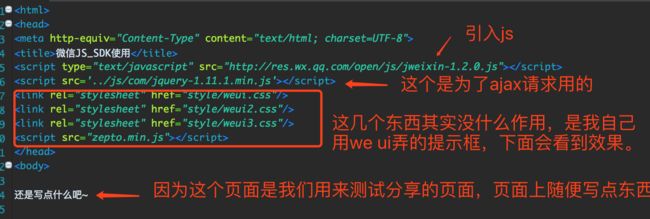
引入文件:
后台代码编写:
获取accesstoken和jsticket
代码说话比较有说服力...
因为是测试阶段,之前是直接存cookie里了,后来发现调试需要用手机微信调试,电脑端是不行的。后来改用session了,后期还可以优化的,测试阶段就不注重这些了。
微信的接口每日有请求限制,放session里保存90分钟,微信那边请求到的accesstoken和jsticket2小时自动失效,这里保存90分钟等失效后再重新获取。
只要访问下面的这个地址,就会获取到accesstoken和jsticket,放session中保存。
import java.io.IOException;

import javax.servlet.http.HttpServletRequest;
import javax.servlet.http.HttpServletResponse;
import javax.servlet.http.HttpSession;

import org.springframework.stereotype.Controller;
import org.springframework.web.bind.annotation.RequestMapping;
import org.springframework.web.bind.annotation.RequestMethod;
import org.springframework.web.bind.annotation.ResponseBody;

import com.udbac.weixin.WxApiClient;


@Controller
@RequestMapping("/wxapi")
public class WxApiController {

    /**
     * 获取accesstoken和jsticket
     * @param request
     * @return
     * @throws IOException
     */
    @RequestMapping(value = "/message/AccessToken", method = RequestMethod.GET)
    public @ResponseBody void doGet(HttpServletRequest request,HttpServletResponse response) throws IOException {

            HttpSession session = request.getSession();
            session.setMaxInactiveInterval(90*60);
            if(session.getAttribute("AccessToken") == null){
                session.setAttribute("AccessToken", WxApiClient.getAccessToken());
            }
            if(session.getAttribute("ticket") == null){
                session.setAttribute("ticket", WxApiClient.getTicket(session.getAttribute("AccessToken").toString()));
            }
            //获取浏览器访问访问服务器时传递过来的cookie数组
//          Cookie[] cookies = request.getCookies();
//          //如果用户是第一次访问,那么得到的cookies将是null
//          if (cookies!=null) {
//              for (int i = 0; i < cookies.length; i++) {
//                  Cookie cookie = cookies[i];
//                  if (cookie.getName().equals("AccessToken")) {
//                      String accessToken = cookie.getValue();
//                      System.out.println("浏览器中存在cookie:"+accessToken);
//                  }
//
//                  if (cookie.getName().equals("ticket")) {
//                      System.out.println("浏览器中存在ticket:"+cookie.getValue());
//                  }
//              }
//          }else {
//              //设置cookie的过期时间为1个半小时
//              Cookie cookie = new Cookie("AccessToken", WxApiClient.getAccessToken());//创建一个cookie,cookie的名字是lastAccessTime
//              Cookie ticketCookie = new Cookie("ticket", WxApiClient.getTicket(cookie.getValue()));
//              cookie.setMaxAge(90*60);
//              cookie.setPath("/");
//              ticketCookie.setMaxAge(90*60);
//              ticketCookie.setPath("/");
//              //将cookie对象添加到response对象中,这样服务器在输出response对象中的内容时就会把cookie也输出到客户端浏览器
//              response.addCookie(cookie);
//              response.addCookie(ticketCookie);
//              System.out.println("新添加的cookie:"+cookie.getValue());
//              System.out.println("新添加的ticket:"+ticketCookie.getValue());
//          }


            System.out.println("cookie:"+session.getAttribute("AccessToken"));
            System.out.println("ticket:"+session.getAttribute("ticket"));
    }
怎么获取到的accesstoken和jsticket?
import java.io.BufferedReader;
import java.io.IOException;
import java.io.InputStreamReader;
import java.io.ObjectOutputStream;
import java.io.OutputStream;
import java.net.HttpURLConnection;
import java.net.MalformedURLException;
import java.net.ProtocolException;
import java.net.URL;
import java.net.URLConnection;

import javax.json.JsonObject;

import net.sf.json.JSONObject;

/**
 * Title:WxApiClient
 * Description:
 * @author root
 * @date 2017年06月14日15:09:00
 */
public class WxApiClient {

    // APPID
    public static String appid = "公众号的appId";

    // APPSECRET
    public static String appsecret = "公众号的appSecret";

    // 获取AccessToken的接口的地址
    public static String access_token_url = "https://api.weixin.qq.com/cgi-bin/token?grant_type=client_credential&appid="
            + appid + "&secret=" + appsecret;

    // jsapi票据接口地址
    public static String jsapi_ticket_url = "http://api.weixin.qq.com/cgi-bin/ticket/getticket?type=jsapi&access_token=%s";

    // 通过获取Token的接口得到accesstoken
    public static String getAccessToken() {
        String message = getMessage(access_token_url);
        JSONObject jsonObject = JSONObject.fromObject(message);
        String accessToken = (String) jsonObject.get("access_token");
        return accessToken;
    }

    /**
     * 通过accesstoken换取ticket票据
     * @param accessToken
     * @return
     */
    public static String getTicket(String accessToken){
        String jsTicket = getMessage(String.format(jsapi_ticket_url,accessToken));
        JSONObject jsonObject = JSONObject.fromObject(jsTicket);
        String ticket = (String)jsonObject.get("ticket");
        return ticket;
    }

    /**
     * GET请求获取返回信息
     *
     * @param urlPath
     * @return
     */
    public static String getMessage(String urlPath) {
        try {
            URL url = new URL(urlPath);
            URLConnection rulConnection = url.openConnection();
            HttpURLConnection httpUrlConnection = (HttpURLConnection) rulConnection;
            httpUrlConnection.setDoOutput(true);
            httpUrlConnection.setDoInput(true);
            httpUrlConnection.setUseCaches(false);
            httpUrlConnection.setRequestProperty("Content-type", "application/x-java-serialized-object");
            httpUrlConnection.setRequestMethod("GET");
            // httpUrlConnection.connect();
            OutputStream outStrm = httpUrlConnection.getOutputStream();
            ObjectOutputStream objOutputStrm = new ObjectOutputStream(outStrm);
            objOutputStrm.flush();
            objOutputStrm.close();
            // InputStream inStrm = httpUrlConnection.getInputStream();

            int code = httpUrlConnection.getResponseCode();
            // System.out.println("code " + code);
            // System.out.println(httpUrlConnection.getResponseMessage());

            // 读取响应内容
            String sCurrentLine = "";
            String sTotalString = "";
            if (code == 200) {
                java.io.InputStream is = httpUrlConnection.getInputStream();
                BufferedReader reader = new BufferedReader(new InputStreamReader(is));
                while ((sCurrentLine = reader.readLine()) != null)
                    if (sCurrentLine.length() > 0)
                        sTotalString = sTotalString + sCurrentLine.trim();
            } else {
                sTotalString = "远程服务器连接失败,错误代码:" + code;

            }
            // System.out.println("response:" + sTotalString);
            return sTotalString;

        } catch (MalformedURLException e) {
            // TODO Auto-generated catch block
            e.printStackTrace();
        } catch (ProtocolException e) {
            // TODO Auto-generated catch block
            e.printStackTrace();
        } catch (IOException e) {
            // TODO Auto-generated catch block
            e.printStackTrace();
        }
        return urlPath;
    }

}
有了accesstoken和ticket了,就能生成权限验证配置(我习惯说成是签名)了。
就是官方文档中提到的下面这些:
wx.config({
    debug: true, // 开启调试模式,调用的所有api的返回值会在客户端alert出来,若要查看传入的参数,
    可以在pc端打开,参数信息会通过log打出,仅在pc端时才会打印。
    appId: '', // 必填,公众号的唯一标识
    timestamp: , // 必填,生成签名的时间戳
    nonceStr: '', // 必填,生成签名的随机串
    signature: '',// 必填,签名,见附录1
    jsApiList: [] // 必填,需要使用的JS接口列表,所有JS接口列表见附录2
});
上面的这些马上就能获取到了,看看怎么实现它的
import java.util.Map;

import javax.servlet.http.Cookie;
import javax.servlet.http.HttpServletRequest;
import javax.servlet.http.HttpSession;

import org.springframework.stereotype.Controller;
import org.springframework.web.bind.annotation.RequestMapping;
import org.springframework.web.bind.annotation.RequestMethod;
import org.springframework.web.bind.annotation.RequestParam;
import org.springframework.web.bind.annotation.ResponseBody;

import com.udbac.weixin.WxSign;

import net.sf.json.JSONObject;

/**
 * js_sdk测试链接分享
 * Description:
 * @author root
 * @date 2017年6月14日 下午3:37:43
 */

@Controller
@RequestMapping("/wxtest")
public class TestShareController {

    /**
     * 生成需要的签名
     * @param request
     * @param url  //实际需要分享的URL
     * @return
     */
    @ResponseBody
    @RequestMapping(value="/sign",method=RequestMethod.POST)
    public JSONObject sign(HttpServletRequest request,@RequestParam("url") String url){
        JSONObject jsonObject = new JSONObject();
        String jsapi_ticket = null;
//      Cookie[] cookies = request.getCookies();
//      for (int i = 0; i < cookies.length; i++) {
//          Cookie cookie = cookies[i];
//          if(cookie.getName().equals("ticket")){
//              jsapi_ticket = cookie.getValue();
//          }
//      }
        HttpSession session = request.getSession();
        jsapi_ticket = session.getAttribute("ticket").toString();
        Map sign = WxSign.sign(jsapi_ticket, url);
        for (Map.Entry entry : sign.entrySet()) {
            jsonObject.put(entry.getKey(), entry.getValue());
//            System.out.println(entry.getKey() + ", " + entry.getValue());
        }
        System.out.println(jsonObject);
        return jsonObject;
    }
}
当我们从页面ajax访问这个请求的时候,注意是先执行上面的/api/message/AccessToken请求,获取到accesstoken和jsticket了才能从页面获取这个签名规则,测试阶段,可以自己优化一下就行了。
访问成功后,会得到我们需要的签名信息,如下:
{"timestamp":"1497445752","nonceStr":"0870902e-2aea-4558-b380-3d04110f9700",
"jsapi_ticket":"sM4AOVdWfPE4DxkXGEs8VFgEz7OrZJykcz39ZYlhg8AimcNz9J0kSWLNMaNGIjVSyOS5kPqiIiqXUTSXLVQkgw",
"signature":"50f2a127e61dd78724fd547fd0677d9e41d70f9c",
"url":"http://qq1216028459.tunnel.2bdata.com/stt/js_sdk/wx.html"}
配置各种接口:
获取到的这些就是上面config中需要配置的了,看下面的代码吧:
还是写点什么吧~
