结合前面两篇的内容。我们现在开始对框架入口文件整理和编写了。
本章我们会用到一些基本的逻辑和规则:
A、https://rustcc.gitbooks.io/rustprimer/content/module/module.html
注意:
Rust 的多层模块遵循如下两条规则:
优先查找xxx.rs 文件
main.rs、lib.rs、mod.rs中的mod xxx; 默认优先查找同级目录下的 xxx.rs 文件;
其他文件yyy.rs中的mod xxx;默认优先查找同级目录的yyy目录下的 xxx.rs 文件;
如果 xxx.rs 不存在,则查找 xxx/mod.rs 文件,即 xxx 目录下的 mod.rs 文件。
B、https://rustcc.gitbooks.io/rustprimer/content/cargo-projects-manager/cargo-projects-manager.html
对cargo默认的项目结构解释如下:
cargo.toml和cargo.lock文件总是位于项目根目录下。
1、源代码位于src目录下。
2、默认的库入口文件是src/lib.rs。
3、默认的可执行程序入口文件是src/main.rs。
4、其他可选的可执行文件位于src/bin/*.rs(这里每一个rs文件均对应一个可执行文件)。
5、外部测试源代码文件位于tests目录下。
6、示例程序源代码文件位于examples。
7、基准测试源代码文件位于benches目录下。
C、https://doc.rust-lang.org/book/ch14-03-cargo-workspaces.html
中文版:https://rustlang-cn.org/office/rust/book/more-about-cargo/ch14-03-cargo-workspaces.html
引入工作空间workspace的概念。
我们不能把所有的业务逻辑写到一个文件里面。
所以我们需要对代码写到其他文件里面。
个人习惯与和URL进行结合。
例如:/api/v1/resources[endpoint]/control
resources[endpoint] 作为文件名/类名,control 作为被调用函数名。
control后面还有Module.
control会根据业务的需求,可能会调用不同的Module的内的不同的函数。
然后组合起来返回给前端,这样的做法主要是减少前端的请求次数。然而耦合性有点强。
怎么办呢??
我是想着Module作为lib,如果要把某个模块单独抽出来作为微服务,修改control的内容就好了。
好像我想多了。O(∩_∩)O哈哈~ 先把现在的基本的先写好了。
那么我们就按照这种思路干了。进行划分。
不过是静态的lib。动态lib...俺现在能力真不够。先写逻辑代码,以后能力够了再修改成动态lib.
我们还是用例子来说明吧。
举个用户注册的:
URI:/api/v1/user/register
根据工作空间的做法。我们先创建一个工作空间的目录。我就命名为:venom(毒液) 哈哈~~之所以要使用这个名字因为我打算重新写系统的时候正好在看着电影《毒液》,另外Rust的中文 就是腐蚀啊。很好 很好 很棒 很棒
接着创建一个Cargo.toml 的文件。
里面写上
members = [
    "interface_main",
]
API其实就是一个网络接口(Interface),然而 Interface属于Key word。为了避免冲突,增加一个main ,意思就是interface_main
然后到控制台,进入到这个目录下。
输入 :cargo new interface_main
输入:cargo build
我们看到了
接着我们继续加上另外一个lib的crate.
我命名为modules
venom/cargo.toml 添加
members = [
  "interface_main",
  "modules",
]
注意一定要先在venom/cargo.toml写 再运行生成新的crate
不然会出现警告
warning: compiling this new crate may not work due to invalid workspace configuration

current package believes it's in a workspace when it's not:
在venom目录下
输入:cargo new modules --lib
这个时候我们用 tree 看下
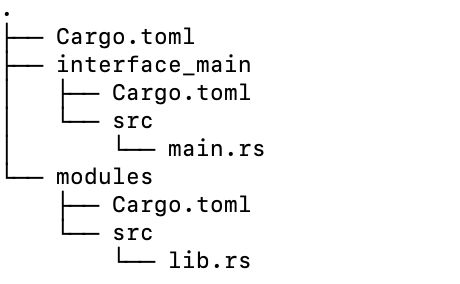
让 interface_main 依赖库 crate modules。首先需要在 interface_main/Cargo.toml 文件中增加 modules 作为路径依赖:
文件名: interface_main/Cargo.toml
[dependencies]
modules= {path="../modules"}
工作空间中的 crate 不必相互依赖,所以仍需显式地表明工作空间中 crate 的依赖关系。
我们尝试一下调用有没有问题。
我们在modules/src 中添加一个文件 user.rs
里面添加代码
pub fn register()
{
    println!("注册成功");
}
在interface_main /src/main.rs
中添加代码
use modules;
fn main() {
    modules::user::register();
}
然后进行编译一下。控制台 venom目录下输入
cargo build

然后 运行一下项目
cargo run -p interface_main

这个还不是我们要的。
我们在 interface_main 添加一个文件夹 control
这里才是对应的。
然后创建一个文件 control_user.rs 其实也可以命名为user.rs
个人习惯吧。我害怕到时候文件检索找出来两个user的文件出来。
里面添加代码
use modules::user;
pub fn register()
{
    user:: register();
}
根目录下增加一个 control.rs文件
修改 control.rs文件
写入
pub mod control_user;
修改 main.rs文件
引入 control 并调用 control_user:: register()
use modules::user;
pub fn register()
{
    user::register();
}
执行下
cargo run -p interface_main
结果出来了。

文件架构实验成功。写这个东西各种研究、思考、测试。
这个弄有什么好处?
不知道,至少层次相对的清晰点了。
control专门负责调用 Modules。
modules 专门负责和DB 数据库、Redis、缓存进行进行打交道。
然后我们把之前写的代码搬过来先。
cargo build
漫长的拉库等待.....
没有用国内的源。
需要注意的是 配置文件server.conf
放在venom的根目录下哦。
最后成型。
main.rs
extern crate regex;
extern crate actix_web;


use std::fs::File;
use std::io::prelude::*;
use std::io::BufReader;
use std::collections::HashMap;

use regex::Regex;
use actix_web::{server, App,HttpRequest, Responder};
use chrono::prelude::*; //朋友

mod control;


static LOGO:&str = "
$$\\                       $$\\       $$\\            $$$$$$\\                  $$\\
$$ |                      $$ |      $$ |          $$  __$$\\                 $$ |
$$$$$$$\\  $$\\   $$\\  $$$$$$$ | $$$$$$$ |$$\\   $$\\ $$ /  \\__| $$$$$$\\   $$$$$$$ | $$$$$$\\   $$$$$$\\
$$  __$$\\ $$ |  $$ |$$  __$$ |$$  __$$ |$$ |  $$ |$$ |      $$  __$$\\ $$  __$$ |$$  __$$\\ $$  __$$\\
$$ |  $$ |$$ |  $$ |$$ /  $$ |$$ /  $$ |$$ |  $$ |$$ |      $$ /  $$ |$$ /  $$ |$$$$$$$$ |$$ |  \\__|
$$ |  $$ |$$ |  $$ |$$ |  $$ |$$ |  $$ |$$ |  $$ |$$ |  $$\\ $$ |  $$ |$$ |  $$ |$$   ____|$$ |
$$$$$$$  |\\$$$$$$  |\\$$$$$$$ |\\$$$$$$$ |\\$$$$$$$ |\\$$$$$$  |\\$$$$$$  |\\$$$$$$$ |\\$$$$$$$\\ $$ |
\\_______/  \\______/  \\_______| \\_______| \\____$$ | \\______/  \\______/  \\_______| \\_______|\\__|
                                        $$\\   $$ |
                                        \\$$$$$$  |
                                         \\______/        ";

fn read_server_conf()->HashMap{
    let path = "server.conf";
    let  file = File::open(path).expect("server.conf file not found ");
    let buffered = BufReader::new(file);

    //定义一个HashMap存储系统设置
    let mut config_hashmap:HashMap = HashMap::new();

    //正则逻辑 去掉包含#的字符串
    let re = Regex::new(r"^\#").unwrap();
    //正则表达式进行分割key 和value. 当然也可以使用String的函数进行分割。
    // 不过需要考虑的很多
    let reg = Regex::new(r"(?P\w+)=(?P.*)").unwrap();
    for line in buffered.lines() {
        let line_str = line.unwrap().clone();
        let match_bool = re.is_match(line_str.trim());
        //如果是 # 开头 或者空行就去掉
        if !match_bool && (line_str.trim() != "" ){
            for caps in reg.captures_iter(&line_str){
                config_hashmap.insert(
                    caps["key"].to_string(),
                    caps["value"].to_string()
                );
            }
        }
    }
    config_hashmap
}

enum MessageType{
    Info,
    Warn,
    Error,
}

fn print_message(message_type:MessageType,message:&str){
    //定义打印格式: [message_type] time[xxxx/mm/dd hh:ss:mm]  Msg:XXXXXXX
    //获取一个时间
    let dt = Local::now().format("%Y-%m-%d %H:%M:%S").to_string(); //获取当前时间并且转换成字符串
    let msg_type= match message_type {
        MessageType::Info => "Info",
        MessageType::Warn =>  "Warn",
        MessageType::Error =>  "Error"
    };
    println!("【{}】  TIME【{}】:{}",msg_type,dt,message);

}


//一个处理函数
fn greet(req: &HttpRequest) -> impl Responder {
    control::control_user::register();

    let to = req.match_info().get("name").unwrap_or("World");
    format!("Hello {}!", to)
}
fn main() {
    println!("{}",LOGO);
    //调用读取
    print_message(MessageType::Info, "Load...... Config......");
    let config_hashmap = read_server_conf();
    print_message(MessageType::Info,"Finished Load Config  !");

    //通过format!拼接字符串
    let bind_adder_port = format!("{}:{}",config_hashmap["ip"],config_hashmap["port"]);

    let api_server = server::new(|| {
        App::new()
            .resource("/", |r| r.f(greet))
            .resource("/{name}", |r| r.f(greet))

    })
        .bind(bind_adder_port)
        .expect("Can not bind to port");
    //绑定完成进行提示
    let msg_binded = format!("Server is bind: {}:{}",config_hashmap["ip"],config_hashmap["port"]);
    print_message(MessageType::Info, &msg_binded);

    //做出启动的提示
    print_message(MessageType::Info,"Server is start !");

    api_server.run();
}
在浏览器上调用获得想要的结果。