- 欢迎关注我的公众号
源码基于安卓8.0分析结果
为什么要写这篇文章?其实是给这个LayoutInflater类铺垫的,要解释这个LayoutInflater源码,就必须知道到底怎么调用的,包括include、merge、ViewStub和原理,如何自己撸一个大小为0的View,我们最能够接触到的地方都是这个方法。
调用的是AppCompatActivity的setContentView()
    @Override
    public void setContentView(@LayoutRes int layoutResID) {
        getDelegate().setContentView(layoutResID);
    }
- 注意下getDelegate()方法中的AppCompatDelegate.create(this,this),传入的是this,也就是Activity的本身,这里不会讲到,但是在讲到View的绘制流程,需要明白初始化传入的是什么
  @NonNull
    public AppCompatDelegate getDelegate() {
        if (mDelegate == null) {
            mDelegate = AppCompatDelegate.create(this, this);
        }
        return mDelegate;
    }
-
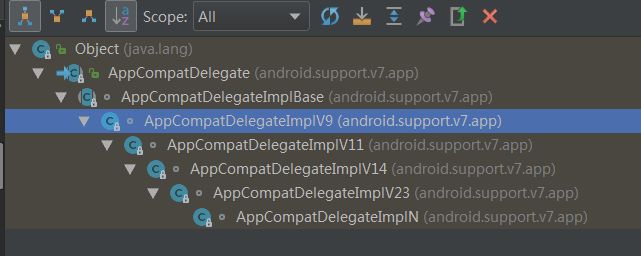
去找实现的类,AppCompatDelegateImplV9
  @Override
    public void setContentView(View v) {
        ensureSubDecor();
        ViewGroup contentParent = (ViewGroup) mSubDecor.findViewById(android.R.id.content);
        contentParent.removeAllViews();
        contentParent.addView(v);
        mOriginalWindowCallback.onContentChanged();
    }
    @Override
    public void setContentView(View v, ViewGroup.LayoutParams lp) {
        ensureSubDecor();
        ViewGroup contentParent = (ViewGroup) mSubDecor.findViewById(android.R.id.content);
        contentParent.removeAllViews();
        contentParent.addView(v, lp);
        mOriginalWindowCallback.onContentChanged();
    }
- 其中这种方法在实际的使用过程中,是最常见方法,核心的方法会调用到 LayoutInflater.from(mContext).inflate(resId, contentParent);
    @Override
    public void setContentView(int resId) {
        ensureSubDecor();
        ViewGroup contentParent = (ViewGroup) mSubDecor.findViewById(android.R.id.content);
        contentParent.removeAllViews();
        LayoutInflater.from(mContext).inflate(resId, contentParent);
        mOriginalWindowCallback.onContentChanged();
    }
- ensureSubDecor();不管使用哪种的setContentView都会调用这个方法
   private void ensureSubDecor() {
        if (!mSubDecorInstalled) {
            // TODO: 2018/5/23 关键的方法
            mSubDecor = createSubDecor();

            // If a title was set before we installed the decor, propagate it now
            // TODO: 2018/5/23 2、如果我们在布局前安装了一个标题,现在就把它传播出去。
            CharSequence title = getTitle();
            if (!TextUtils.isEmpty(title)) {
                onTitleChanged(title);
            }
            // TODO: 2018/5/23  3、适配尺寸在设备上,一些参数的初始化
            applyFixedSizeWindow();
            // TODO: 2018/5/23 4、空实现,我也不知道做啥的
            onSubDecorInstalled(mSubDecor);

            mSubDecorInstalled = true;

            // Invalidate if the panel menu hasn't been created before this.
            // Panel menu invalidation is deferred avoiding application onCreateOptionsMenu
            // being called in the middle of onCreate or similar.
            // A pending invalidation will typically be resolved before the posted message
            // would run normally in order to satisfy instance state restoration.
            // TODO: 2018/5/23 5、目前我也不知道做啥的,需要详细的研究
            PanelFeatureState st = getPanelState(FEATURE_OPTIONS_PANEL, false);
            if (!isDestroyed() && (st == null || st.menu == null)) {
                invalidatePanelMenu(FEATURE_SUPPORT_ACTION_BAR);
            }
        }
    }
关于标记mSubDecorInstalled,可以这样的理解,当已经给Activity设置了一个layout,在设置的就会报错,这个标记就是来做这个的
  // true if we have installed a window sub-decor layout.
    private boolean mSubDecorInstalled;
- 关于createSubDecor()方法,这也是最关键的方法在setContentview的过程中
createSubDecor()方法的解析 - 1、获取系统的TypedArray,系统主题,而且哇,找不到的话,抛出异常的同时,而且释放
 //1、获取系统的TypedArray
        TypedArray a = mContext.obtainStyledAttributes(R.styleable.AppCompatTheme);
        //2、系统主题,而且哇,找不到的话,抛出异常的同时,而且释放
        if (!a.hasValue(R.styleable.AppCompatTheme_windowActionBar)) {
            a.recycle();
            throw new IllegalStateException(
                    "You need to use a Theme.AppCompat theme (or descendant) with this activity.");
        }
   if (a.getBoolean(R.styleable.AppCompatTheme_windowNoTitle, false)) {
            requestWindowFeature(Window.FEATURE_NO_TITLE);
        } else if (a.getBoolean(R.styleable.AppCompatTheme_windowActionBar, false)) {
            // Don't allow an action bar if there is no title.
            requestWindowFeature(FEATURE_SUPPORT_ACTION_BAR);
        }
        if (a.getBoolean(R.styleable.AppCompatTheme_windowActionBarOverlay, false)) {
            requestWindowFeature(FEATURE_SUPPORT_ACTION_BAR_OVERLAY);
        }
        if (a.getBoolean(R.styleable.AppCompatTheme_windowActionModeOverlay, false)) {
            requestWindowFeature(FEATURE_ACTION_MODE_OVERLAY);
        }
- 2、读取一个系统的属性android:windowIsFloating,记得释放recycle(),要不然这比消耗性能的很 mIsFloating表示浮在屏幕上的,如果在这里使用了,整个layout就会在 屏幕中心,相当于浮在屏幕上,所以这个只适用于dialog,Activity也可以是Dialog的样子.
    mIsFloating = a.getBoolean(R.styleable.AppCompatTheme_android_windowIsFloating, false);
        a.recycle();
- 3、调用了 mWindow.getDecorView();通过代码可以发现,PhoneWindow( Window的唯一的子类),这个方法其实就是准备好根布局,这个根布局是DecorView,一个FrameLayout,他是把一个垂直方向的LinearLayout。addView到DecorView中,当然涉及到好多初始化,和系统的设置的属性
  @Override
      public void setContentView(@LayoutRes int layoutResID) {
        getDelegate().setContentView(layoutResID);
      }
      //todo 这里传入的是this,就是Activity的本身
          @NonNull
    public AppCompatDelegate getDelegate() {
        if (mDelegate == null) {
            mDelegate = AppCompatDelegate.create(this, this);
        }
        return mDelegate;
    }
     //todo 这里就是本身了 PhoneWindow  Window的唯一的子类
       public static AppCompatDelegate create(Activity activity, AppCompatCallback callback) {
        return create(activity, activity.getWindow(), callback);
    }

       private static AppCompatDelegate create(Context context, Window window,
            AppCompatCallback callback) {
        if (Build.VERSION.SDK_INT >= 24) {
            return new AppCompatDelegateImplN(context, window, callback);
        } else if (Build.VERSION.SDK_INT >= 23) {
            return new AppCompatDelegateImplV23(context, window, callback);
        } else if (Build.VERSION.SDK_INT >= 14) {
            return new AppCompatDelegateImplV14(context, window, callback);
        } else if (Build.VERSION.SDK_INT >= 11) {
            return new AppCompatDelegateImplV11(context, window, callback);
        } else {
      //  todo V9 基类的第二层 就在这里
            return new AppCompatDelegateImplV9(context, window, callback);
        }
    }
我们着重来关心下这个方法 mWindow.getDecorView();
mWindow.getDecorView();
其实就是调用的是PhoneWindow的getDecorView
   @Override
    public final View getDecorView() {
        if (mDecor == null) {
            installDecor();
        }
        return mDecor;
    }
关于PhoneWindow中的installDecor();这个方法特别有意思,如果看到这个来了,你可以知道一下挖出好多源码级的东西
- 获取DecorView,然后他是一个FrameLayout--> new DecorView(getContext(), -1);
 private void installDecor() {
        if (mDecor == null) {
            //获取DecorView,然后他是一个FrameLayout
            mDecor = generateDecor();
            mDecor.setIsRootNamespace(true);
        }
- 其实这里就是给DecorView设置其他的系统属性,这两行代码是generateLayout的里面的
- 系统的第一种根布局com.android.internal.R.layout.screen_title:LinearLayout 布局
- 系统的第一种根布局com.android.internal.R.layout.screen_simple_title:LinearLayout 布局
通过两种根布局的对比,其实其他的布局也差不多是这样子的。也可以得出Activity的根布局是个LinearLayout 并且方向是vertical的.,在把这个根布局加到DecorView中
 View in = mLayoutInflater.inflate(layoutResource, null);
decor.addView(in, new ViewGroup.LayoutParams(FILL_PARENT, FILL_PARENT));
然后呢,DecorView.addView()到布局中,这里就做到了设备的适配的,而不是在底层设置好一个布局就行了
        if (mContentParent == null) {
            mContentParent = generateLayout(mDecor);
- mTitleView = (TextView)findViewById(com.android.internal.R.id.title);当看到这一行代码的时候,我有点疑惑title好像一定找的到似的,没有注意到下面的代码。通过源码发现在View.findViewById()找不到会返回null,这里也判断了找不到这个title的情况
            //这里我有疑惑,看样子这个id。title好像一定找的到似的
            //麻痹,老子去找源码在View.findViewById()找不到会返回null
            //这里的意思就是我找的到这个titleView我就设置title过去,或者是没有titile设置不可见
            mTitleView = (TextView)findViewById(com.android.internal.R.id.title);
            if (mTitleView != null) {
                if ((getLocalFeatures() & (1 << FEATURE_NO_TITLE)) != 0) {
                    View titleContainer = findViewById(com.android.internal.R.id.title_container);
                    if (titleContainer != null) {
                        titleContainer.setVisibility(View.GONE);
                    } else {
                        mTitleView.setVisibility(View.GONE);
                    }
                    if (mContentParent instanceof FrameLayout) {
                        ((FrameLayout)mContentParent).setForeground(null);
                    }
                } else {
                    mTitleView.setText(mTitle);
                }
            }
        }
    }
- 4关键的还是LayoutInflater这个类,说明Activity.setContentView最后也会调用到这里来
final LayoutInflater inflater = LayoutInflater.from(mContext);
- 5、一些设置:dialog式的Activity Window.FEATURE_NO_TITLE
  if (!mWindowNoTitle) {
            if (mIsFloating) {
                subDecor = (ViewGroup) inflater.inflate(
                        R.layout.abc_dialog_title_material, null);
                mHasActionBar = mOverlayActionBar = false;
            } else if (mHasActionBar) {
                //第六步:这需要一些解释。因为我们不能使用Android:主题属性pre-L,我手动的创建一个布局
                // 填充器使用theme指向actionBar的主题,同时也找到了subDecor  ---》
                // 现在使用主题上下文膨胀视图并将其设置为内容视图。
                TypedValue outValue = new TypedValue();
                mContext.getTheme().resolveAttribute(R.attr.actionBarTheme, outValue, true);

                Context themedContext;
                if (outValue.resourceId != 0) {
                    themedContext = new ContextThemeWrapper(mContext, outValue.resourceId);
                } else {
                    themedContext = mContext;
                }

                // Now inflate the view using the themed context and set it as the content view
                subDecor = (ViewGroup) LayoutInflater.from(themedContext)
                        .inflate(R.layout.abc_screen_toolbar, null);

                mDecorContentParent = (DecorContentParent) subDecor
                        .findViewById(R.id.decor_content_parent);
                mDecorContentParent.setWindowCallback(getWindowCallback());

                /**
                 * Propagate features to DecorContentParent
                 */
                if (mOverlayActionBar) {
                    mDecorContentParent.initFeature(FEATURE_SUPPORT_ACTION_BAR_OVERLAY);
                }
                if (mFeatureProgress) {
                    mDecorContentParent.initFeature(Window.FEATURE_PROGRESS);
                }
                if (mFeatureIndeterminateProgress) {
                    mDecorContentParent.initFeature(Window.FEATURE_INDETERMINATE_PROGRESS);
                }
            }
        } else {
            //第七步:如果设置了Window.FEATURE_NO_TITLE---》mWindowNoTitle==true
            // 走到这个循环中,也是会设置初始化这个subDecor
            if (mOverlayActionMode) {
                subDecor = (ViewGroup) inflater.inflate(
                        R.layout.abc_screen_simple_overlay_action_mode, null);
            } else {
                subDecor = (ViewGroup) inflater.inflate(R.layout.abc_screen_simple, null);
            }
- 6 、对高版本适配:实现 Android 5.0 以上的插图效果的,可以明确的看到安卓5.0是个分界点,是不是在开发的过程中,安卓5.0上提供了好多系统的风格,这也是谷歌工程师Design的开始
Android 7.0 24 N
Android 6.0 23 M
Android 5.1 22 LOLLIPOP_MR1
Android 5.0 21 LOLLIPOP
Android 4.4W 20 KITKAT_WATCH
Android 4.4 19 KITKAT
Android 4.3 18 JELLY_BEAN_MR2
Android 4.2、4.2.2 17 JELLY_BEAN_MR1
           //第八步对高版本适配:ViewCompat.setOnApplyWindowInsetsListener()
            // 原来就是为了实现 Android 5.0 以上的插图效果的。
            if (Build.VERSION.SDK_INT >= 21) {
                // If we're running on L or above, we can rely on ViewCompat's
                // setOnApplyWindowInsetsListener
                ViewCompat.setOnApplyWindowInsetsListener(subDecor,
                        new OnApplyWindowInsetsListener() {
                            @Override
                            public WindowInsetsCompat onApplyWindowInsets(View v,
                                    WindowInsetsCompat insets) {
                                final int top = insets.getSystemWindowInsetTop();
                                final int newTop = updateStatusGuard(top);

                                if (top != newTop) {
                                    insets = insets.replaceSystemWindowInsets(
                                            insets.getSystemWindowInsetLeft(),
                                            newTop,
                                            insets.getSystemWindowInsetRight(),
                                            insets.getSystemWindowInsetBottom());
                                }

                                // Now apply the insets on our view
                                return ViewCompat.onApplyWindowInsets(v, insets);
                            }
                        });
            } else {
                // Else, we need to use our own FitWindowsViewGroup handling
                ((FitWindowsViewGroup) subDecor).setOnFitSystemWindowsListener(
                        new FitWindowsViewGroup.OnFitSystemWindowsListener() {
                            @Override
                            public void onFitSystemWindows(Rect insets) {
                                insets.top = updateStatusGuard(insets.top);
                            }
                        });
            }
- 7 mWindow.setContentView(subDecor);方法,底层还是调用的PhoneWindow的setContentVeiw的方法:通过前面我们的分析PhoneWindow.getDecorView()的方法会提前在AppCompatDelegateImplV9.createSubDecor()方法中调用,所以这里mContentParent 不会为null.
- 关键方法,一定走到这里来了,后续分析inflate的源码 mLayoutInflater.inflate(layoutResID, mContentParent)
  @Override
    public void setContentView(int layoutResID) {
        //通过前面我们的分析PhoneWindow.getDecorView()的方法会提前在AppCompatDelegateImplV9.createSubDecor()方法中调用,所以这里mContentParent 不会为null
        if (mContentParent == null) {
            installDecor();
        } else {
            //会走到这里来
            mContentParent.removeAllViews();
        }
        // TODO: 2018/5/29  关键方法,一定走到这里来了,后续分析inflate的源码
        mLayoutInflater.inflate(layoutResID, mContentParent);
        final Callback cb = getCallback();
        if (cb != null) {
            cb.onContentChanged();
        }
    }
createSubDecor()方法的代码如下,如果要深入理解的话,还是建议自己走源码一遍,这样理解的更加的透彻,哈哈~~
 private ViewGroup createSubDecor() {
        //1、获取系统的TypedArray
        TypedArray a = mContext.obtainStyledAttributes(R.styleable.AppCompatTheme);
        //2、系统主题,而且哇,找不到的话,抛出异常的同时,而且释放
        if (!a.hasValue(R.styleable.AppCompatTheme_windowActionBar)) {
            a.recycle();
            throw new IllegalStateException(
                    "You need to use a Theme.AppCompat theme (or descendant) with this activity.");
        }

        if (a.getBoolean(R.styleable.AppCompatTheme_windowNoTitle, false)) {
            requestWindowFeature(Window.FEATURE_NO_TITLE);
        } else if (a.getBoolean(R.styleable.AppCompatTheme_windowActionBar, false)) {
            // Don't allow an action bar if there is no title.
            requestWindowFeature(FEATURE_SUPPORT_ACTION_BAR);
        }
        if (a.getBoolean(R.styleable.AppCompatTheme_windowActionBarOverlay, false)) {
            requestWindowFeature(FEATURE_SUPPORT_ACTION_BAR_OVERLAY);
        }
        if (a.getBoolean(R.styleable.AppCompatTheme_windowActionModeOverlay, false)) {
            requestWindowFeature(FEATURE_ACTION_MODE_OVERLAY);
        }
        /*
        第二步,读取一个系统的属性android:windowIsFloating,记得释放recycle(),
        要不然这比消耗性能的很  mIsFloating表示浮在屏幕上的,如果在这里使用了,
        整个layout就会在 屏幕中心,相当于浮在屏幕上,所以这个只适用于dialog,Activity也可以是Dialog的样子
         */
        // TODO: 2018/5/23  大概相当于一个 dialog式的Activity
        mIsFloating = a.getBoolean(R.styleable.AppCompatTheme_android_windowIsFloating, false);
        a.recycle();

        // Now let's make sure that the Window has installed its decor by retrieving it
        /*
     @Override
      public void setContentView(@LayoutRes int layoutResID) {
        getDelegate().setContentView(layoutResID);
      }
      todo 这里传入的是this,就是Activity的本身
          @NonNull
    public AppCompatDelegate getDelegate() {
        if (mDelegate == null) {
            mDelegate = AppCompatDelegate.create(this, this);
        }
        return mDelegate;
    }
     todo 这里就是本身了 PhoneWindow  Window的唯一的子类
       public static AppCompatDelegate create(Activity activity, AppCompatCallback callback) {
        return create(activity, activity.getWindow(), callback);
    }

       private static AppCompatDelegate create(Context context, Window window,
            AppCompatCallback callback) {
        if (Build.VERSION.SDK_INT >= 24) {
            return new AppCompatDelegateImplN(context, window, callback);
        } else if (Build.VERSION.SDK_INT >= 23) {
            return new AppCompatDelegateImplV23(context, window, callback);
        } else if (Build.VERSION.SDK_INT >= 14) {
            return new AppCompatDelegateImplV14(context, window, callback);
        } else if (Build.VERSION.SDK_INT >= 11) {
            return new AppCompatDelegateImplV11(context, window, callback);
        } else {
        todo V9 基类的第二层 就在这里
            return new AppCompatDelegateImplV9(context, window, callback);
        }
    }
         */
        // TODO: 2018/5/23  这个就是一个PhoneWindow的类
        mWindow.getDecorView();
        //关键的还是inflate这个类
        final LayoutInflater inflater = LayoutInflater.from(mContext);
        ViewGroup subDecor = null;


        if (!mWindowNoTitle) {
            if (mIsFloating) {
                // If we're floating, inflate the dialog title decor
//                第五步,dialog式的Activity  Window.FEATURE_NO_TITLE
// 设置为false的话,就是不设置,一般都会走到下面的那个循环中,请看第六步
                subDecor = (ViewGroup) inflater.inflate(
                        R.layout.abc_dialog_title_material, null);

                // Floating windows can never have an action bar, reset the flags
                mHasActionBar = mOverlayActionBar = false;
            } else if (mHasActionBar) {
                /**
                 * This needs some explanation. As we can not use the android:theme attribute
                 * pre-L, we emulate it by manually creating a LayoutInflater using a
                 * ContextThemeWrapper pointing to actionBarTheme.
                 */
                //第六步:这需要一些解释。因为我们不能使用Android:主题属性pre-L,我手动的创建一个布局
                // 填充器使用theme指向actionBar的主题,同时也找到了subDecor  ---》
                // 现在使用主题上下文膨胀视图并将其设置为内容视图。
                TypedValue outValue = new TypedValue();
                mContext.getTheme().resolveAttribute(R.attr.actionBarTheme, outValue, true);

                Context themedContext;
                if (outValue.resourceId != 0) {
                    themedContext = new ContextThemeWrapper(mContext, outValue.resourceId);
                } else {
                    themedContext = mContext;
                }

                // Now inflate the view using the themed context and set it as the content view
                subDecor = (ViewGroup) LayoutInflater.from(themedContext)
                        .inflate(R.layout.abc_screen_toolbar, null);

                mDecorContentParent = (DecorContentParent) subDecor
                        .findViewById(R.id.decor_content_parent);
                mDecorContentParent.setWindowCallback(getWindowCallback());

                /**
                 * Propagate features to DecorContentParent
                 */
                if (mOverlayActionBar) {
                    mDecorContentParent.initFeature(FEATURE_SUPPORT_ACTION_BAR_OVERLAY);
                }
                if (mFeatureProgress) {
                    mDecorContentParent.initFeature(Window.FEATURE_PROGRESS);
                }
                if (mFeatureIndeterminateProgress) {
                    mDecorContentParent.initFeature(Window.FEATURE_INDETERMINATE_PROGRESS);
                }
            }
        } else {
            //第七步:如果设置了Window.FEATURE_NO_TITLE---》mWindowNoTitle==true
            // 走到这个循环中,也是会设置初始化这个subDecor
            if (mOverlayActionMode) {
                subDecor = (ViewGroup) inflater.inflate(
                        R.layout.abc_screen_simple_overlay_action_mode, null);
            } else {
                subDecor = (ViewGroup) inflater.inflate(R.layout.abc_screen_simple, null);
            }
           //第八步对高版本适配:ViewCompat.setOnApplyWindowInsetsListener()
            // 原来就是为了实现 Android 5.0 以上的插图效果的。
            if (Build.VERSION.SDK_INT >= 21) {
                // If we're running on L or above, we can rely on ViewCompat's
                // setOnApplyWindowInsetsListener

                /*
Android 7.0 24  N   平台亮点
Android 6.0 23  M   平台亮点
Android 5.1 22  LOLLIPOP_MR1    平台亮点
Android 5.0 21  LOLLIPOP
Android 4.4W    20  KITKAT_WATCH    仅限 KitKat for Wearables
Android 4.4 19  KITKAT  平台亮点
Android 4.3 18  JELLY_BEAN_MR2  平台亮点
Android 4.2、4.2.2   17  JELLY_BEAN_MR1  平台亮点
                 */
                ViewCompat.setOnApplyWindowInsetsListener(subDecor,
                        new OnApplyWindowInsetsListener() {
                            @Override
                            public WindowInsetsCompat onApplyWindowInsets(View v,
                                    WindowInsetsCompat insets) {
                                final int top = insets.getSystemWindowInsetTop();
                                final int newTop = updateStatusGuard(top);

                                if (top != newTop) {
                                    insets = insets.replaceSystemWindowInsets(
                                            insets.getSystemWindowInsetLeft(),
                                            newTop,
                                            insets.getSystemWindowInsetRight(),
                                            insets.getSystemWindowInsetBottom());
                                }

                                // Now apply the insets on our view
                                return ViewCompat.onApplyWindowInsets(v, insets);
                            }
                        });
            } else {
                // Else, we need to use our own FitWindowsViewGroup handling
                ((FitWindowsViewGroup) subDecor).setOnFitSystemWindowsListener(
                        new FitWindowsViewGroup.OnFitSystemWindowsListener() {
                            @Override
                            public void onFitSystemWindows(Rect insets) {
                                insets.top = updateStatusGuard(insets.top);
                            }
                        });
            }
        }

        if (subDecor == null) {
            throw new IllegalArgumentException(
                    "AppCompat does not support the current theme features: { "
                            + "windowActionBar: " + mHasActionBar
                            + ", windowActionBarOverlay: "+ mOverlayActionBar
                            + ", android:windowIsFloating: " + mIsFloating
                            + ", windowActionModeOverlay: " + mOverlayActionMode
                            + ", windowNoTitle: " + mWindowNoTitle
                            + " }");
        }

        if (mDecorContentParent == null) {
            mTitleView = (TextView) subDecor.findViewById(R.id.title);
        }

        // Make the decor optionally fit system windows, like the window's decor
        ViewUtils.makeOptionalFitsSystemWindows(subDecor);

        final ContentFrameLayout contentView = (ContentFrameLayout) subDecor.findViewById(
                R.id.action_bar_activity_content);

        final ViewGroup windowContentView = (ViewGroup) mWindow.findViewById(android.R.id.content);
        if (windowContentView != null) {
            // There might be Views already added to the Window's content view so we need to
            // migrate them to our content view
            while (windowContentView.getChildCount() > 0) {
                final View child = windowContentView.getChildAt(0);
                windowContentView.removeViewAt(0);
                contentView.addView(child);
            }

            // Change our content FrameLayout to use the android.R.id.content id.
            // Useful for fragments.
            windowContentView.setId(View.NO_ID);
            contentView.setId(android.R.id.content);

            // The decorContent may have a foreground drawable set (windowContentOverlay).
            // Remove this as we handle it ourselves
            if (windowContentView instanceof FrameLayout) {
                ((FrameLayout) windowContentView).setForeground(null);
            }
        }

        // Now set the Window's content view with the decor
        mWindow.setContentView(subDecor);

        contentView.setAttachListener(new ContentFrameLayout.OnAttachListener() {
            @Override
            public void onAttachedFromWindow() {}

            @Override
            public void onDetachedFromWindow() {
                dismissPopups();
            }
        });

        return subDecor;
    }
-
最后做了一张图
- 说明几点
- 1、关键方法:
mWindow.getDecorView();的解释,第一步得到DecorView,同时把DecorView根据系统的属性,就是App设置的属性,同时也设置了DecorView.addView(view) ,这里面的view,有很多种,有dialog,com.android.internal.R.layout.screen_titlecom.android.internal.R.layout.screen_simple这些系统的根布局,特点基本上是一个LinearLayout 方向为垂直方法的布局。总结就是得到一个DecorView,并且里面addView(view)了。 - 2、关键方法
mWindow.setContentView(subDecor);PhoneWindow的类里面的setContentView
- 1、关键方法:
 @Override
    public void setContentView(int layoutResID) {
        //通过前面我们的分析PhoneWindow.getDecorView()的方法会提前在AppCompatDelegateImplV9.createSubDecor()方法中调用,所以这里mContentParent 不会为null
        if (mContentParent == null) {
            installDecor();
        } else {
            //会走到这里来
            mContentParent.removeAllViews();
        }
        // TODO: 2018/5/29  关键方法,一定走到这里来了,后续分析inflate的源码
        mLayoutInflater.inflate(layoutResID, mContentParent);
        final Callback cb = getCallback();
        if (cb != null) {
            cb.onContentChanged();
        }
    }
- 3、Activity.setContentView(resId)底层走的方法是
LayoutInflater.from(mContext).inflate(resId, contentParent);这个方法调用了三次,- 第一次调用的时候是在
PhoneWindon的generateLayout(DecorView decor)方法,通过getDecorView()这个方法调用的,目的是把,安卓底层提供的布局和decorView相结合
- 第一次调用的时候是在
    View in = mLayoutInflater.inflate(layoutResource, null);
  decor.addView(in, new ViewGroup.LayoutParams(FILL_PARENT, FILL_PARENT));
- 第二次调用的时候
mWindow.setContentView(subDecor);也在PhoneWindon中,具体代码可以看总结的第二点,主要是subDecor的来源,随便找了一个来源的地方,可以看到是v7包下的FitWindowsFragmeLayout,这就解释了,为什么我们没有使用到这个布局,但是打断点可以断进来的原因,如果有心情的小伙伴可以对一个ViewGroup的onMeasure方法进行断点,可以发现好多有趣的事情,如果断点的得当的话,你可以明白api26:执行2次onMeasure、1次onLayout、1次onDraw,后续会写篇文章来详细介绍下
- 第三次调用,就是通过
AppCompatDelegateImplV9.setContentView
   @Override
    public void setContentView(int resId) {
        ensureSubDecor();
        ViewGroup contentParent = (ViewGroup) mSubDecor.findViewById(android.R.id.content);
        contentParent.removeAllViews();
        // TODO: 2018/5/23 关键的方法
        LayoutInflater.from(mContext).inflate(resId, contentParent);
        mOriginalWindowCallback.onContentChanged();
    }
- 4、Activity.setContentView(view)底层就走了两次
LayoutInflater.from(mContext).inflate(),因为这个方法内部没有调用,代码如下,更不没有调用,这个非常有意思,
  @Override
    public void setContentView(View v) {
        ensureSubDecor();
        ViewGroup contentParent = (ViewGroup) mSubDecor.findViewById(android.R.id.content);
        contentParent.removeAllViews();
        contentParent.addView(v);
        mOriginalWindowCallback.onContentChanged();
    }
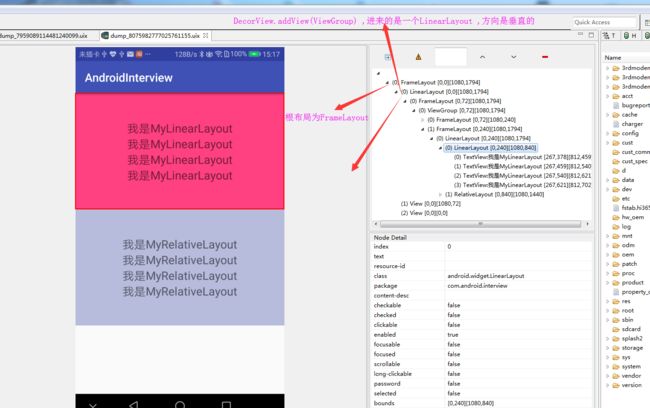
- 5、说明Activity根布局是PhoneWindow的DecorView,DecorView继承FrameLayout,只不过通过开发者设置的一些属性,通过DecorView.addView(resId)方法,加载到DecorView中是LinearLayout布局,同时是垂直方向,
网上说Activity的根布局是LinearLayout的全都是瞎扯(哈哈,也有可能版本不一样,我这是基于安卓8.0) -
随便copy了一张图加以说明,可以看到,根布局是FrameLayout!
- 6、关于PhoneWindow Window的唯一子类,个人建议一定要去看下源码,在安卓事件传递,如何从Activity传递到ViewGroup的,也和这个类有关,具体可看这篇文章Android源码分析(事件传递)


