作为一个“不务正业”的iOS developer,这半年的时间都花在在了其它技术栈上,是时候花点时间重温一下“正业”了。
第一个想要看的就是SwiftUI了,也想试着写一点系列教程(若有不妥之处欢迎大家指正),搜索了一番,有两个比较系统的资料可供参考:
- SwiftUI by Tutorials,www.raywenderlich.com 出品,正版有点贵;
- SwiftUI与Combine编程,猫神出品必为精品。
废话不多说,开始吧(本文将以SwiftUI by Tutorials中的例子作为示例)。
环境: Xcode 11.0, macOS 10.15 (对SwiftUI支持完善)
准备
SwiftUI仅适用于iOS13,创建项目时,请选择SwiftUI,语言选择Swift,Deployment Target选择iOS 13。
Tips: Xcode 11.0 启动的项目模板中默认创建了
SceneDelegate,以及在AppDelegate中仅iOS 13可使用的UISceneDelegate。若将Deployment target改为低于13的版本,需将SceneDelegate文件,AppDelegate中不可用的方法,info.plist中的不可用属性删除。同时,如果启动storyboard,需要在AppDelegate中添加var window: UIWindow?
第一个页面
熟悉原来开发方式的我,第一个感觉是,rootViewController在哪里设置,iOS 13开始,将原来的AppDelegate进行了拆分,分出了一个名为SceneDelegate的类,至于这个类是做什么的,先不要着急,随着之后的教程会慢慢明了。
在该类中有这样一段代码:
let contentView = ContentView()
if let windowScene = scene as? UIWindowScene {
  let window = UIWindow(windowScene: windowScene)
  window.rootViewController = UIHostingController(rootView: contentView)
    self.window = window
    window.makeKeyAndVisible()
}
我们看到了对window的初始化,以及对rootViewController的赋值,赋值的对象是一个名为UIHostingController的类,看一下这个类的定义
open class UIHostingController : UIViewController where Content : View {...}
它是一个UIViewController的子类,那么它就和我们原先的开发方式并没有什么不同了。
Tips: 若想要将SwiftUI和UIKit共同使用,使用的就是这个UIHostingController。
而我们所有的UI代码就被封装在UIHostingController初始化时传入的contentView中。如果熟悉React Native,RN的初始化方式也是将一个react view赋值给了UIViewController的view属性,用于展示UI。
那么接下来,我们就一起看看这个ContentView是如何绘制UI的。
struct ContentView: View {
  var body: some View {
    Text("Match the color")
  }
}
View这个protocol中只有一个属性body,来表明UI上要绘制些什么。
public protocol View {
  associatedtype Body : View
  var body: Self.Body { get }
}
body中只能有一个根元素,这和React Native也是相同的,若想要在其中放置多个元素,则需要用一个容器将其包裹,例如 VStack,HStack(很像UIStackView)。VStack为纵向排列的容器,HStack为横向排列的容器。添加容器的方式也有两种,写代码或是从右侧的canvas中添加,canvas中添加(按住Cmd点击该元素 / 从Object Library中拖拽)有点像storyboard。看到这里我们可以发现SwiftUI两个明显优势:
- 声明式的UI书写方式,对比UIKit时代,当我们定义好子元素后,需要在相应的生命周期函数中添加约束,或是设置frame;
- 所见即所得,代码和canvas是同步的,虽然之前的@IBDesignable 和 @IBInspectable也能实现类似的效果,但远不及SwiftUI强大,便捷。在后面的view的抽离,复用上也展现出了它的不凡之处。
struct ContentView: View {
  var body: some View {
    VStack {
      HStack {
        VStack {
          Color(red: 0.5, green: 0.5, blue: 0.5)
          Text("Match the color")
        }
        VStack {
          Color(red: 0.5, green: 0.5, blue: 0.5)
          Text("R: 127  G: 127  B: 127")
        }
      }
      Button(action: {}) {
        Text("Hit me")
      }
      Slider(value: 0.5)
    }
  }
}
Tips: 所见即所得原于如下这段代码:
struct ContentView_Previews: PreviewProvider {
  static var previews: some View {
    ContentView()
  }
}
添加多个元素的过程在这里就忽略了,后面会附上GitHub链接。
双向绑定
静态页面的展示已经妥了,接下来让我们看看如何给它添加一些行为。想想原先是怎么做的。使用button.addTarget(...)或@IBAction,而在SwiftUI中使用了双向绑定的方式,这种方式也不是SwiftUI初创的了,之前原生应用可以使用RxSwift或ReactiveCocoa,React Native中可以使用hooks,比如useState(...)来实现。(猜想SwiftUI可能是借鉴了RN或是Flutter的state,YY而已,若不对请轻拍,嘿嘿)
在示例中有一个button,点击它想弹出一个Altert,如何实现呢?先看代码:
Button(action: { self.showAlert = true }) {
  Text("Hit me")
}.alert(isPresented: $showAlert) { () -> Alert in
  Alert(title: Text("Title"), message: "Hello World")
}.padding()
其中showAlert为这个ContentView的一个属性:
@State var showAlert: Bool
点击的行为就是改变showAlert的值为true,showAlert如何是alert展示出来呢?alert方法。我们来看一下他的定义:
extension View {
/// Presents an alert.
///
/// - Parameters:
/// - item: A `Binding` to an optional source of truth for the `Alert`.
/// When representing a non-nil item, the system uses `content` to
/// create an alert representation of the item.
///
/// If the identity changes, the system will dismiss a
/// currently-presented alert and replace it by a new alert.
///
/// - content: A closure returning the `Alert` to present.
public func alert- (item: Binding
, content: (Item) -> Alert) -> some View where Item : Identifiable
/// Presents an alert.
///
/// - Parameters:
/// - isPresented: A `Binding` to whether the `Alert` should be shown.
/// - content: A closure returning the `Alert` to present.
public func alert(isPresented: Binding, content: () -> Alert) -> some View
}
它是View的一个extension,只要是view就有这个方法,它接收两个参数,第一个就是isPresented,我们传如了$showAlert,它前面的$符号表示和参数showAlter进行绑定,绑定是什么意思呢?相当于传入了一个引用,alert方法中对showAlert的改变,将作用于@State var showAlert: Bool。第二个参数为一个closure,返回值是一个Alert对象,即原先的UIAlertView。此时这个方法的作用就很明显咯。
UI元素复用
最后我们看一下如何复用自定义的View。回忆一下UIKit时,如何复用?在storyboard或xib中定义的view基本上是很难被灵活复用的。想要复用只能用代码手写view,手写view就意味着需要定义约束或是frame,当view比较复杂时,费了劲写完的view无法预览,只能让app运行起来才能看到,这样自然就拉长了反馈周期,很不便利。
SwiftUI将改变这一现状,假设我们要抽出一个如下图所示的view:

在抽离其代码是这样的:
HStack {
  Text("0").foregroundColor(.red)
  Slider(value: .constant(0.5))
  Text("255").foregroundColor(.red)
}.padding(.horizontal)
可以通过代码直接创建一个View:
struct SlideView: View {
  @Binding var value: Double
  var textColor: Color
  var body: some View {
    HStack {
      Text("0").foregroundColor(textColor)
      Slider(value: $value)
      Text("255").foregroundColor(textColor)
    }.padding(.horizontal)
  }
}
或在canvas中按住cmd点击这个HStack,选择extract。Apple官方也推荐尽可能的抽取复用的view。这个复用的view自然也可以在canvas中看到。这个优势完美。
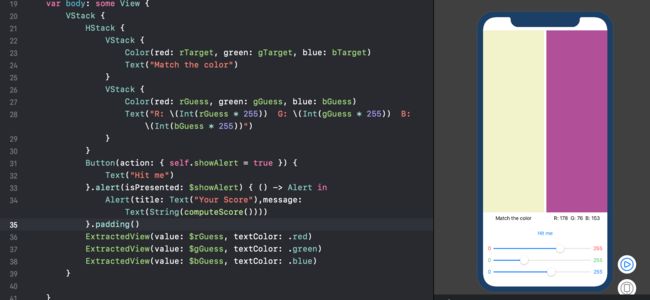
最后,我们来看一下效果图:
效果展示
Demo 链接: GitHub