上一节灌水了深度学习、概率建模和特征表示的理论抽象,为了更好的理解理论,接下来本文给出上节中各个部分的实现,首先使用tensorflow逐步拆解实现上节中框架的“中间层”特征表示级“顶层”概率建模,然后给出纯python的1个隐层的网络建模实现(便于理解神经网络的运作)。
基于tensorflow实现上一节框架
- 创建数据集-输入层
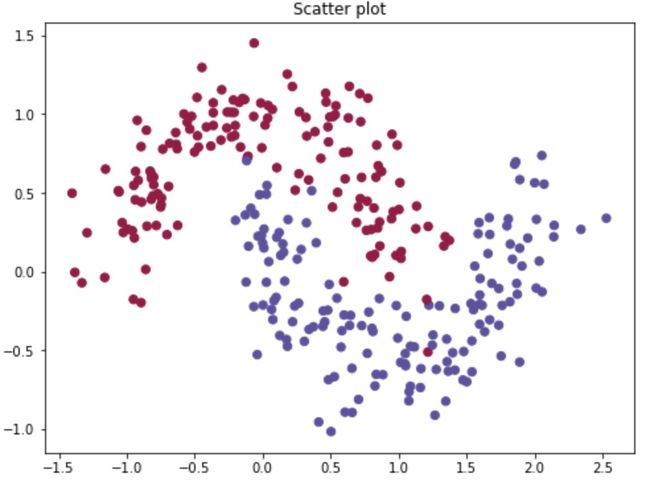
为了方便演示,直接采用sklearn package的二分类数据集:
import numpy as np
from sklearn import datasets, linear_model
import matplotlib.pyplot as plt
import matplotlib
%matplotlib inline
#7000个样本,2维特征,添加20%的噪声
np.random.seed(0)
X, Y = datasets.make_moons(7000, noise=0.20)
trY=Y
temp = trY.shape
_y = Y.reshape(temp[0],1)
plt.scatter(X[:,0], X[:,1], s=40, c=y, cmap=plt.cm.Spectral)
plt.title("Scatter plot")
- 中间层-特征层学习层
定义中间层激活函数(连接函数):![][t1]
import tensorflow as tf
def tf_leaky_relu(_X, leak=0.1):
    return tf.maximum(_X, leak*_X)
定义隐层
x_train=X
#中间隐层list,第一维和最后一维分别为给输入层和输出层预留的节点数
n_units_l = (1, 10, 10, 10, 10, 10, 10, 10, 1)
io_tf = lambda dim: tf.placeholder(tf.float32, dim)
n_input=x_train.shape[1]
n_classes=_y.shape[1]
#定义输入特征维度及类型,None表示样本数可任意
x = io_tf([None, n_input])
y = io_tf([None, n_classes])
#定义中间层函数,tensorflow自带的relu激活函数: tf.nn.relu(tf.matmul(_input, W) + b), W, b
def hidden_layer(_input, n_units):
    n_in = int(_input.get_shape()[1])
    W = tf.Variable(tf.random_uniform([n_in, n_units], minval=-1, maxval=1))
    b = tf.Variable(tf.random_uniform([n_units], minval=-1, maxval=1))
    return tf_leaky_relu(tf.matmul(_input, W) + b), W, b
Back-propagation定义
#Back-propagation
layer = []
Ws = []
bs = []
_l, _W, _b = hidden_layer(x, n_units_l[1])
Ws.append(_W)
bs.append(_b)
layer.append(_l)
#中间层学习到的新特征存放与layer list,可用于其他分类器使用。
for n_l in n_units_l[2:-1]:
    _l, _W, _b = hidden_layer(_l, n_l)
    Ws.append(_W)
    bs.append(_b)
    layer.append(_l)
#最后一层输出参数的初始化
W_out = tf.Variable(tf.random_uniform([n_l, 1]))
b_out = tf.Variable(tf.random_uniform([1]))
定义顶层极大似然函数(loss),回忆上一节中Logistic regression的极大似然函数和看连接函数(作为顶层的激活函数):![][t2]![][t3]
实现如下:
def tf_logistic(_X):
    return 1/(1 + tf.exp(-_X))
#顶层以logistic连接函数输出
y_ = tf_logistic(tf.matmul(layer[-1], W_out) + b_out)
pred=y_
#其中,tf.reduce_sum计算Loss中的sum,tf.reduce_mean为后续min-batch计算没个batch的loss 均值,因后面优化时是求极小值,所以在极大似然函数
#极大似然函数:
loss = -tf.reduce_mean(tf.reduce_sum(y*tf.log(y_)+(1-y)*(1-tf.log(y_))))
# Parameters
learning_rate = 0.001
training_epochs = 27
batch_size = 100
display_step = 1
BATCH_SIZE=batch_size
NUM_EPOCHS=training_epochs
#建立优化器
optimizer = tf.train.AdadeltaOptimizer(learning_rate).minimize(loss)
#初始化所有global变量
init = tf.global_variables_initializer()
min-batch数据生成器
def batch_iter(data,y_, batch_size, num_epochs, seed=None, fill=False):
    """
    Generates a batch iterator for a dataset.
    """
    random = np.random.RandomState(seed)
    data = np.array(data)
    y_= np.array(y_)
    data_length = len(data)
    num_batches_per_epoch = int(len(data)/batch_size)
    if len(data) % batch_size != 0:
        num_batches_per_epoch += 1
    for epoch in range(num_epochs):
        # Shuffle the data at each epoch
        shuffle_indices = random.permutation(np.arange(data_length))
        for batch_num in range(num_batches_per_epoch):
            start_index = batch_num * batch_size
            end_index = min((batch_num + 1) * batch_size, data_length)
            selected_indices = shuffle_indices[start_index:end_index]
            # If we don't have enough data left for a whole batch, fill it randomly
            if fill is True and end_index >= data_length:
                num_missing = batch_size - len(selected_indices)
                selected_indices = np.concatenate([selected_indices, random.randint(0, data_length, num_missing)])
            #print data[selected_indices]
            yield data[selected_indices],y_[selected_indices]
建模与数据传入
with tf.Session() as sess:
    sess.run(init)

    # Training cycle
    for epoch in range(training_epochs):
        avg_cost = 0.
        total_batch = int(7000/batch_size)
        # Loop over all batches
        batches=batch_iter(x_train,_y, BATCH_SIZE, NUM_EPOCHS)
        for batch_x, batch_y in batches:
            #batch_x, batch_y = batch_iter(x_train,o, BATCH_SIZE, NUM_EPOCHS)
            # Run optimization op (backprop) and cost op (to get loss value)
            _, c = sess.run([optimizer, loss], feed_dict={x: batch_x,
                                                          y: batch_y})
            # Compute average loss
            avg_cost += c / total_batch
        # Display logs per epoch step
        if epoch % display_step == 0:
            print("Epoch:", '%04d' % (epoch+1), "cost=", \
                "{:.9f}".format(avg_cost))
    print("Optimization Finished!")
    # Test model
    correct_prediction = tf.equal(tf.argmax(pred, 1), tf.argmax(_y, 1))
    # Calculate accuracy
    accuracy = tf.reduce_mean(tf.cast(correct_prediction, "float"))
#利用中间层学习好的新特征,后面可以接其他分类器进行分类
    x_train_transformed = sess.run(layer[-1], { x: x_train})
    x_test_transformed = sess.run(layer[-1], { x: x_train})
    print("Accuracy:", accuracy.eval({x: x_train, y: _y}))
训练过程与预测准确示例
('Epoch:', '0001', 'cost=', '152.377854455')
('Epoch:', '0002', 'cost=', '23.440722574')
('Epoch:', '0003', 'cost=', '2.304186556')
('Epoch:', '0004', 'cost=', '0.265421045')
('Epoch:', '0005', 'cost=', '0.035039518')
('Epoch:', '0006', 'cost=', '0.006159934')
('Epoch:', '0007', 'cost=', '0.001725823')
('Epoch:', '0008', 'cost=', '0.000785618')
('Epoch:', '0009', 'cost=', '0.000474063')
('Epoch:', '0010', 'cost=', '0.000331294')
('Epoch:', '0011', 'cost=', '0.000252167')
('Epoch:', '0012', 'cost=', '0.000202825')
('Epoch:', '0013', 'cost=', '0.000169351')
('Epoch:', '0014', 'cost=', '0.000145309')
('Epoch:', '0015', 'cost=', '0.000127185')
('Epoch:', '0016', 'cost=', '0.000112951')
('Epoch:', '0017', 'cost=', '0.000101122')
('Epoch:', '0018', 'cost=', '0.000091587')
('Epoch:', '0019', 'cost=', '0.000083598')
('Epoch:', '0020', 'cost=', '0.000076807')
('Epoch:', '0021', 'cost=', '0.000071127')
('Epoch:', '0022', 'cost=', '0.000066287')
('Epoch:', '0023', 'cost=', '0.000061853')
('Epoch:', '0024', 'cost=', '0.000058067')
('Epoch:', '0025', 'cost=', '0.000054659')
('Epoch:', '0026', 'cost=', '0.000051710')
('Epoch:', '0027', 'cost=', '0.000049336')
Optimization Finished!
('Accuracy:', 1.0)
至此,构建的7层网络的模型已准备完毕,并生成中间隐层学习到的新特征-标题提到的特征表示(也可以采用自编码autoencoder进行学习,只是在顶层将y替换成原始的x非监督学习),接下来以knn作为顶层分类起,用学习到的新特征进行分类,示例如下:
from sklearn.metrics import accuracy_score, classification_report
from sklearn.neighbors import KNeighborsClassifier
clf = KNeighborsClassifier()
clf.fit(x_train_transformed, _y)
y_pred = clf.predict(x_test_transformed)
print(classification_report(_y, y_pred, digits=3))
#####分类结果:#####
             precision    recall  f1-score   support
          0      0.972     0.977     0.974      3500
          1      0.977     0.972     0.974      3500
avg / total      0.974     0.974     0.974      7000
完成基于tensorflow实现的中间网络实现、概率建模、特征表示的事项。
[t1]: http://latex.codecogs.com/gif.latex?{f_{Relu}(x)=max(0,\eta*x)}
[t2]: http://latex.codecogs.com/gif.latex?{f_{logistic}(x)=\frac{1}{1+e(-x^Tw)}}
[t3]: http://latex.codecogs.com/gif.latex?{Loss=\sum[{y_i}\log(f_{logistic}(x_i))+(1-y_i)(1-f_{logistic}(x_i))]}
基于纯python实现神经网络
- sklearn实现仅接入输入层的LR
# Train the logistic regeression classifier
import sklearn.linear_model
clf = sklearn.linear_model.LogisticRegressionCV()
clf.fit(X, _y)
##可视化分类超平面
def plot_decision_boundary(pred_func, X, y):
    # Set min and max values and give it some padding
    x_min, x_max = X[:, 0].min() - .5, X[:, 0].max() + .5
    y_min, y_max = X[:, 1].min() - .5, X[:, 1].max() + .5
    h = 0.01
    # Generate a grid of points with distance h between them
    xx, yy = np.meshgrid(np.arange(x_min, x_max, h), np.arange(y_min, y_max, h))
    # Predict the function value for the whole gid
    Z = pred_func(np.c_[xx.ravel(), yy.ravel()])
    Z = Z.reshape(xx.shape)
    # Plot the contour and training examples
    plt.contourf(xx, yy, Z, cmap=plt.cm.Spectral)
    plt.scatter(X[:, 0], X[:, 1], c=y, cmap=plt.cm.Spectral)
# Plot the decision boundary
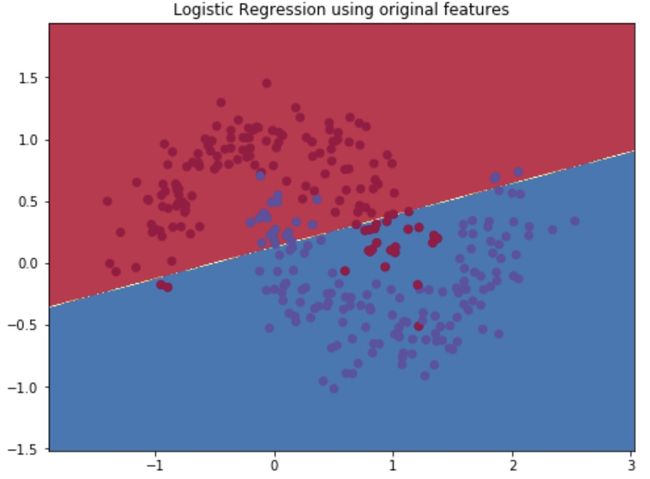
plot_decision_boundary(lambda x: clf.predict(x),X,_y)
plt.title("Logistic Regression using original features")
可以得到线性的分类超平面:
- 基于神经网络(MLP)
定义基础参数
num_examples = len(X) # 样本量
nn_input_dim = 2 # 输入层维度
nn_output_dim = 2 # 输出层维度(给顶层)
# 梯度下降相关参数
epsilon = 0.01 # learning rate
reg_lambda = 0.01 # 正则化参数
定义损失函数Loss,首先中间层的网络和损失函数(log-极大似然)定义:![][p1]![][p2]![][p3]![][p4]![][p5]
[p1]: http://latex.codecogs.com/gif.latex?{I_1=xW_1+b_1}
[p2]: http://latex.codecogs.com/gif.latex?{O_1=tanh(z_1)}
[p3]: http://latex.codecogs.com/gif.latex?{I_2=O_1W_2+b_2}
[p4]: http://latex.codecogs.com/gif.latex?{O_2=\hat{y}=softmax(I_2)}
[p5]: http://latex.codecogs.com/gif.latex?{L(y,\hat{y})=-\frac{1}{N}\sum_{n\in{N}}\sum_{i\in{Class}}y_ni\log(\hat{y_ni})}
需要估计的参数为W1、W2、b1、b2,使用方法为上一节的后向传播。
def calculate_loss(model, X, y):
    num_examples = len(X)  # training set size
    W1, b1, W2, b2 = model['W1'], model['b1'], model['W2'], model['b2']
    # Forward propagation to calculate our predictions
    z1 = X.dot(W1) + b1
    a1 = np.tanh(z1)
    z2 = a1.dot(W2) + b2
    exp_scores = np.exp(z2)
    probs = exp_scores / np.sum(exp_scores, axis=1, keepdims=True)
    # Calculating the loss
    corect_logprobs = -np.log(probs[range(num_examples), y])
    data_loss = np.sum(corect_logprobs)
    # Add regulatization term to loss (optional)
    data_loss += reg_lambda / 2 * (np.sum(np.square(W1)) + np.sum(np.square(W2)))
    return 1. / num_examples * data_loss
构建参数估计模型:
# 该函数返回模型相关参数.
# - nn_hdim: 隐层的神经元节点数
# - num_passes: 梯度迭代次数
# - print_loss: 打印loss日志
def build_model(X, y, nn_hdim, num_passes=20000, print_loss=False):
    # 初始化需要学习的参数
    num_examples = len(X)
    np.random.seed(0)
    #W1:输入特征维度*节点数的矩阵
    W1 = np.random.randn(nn_input_dim, nn_hdim) / np.sqrt(nn_input_dim)
    #b1:1*节点数的矩阵
    b1 = np.zeros((1, nn_hdim))
    #W2:上一层输出节点数*给下一层输出的特征维度
    W2 = np.random.randn(nn_hdim, nn_output_dim) / np.sqrt(nn_hdim)
    #b2:1*下一层输出的特征维度
    b2 = np.zeros((1, nn_output_dim))
    # 模型字典:储存各个参数的学习值
    model = {}

    # 对没个batch数据进行梯度学习
    for i in range(0, num_passes):
        # 后向传播函数定义
        z1 = X.dot(W1) + b1
        a1 = np.tanh(z1)
        z2 = a1.dot(W2) + b2
        exp_scores = np.exp(z2)
        probs = exp_scores / np.sum(exp_scores, axis=1, keepdims=True)
        # 后向传播计算:链式法则
        delta3 = probs
        delta3[range(num_examples), y] -= 1
        dW2 = (a1.T).dot(delta3)
        db2 = np.sum(delta3, axis=0, keepdims=True)
        delta2 = delta3.dot(W2.T) * (1 - np.power(a1, 2))
        dW1 = np.dot(X.T, delta2)
        db1 = np.sum(delta2, axis=0)
        # 增加参数的正则项 (L2,即假设参数服从正态先验)
        dW2 += reg_lambda * W2
        dW1 += reg_lambda * W1
        # 计算梯度参数更新
        W1 += -epsilon * dW1
        b1 += -epsilon * db1
        W2 += -epsilon * dW2
        b2 += -epsilon * db2
        # 将学习到新的参数更新到模型字典
        model = {'W1': W1, 'b1': b1, 'W2': W2, 'b2': b2}
        # 定义是否打印loss日志以,如果打印每1000次迭代输出一条.
        # This is expensive because it uses the whole dataset, so we don't want to do it too often.
        if print_loss and i % 1000 == 0:
            print("Loss after iteration %i: %f" % (i, calculate_loss(model, X, y)))
    return model
定义预测函数:
# 预测输出(0 or 1),利用训练层学习到的参数和顶层的定义进行预测
def predict(model, x):
    W1, b1, W2, b2 = model['W1'], model['b1'], model['W2'], model['b2']
    # Forward propagation
    z1 = x.dot(W1) + b1
    a1 = np.tanh(z1)
    z2 = a1.dot(W2) + b2
    exp_scores = np.exp(z2)
    probs = exp_scores / np.sum(exp_scores, axis=1, keepdims=True)
    return np.argmax(probs, axis=1)
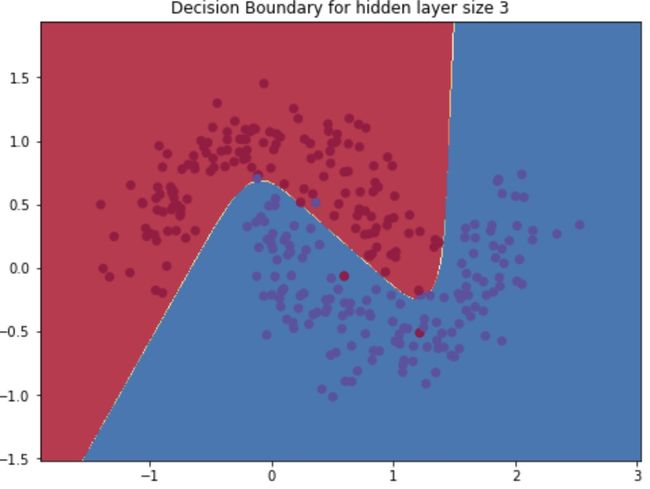
以3个节点为例进行模型的训练、预测和分类超平面的可视化,得到结果:
# 创建中间层3个节点的网络模型
model = build_model(X,Y,3, print_loss=True)
# Plot the decision boundary
plot_decision_boundary(lambda x: predict(model, x),X,_y)
plt.title("Decision Boundary for hidden layer size 3")
######迭代日志######
Loss after iteration 0: 0.381135
Loss after iteration 1000: 0.065193
Loss after iteration 2000: 0.061954
Loss after iteration 3000: 0.062843
Loss after iteration 4000: 0.062996
Loss after iteration 5000: 0.063110
Loss after iteration 6000: 0.063533
Loss after iteration 7000: 0.063568
Loss after iteration 8000: 0.063252
Loss after iteration 9000: 0.063574
Loss after iteration 10000: 0.063360
Loss after iteration 11000: 0.063640
Loss after iteration 12000: 0.063568
Loss after iteration 13000: 0.063832
Loss after iteration 14000: 0.063743
Loss after iteration 15000: 0.063591
Loss after iteration 16000: 0.062715
Loss after iteration 17000: 0.063193
Loss after iteration 18000: 0.063929
Loss after iteration 19000: 0.067279
可以发现分类面已经不在是线性,接下来可以看看单层网络不同节点数情况下的分类超平面的情况(与上面直接将输入层用LR做的线性相比,神经网络具有明显的非线性特征):
plt.figure(figsize=(10, 20))
hidden_layer_dimensions = [1, 2, 5, 10, 20]
for i, nn_hdim in enumerate(hidden_layer_dimensions):
    plt.subplot(5, 2, i+1)
    plt.title('Hidden Layer size %d' % nn_hdim)
    model = build_model(X,Y,nn_hdim, print_loss=False)
    plot_decision_boundary(lambda x: predict(model, x),X,Y)
plt.show()


